Epson SureColor P800 Printer
Review Summary: The Epson SureColor P800 is a substantial upgrade from the popular Epson Stylus Pro 3800-series of printers. There is a distinct improvement in print quality and the ability to accept roll media is a great feature. Competition is heating up for this class of printer, but the P800 is a very good 17" desktop printer that every photographer ought to consider. If you're looking to get your first printer of this class or upgrade your current printer, the Epson P800 is a great option.
Pros: Vibrant color reproduction; Deep, rich blacks; Roll paper & panoramic printing support; Front-loading fine art media system better than rear-feed method of predecessor.
Cons: Touchscreen controls a bit finicky & slow at times; Print speeds not as quick as the competition; Automatic black switching is nice, but uses same nozzle for black inks.
Pricing and Availability: The Epson SureColor P800 has been available since June 2015 for about US$1,295, with 80mL ink cartridges retailing for around US$55 each. The printer ships with a set of 64mL starter ink cartridges.
 |
Epson SureColor P800 Printer Review
Deep blacks & vibrant colors make it a worthy successor to the Stylus Pro series
by Jeremy Gray | Posted 12/22/2015
Introduction
The Epson SureColor P800 is the 17" desktop printer successor to the Epson Stylus Pro 3880. There are some key feature differences between the P800 and 3880 that make the P800 a worthy replacement for what was already a very good printer (I've thoroughly enjoyed using my own 3880 for the past five-plus years). After having made a wide variety of prints with the P800, I can confidently say that it not only outclasses the 3880 in every conceivable way, it also matches up well against the new and very good Canon imagePROGRAF PRO-1000 printer.
Key Features
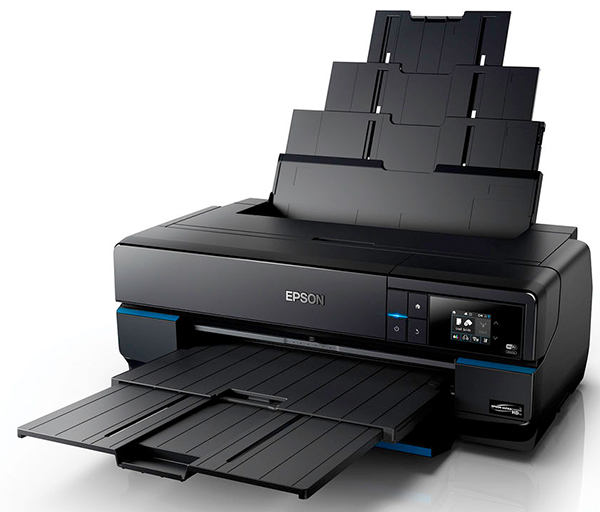
Compact The Epson SureColor P800 is currently the world's smallest 17" photo printer.
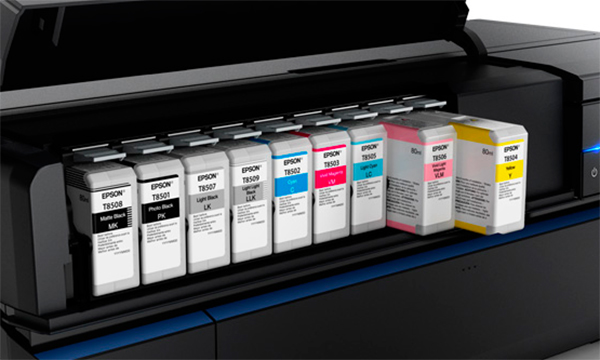
All-new inks For the first time, Epson has made a completely new set of inks. Each pigment and density per droplet is different from the previous-generation inks. Epson has also reformulated the resin technology that coats each pigment.
- The new Photo Black pigment is one and a half times denser than the previous generation ink set, which leads to improved contrast and clarity in your prints.
- For the first time in fourteen years, Epson has made a new matte black ink. Designed to stay closer to the surface of the paper, the new matte black ink leads to deeper blacks.
- With the new ink set, prints from the P800 have up to twice the permanence of prints made using the previous-generation ink set.
Precise The eight channel, 1" Epson MicroPiezo AMC print head has 180 nozzles per channel and offers a maximum resolution of 2880 x 1440. It can utilize droplets as small as 3.5 picoliters.
- In conjunction with the new ink repellent surface coating, the Advanced Meniscus Control (AMC) technology ensures that dot placement is accurate and consistent.
Versatile Like the 3800-series, the P800 is able to accept sheet media up to 17 x 22". The P800 can accept media up to 1.5mm thick through its front heavy media path. Unlike the 3800-series, the P800 can accept roll media by utilizing an optional roll media attachment.
Connected With Hi-Speed USB 2.0 and Ethernet ports, the P800 can also connect wireless via 2.5GHz Wi-Fi. The P800 also supports Apple AirPrint and Google Cloud Print.
Fast The P800 can print 8 x 10" prints in as little as 1 minute, 53 seconds. It can make a 17 x 22" print as quickly as 6 minutes, 19 seconds.
Simple and fast setup
The Epson P800 comes well-packaged with a lot of protective materials and tape. Once you go through the task of removing all of these bits, you have to plug in the printer, install the inks, connect the printer to your computer, and you're basically good to go. Ink installation is very simple with the P800 as the ink cartridges snap easily into place. Once you've done that and the printer initializes, which is pretty quick, you just have to get the printer set up on the computer. The only issues I had setting up the printer was that the 2.7" touchscreen is somewhat finicky. On-screen elements are often quite small and the touchscreen sometimes failed to register my touches accurately. This made some aspects of setting up the printer a little slower than anticipated. I had no problems whatsoever getting the P800 set up on my network and installing the print drivers to my Mac. Once the ICC profiles for Epson's papers were all installed to Photoshop, I was ready to get started. All in all, not a difficult setup process, in my opinion.
 |
Support our site, by buying through one of our trusted affiliates!
Amazon | Adorama | B&H
Taking a closer look at the stylish P800
Once I got the printer set up, I realized just how nice its styling is. The matte black finish with blue accents look modern, yet understated, and the printer will look good no matter where you place it. It is also nice that the P800 is the world's smallest 17" desktop printer according to Epson. At 26.93" (W) x 14.80" (D) x 9.85" (H) (68.4 x 37.6 x 25.0 cm), the P800's dimensions are impressively compact. The printer does add some depth and height with the optional roll adapter installed, however, as that attachment brings it to 23.07" (58.6 cm) deep and 11.26" (28.6 cm) tall. Without the adapter, the P800 weighs 43 lbs (19.5 kg). With the adapter, the weight increases to 49 lbs (22.2 kg).
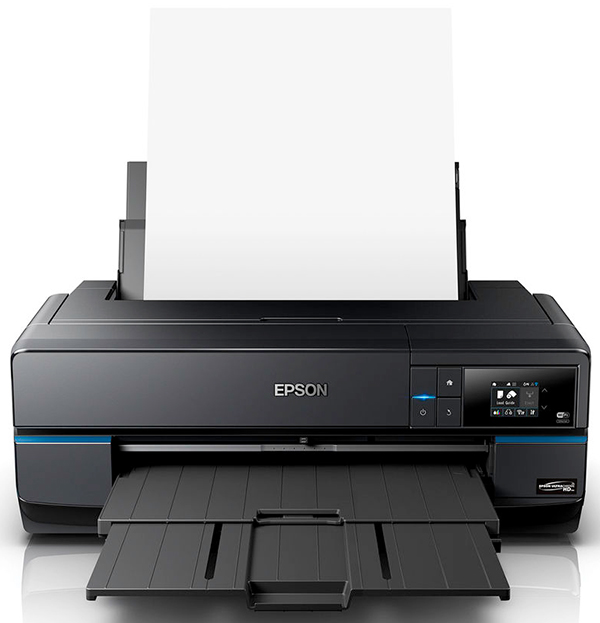 |
The front of the P800 is quite simple. To the right of the print tray, there are three buttons (power, home, and back buttons) and a touchscreen (which has two touch-sensitive arrows to the right of it). There is no directional pad anywhere, just the few buttons and the screen. In my experience, there are pros and cons to this set up. For quick selections, such as entering into menus and checking ink supplies, the touchscreen works great; you just tap and have quick access to information. For moving through longer menus, the arrows to the right of the display work okay. When you have to scroll using arrows on the display itself, the touchscreen becomes a bit of a nuisance. The touchscreen is neither big enough nor responsive enough to be a perfectly reliable method of interaction. I regularly had to touch the display multiple times to get the desired result and sometimes it felt like certain actions just took too long to complete. With that said, the entire panel with the buttons and touchscreen can be tilted, which is a really nice feature.
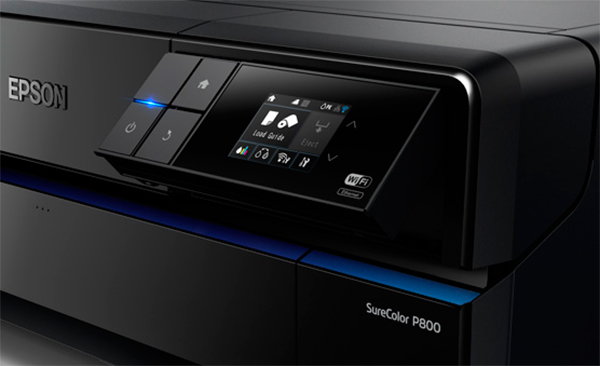 |
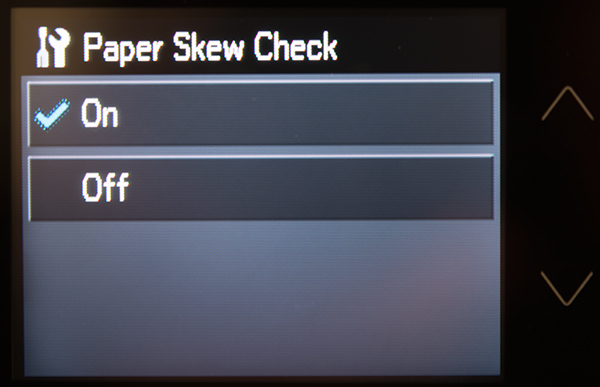
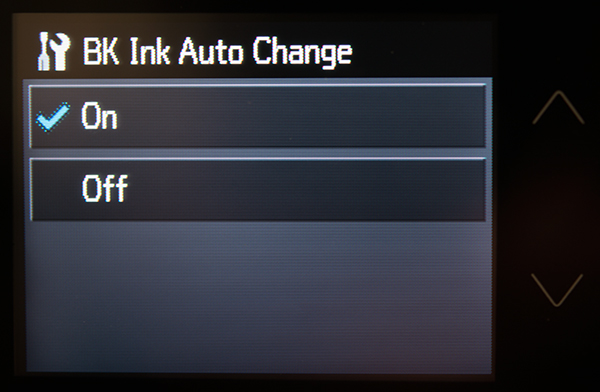
While the touchscreen didn't impress me, the overall menu system did. For anyone who has used an Epson printer before, it will feel familiar. The menu options are well-organized and plentiful. The introduction of control over automatic black ink switching and automatic skew check are fantastic and really help the P800 to feel like it is aimed at serious photographers. Gone are the days of user errors in the print dialog on your computer wasting your precious time and ink. And for those of us who have struggled at times with slightly crooked fine art papers triggering a skew check and bringing printing to a halt, being able to turn that feature off is great. In both cases, this means that you will need to be more aware than before when printing on different medias and loading fine art papers, but giving users more control is nice.
 |
|
The Epson P800 offers the option to turn off the automatic paper skew check. This is a good option for photographers who print on media that occasionally has a very slightly crooked cut, which can trigger the sensitive skew check system.
|
Superb print quality
Prints from the P800 are sharp and vibrant and blacks are rich and deep. Any decent printer these days can produce good prints, so where the excellent printers set themselves apart is through their subtleties. The P800 achieves its excellence through particularly deep blacks and accurate colors. When matched with high-quality paper, such as Epson's Hot Press Bright (one of my favorite papers), the P800 produces professional-quality prints that I would be proud to put my name on.
The all-new Epson UltraChrome HD inks deliver excellent colors across the gamut. The Photo Black, Matte Black, Light Black, Light Light Black, Cyan, Light Cyan, Vivid Magenta, Vivid Light Magenta, and Yellow inks, which each have access to 180 nozzles, work together to create prints with accurate colors and smooth tonal gradations. I was particularly impressed with the P800's ability to achieve vivid prints without going overboard. While saturated colors are often desired, it is easy for a printer to go too far and introduce issues with transitions and accuracy. The P800 manages to strike an excellent balance between creating saturated prints and being an accurate representation of the original image.
 |
|
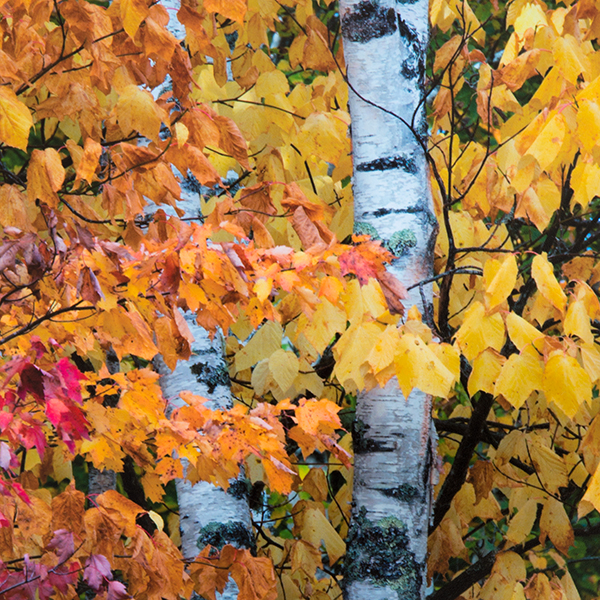
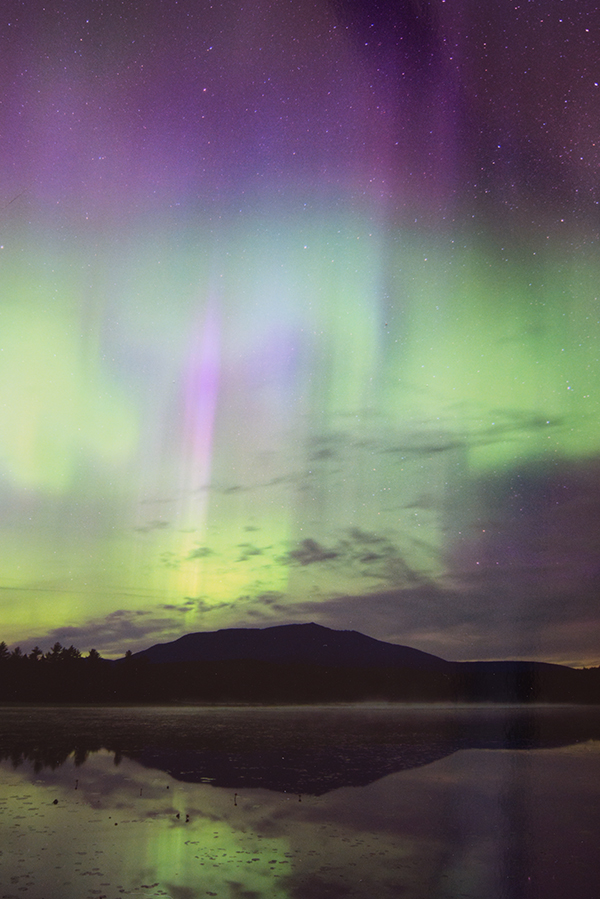
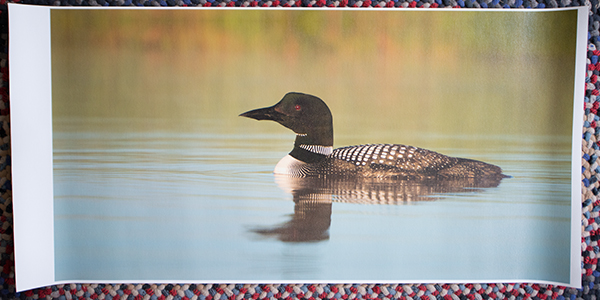
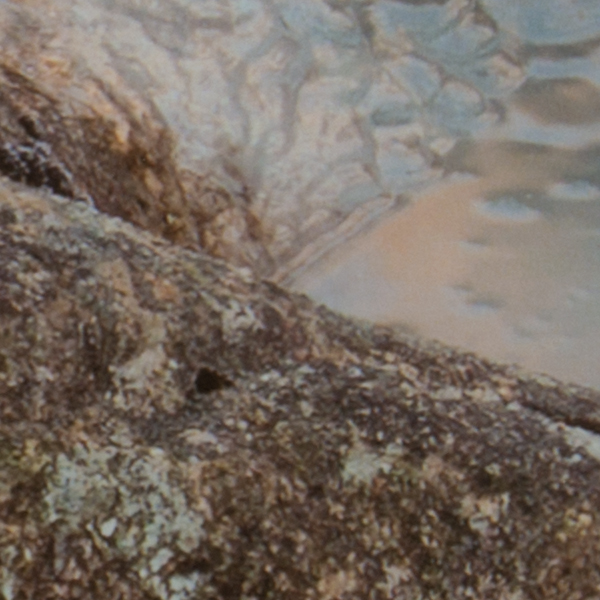
The P800 was able to print this image (close-up of a 17 x 22" print on Epson Ultra Premium Luster paper at 1440 dpi printed with 'high speed' enabled seen below) without pushing the red too far. It also handled the yellows and rendered the subtle transitions from yellow to orange throughout the leaves very well. The printer was also able to retain the shadow details in the bark of the background trees. Note that images of prints in this review were taken with a Nikon D800E with 60mm macro lens, unless otherwise noted. 'Birches,' copyright Jeremy P. Gray
|
 |
Black and white prints look very nice from the P800. With the new, denser Photo Black ink, blacks are deep and prints have an expansive dynamic range. The smooth transitions from black to dark gray allow for the P800 to produce prints that retain good shadow detail. An area of dramatic improvement of the P800 over the 3880 is printing black and white images on matte papers. With the newly-formulated matte black ink, the ink doesn't penetrate as deeply into the paper and therefore the blacks appear richer. I occasionally shy away from printing certain images on matte fine art papers with my 3880 due to the lack of contrast, but that is no longer an issue with the P800. While there are improvements to print quality in all regards with the P800, the improvement to printing on matte papers is the biggest step forward in my opinion.
Monochrome printing using Advanced Black and White mode
The P800 can make great black and white prints using the standard print dialog and paper profiles, but you can also utilize the Epson's Advanced Black and White (ABW) mode to make more fine-tuned black and white prints.
 |
|
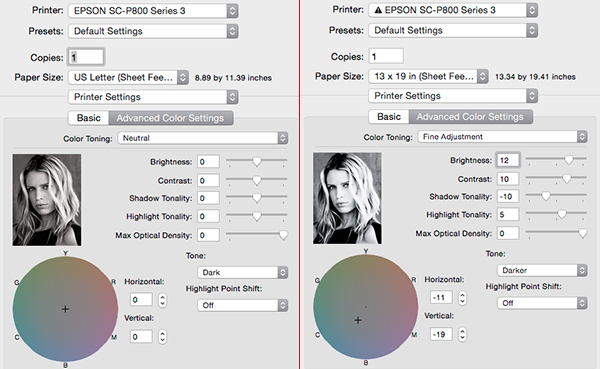
On the left is the default ABW 'Advanced Color Settings' menu. On the right is the same menu with the settings that were used in the second print below.
|
With ABW mode, you can change the brightness, contrast, shadow tonality, highlight tonality, and overall tone of the image. You can even convert color images to black and white via ABW mode. You get a live preview of a stock image in the print dialog rather than your own image, so it can be a bit tricky to get a good sense of how the changes you're making will impact your own image.
 |
|
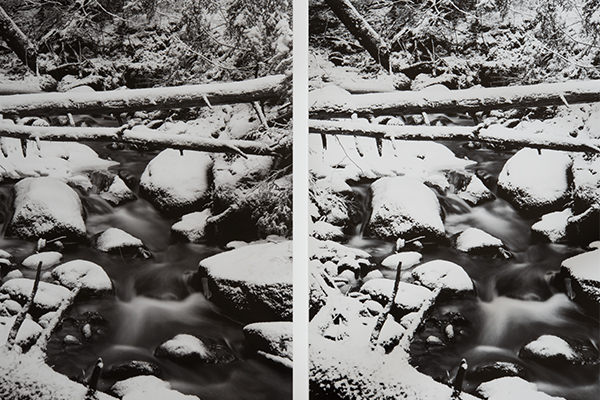
On the left is the default ABW print. On the right is the ABW print made using the settings above: +12 brightness, +10 contrast, -10 shadow tonality, +5 highlight tonality, tone: darker, and -11, -19 color tone.
|
I prefer to handle black and white conversions and editing on my own, but the ABW mode is a great way to ensure the most neutral black and white prints as certain paper profiles can sometimes produce a color cast. You can also use ABW mode to compensate for different qualities in a paper that you might not have a profile for or to add your own unique twist, such as a color tone, to your prints.
Printing on Epson media
In addition to the printer itself, Epson supplied me with a wide array of papers to use, including Ultra Premium Luster, Hot Press Bright, Velvet Fine Art, Metallic Luster, and Metallic Glossy. They also sent me a roll of Exhibition Canvas Satin, which I discuss in the next section.
With Photo Black ink, the P800 printed very well on both the luster and metallic glossy papers. Prints are vibrant and sharp. Epson's Ultra Premium Luster is a great paper for making your images pop. It works well for basically any image and should always deliver good results. The Metallic Glossy paper, on the other hand, doesn't work for every type of image. It has a subtle warm tint to it and it is very reflective. Its sheen makes bright colors appear even brighter, but it also means that you can lose a bit of detail. In addition, its overall tone isn't neutral enough for me to want to use it for black and white prints.
 |
|
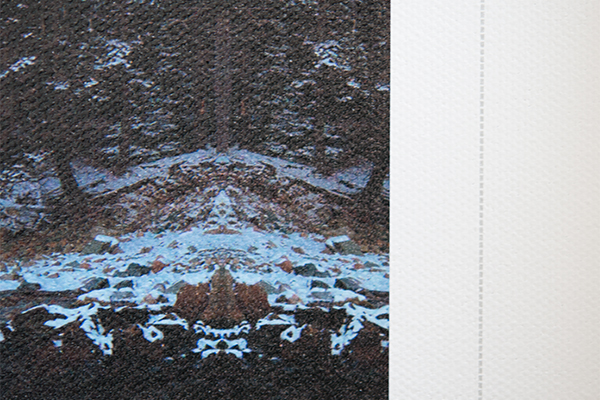
Close-up of 'Brilliant Pillars' printed on Epson Metallic Photo Glossy paper.
|
Printing on matte paper meant switching the black inks. Unlike the Canon PRO-1000, the P800 does not have dedicated nozzles for the individual black inks, so the printer has to switch the inks, which consumes both time and ink. According to Epson, switching from matte to photo black ink takes 3 minutes 30 seconds and uses up approximately 4.6mL of ink. Switching from photo to matte black ink takes 2 minutes 30 seconds and uses up approximately 1.6mL of ink. In case you're curious as to why switching from matte black to photo black ink consumes more ink and takes longer than switching from photo black to matte black ink, there is actually a very specific reason related to the different pigments. Matte black ink cannot be used on non-matte papers. The pigment will not be absorbed and you'll be left with black dust that sits on top of the paper, which is undesirable and also bad for the printer itself. On the other hand, photo black ink can be used on matte papers (although it obviously won't look as good at matte black). What this means is that the P800 has to get all of the matte black ink out of the nozzles before it starts printing on non-matte papers, which as a result takes longer and uses up more ink. Photo black ink left in the nozzles won't ruin the prints or paper, so it is not as critical to cycle all of the leftover photo black ink out of the nozzles, which means less time and less ink are required in the switching process. As I discussed in the previous section, matte prints from the P800 look very good though, so any wait for black ink switching is definitely worth it if you desire to use matte paper.
 |
|
I'd personally toggle this option off. It is unfortunate when you make a mistake in the print dialog and lose paper and ink because the wrong ink was being used. I think that it's better to have more control as long as you remember to make the manual switch when switching types of media.
|
 |
|
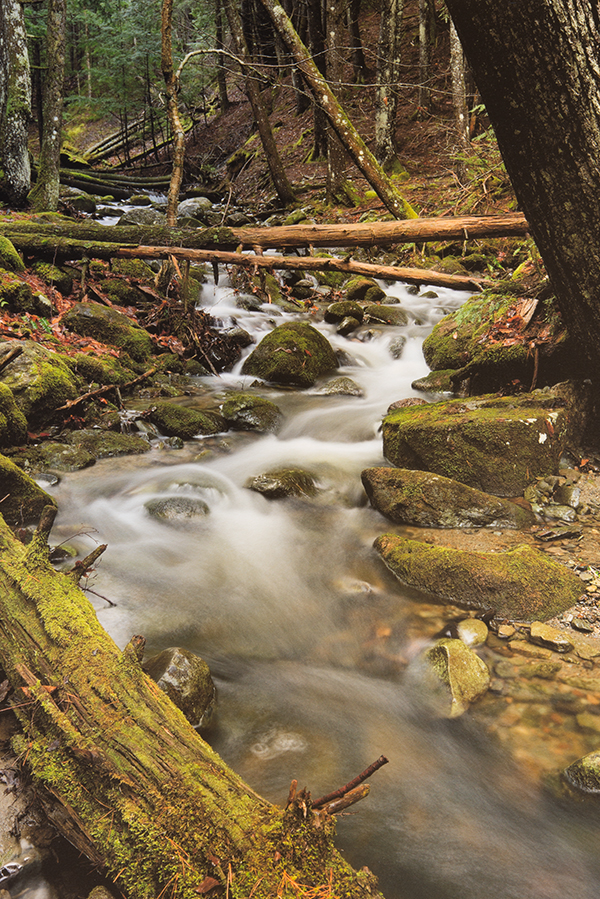
Close-up of 'Fallen' on Epson Velvet Fine Art paper.
|
When printing on thicker papers (anything from 0.29-0.70mm thick), you have to use the front Fine Art paper feed. Rather than feeding fine art paper through the rear of the printer like you do with the Stylus Pro 3880, you instead open up the front of the printer and release the gray fine art front loading tray. By pressing this tray open and opening the rear feed support on the top of the printer, you are able to slide thicker media through the front tray and the printer will then pull it through into the rear feed support. Once the paper has been fed through, you close the light gray tray and you're good to go. I like this system for loading thicker paper a lot; it's very simple to use and much more convenient than having to reach around the printer to get to a feeding slot on the back.
Roll adapter provides a lot of versatility
Using the optional roll media adapter, you can print up to 17" wide and 129" long images on roll paper with the P800. Attaching the adapter itself is easy as there are two slots on the back of the printer where you just slide on the adapter and then you tighten two screws in at the bottom. It takes less than a minute to do. Epson supplied me with a roll of Exhibition Canvas Satin. Once the roll was on the roll media adapter, I unrolled the canvas and fed it into the rear slot of the printer. By tapping 'Load Guide' on the printer's display, the printer will give you step-by-step instructions on how to load the roll media.
 |
|
Epson's Roll Media adapter is available for ~$200 USD. It does add size and weight to the P800, but it allows for much more versatility.
|
There is not a built-in cutting tool, but you can have the P800 print a cut line on the canvas to guide you with cutting the paper. You'll want to be very careful to cut a straight edge when working with roll media to ensure proper feeding.
 |
|
30" long canvas print of 'Through the Mist' on Exhibition Canvas Satin.
|
This was my first experience working with roll paper, and I was able to get everything set up and working correctly in short order, so I think that speaks to how well the P800 is equipped for printing on roll media.
 |
|
You can see the printed cut line here. After you cut the canvas with a sharp pair of scissors, the printer will load the roll back up into the printer to minimize waste. After the media is fed back into position inside the printer, you need to tighten the roll media spindle so that the canvas remains tight.
|
Epson's new Legacy papers impress
In addition to the media listed above, Epson also supplied me with a sample pack of their yet to be released Legacy Paper. The Legacy Paper line includes four papers: Legacy Baryta, Legacy Platine, Legacy Etching and Legacy Fibre. The latter two of which are matte papers.
The Legacy Baryta paper features a smooth, satin finish and has a whiteness rating of 90. It's 12 mils thick and feels very nice. It has two barium sulphate coatings and an industry leading microporous inkjet receptive layer. This results in the Legacy Baryta paper producing prints with deep blacks, vibrant colors, and smooth tonal gradations. If you're after the look and feel of silver halide F-surface darkroom papers, this is the paper for you.
Epson's Legacy Platine paper is thicker than the Baryta paper at 17 mils, a bit less white (82 whiteness rating), and it has a slightly less smooth surface, although it is still considered a smooth satin finish. Whereas the Baryta paper is 100% alpha cellulose, the Platine paper is 100% cotton fibre. While they're both excellent satin papers, I have a slight preference for the Legacy Platine paper due to its subtle texture.
 |
|
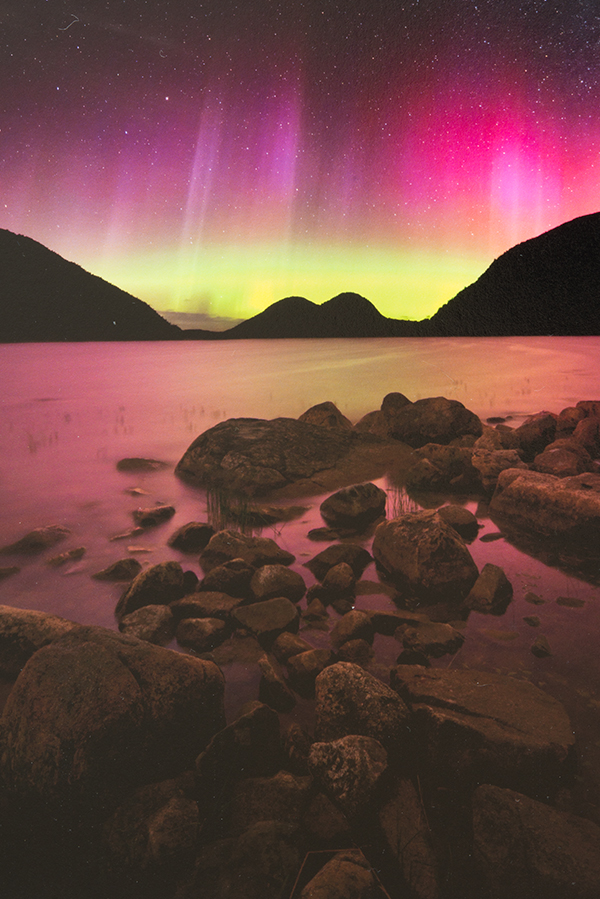
'Dancing Lights' printed on Epson's new Legacy Platine paper. Although all four of Epson's new Legacy Papers are excellent, this was my favorite paper due to its slightly-textured satin finish.
|
At 20 mils thick, the Legacy Etching paper is the thickest of Epson's four new papers. It's also the whitest at 99 whiteness and the brightest at 96 ISO brightness. It's a 100% cotton fibre paper with a textured matte finish. On the P800, the Etching paper produces very rich blacks and vibrant colors. It is the perfect paper for gritty, raw images with lots of depth and texture.
For a smooth paper, Epson offers the Legacy Fibre paper. At 19 mils thick and with 98 whiteness rating and a 93 ISO brightness rating, this semi-smooth satin paper works very well. Deep blacks and vibrant colors make this a great matte paper. Which of the two matte papers, Etching or Fibre, you prefer really comes down to whether or not you want a textured or a semi-smooth finish.
Overall, the Legacy papers are all very good. They are thick papers that just feel substantial in the hands. Making prints is a very tactile experience and handling any of the four Legacy papers just feels like a good experience. Most importantly, any of the four make excellent prints with the P800. Paper selection is very subjective; everyone has different preferences and every image is different, but you can't go wrong with any of Epson's new Legacy Papers. They will all be available in cut sheets and rolls with rolls releasing in December and cut sheets in January. I will be writing a separate article about printing with the Legacy Papers soon, so keep an eye out for it.
P800 prints well on third-party paper
During my time using the P800, I was sent papers by both Red River Paper and Hahnemuhle, which I printed on using the P800 to great success. While I am a big fan of Epson's own papers, it's important that a printer be able to work well with third-party media as well.
Using .icc profiles for the Red River and Hahnemuhle papers, the P800 consistently produced very good prints on the third-party papers. For the thicker medias, I regularly used the front fine art paper feed. Through this extended use, I came to really appreciate how much better this front-feeding system is compared to the rear-feeding system found on my 3880. I will be discussing the Red River and Hahnemuhle papers in separate posts.
 |
|
'Autumn Storm' printed on Red River Paper 66lb. Arctic Polar Gloss.
|
Some specialty papers can sometimes be cut very slightly skewed (none of the ones that I've tested with the P800 were skewed, but I have experienced it with thick fine art papers before), which can trigger a printer's skew check and bring your printing to a grinding halt. Fortunately, this issue (which was an issue for me with the 3880 from time to time) has been addressed and auto skew check can actually be disabled through the menus. However, with auto skew check disabled, the printer will print even if you loaded a piece of paper very poorly, so you need to be cautious.
Print quality and high speed printing
Through Epson's print dialog, you have the option to print with a high speed option, which is disabled by default. When you print at high speed setting, the print head lays down ink in both directions, the outward direction and the return direction. In the case of the P800, this leads to a dramatic increase in print speeds without a noticeable decrease in print quality. I looked at images printed with high speed on and off using a magnifying glass and would be hard-pressed to tell you which one is which if I hadn't labeled them. The difference in quality, if it exists at all, would never be seen when viewing the prints from a normal distance.
 |
|
Above: Print with high speed disabled. This print took 20 minutes and 20 seconds. Below: Print with high speed enabled. This print took 11 minutes and 10 seconds (slightly longer than half the time with high speed printing enabled, which makes sense as the printer head lays down ink in two directions instead of one). Even with a magnifying glass, I wouldn't have been able to tell the two prints apart had I not labeled them. |
 |
There is also a print quality option. Depending on the selected paper, your options vary, but for most photo papers you can select between 1440 dpi (FinePhoto) and 2880 dpi (SuperPhoto) print quality. There is a difference in print speed, but not necessarily in print quality. Supposing that you have a very sharp image file to begin with, the difference in sharpness is minuscule. Even with a magnifying glass, I couldn't tell the image printed at 1440 dpi apart from the one printed at 2880 dpi. In fact, many papers, such as the fine art papers I used from Red River and Hahnemuhle, come with recommending print settings on Epson printers of 1440 dpi resolution.
 |
 |
|
These are macro images of two prints of 'Clutching.' One of them was printed at 2880 "SuperPhoto" resolution and the other was printed at 1440 "FinePhoto" resolution. See if you can figure out which one is which without looking at the file names. The 1440 print took 8 minutes and 50 seconds. The 2880 print took 15 minutes and 40 seconds. |
 |
Print speed results
| Size (inches) | Color or BW | Quality | Paper Type | Time |
|---|---|---|---|---|
| 8 x 10 | Color | 1440 DPI (High Speed) | Epson Metallic Glossy | 02:25 |
| 8 x 10 | Color | 1440 | Hahnemuhle Torchon | 04:05 |
| 8 x 10 | Color | 2880 (High Speed) | Hahnemuhle Albrecht Durer | 03:35 |
| 8 x 10 | BW | 2880 | Epson Legacy Baryta | 07:00 |
| 12 x 18 | BW | 1440 (High Speed) | Red River Paper Palo Duro Satin | 04:40 |
| 12 x 18 | Color | 1440 | Red River Paper Palo Duro Satin | 08:50 |
| 12 x 18 | Color | 2880 | Red River Paper Palo Duro Satin | 15:40 |
| 12 x 22 | Color | 2880 (High Speed) | Epson Exhibition Canvas Satin | 07:20 |
| 13 x 20 | BW | 1440 (High Speed) | Epson Exhibition Canvas Satin | 05:45 |
| 16 x 20 | Color | 2880 (High Speed) | Epson Ultra Premium Luster | 11:10 |
| 16 x 20 | Color | 2880 | Epson Ultra Premium Luster | 20:20 |
| 16 x 24 | Color | 1440 | Red River Palo Duro SoftGloss Rag | 13:40 |
| 17 x 22 | Color | 1440 (High Speed) | Epson Ultra Premium Luster | 07:40 |
| 17 x 22 | Color | 1440 | Epson Ultra Premium Luster | 14:15 |
| 17 x 22 | Color | 2880 | Epson Ultra Premium Luster | 25:40 |
| 17 x 32 | Color | 2880 | Epson Exhibition Canvas Satin | 32:45 |
Epson SureColor P800 versus Canon PRO-1000 (and Epson 3880)
With Canon's recently released 17" imagePROGRAF PRO-1000 printer, the P800 has a new rival. Having reviewed the PRO-1000, I was able to directly compare the two printers.
 |
|
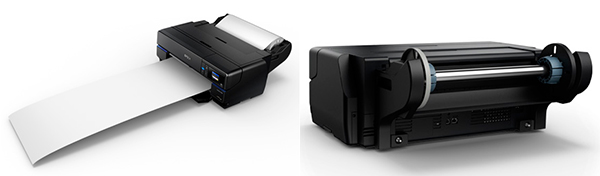
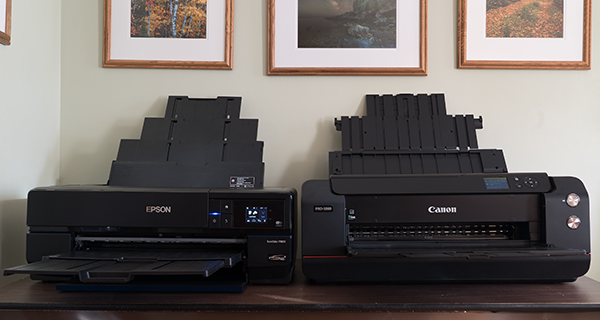
The Epson P800 (left) is noticeably smaller than the Canon PRO-1000 (right).
|
Printing various test images from here and here on the two printer's respective 17 x 22" luster papers and using the highest possible settings, the P800 printed the test sheet in 20 minutes, 30 seconds and the PRO-1000 printed the same file in 15 minutes, 57 seconds.
Only when viewing the prints up close is there any noticeable difference. Both the P800 and PRO-1000 produce similarly impressive black levels. The P800 produces slightly different colors, but I wouldn't say that they're overall better or worse than the colors from the PRO-1000. Specifically, I think that the P800 handles greens a bit better and that the PRO-1000 produces better reds and blues. I also printed the same image on my Epson 3880 to see how that fared against the P800 and the P800 bests the 3880 across the board. Colors are more vibrant and the black is much deeper.
As far as sharpness and detail is concerned, both Epson P800 and Canon PRO-1000 produce very sharp prints. When viewing prints up close, perhaps the P800 produces very slightly sharper prints, but I couldn't confidently tell the two prints apart with regards to sharpness and fine detail. Besides, if you have to use a magnifying glass to distinguish between two prints, then they're not different in any meaningful way.
 |
|
Epson SureColor P800 test image close-up. Notice that the red and orange are very slightly less vibrant than the Canon PRO-1000 print below. But notice how the leftmost green is lighter while the middle and right greens are a bit more distinct from one another on the P800 print. The blue is a bit warmer on the P800 print and the violet is lighter. The magenta is darker on the P800 print as well. (Note: This image was printed on Epson's luster paper at 'SuperPhoto' print quality whereas the Canon test image was printed on Canon's luster paper at 'highest' print quality. The difference in paper could affect color rendition, but I wanted to have each printer print on its respective luster paper. Also note that these three images were taken with a Sony A7S II and a 90mm f/2.8 Macro G OSS lens at ISO 100 in raw mode using the same settings and processing. Hue and saturation won't be absolutely accurate, but still useful for comparison purposes.)
|
 |
|
Canon imagePROGRAF PRO-1000 test image close-up. Notice the vibrancy of the red and orange. There is also a distinct difference in the green swatches compared to the two Epson printers. The blue and violet swatches are also darker and denser on the PRO-1000 test image. Both the PRO-1000 and Epson P800 print have deeper blacks than the Epson 3880 print further below. (Note: This image was printed on Canon's luster paper at 'highest' print quality whereas the two Epson test images were printed on Epson's luster paper at 'SuperPhoto' print quality. The difference in paper could affect color rendition, but I wanted to have each printer print on its respective luster paper.)
|
 |
|
Epson Stylus Pro 3880 test image close-up. Across the spectrum of colors, the 3880 print is just not quite as vibrant as either the P800 or the Canon PRO-1000. The black levels, while impressive, just don't quite match the superb black levels found on the P800. (Note: This image was printed on Epson's luster paper at 'SuperPhoto' print quality whereas the Canon test image was printed on Canon's luster paper at 'highest' print quality. The difference in paper could affect color rendition, but I wanted to have each printer print on its respective luster paper.)
|
The P800 makes excellent prints that are noticeably improved compared to prints from the Epson 3880. Going up against Canon's PRO-1000, the differences are subtle. The P800 and PRO-1000 render colors a little differently, but which one renders them better is more of a personal preference.
Efficiency
Every particular image and media places different demands on a printer's ink supply, so it is not possible for me to determine how efficient the P800 is and how its ink use would be for any individual user. Anecdotally, for me, it went through Photo Black ink pretty quickly. I've made only slightly more prints using Photo Black ink compared to Matte Black ink, but the Photo Black ink decreased more than twice as fast during my testing. Compared to printing with my 3880, the P800 definitely seemed more efficient, though. Like the 3880, the P800 uses high-capacity 80mL ink cartridges, although the printer comes with a starter set of 64mL ink cartridges.
Epson P800 Review Conclusion
An excellent printer that bests its predecessor across the board
What I like:
- Versatile media handling. Accepts media up to 1.5mm thick and can print on roll media with the optional roll media attachment.
- Front-loading fine art papers is much better than the rear-loading mechanism of the 3800/3880 printers.
- Additional menu options, such as disabling automatic black ink switching and skew check, provide users more control.
- All-new UltraChrome HD inks produce vibrant prints with rich, deep blacks.
- The new Matte Black ink helps the P800 make fantastic prints on matte papers.
- Print drivers are easy-to-use yet powerful. Advanced Black and White mode works well.
What I dislike:
- Touchscreen is an occasionally slow method of input.
- Printer is a bit slower than the competition.
- While black ink switching is automatic (by default), efficient printing requires that you consider the order in which you make prints when using various media.
Other Pros:
- Easy, quick setup.
- Stylish design with relatively compact footprint.
- Wi-Fi connectivity with Apple AirPrint & Google Cloud Print support.
- Versatile: high-quality prints on both Epson and 3rd-party brand print media.
- High-speed print option lays ink in both directions with little negative affect on print quality.
Other Cons:
- Does not ship with 80mL ink cartridges (only 64mL starter kit).
- 2880 dpi (SuperPhoto) print quality shows little improvement over 1440 dpi FinePhoto (so save time on printing!)
Summary
The Epson SureColor P800 is a substantial upgrade from the popular Epson Stylus Pro 3800-series of printers. There is a distinct improvement in print quality and the ability to accept roll media is a great feature. Competition is heating up for this class of printer, but the P800 is a very good 17" desktop printer that every photographer ought to consider. If you're looking to get your first printer of this class or upgrade your current printer, the Epson P800 is a great option.
Support our site, by buying through our trusted affiliates!
Reviews are a lot of work, and we're dependent on you, our readers, for our sustenance. Advertising covers only part of our costs, so if you found this review valuable, please consider using one of the links below to purchase your printer. Reader purchases through our affiliates makes a huge difference -- thank you!
Amazon | Adorama | B&H