Nikon D7000 Exposure
 Exposure Modes. Although it's a prosumer camera that's clearly aimed at reasonably experienced photographers, the Nikon D7000 offers not only the traditional selection of Programmed Auto, Shutter Priority, Aperture Priority, and Manual modes, but also a Full Auto mode, a Flash Off Auto mode, a generous selection of Scene modes that help beginners capture the photos they're looking for without needing to understand the complexities behind the process, and two User modes (U1 and U2) that allow the photographer to save groups of settings for later recall. Among other settings, when you store a User mode, you save the camera's current exposure mode, and so these simply mirror one of the other available exposure modes (including scene modes). In Shutter Priority and Manual modes, shutter speeds from 1/8,000 to 30 seconds are available in 1/3 EV steps. The Manual mode also adds a Bulb setting for manually timed exposures whose length is limited only by available battery power, and an X-sync setting that locks the shutter speed at 1/250th second.
 A very nice touch that's common to other Nikon DSLRs is that, while in Program AE mode, you can rotate the Main Command dial to select different combinations of aperture and shutter speed settings than those normally chosen by the autoexposure system. (That is, if the automatic program would have chosen 1/125 second and f/5.6, you could instead direct the camera to use 1/60 at f/8 or 1/30 at f/11, to get greater depth of field.) Nikon calls this Flexible Program, and photographers familiar with other brands may know it as Program Shift. It's a very handy option for those times when you need some measure of increased control, but still want the camera to do most of the work for you. We personally use this capability more than Aperture- or Shutter-priority metering in our own shooting. The Nikon D7000 also allows the step size used for aperture, shutter speed, ISO sensitivity, exposure compensation and exposure bracketing to be set to the user's preference of either 1/3 or 1/2 or 1EV steps. If you generally want fine-grained control over shutter speed and aperture, but find yourself occasionally wanting to make quicker adjustments, the camera can be set using Custom Setting f3 to temporarily use a 1EV step size for these variables while the Function button is held down.
An interesting feature when using Manual exposure mode is the electronic analog exposure display visible in the optical viewfinder data readout. This shows the amount the camera thinks an image will be over- or underexposed, based on the settings you have selected, and helps you find the best exposure for the subject.
The Scene modes, meanwhile, are all accessed through a single position on the Mode dial, with the Main Command dial used to select between available scene types, which include Portrait, Child, Landscape, Sports, Close Up, Night Landscape, Night Portrait, Party / Indoor, Beach / Snow, Dusk / Dawn, Sunset, Pet Portrait, Candlelight, Autumn Colors, Blossom, Food, Silhouette, Low Key, and High Key. Although an information screen briefly pops up on the rear-panel LCD when you change scene modes, it doesn't go out of its way to help the photographer learn, with only a limited number of settings listed beneath the name of the scene mode, with most of the settings shown being identical in all scene modes. The majority of the selection screen is taken up by an animation of a dial turning as the scene types are changed, and a small thumbnail showing an example of the current scene type. The help pages for each scene mode likewise offer only the briefest of descriptions, with the Candelight mode's terse "For candlelit scenes." being one such example. With that said, you do at least see the shutter speed and aperture chosen by the camera while the shutter button is half pressed (and in Live View mode, the ISO sensitivity), while quite a few other settings can be confirmed by looking at the LCD info display, or the information display that can be enabled on the rear panel LCD, so photographers who want to learn from the scene modes can do so -- the information just isn't provided in quite as direct a manner as it could be.
 Exposure Metering. Nikon has one of the most sophisticated and flexible metering systems currently on the market, and in the case of the Nikon D7000, its metering sensor covers a wide area of the frame with a 2,016-pixel RGB array. Like most SLRs, there are three main metering modes on the Nikon D7000: Matrix, Center-weighted, and Spot metering. Where Nikon's system differs is in the capability of these modes. Nikon's matrix metering -- the default option on the D7000 -- is called 3D Color Matrix Metering II, and takes into account not only subject brightness and contrast, but also subject and overall scene color, as well as subject distance information from the lens (when using type G or D lenses). This information is then compared against an in-camera database of over 30,000 different scene types, before the optimal exposure for the scene is calculated.
By default, the Nikon D7000's Center-Weighted metering mode gives a greater weight to an 8mm diameter circle in the center of the frame, although this can be changed with Custom Setting b4 to use either a 6mm, 10mm or 13mm spot, or to average the entire frame. Finally, Spot meters a 3.5mm diameter circle (about 2.5% of the frame) centered on the active focus area, unless you're using a non-CPU lens or Auto-area AF, in which case the D7000 behaves like most DSLRs in only metering the very center of the frame in Spot metering mode.
 An even more unusual feature of the Nikon D7000 comes courtesy of Custom Setting b5, which allows fine-tuning of the camera's metering system within a range of +/-1EV in extremely fine 1/6 EV steps. Three values can be set, allowing you to fine-tune Matrix, Center-weighted and Spot metering separately. This means that if you feel the camera to be consistently under- or over-exposing scenes, you should be able to pull it back towards your preferred exposure without needing to dial in exposure compensation for most images. Another similarly useful feature for tuning the D7000 to your tastes is Custom Setting c2, which allows the user to select how long the camera's metering system should be powered on during a period of inactivity. This lets you balance battery life against convenience, within a nine-step range from a miserly four seconds to a spendthrift 30 minutes, as well as an option to leave the metering system powered on at all times. Note that when running on A/C power, the metering system remains powered on all the time, for convenience's sake.
It's important to note that 3D Color Matrix Metering II does rely on the use of a Type-G or -D lens. With other CPU lenses, the D7000 falls back to Color Matrix Metering II, which doesn't take account of distance information in exposure calculations. Non-CPU lenses can use Color Matrix Metering if the focal length and maximum aperture are manually specified, but otherwise fall back to Center-weighted metering. The 2,016-pixel RGB sensor also serves to ascertain automatic white-balance, and provides assistance for focus tracking when the subject leaves the AF sensor area. Metering range is specified at 0 to 20 EV in Matrix or Center-Weighted, and 2 to 20 EV in Spot metering mode.
 Exposure Lock. Ordinarily, the AE-L/AF-L button locks both exposure and autofocus, useful for off-center subjects in tricky lighting. Alternatively, it can be programmed to lock only exposure, or only focus, via the custom menu. You can also program the button to toggle the exposure lock on and off, rather than requiring the button to be held. In addition, you can program the camera to trigger autofocus operation while the button is held in, or to toggle a flash value lock when using the built-in flash, or one of six external flash strobes -- the SB-900, SB-800, SB-700, SB-600, SB-400, or SB-R200.
 Exposure Compensation. Exposure compensation on the Nikon D7000 is adjustable from -5 to +5 exposure equivalents (EV) in 1/3 or 1/2 EV step increments, and is controllable in Program, Aperture-priority, or Shutter-priority modes. Note that in Manual exposure mode, the EV button doesn't actually vary the exposure - it only biases the electronic analog exposure display that's shown in the optical viewfinder data readout. The Auto Bracketing feature on the Nikon D7000 can capture either two or three sequential shots of the same subject with varying exposure values. Exposure settings for bracketing can vary from -2 to +2 EV, with step sizes of 1/3, 1/2, 2/3, 1, or 2 EV units, and are additive to the current exposure compensation value. That is to say, if you have the camera set with +5 EV exposure compensation, and you then bracket three frames with a 2 EV step size, it's possible for one frame to stray as far as +7 EV from the originally metered exposure. When shooting only two bracketed frames, you can select the extra frame to be shot either above or below the metered value.
Through Custom Setting e6, you can change the order in which bracketed shots are captured. By default, the metered exposure is captured first, then the shots under and over the metered exposure. The alternative is to capture the shots in order from under, metered, then over the metered value. Custom Setting e5 allows you to designate whether the bracketing sequence adjusts the ambient and/or flash exposure, white balance, or Active D-Lighting. When bracketing white balance, which is not available for Raw or Raw+JPEG shooting, note that the shutter is tripped only once and the camera then saves the bracketed exposures from the same source data. For two frame ADL bracketing, one frame has ADL disabled, and the other uses Auto ADL. For three shots, the camera brackets with ADL Off, Normal, and High.
 ISO Sensitivity. The Nikon D7000's normal ISO ranges from 100 to 6,400 equivalents, and can be extended up to ISO 25,600 equivalent (Hi 2). By default, ISO is adjustable in 1/3 EV steps (100, 125, 160, 200, 250, 320, 400, 500, 640, 800, etc.). Through Custom Setting b1, the D7000 can be set to allow sensitivity adjustment in 1/2 EV steps (100, 140, 200, 280, 400, 560, 800, etc.). Nikon's excellent Auto ISO feature is carried over as well, which allows you to set both the upper ISO limit (from ISO 200 to 25,600 / Hi 2) as well as the minimum shutter speed (selectable from 1s to 1/4,000s) required before ISO is increased automatically.
The menu design does have one slight quirk, though, which we've commented on previously in our D3100 review. When you're shooting in Program, Priority or Manual modes, you'll notice a greyed-out Auto option at the top of the list of ISO sensitivities, which no amount of fiddling with camera settings will activate. That's because this option is available only when shooting in Auto, Flash Off Auto, or Scene modes -- in which case the Auto ISO sensitivity control option is instead greyed out. The two options are completely separate and accessible only in their correct exposure modes, but might cause a newcomer to Nikon's interface to believe that Auto mode wasn't actually enabled, when in fact it is. Even with Auto ISO set, you still manually choose an ISO sensitivity, and this simply acts as a starting point for the camera to raise if needed. Shots where the ISO sensitivity was automatically raised are indicated in playback mode, with the automatically chosen sensitivity listed in red.
 White Balance. The Nikon D7000 offers quite a range of white balance settings. There are two Auto modes: Auto 1 operates normally, while Auto 2 is similar to Pentax's CTE (Color Temperature Enhancement) mode, and adjusts white balance automatically, but with a bias towards a warm result. There are also six presets consisting of Incandescent, Fluorescent, Direct Sunlight, Flash, Cloudy, and Shade, a direct color temperature setting (2,500 to 10,000K), and a manual mode where white-balance is determined from a white or grey card or copied from an existing image. The Fluorescent preset has seven sub-settings consisting of Sodium Vapor (2,700K), Warm-white (3,000K), White (3,700K), Cool-white (4,200K), Day White (5,000K), Daylight (6,500K), and High Temperature Mercury Vapor (7,200K). The manual setting allows five custom white-balance measurements to be stored, and each preset can be fine-tuned and given a 36-character alphanumeric comment (including both upper and lower case, and a selection of punctuations marks, all entered through an on-screen keyboard).
 As with a number of other high-end SLRs these days, all the D7000's white balance presets and manual settings except for the direct color temperature settings are adjustable via a 2D fine-tuning grid display. The Nikon D7000 also supports White Balance bracketing, where either two or three frames can be bracketed with Blue and/or Amber white balance bias increments of approximately 5, 10 or 15 mireds.
Active D-Lighting. D-Lighting has proven a popular post-processing feature in Nikon's recent digital SLRs, as well as some of the company's point & shoot models. It's a quick software process that attempts to overcome underexposed images, and bring detail out of shadows. An improved version of Active D-Lighting appeared in the Nikon D3 and D300, including optimization of image contrast, helping to prevent overprocessing of shadows and flattening of overall image contrast. The Nikon D7000 inherits this same Active D-Lighting setup, which features Extra-High, High, Normal, Low, and Off settings plus the ability to automatically choose the Active D-Lighting strength on the fly.
|
D7000 Active D-Lighting
|
|
 |
 |
|
Active D-Lighting
Off |
Active D-Lighting
Extra-High |
The effect of Active D-Lighting is highly dependent on the particular subject and lighting being shot, but for the most part is fairly subtle. The thumbnails above shows its effect on our Outdoor Portrait test, where you can see it opening up the shadows somewhat, while simultaneously holding back the highlights a little. We like that it's generally subtle in its effect, as it's so easy to overdo automatic tonal adjustments like this. (See the Nikon D7000 Image Quality tab for more detail on how well Active D-Lighting performs.)
Lateral Chromatic Aberration Correction. While other cameras have had lens distortion processing built-in, (notably the Olympus E-1, quite some time ago, and more recently many Panasonic cameras), none until Nikon's D3 and D300 did the processing based on the distortion detected in the image. Past cameras (and most distortion-correction software) simply looked at which lens was mounted and perhaps the focal length if it was a zoom lens, and then applied a pre-set amount of correction; no image analysis actually took place. Nikon's Lateral Chromatic Aberration correction offered a more sophisticated approach, thanks to the power of the camera's EXPEED 2 processor, by actually analyzing each image after capture and fixing the chromatic aberration detected therein before saving the JPEG file. Cameras with high-resolution sensors place a greater demand on lenses, and hence Lateral Chromatic Aberration correction proves a useful feature on the Nikon D7000. There are no settings for this feature; it's always enabled for JPEGs.
|
Nikon In-Camera CA Correction
|
|
 |
 |
|
200% Crop from Nikon D90,
18-105mm VR lens at 18mm Converted from Raw, no CA correction applied |
200% Crop from Nikon D90,
18-105mm VR lens at 18mm Camera JPEG, Automatic CA correction applied |
The crops above are actually taken from our review of the Nikon D90, but the D7000 uses the same technology, and the D90 crops above make good examples, because its 18-105mm VR kit lens had quite a bit of CA in the corners at the wide-angle end. The crop at left was taken from an image converted from a Raw file from the D90, enlarged 200% to make the colored fringing caused by the CA more evident. As you can see, there's quite a bit of CA present. The crop at right is from a camera JPEG, shot at the same time under identical conditions. The difference in CA is pretty amazing; the camera did a remarkably good job of eliminating it. (Click on either image to see the full-resolution images as they came from the camera and Raw converter.)
 Picture Control. Nikon has standardized its Picture Control system so that camera settings for sharpening, contrast, brightness, saturation, and hue can be finely adjusted and ported to other Nikon digital SLRs that support the system. The D3 was the first camera compatible with the option, and all Nikon SLRs since, including the D7000 follow the standard. The Nikon D7000 has six presets called Standard, Neutral, Vivid, Monochrome, Portrait, and Landscape, and up to nine custom presets can be defined, named, saved, and copied. Sharpness can be adjusted in ten steps, along with an Auto setting; contrast and saturation can be adjusted in seven steps or determined automatically, while for hue there's a seven-step adjustment with no auto mode. Brightness is adjustable in three steps, and doesn't affect exposure. There is also a five-step "Quick Adjust" setting which exaggerates or mutes the combined effect without having to adjust each slider individually. When Monochrome Picture Control is selected, Hue and Saturation are replaced by Filter Effects and Toning respectively. Filter Effects offers Off, Yellow, Orange, Red, and Green settings, while Toning offers B&W, Sepia, Cyanotype, Red, Yellow, Green, Blue Green, Blue, Purple Blue and Red Purple settings, with each of the colored settings offering seven adjustment steps. Of course, the Nikon D7000 also offers sRGB and Adobe RGB settings, in a separate Color Space option located in the Shooting menu.
 Noise Reduction. The Nikon D7000 offers four levels of high ISO noise reduction: Off, Low, Normal, and High. When set to Off, minimal noise reduction is still performed at ISO sensitivities of 1,600 equivalent or above for JPEG images. High ISO noise reduction is not performed on Raw files. The Nikon D7000 also offers long-exposure noise reduction for exposures longer than 8 seconds. When set to On, the camera takes a second exposure for somewhere between half to the same duration as the actual exposure, but with the shutter closed, and subtracts the "dark frame" from the first, to further reduce hot-pixel and amp noise.
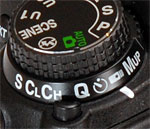 Release Modes. The Nikon D7000's release modes are selected via the lockable release mode dial, which surrounds the base of the Mode dial, on the left of the camera's prism / popup flash housing. Release modes consist of Single Frame (S), Continuous Low-speed (CL), Continuous High-speed (CH), Quiet Shutter-release (Q), Self-timer, Remote, and Mirror Up (MUP). The Nikon D7000's Continuous High mode is rated by Nikon for up to six frames per second with the standard EN-EL15 battery pack, while Continuous Low allows one, two, three, four, or five frames per second as configured in Custom Setting d6. These figures apply only with a shutter speed of 1/250 second or faster, continuous servo AF, manual or shutter-priority auto exposure, and all other settings at their default values. The number of shots that can be captured in a Continuous-mode burst before the camera slows down varies, depending on the file type and image size, as well as the amount of fine detail in the scene for compressed filetypes. Nikon doesn't provide a specification for the number of shots that can be captured before the buffer fills, but our tests with a deliberately difficult-to-compress image showed a capacity of ten Raw files (regardless of bit depth or whether JPEGs were simultaneously recorded), and a limit of 19 large/Fine JPEGs. Of course, the number of consecutive shots could also be limited by available memory card space, if your card(s) are nearly full.
Quiet Shutter-release is similar to normal Single Frame mode; however, the camera reduces noise by disabling the beep sound when the camera focuses, something which can be achieved in other modes through Custom Setting d1 in the Custom menu. It also delays lowering of the mirror until the shutter button is released, separating the noise of this operation from that of the mirror being raised and the shutter fired. It further reduces actuation speed of the mirror mechanism, and of the shutter recocking mechanism. The result is, indeed, a much quieter shutter sound. Self-Timer mode triggers the shutter a programmable delay (2, 5, 10, or 20 seconds) after the shutter button is pressed. The delay is set using Custom Setting c3, which also allows the D7000 to be programmed to capture anywhere from one to nine shots after the timer countdown has elapsed, with an interval of 0.5, one, two, or three seconds between shots. (Note that Self-Timer mode requires placing the bundled DK-5 eyepiece cap over the viewfinder to prevent stray light from affecting the exposure, and that Bulb exposures in Self-Timer mode will have a duration of 1/4 second.) Remote Control mode allows the D7000's shutter to be triggered using the optionally available ML-L3 infrared wireless remote control unit. Three operating modes are possible, configured using the Remote Control Mode option in the Shooting menu. The D7000 can either trigger the shutter immediately that the button on the remote is pressed, after a two second delay has elapsed, or the mirror and shutter can be separated so that the first press will lift the mirror, and the second press will start the exposure. Finally, Mirror Up mode allows the mirror to be locked up with a first press of the shutter button or optional MC-DC2 corded remote release, and fires the shutter on a second press (or automatically, after a delay of 30 seconds), allowing camera shake caused by mirror slap to be reduced when shooting on a tripod. There is also an Exposure Delay option in Custom Setting d11 which delays the exposure one second after the shutter button has been pressed and the mirror raised.
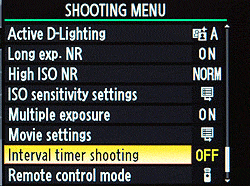 Interval Timer Mode. Another useful feature on the Nikon D7000 that first appeared on more expensive models is Interval Timer mode, which facilitates time-lapse photography by taking a series of images at preset intervals. You can set the starting time for the series, as well as the time interval between shots, the number of shots to be captured after each interval (from one to nine), and the total number of intervals after which capture should cease (from one to 999). You can set hours, minutes, and seconds between each shot, and you can set a start time using 24-hour notation (HH:MM) from 00:00 to 24:00. (Make sure the camera's timezone, date and time are correctly set!) You can also start immediately, using the "Now" option. This is a good way to capture a timeline of slower events, such as clouds passing across the sky, tidal changes, a flower opening, etc. As with the Self-timer mode, the bundled DK-5 eyepiece cap should be placed over the viewfinder to prevent stray light from affecting the exposure. Exposure, flash, Active D-Lighting and white balance bracketing are all possible during interval shooting, and all but the latter will override the shots per interval setting to capture the required number of bracketed exposures. (White balance bracketing will capture only the requested number of exposures, but then process each single exposure differently so as to create the separate WB-bracketed still image files.). Interval capture can be paused and resumed, or interrupted, through the camera's menu system, if needed.
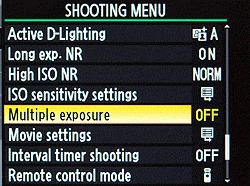 Multiple Exposure Mode. The Nikon D7000 allows either two or three exposures to be captured separately, and then combined in-camera into a single multiple-exposure image. This function allows effects similar to those that might have been obtained by intentionally winding back and re-exposing an image on a film camera. Up to 30 seconds is allowed between exposures, in addition to the time set in Custom Setting c4, "Monitor Off Delay" if Image Review is enabled - so a maximum of 10 minutes and 30 seconds between exposures is possible if the camera has sufficient battery life remaining. As they're captured, the exposures can either be averaged by setting gain to "On", or the brightness values from each exposure simply added up. The Multiple Exposure mode can be combined with the Interval timer function to automatically capture all the shots of the multiple exposure if desired, and it's also possible to change white balance between exposures. Most other menu options are disabled during Multiple Exposure capture. Sadly, live view can't be used to capture multiple exposures, so there's no way to preview the effect and precisely align subjects by looking at the camera's LCD display.
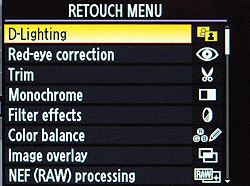 Retouch Menu. The Nikon D7000 has an extensive Retouch menu, which is starting to rival what basic image editing software packages can do on a computer - so much so that some users may not feel the need to use a computer for Nikon D7000 image editing at all. Retouch options include adjusting D-Lighting, red-eye correction, image cropping (trim), converting to monochrome, applying one of seven filter effects (including Skylight and Warm filters), adjusting color balance, image overlay for combining two Raw images into one JPEG, NEF (Raw) processing, resizing to small images (for TV, Web or email), "Quick Retouch" (boosts saturation / contrast and applies D-Lighting for contrasty scenes), straighten (rotates images +/- five degrees in 0.25 degree increments), distortion (barrel / pincushion) correction, a fisheye effect, color outline, a pencil-like color sketch effect, perspective control (correcting diverging verticals / horizontals), miniature effect (graduated blur at top and bottom of the frame to emulate reduced depth of field), and basic movie editing.
Raw Processing SubMenu. Raw-format files are pretty common on SLRs these days: They capture all the data as it comes from the sensor, usually without any processing applied. Manipulated on a computer with Raw-processing software, they let you make major white balance adjustments, minor exposure tweaks, and perform noise-reduction processing beyond what the camera can manage on its own. Like many of their other high-end SLRs, the Nikon D7000 also lets you do this sort of processing right in the camera, via a sub-menu off the Retouch Menu.
|
Nikon in-camera Raw processing
|
|
 |
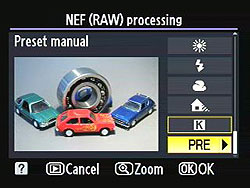 |
Here's a screenshot from our D300s review |
Changing to a manual white balance setting lets us make a fresh JPEG with good color. |
As seen in the screen shots above from our D300s, Nikon's in-camera Raw processing menu gives you a lot of options, and the D7000 adds one more. As well as letting you change the JPEG quality, image size, white balance, exposure compensation (within +/-2 EV limits), Picture Control setting, High ISO noise reduction, and color space of a file, you can now adjust D-Lighting in three steps, or disable it together, before generating a new JPEG. (The original Raw file itself and any JPEG is left untouched; a new file is created.) This can be pretty handy if you need to make a quick change to white balance or minor exposure tweak in the field, before uploading an image to beat a deadline.
The images above were taken from our standardized test shots. For a collection of more pictorial photos, see our Nikon D7000 Photo Gallery .
Not sure which camera to buy? Let your eyes be the ultimate judge! Visit our Comparometer(tm) to compare images from the Nikon D7000 with those from other cameras you may be considering. The proof is in the pictures, so let your own eyes decide which you like best!
 Fujifilm GFX 50S Review
 Fujifilm X-T3 Review
 Olympus E-M5 III Review

Follow Imaging Resource