Canon EOS 5D Mark II Operation
The Canon EOS 5D Mark II has an enhanced interface compared to the 5D, with both the traditional monochrome Status LCD, a viewfinder LED display, and a new rear Status display that can be brought up on the 3-inch LCD. A Status display has also been added to Live View mode, including a live histogram.
The control layout has changed compared to the 5D. The top panel buttons have be re-arranged, and have different combinations of assignments. The AF/WB button has become Metering/WB, Drive/ISO has become AF/Drive, and the Metering/Flash Compensation button has become ISO/Flash Compensation. The top panel LCD backlight button has also been moved from the top-left to the top-right of the top panel LCD. The Exposure Mode dial adds a new Creative Auto setting, as well as two additional Custom settings. (See the Modes & Menus tab for more details on exposure modes.) The rear-panel controls have been rearranged to make room for the larger LCD, and one button has been added. The Jump button has been removed to make room for a Picture Style button, the Print/Share button now also serves as a Live View button, a new AF-ON button is provided for starting autofocus without the use of the shutter button, and the Delete button has been moved from below the LCD to the left-hand side. See the Design tab for more details on control placement and function.
Canon EOS 5D Mark II Top-Panel LCD Display
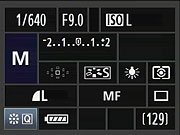
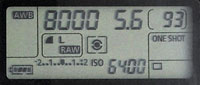 The Canon 5D Mark II features a top-panel LCD display, which reports practically all of the camera's main exposure and menu settings. The display is black and white, and only shows the settings that are applicable during use, though the illustration below shows the full range of settings that can appear. (Illustration courtesy Canon USA.) There is a backlight button to the top-right of the display for viewing the LCD in dark conditions.
New for the 5D Mark II compared to the 5D are the enhanced Battery Check display (with four segments and six levels instead of just two segments and four levels), Highlight Tone Priority icon, ISO Speed display, IR Remote Control and two-second Self-Timer icons.
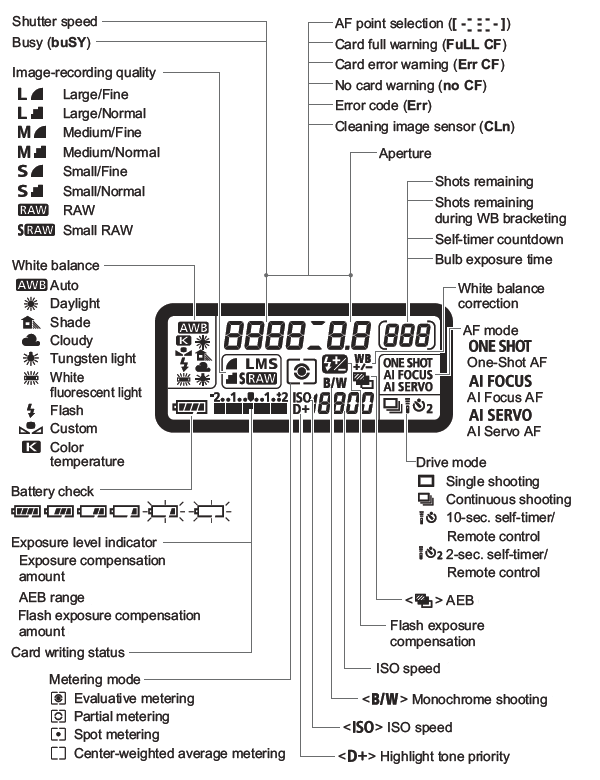
Canon EOS 5D Mark II Record Mode Displays
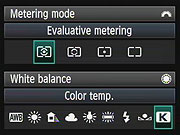
When the INFO button is pressed, the 5D Mark II's rear-panel LCD monitor also offers a status display, similar to ones found on models without a top status LCD. The image below shows callouts for all the information shown in this shooting display. (Illustration courtesy Canon USA.)
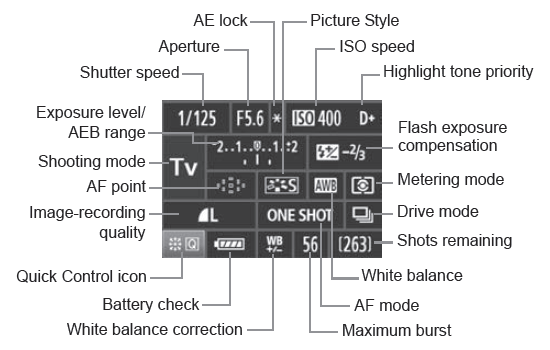
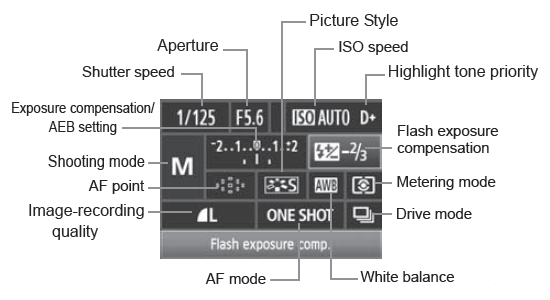
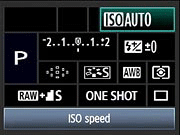
The 5D Mark II also has the ability to adjust settings directly from this display using the Multi-controller joystick. The image below shows callouts for the "Quick Menu," as Canon calls it. (Illustration courtesy Canon USA.)
| Canon EOS 5D Mark II Record Displays | ||
 |
 |
 |
|
Record mode display is activated with a press of the INFO button, and is deactivated when you press the shutter button halfway.
|
Pressing the INFO button turns the display into a quick menu, where the displayed settings can be selected with the Multi-controller, and adjusted directly with the Quick control dial.
|
You can also use the SET button, which displays the dedicated menu for a function.
|
Additionally, the EOS 5D Mark II's rear-panel LCD monitor can be used as a viewfinder, via the camera's Live View mode (see the Viewfinder tab). A sampling of exposure information appears on-screen, and if the Exposure Simulation option is enabled, the image display reflects what the expected exposure outcome will be. An optional histogram can display, but unfortunately it isn't translucent, completely blocking that upper right quadrant.
Canon EOS 5D Mark II Playback Mode Displays
The display mode used in Record Review is the same as was last used in Playback mode, or you can hit the DISP button to cycle to a different mode. Likewise, in Playback mode, you can cycle between the available display options by pressing the DISP button repeatedly. You can also select between the normal luminance-based histogram and the new RGB histogram option via a Playback-mode menu item.
| Canon EOS 5D Mark II Playback Displays | ||
 |
 |
 |
|
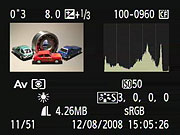
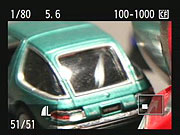
Normal playback mode display, shows shutter speed, aperture and file number; pressing the INFO button adds the frame number and image size/quality.
|
Pressing the INFO button a second time cycles through several displays including a screen with one luminance histogram.
|
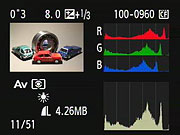
A third press brings up another display with both an RGB and a luminance histogram.
|
 |
 |
 |
|
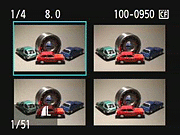
You can zoom out to thumbnail views, the standard display moving through screens with 4-up, 9-up, and 9-up with the ability to jump through images on the card 9 at a time by turning the Main command dial.
|
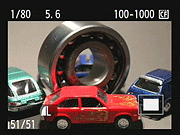
There's the usual ability to zoom in on the subject, with the location of the current zoomed view within the full frame shown in the little navigator window in the lower right.
|
We like that you can step between images while maintaining the zoomed display. This makes it easy to compare focus or other fine details from one shot to the next.
|
 Fujifilm GFX 50S Review
 Fujifilm X-T3 Review
 Olympus E-M5 III Review

Follow Imaging Resource