Canon EOS 60D Operation
The Canon EOS 60D retains the enthusiast-friendly interface like that of the preceding 40D and 50D models, with traditional monochrome Status LCD and viewfinder LED displays, plus a Status display that can be brought up on the 3-inch rear-panel LCD. Finally, Live View mode also has a Status display, including a live histogram.
The control layout has changed significantly since the 40D. Perhaps most significantly, the tiny rear-panel multi-controller joystick is gone, with its functionality instead integrated into an expanded control dial cluster. This now comprises three controls in one area. The outer, rotating ring serves as a Quick Control dial, inside which are nested an eight-way Multi-controller, and a central Set button. The combination is significantly easier to use than the tiny, fiddly joystick of previous models. Accommodating these new controls, as well as the tilt/swivel LCD panel assembly, many other controls have moved around the camera body, and a number of new ones have been added. The Power switch now resides under the Control dial, which adds a central locking button to prevent accidental mode changes. The Delete button has been moved directly beneath these. On the top deck, there's now an extra button in front of the status LCD, and all the buttons in this row are now single-purpose: autofocus, drive, ISO, metering, and info display illumination. On the rear of the camera, the Live View / Movie button is now easy to access with a thumb, to the right of the viewfinder. To the right of the LCD, and above the Quick Control dial, are the Menu and Info buttons, along with a new Quick Control button. Beneath the dial, there's the Playback button, and a new Unlock button that also serves duty as a Direct Print button.
Canon EOS 60D Top-Panel LCD Display
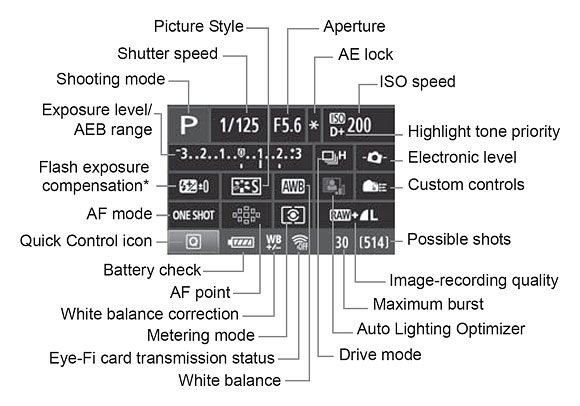
 The Canon 60D features a top-panel LCD display, which reports most of the camera's main exposure and menu settings. The display is black and white, and only shows the settings that are applicable during use, though the illustration below shows the full range of settings that can appear. (Illustration courtesy Canon USA.)
Note that compared to the 50D, both file formats and white balance modes have been removed from this display, along with the indication of whether camera sounds are enabled. There aren't any added icons on the display, but the 60D can now show the new single-axis electronic level using the same portion of the LCD display that's ordinarily used as an exposure level indicator.

Canon EOS 60D Record Mode Displays
When the INFO button is pressed, the 60D's rear panel LCD monitor also offers a status display, similar to ones found on models without a top status LCD. Like the 50D, this display allows you to adjust settings directly from this display using the Multi-controller and control dials, although you must now press the Quick Control button first. The image below shows callouts for all the information shown in this shooting display. (Illustration courtesy Canon USA.)
| Canon EOS 60D Record Displays | |
 |
 |
Pressing the Info button once enables the normal record mode display. |
Pressing it a second time turns the display into a single-axis level, which indicates roll around the central axis of the lens. When the camera is perfectly level in portrait or landscape orientation, the horizon line turns green. |
 |
 |
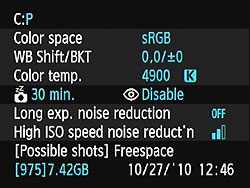
Pressing the Info button for a third time switches to a shooting settings display, summarizing common exposure variables. |
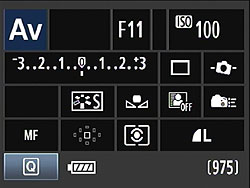
Regardless of which display mode you're currently using (and even when the LCD display is switched off altogether), pressing the Quick Control button turns the display into an interactive Quick Control screen. With the exception of the bottom line, which identifies the current selection, the layout is identical to that of the shooting settings display. The Multi-controller is used to switch between items, and the values for most can be adjusted directly with either control dial. You can also press the SET button to display the dedicated menu for the currently selected item. |
Additionally, the EOS 60D's rear-panel LCD monitor can be used as a viewfinder, via the camera's Live View mode (see the Live View tab). A sampling of exposure information appears on-screen, and if the Exposure Simulation option is enabled, the image display reflects what the expected exposure outcome will be. An optional histogram can be overlaid in the upper right corner of the screen.
Canon EOS 60D Playback Mode Displays
The display mode used in Record Review is the same as was last used in Playback mode, or you can hit the DISP button to cycle to a different mode. Likewise, in Playback mode, you can cycle between the available display options by pressing the DISP button repeatedly. You can also select between the normal luminance-based histogram and the new RGB histogram option via a Playback-mode menu item.
| Canon EOS 60D Playback Displays | |
 |
 |
This is the default display in playback mode. The file number is displayed upper right, the shutter speed, aperture, and exposure compensation (if applicable) in the upper left, and the file sequence number are shown below left. |
Pressing the Info button cycles through the four available displays. The second display option shows a histogram and more detailed exposure information. A setting in Playback Menu 2 lets you choose between a conventional luminance-only histogram (as shown above), or separate red, green, and blue channel histograms.
|
 |
 |
The third playback display option shows both RGB and luminance histograms side by side, along with an intermediate level of exposure information. |
The final playback display option shows the image with no overlay. In the screenshot above we've enabled the blinking highlight warning, but it isn't limited solely to this display mode. It's probably most useful here, where the preview is as large as possible, and isn't obscured by overlays, but it can also be activated in any of the other display modes. |
 |
 |
If you press the Zoom Out button while viewing a single image on the LCD screen, it'll take you first to a 4-image thumbnail display, and then to a 9-image one, if you press it once again. The arrow keys let you navigate among the thumbnail images. It's not shown here, but by pressing the DISP button in this mode, you can toggle an overlay with data for the currently-selected image. Contents are the same as for the default single image display, showing image size/quality and file numbers. |
You can also zoom in on an image, up to 10x at the highest resolution. The small navigator window in the lower right-hand corner shows you what part of the larger image you're currently viewing. The Multi-controller lets you navigate around the full image, and the zoom in / zoom out keys increase or decrease the magnification level. We like that you can step between images while maintaining the zoomed display. This makes it easy to compare focus or other fine details from one shot to the next. |
 |
 |
By turning the Main dial on the Canon 60D in Playback mode, you can "jump" through images in a variety of ways. An option on the Playback menu sets options of jumping through images 1, 10, or 100 images at a time, between shots captured on different dates or stored in different folders, between groups of movies, or groups of still shots. You can also jump between images by rating, either viewing only rated images, only unrated images, or only those with a specific rating. The jump menu setting only applies when you're in single-image playback mode. In thumbnail display mode, the Main Dial always jumps ahead one screen of thumbnails at a time, regardless of the menu setting for the Jump option. |
Images are rated from the Rating option in Playback Menu 2. The Quick Control steps through images one at a time, and the Main Dial as configured in the previous menu. The rating for each image is selected with the Multi-controller, and a count of the number of images with each rating is shown across the top of the screen. The rating is stored in the EXIF header of each image, and can also be viewed with compatible software on your computer. |
 |
 |
The Canon 60D offers a fairly robust slide show function, which allows a predefined time per slide from one to 20 seconds, and a choice of three optional transition effects. As well as including all images, t's possible to limit slideshow playback to just stills or movies, just a specific date or folder, and just images with a specific rating. |
Pressing the Delete button in playback mode lets you delete the currently displayed image. If you want to erase multiple images at once, though, you can do so through Playback Menu 1. |
 |
 |
For those who like to print their images without using a computer, the Canon 60D can set up DPOF print orders on the memory card. You can select the usual options -- number of prints for each image, whether to overlay the date and file number on each print, etc. |
The Canon 60D also includes several filter effects that can be applied to images post-capture, each offering a small amount of control over the look of the effect. These include Grainy B/W, Soft Focus, Toy Camera Effect, and Miniature Effect. |
 |
 |
You can downsample images in-camera, using the Resize option. It's not possible to interpolate larger images from smaller ones in-camera, however. |
Like many of its competitors, the Canon 60D includes the ability to process Raw files in-camera, creating a JPEG image with your choice of settings. |
 Fujifilm GFX 50S Review
 Fujifilm X-T3 Review
 Olympus E-M5 III Review

Follow Imaging Resource