Olympus E-PL2 Exposure
Olympus E-PL2 Capture Modes
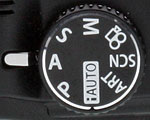 When powered on, the camera is automatically placed into Record mode. The Exposure Mode dial on top of the camera sets the main shooting mode, with the following options:
 Program AE (Program Shift): This mode places the camera in control over both aperture and shutter speed, while the user has access to all other menu functions. Pressing the Exposure Compensation (Up Arrow) button once readies the camera for Program Shift mode, indicated by a Ps icon on the LCD display or EVF. Subsequent Up or Down arrow presses step through a range of equivalent exposure settings, while Left or Right arrow presses adjust exposure compensation. Program Shift is cleared by adjusting the exposure back to the values originally selected by the camera.
 Aperture Priority: Puts the user in control of the aperture setting while the camera selects the best shutter speed. (The aperture range varies with the lens in use.)
 Shutter Priority: The opposite of Aperture Priority, this mode allows the user to set the shutter speed, from 1/4,000 to 60 seconds, while the camera selects the most appropriate aperture setting.
 Manual: Provides complete user control over the exposure, including both aperture and shutter speed settings. A Bulb shutter setting also becomes available in this mode, allowing variable length exposures for as long as you hold down the shutter button, up to a maximum of 30 minutes.
 Movie Mode: Used for shooting HD (1,280 x 720) or SD (640 x 480) movies at 30 frames per second with monaural sound (unless using the optional stereo microphone jack adapter). A menu allows Program, Aperture Priority or Manual modes to be used, as well as the one of the six available Art Filters. Most of the art filters reduce the capture frame rate, causing the live preview and captured video to appear jerky. The Diorama art filter is particularly strongly affected, and curiously, is played back at roughly 15x realtime speed. Hence audio recording is disabled when using this filter.
 Scene Mode:This mode provides access to the 19 preset shooting modes via a scene menu. Scene modes available are: Portrait, e-Portrait, Landscape, Landscape + Portrait, Sport, Night Scene, Night + Portrait, Children, High Key, Low Key, DIS Mode, Macro, Nature Macro, Candle, Sunset, Documents, Panorama, Fireworks, and Beach & Snow. Three additional settings are available for optional Fisheye, Wide-angle, and Macro accessory lenses.
 Art Filters: This mode accesses the six available Art Filter modes: Pop Art, Soft Focus, Grainy Film, Pin Hole, Diorama and Dramatic Tone. As in movie-mode, frame rate is adversely impacted when using most art filters, and the diorama effect in particular causes a very slow refresh rate for live view.
 Intelligent Auto: This mode gives the camera control over most exposure variables: The Olympus E-PL2 analyses the scene and automatically selects from Portrait, Landscape, Macro, Sports, Night Scene, and Night Scene Portrait exposure modes. The user can still adjust image resolution / compression, aspect ratio, drive mode, image stabilizer, focus mode / point, and whether the flash should fire automatically, or be suppressed
A Live Guide function accessed by pressing the Start / OK button allows 15-step control over saturation, hue, brightness, aperture, and shutter speed -- all accomplished with vertical sliders and "friendlier" terminology. For example, instead of Aperture, we have a "Blur Background" slider, labeled "Blur" at the top, and "Sharp" at the bottom. There's also a separate section of Shooting Tips, with advice on how to capture attractive images.
 Movie Record Button: Pressing this dedicated movie record button will start and stop movie recording. Confusingly, in all but two exposure modes, the movies will be recorded using Program autoexposure, regardless of what modes are currently selected on the Mode dial, and in the Custom menu's Movie Mode setting. The sole exceptions are the Art Filter and Movie mode positions on the Mode dial. In the Art Filter mode, the movie will be recorded with the same art filter type as used for still images, overriding the Custom menu Movie Mode setting. In Movie mode, the custom menu setting will determine which exposure mode to use. The Movie Record button can be enabled or disabled, or used for something other than movie recording, via a Custom menu setting. (It's also possible to use the Function button as a Movie Record button, if the function of the Movie Record button itself has been changed.) If the Movie Record button is disabled and movie recording not assigned to the Function button instead, then the Shutter Release button initiates movie recording in the PL2's Movie mode, and movie recording becomes impossible in all other modes.
In Playback mode, the Movie Record button serves as a dedicated Protect button, marking images to be protected from deletion, or clearing the protection marker. (This doesn't protect images from deletion if the flash card is formatted, however.)
 Playback Mode: The Playback button on the rear panel accesses Playback mode, where you can review captured images. The left and right arrow keys scroll forward and backward one image at a time, while the up and down keys scroll ten images at a time. You can enlarge captured images or display them in an index format for quick viewing. It's also possible to convert Raw images to JPEGs, perform basic editing functions such as cropping and red-eye fix, view a slideshow, and protect or delete images.
Olympus E-PL2 Metering
| Metering, Exposure compensation, and Bracketing | |
 |
 |
|
Metering. In the default Digital ESP setting, the Olympus E-PL2 uses a 324 segment meter. Available metering options are Auto, Center-Weighted, Spot, Spot HI (highlights), and Spot SH (shadows). The latter two modes, bias toward bright and dark images, respectively.
|
Metering options can also be set more quickly with the Live Control Menu (above) or the optional Super Control Panel.
|
 |
 |
|
EV Compensation. Pressing the top button on the four-way controller activates the EV area of the screen, and left and right arrows adjust the compensation up and down, while the onscreen display changes to show the difference.
|
EV compensation can be previewed live by pressing the Info button repeatedly until the multi-view display appears. Toggling left and right moves through +/- 3 stops of compensation.
|
 |
 |
|
Tone control is a surprisingly obscure option for a consumer camera, one that allows you to brighten or darken highlights and shadows. First pressing the EV button, followed by a first and second press of the Info button, you access a very small curves box that can be adjusted in seven steps in either direction.
|
Exposure bracketing allows capture of from 2 to 7 images in 0.3, 0.5, or 1 EV units. Also available are White balance, Flash, and ISO bracketing.
|
Olympus E-PL2 White Balance
| White balance options | |
 |
 |
|
White balance options include Auto, Sunny, Shadow, Cloudy, Incandescent (Tungsten), Fluorescent 1, Fluorescent 2, Fluorescent 3, Flash, One-Touch, and Custom, to accommodate a variety of lighting situations. You can also adjust the white balance, controlling the amount of amber-blue and green-magenta bias in the color balance, in any of the selected modes, in +/- 7 steps.
|
White balance can also be adjusted in the Super Control Menu or the Live Control Menu. You can also set the Fn button to activate One-Touch White Balance. Just aim the camera at something white and press the shutter button while holding the function button, and Custom White Balance records a new setting.
|
 |
 |
|
The user can also specify a color temperature using the Kelvin temperature scale, from 2,000K to 14,000K.
|
The E-PL2 also features white balance bracketing. If activated, the camera will write three separate images for each press of the shutter button, either biasing between amber and blue or green and magenta. You can set the images to vary by two, four, or six arbitrary adjustment steps.
|
Olympus E-PL2 ISO Sensitivity
| ISO and noise reduction options | |
 |
 |
|
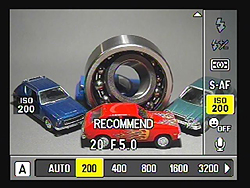
The Olympus E-PL2 lets you adjust its light sensitivity in either 1 or 1/3 EV steps, within a range of ISO 200 to 6,400 ISO equivalents. There's also an Auto mode in which the camera selects an ISO sensitivity automatically.
|
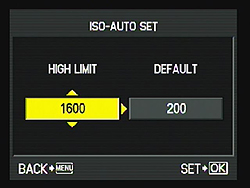
To keep noise and shutter speeds inside your desired range, you can set both maximum and minimum ISO limits for the Auto mode, within a range of 200 to 6,400.
|
 |
 |
|
Noise Reduction reduces noise in long exposures by capturing a second exposure containing only the dark current noise, then subtracting this from the image.
|
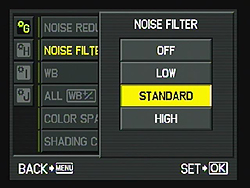
The E-PL2's Custom menu offers a variable high-ISO noise reduction function with options of either Off, Low, Standard, or High.
|
Olympus E-PL2 Picture modes
| Picture modes and PASM Art filters | |
 |
 |
|
As well as Vivid, Natural, Muted, Portrait, Monotone, and Custom options, there's the i-Enhance option that automatically detects the main subject in any scene, then boosts brightness and saturation to draw your attention to the subject. Each mode can be adjusted to tweak Contrast, Sharpness, and Saturation, as well as apply color filters to the Monotone setting.
|
Though the six Art filters are available in Auto mode via the Mode dial, you can also apply them to PASM modes through the same Picture mode menu item, or via the Exposure mode Live Control menu item in Movie mode (not shown).
|
Olympus E-PL2 Multiple exposure mode
| Multiple exposure modes | |
 |
 |
|
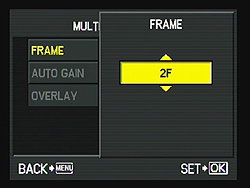
The Olympus E-PL2 supports multiple exposures overlaid as one image. You can overlay two subsequent images while they are being taken and save the result as a JPEG or Raw file.
|
By enabling the Auto Gain feature, the camera can automatically adjust the gain so that the resulting image is averaged from the source images. The result is additive if auto gain is left disabled.
|
 |
 |
|
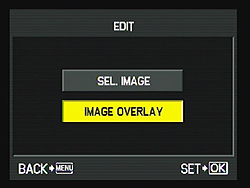
The E-PL2 offers one further method of creating multiple exposures through its Playback menu Image Overlay function.
|
This allows selection of either two or three Raw images which are then combined into a single image, which is saved as a new Raw file.
|
Olympus E-PL2 Other items
| Other details | |
 |
 |
|
Drive modes offered include Single, Sequential, 12 second self-timer, 2 second self-timer, 2 second Anti-shock self-timer, 12 second Anti-shock self-timer, Sequential Anti-shock, Single Anti-shock. (Anti-shock activates the first curtain before the exposure to reduce shake.)
|
Toggling the up and down arrows while in the Multi-view display mode changes to the White Balance preview mode, where you can see how all of the standard presets and your custom setting, would look with the current lighting.
|
 |
|
|
The E-PL2 has Shading Compensation to reduce vignetting in the corners. It's not clear whether the camera applies fixed compensation based on lens type, or by analyzing the actual light fall-off in the corners of captured images.
|
|
The images above were taken from our standardized test shots. For a collection of more pictorial photos, see our Olympus PEN E-PL2 Photo Gallery .
Not sure which camera to buy? Let your eyes be the ultimate judge! Visit our Comparometer(tm) to compare images from the Olympus PEN E-PL2 with those from other cameras you may be considering. The proof is in the pictures, so let your own eyes decide which you like best!
 Fujifilm GFX 50S Review
 Fujifilm X-T3 Review
 Olympus E-M5 III Review

Follow Imaging Resource