 Sony NEX-C3 Operation
Sony NEX-C3 Capture Mode
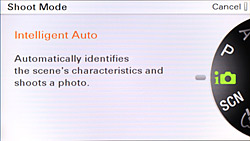
When powered on, the camera is automatically placed into Record mode. The main shooting mode is selected from the Shoot Mode menu, accessed by pressing the Soft key in the center of the Control wheel, except when in Intelligent Auto mode -- in which case it's accessed from the main menu. The Shoot Mode menu offers the following options:
Program AE. Lacks a Program Shift function, so you're limited to whatever aperture / shutter speed combination the camera chooses. |
|
Aperture Priority. |
|
Shutter Priority. Shutter speeds range from 1/4,000 to 30 seconds. |
|
Manual. Includes Bulb mode. |
|
3D Sweep Panorama. Captures a burst of images while the shutter button is held down, then creates separate left and right views in-camera, and saves the result as a panoramic .MPO file. |
|
Sweep Panorama. Similar to 3D Sweep Pano, but creates a single panoramic view in JPEG format. |
|
Anti Motion Blur. Stacks multiple images in-camera to reduce noise, allowing higher sensitivity and faster shutter speeds. |
|
Picture Effect. Options are Posterization (Color or B/W), Pop Color, Retro Photo, Partial Color (Red, Green, Blue, or Yellow), High-key, High Contrast Monochrome, and Toy. |
|
Scene Selection. Options are: Portrait, Landscape, Macro, Sports Action, Sunset, Night Portrait, Night View, and Hand-held Twilight. |
|
Intelligent Auto. Recognized scene types include Night View, Tripod Night View, Night Portrait, Backlight, Backlight Portrait, Portrait, Landscape, and Macro. |
 Movie Record Button: Pressing the dedicated movie record button on the camera's top panel will start and stop movie recording -- even if the NEX-C3 is in Playback mode or a menu.
Movies are recorded using
Program exposure and multi-segment metering, regardless of what modes are currently selected in the
camera's menu system. Exposure compensation is available both before and during movie capture, and stereo audio recording can also be enabled or disabled.
Movie Record Button: Pressing the dedicated movie record button on the camera's top panel will start and stop movie recording -- even if the NEX-C3 is in Playback mode or a menu.
Movies are recorded using
Program exposure and multi-segment metering, regardless of what modes are currently selected in the
camera's menu system. Exposure compensation is available both before and during movie capture, and stereo audio recording can also be enabled or disabled.
 Playback Mode: The Playback button on the top panel accesses the NEX-C3's Playback mode, which retains the unusual design from past models that allows you to review either captured still images, or movies. but not both side by side. The left and right arrow keys scroll forward and backward one image or movie at a time, and turning the Control dial has the same effect. The Up arrow key cycles through the various display modes -- image only, image plus basic information, and RGBY histogram with detailed information, of which only the first two modes are available in movie playback. Using the control dial and its center soft key, you can enlarge captured still images by as much as 11.8x, while the arrow keys pan around the zoomed image. Panoramic images can be automatically scrolled across the screen by pressing the soft key, and paused with a second press. The same controls are used to play, pause, and cue through movie files. By pressing the down arrow key, the NEX-C3 can also display images or movies in an index format for quick viewing, with either six or twelve thumbnails per page. The index includes tabs on the left hand side with which to switch between still image or movie playback, and this can also be done through a Playback menu option. The NEX-C3 also remembers whether you captured a still image or movie most recently, and defaults to entering the Playback type relevant to the last image or movie capture performed.
Sony NEX-C3 Menus
Pressing the Menu button provides access to the camera's full menu system. The following options are available in most camera modes, through five submenus accessed from a graphical menu index which also links to the Shoot Mode screen described previously:
Camera Menu 1:
| Camera Menu Options: | |||
Top-Level Selection |
Second-Level |
Notes |
|
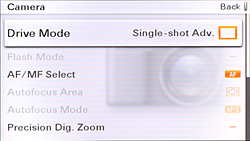
Drive Mode |
- Single-shot Adv. - Continuous Adv. - Speed Priority Cont. |
||
- Self-timer |
- 10 sec - 2 sec |
||
Self-timer - (Cont.) |
- 10 sec. 5 Img. (C5) - 10 sec. 3 Img. (C3) |
||
- Bracket: Cont. |
- 0.3EV - 0.7EV |
||
Flash Mode |
- Fill-flash - Slow Sync. - Rear Sync. - Flash Off - Autoflash |
||
AF / MF Select |
- Autofocus - Direct manual focus (DMF) - Manual focus |
Direct manual focus allows manual focus adjustment after the autofocus cycle has completed. |
|
Autofocus Area |
- Multi - Center |
||
- Flexible Spot |
- Spot positioning screen |
||
Autofocus Mode |
- Single-shot AF - Continuous AF |
||
Precision Dig. Zoom |
- Off - 1.1x - 10.0x |
||
Camera Menu 2:
| Camera Menu Options: | |||
Top-Level Selection |
Second-Level |
Notes |
|
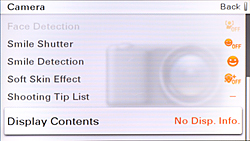
Face Detection |
- Off |
||
Smile Shutter |
- On - Off |
||
Smile Detection |
- Big Smile - Normal Smile - Slight Smile |
||
Soft Skin Effect |
- High - Mid - Low - Off |
||
Shooting Tip List |
- Shooting tips summary |
See the shooting tips list at the end of this page for more detail. |
|
Display Contents |
- Disp. Basic Info - Display Info. - No Disp. Info. |
Even when set to No Display Info, the soft control functions are still shown on the LCD panel. |
|
Image Size Menu 1:

| Image Size Menu Options: | |||
Top-Level Selection |
Second-Level |
Third-Level |
Notes |
Still |
- Image Size |
- L (16M) - M (8.4M) - S (4.0M) |
|
- Aspect Ratio |
- 3:2 - 16:9 |
Image sensor's native aspect ratio is 3:2. |
|
- Quality |
- RAW - RAW & JPEG - Fine - Standard |
When RAW images are being captured, image size is always set to Large. When shooting in RAW & JPEG mode, JPEG quality is fixed at Fine. |
|
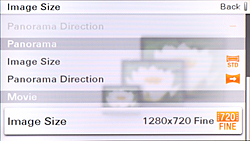
3D Panorama |
- Image Size |
- 16:9 - Standard - Wide |
|
Image Size Menu 2:
| Image Size Menu Options: | |||
Top-Level Selection |
Second-Level |
Third-Level |
Notes |
3D Panorama |
- Panorama Direction |
- Right - Left |
|
Panorama |
- Image Size |
- Standard - Wide |
|
- Panorama Direction |
- Right - Left - Up - Down |
||
Movie |
- Image Size |
- 1280 x 720 Fine - 1280 x 720 Std. - VGA |
|
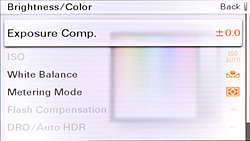
Brightness / Color Menu 1:
| Brightness / Color Menu Options: | |||
Top-Level Selection |
Second-Level |
Third-Level |
Notes |
|
Exposure Comp.
|
- +/- 2.0EV in 0.3EV steps
|
|
|
|
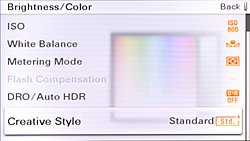
ISO
|
- ISO Auto
- ISO 200 - ISO 400 - ISO 800 - ISO 1600 - ISO 3200 - ISO 6400 - ISO 12800 |
|
|
|
White Balance
|
- Auto WB (AWB)
|
|
|
|
- Daylight
- Shade - Cloudy - Incandescent |
- -3 to +3
|
||
- Fluorescent
|
- -1 to +2
|
||
- Flash
|
- -3 to +3
|
||
- C. Temp / Filter
|
- 2500k - 9900K
- Color filter: Magenta (nine steps) to Green (nine steps) |
||
- Custom
|
|
||
- Custom Setup
|
- Press shutter button to capture data of central area of screen.
|
||
Metering Mode
|
- Multi
- Center - Spot |
|
|
Flash Compensation
|
- +/- 2.0EV in 0.3EV steps
|
|
|
|
DRO / Auto HDR
|
- Dynamic Range Optimizer (DRO)
|
- Auto
- Level 1 (Lv1) - Level 2 (Lv2) - Level 3 (Lv3) - Level 4 (Lv4) - Level 5 (Lv5) |
|
- Exposure Diff. (HDR)
|
- Auto |
||
- D-R Off
|
|||
Brightness / Color Menu 2:
| Brightness / Color Menu Options: | |||
Top-Level Selection |
Second-Level |
Third-Level |
Notes |
|
Creative Style
|
- Standard
- Vivid - Portrait - Landscape - Sunset |
- Contrast (-3 to +3)
- Saturation (-3 to +3) - Sharpness )-3 to +3) |
|
- B/W
|
- Contrast (-3 to +3)
- Sharpness )-3 to +3) |
||
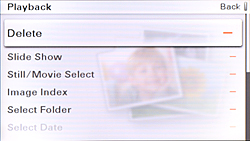
Playback Menu 1:
| Playback Menu Options: | |||
|
Top-Level
Selection |
Second-Level
|
Third-Level
|
Notes
|
|
Delete
|
- Multiple Img.
- All in Folder |
- Select image(s) to delete |
|
- All in Folder |
- Delete all images in this folder? |
||
Slide Show |
- Repeat
|
- On
- Off |
|
- Interval |
- 1 Sec. - 3 Sec. - 5 Sec. - 10 Sec. - 30 Sec. |
||
- Image Type |
- All - Display 3D Only |
||
Still / Movie Select |
- Still
- Movie |
The NEX-C3 retain's Sony's bizarre playback interface, which completely separates still images from movies. You can't browse directly from a still image to a movie, nor view thumbnails or slideshows containing both still images and movies at once. This option selects whether the NEX-C3 should display still images or movies in Playback mode. The change can also be accomplished by going to thumbnail mode, and then switching between the still image and movie tabs. |
|
Image Index |
- 6 Images - 12 Images |
||
Select Folder |
- Folder list |
Applies to still images only. |
|
Select Date
|
- Date list
|
Applies to movies only.
|
|
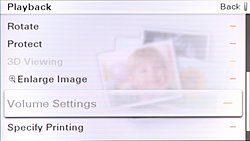
Playback Menu 2:
| Playback Menu Options: | |||
|
Top-Level
Selection |
Second-Level
|
Third-Level
|
Notes
|
Rotate |
- Select image(s) to rotate |
||
Protect |
- Multiple Img. |
- Select image(s) to protect
|
|
- Cancel All Images |
- Cancel protection for all still images? |
||
- Cancel All Movies |
- Cancel protection for all movies? |
||
3D Viewing |
Disabled unless connected to a 3D-compatible TV |
||
Enlarge Image |
- Enlarged view of current image
|
Applies to still images only. |
|
|
Volume Settings
|
- 7 |
||
|
Specify Printing
|
- DPOF Setup
|
- Multiple Img. - Cancel All |
|
- Date Imprint |
- On - Off |
||
Playback Menu 3:
| Playback Menu Options: | |||
|
Top-Level
Selection |
Second-Level
|
Third-Level
|
Notes
|
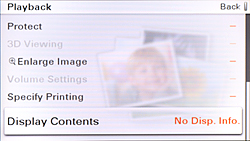
Display Contents |
- Display Info. - Histogram - No Disp. Info. |
Even when set to No Display Info, the soft control functions are still shown on the LCD panel. |
|
Setup Menu 1:
| Setup Menu Options | |||
|
Top-Level Selection |
Second-Level |
Third-Level |
Notes |
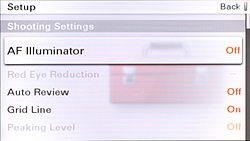
AF Illuminator
|
- Auto
- Off |
|
|
Red Eye Reduction
|
- On
- Off |
|
|
|
Auto Review
|
- 10 Sec
- 5 Sec - 2 Sec - Off |
|
|
|
Grid Line
|
- On
- Off |
|
|
Peaking Level |
- High - Mid - Low - Off |
Overlays a solid color on areas of highest contrast, helping to fine-tune manual focus. |
|
Setup Menu 2:
| Setup Menu Options | |||
|
Top-Level Selection |
Second-Level |
Third-Level |
Notes |
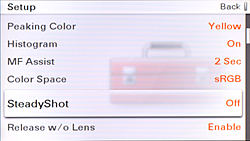
Peaking Color |
- White - Red - Yellow |
||
|
Histogram
|
- On
- Off |
|
|
|
MF Assist
|
- No Limit
- 5 Sec - 2 Sec - Off |
|
|
|
Color Space
|
- sRGB
- AdobeRGB |
|
|
|
SteadyShot
|
- On
- Off |
|
Enables or disables lens-based image stabilization, if available.
|
|
Release w/o Lens
|
- Enable
- Disable |
|
Enables or disables image capture without a lens attached.
|
Setup Menu 3:
| Setup Menu Options | |||
|
Top-Level Selection |
Second-Level |
Third-Level |
Notes |
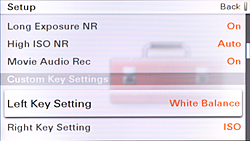
Long Exposure NR
|
- On
- Off |
Doubles the time taken to capture each image.
|
|
High ISO NR
|
- Auto
- Weak |
High ISO noise reduction cannot be disabled altogether.
|
|
Movie Audio Rec.
|
- On
- Off |
||
Left Key Setting |
- Shoot Mode - Shoot. Tips - Drive Mode - AF/MF Select - Autofocus Mode - Autofocus Area - Prec. Dig. Zoom - ISO - White Balance - Metering Mode - DRO / Auto HDR - Creative Style - Flash Mode - Flash Comp. - MF Assist - Not set |
||
Right Key Setting |
|||
Setup Menu 4:
| Setup Menu Options | |||
|
Top-Level Selection |
Second-Level |
Third-Level |
Notes |
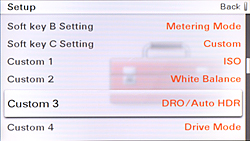
Soft Key B Setting |
- Shoot Mode - Shoot. Tips - Drive Mode - AF/MF Select - Autofocus Mode - Prec. Dig. Zoom - ISO - White Balance - Metering Mode - DRO / Auto HDR - Creative Style - Flash Mode - Flash Comp. - MF Assist |
||
Soft Key C Setting |
- Shoot Mode - Custom |
||
Custom 1 |
- Drive Mode - AF/MF Select - Autofocus Mode - Autofocus Area - ISO - White Balance - Metering Mode - DRO / Auto HDR - Creative Style - Flash Mode - Not set |
||
Custom 2 |
|||
Custom 3 |
|||
Custom 4 |
|||
Setup Menu 5:
| Setup Menu Options | |||
|
Top-Level Selection |
Second-Level |
Third-Level |
Notes |
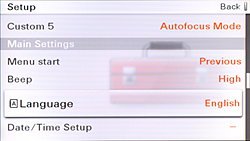
Custom 5 |
- Drive Mode - AF/MF Select - Autofocus Mode - Autofocus Area - ISO - White Balance - Metering Mode - DRO / Auto HDR - Creative Style - Flash Mode - Not set |
||
Menu Start |
- Top - Previous |
||
Beep
|
- AF Sound
- High - Low - Off |
||
Language
|
- English |
Options available will likely vary with the region in which the camera was purchased.
|
|
|
Date / Time Setup
|
Daylight Svg.
|
- On
- Off |
|
Date / Time Input
|
|||
- Date Format
|
- M-D-Y
- Y-M-D - D-M-Y |
||
Setup Menu 6:
| Setup Menu Options | |||
|
Top-Level Selection |
Second-Level |
Third-Level |
Notes |
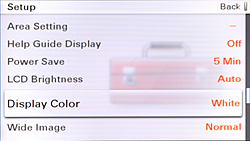
Area Setting |
- Select
|
-Midway Is. / Samoa |
|
- Daylight Svg. |
|||
Help Guide Display
|
- On
- Off |
||
Power Save
|
- 30 Min
- 10 Min - 5 Min - 1 Min |
When connected to a TV, the NEX-C3 ignores this setting and remains powered on for 30 minutes of inactivity.
|
|
LCD Brightness
|
- Brightness
|
- Auto
- Manual - Sunny Weather |
When the optional AC adapter is used, brightness is always set at +2 regardless of this setting.
|
Display Color
|
- Black
- White - Blue - Pink |
Doesn't apply to the Shooting Tips or Scene Selection displays.
|
|
Wide Image
|
- Full Screen
- Normal |
||
Setup Menu 7:
| Setup Menu Options | |||
|
Top-Level Selection |
Second-Level |
Third-Level |
Notes |
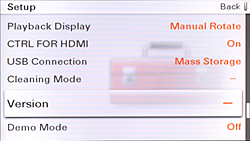
Playback Display
|
- Auto Rotate
- Manual Rotate |
||
Ctrl for HDMI
|
- On
- Off |
||
USB Connection
|
- Mass Storage
- PTP |
When in PTP mode, movies and RAW images cannot be transferred.
|
|
Cleaning Mode
|
After cleaning, turn camera off. Continue?
|
||
Version
|
- Body Version
- Lens / Mount Adapter Version |
||
Demo Mode
|
- On
- Off |
||
Setup Menu 8:
| Setup Menu Options | |||
|
Top-Level Selection |
Second-Level |
Third-Level |
Notes |
Reset Default
|
- Reset Default?
|
||
Format
|
- All data will be deleted. Format?
|
||
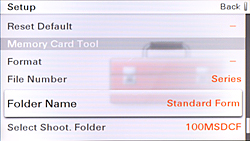
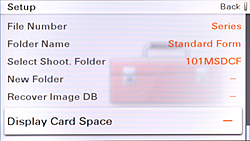
File Number
|
- Series
- Reset |
||
Folder Name
|
- Standard Form
- Date Form |
||
Select Shoot. Folder
|
- Folder List
|
||
Setup Menu 9:
| Setup Menu Options | |||
|
Top-Level Selection |
Second-Level |
Third-Level |
Notes |
New Folder
|
|||
Recover Image DB
|
- Check Image Database File?
|
- Image Database File error. Recover?
- Image Database File error not found. |
|
|
Display Card Space
|
- Still images
- Movie time |
|
|
Shooting Tip List:
| Shooting Tip List Items: | ||
Top-Level |
Second-Level |
Third-Level |
Shooting tips |
||
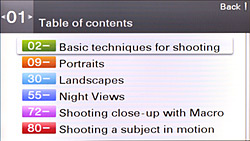
Table of contents |
||
Basic |
- Holding the camera - Position a subject off-center - Vertical or horizontal? - Be aware of light conditions - Avoiding blurred photos - Super-panoramic photos - Capture a moment (movie) |
|
Portrait |
- Basic |
- Defocusing the background |
- Advanced |
- Background defocus control
- Preventing camera shake - Freezing subject motion |
|
Backlight & Portrait |
- Basic |
- Avoiding washed out photos
- Brighter skin tone |
- Advanced |
- Background defocus control - Using a flash - Without flash - In varied brightness |
|
Night & Portrait |
- Basic |
- Buildings in background - Leveling - Preventing red-eye |
- Advanced |
- Brightness of subjects
|
|
Anti Motion Blur |
- Basic |
- Making use of the mode
- Preventing blur |
Landscape |
- Basic |
- Sky: Direction of light
- Buildings - Leveling |
- Advanced |
- Background defocus control
- Super-wide angle - Sky: Brightness - Sky: Saturation - Moving water - Vivid greenery - Vivid colored leaves - Mountains - In/outdoor brightness gap - Vivid landscapes |
|
Backlight |
- Basic |
- Avoiding washed out photos
- Leveling |
- Advanced |
- Background defocus control
- Optimizing gradation |
|
Panoramic |
- Basic |
- Panoramic photos
- Changing the direction - Changing the range |
3D Sweep Pan. |
- Basic |
- 3D sweep panorama
- Landscape suitable for 3D - Changing the direction - Changing the range - Viewing 3D images |
Night View |
- Basic |
- Leveling
|
- Advanced |
- Holding the camera
- Light trails - Fireworks - Twilight - Same scene in 3 brightness - Lighting to the rear |
|
Sunset |
- Advanced |
- Customizing the brightness
- Preventing camera shake - In vivid colors |
Hand-held Twilight |
- Basic |
- Making use of the mode
|
Tripod Night View |
- Basic |
- Leveling
- Preventing blur with timer - Suitable size for 16:9 TV |
- Advanced |
- Background defocus control - Camera in your hand - Flow of stars |
|
Macro |
- Basic |
- Flowers
- Manual focusing |
- Advanced |
- Background defocus control
- Indoor camera shake - Foods - Adjusting colors indoors - Lighting small items - Adjusting brightness |
|
Sports |
- Basic |
- Subjects in motion
- Passing-fast subjects - Fast moving subjects - Catching the best moment |
- Advanced |
- Depicting the motion
|
|
Movie |
- Basic |
- Recording steady movies |
 Fujifilm GFX 50S Review
 Fujifilm X-T3 Review
 Olympus E-M5 III Review

Follow Imaging Resource