Pentax Q Exposure
The Pentax Q offers much the same exposure options you'd expect in an interchangeable-lens camera, plus a few Pentax-specific options. Available exposure modes include Program AE with Program Shift, Manual, Aperture Priority, and Shutter Priority modes, with shutter speeds from 1/2,000 to 30 seconds when using a mechanical shutter, as well as a Bulb setting for exposures as long as 32 seconds. The x-sync speed for external flash photography is 1/250 second with a mechanical shutter, quite a bit faster than average for a compact system camera. With the internal flash, X-sync is possible at 1/2,000 second.
Some Q-mount lenses--specifically, Toy and Fish-eye types--have a fixed aperture and require a completely electronic shutter, however. These offer a range of 1/8,000 to two seconds. It's also possible to achieve the same fastest shutter speed by using an electronic shutter, even for a lens that includes an in-lens shutter. Given the lack of a variable aperture, Program Shift and Priority shooting aren't available with these lenses, although shutter speed can be biased by adjusting the ISO sensitivity. (You can't, however, simply roll the E-dial to select your chosen shutter speed and have the Pentax Q select the ISO speed automatically -- instead, you have to manually adjust the sensitivity to achieve your desired shutter speed.) X-sync with an electronic shutter is extremely slow, at just 1/13 second.
A full Auto mode enables Scene Detection, and places the camera in control of the main exposure variables, although functions such as ISO sensitivity, metering modes, and exposure compensation still remain accessible to the user. The Pentax Q also offers an unusual Blur Control mode that simulates a shallow depth-of-field effect, attempting to mitigate one of the main areas in which large-sensor cameras have an advantage over the Q. See the Operation page for more details.
The Q offers an optional live histogram function in all operating modes except Movie. Located near the bottom right corner of the LCD panel, it's rather small, and offers only a luminance readout rather than a full RGBY histogram, but it's still very useful for ensuring your exposures are correct. Another feature that's rather more common, but still very welcome, is the exposure display visible at bottom center of the LCD when the camera is in either the still image or movie Manual exposure modes. This shows the amount the camera thinks an image will be over- or underexposed within a range of +/-3.0EV, based on the settings you have selected, to help you find the best exposure for the subject. (Beyond the 2.0EV range, the value turns red to emphasise that the metering system's limit has been reached.) Together, the live histogram and exposure display make it relatively easy to get suitable exposures even when shooting manually.
Metering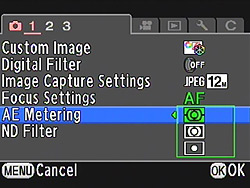 As with most interchangeable-lens cameras, three metering methods are available on the Pentax Q: Multi-segment, Center-Weighted, and Spot. All are accessed through either the Control Panel display on the LCD panel, or through page one of the Record menu.
In Multi-segment mode, the camera takes an exposure reading from 16 segments and chooses the best exposure based on brightness and contrast across much of the scene. The Q gives you the option to decouple the AF points from the autoexposure in Multi-segment mode, via Custom Function 2, "Link AE to AF Point", but the default is to determine exposure at the AF point location.
Center-Weighted metering reads from the center of the frame, but from a fairly large area. Center-Weighted mode is automatically selected instead of Multi-segment mode, if the 03 Fish-eye lens is mounted.
Spot metering simply reads the exposure from the very center of the image, so you can pinpoint the specific area of the photograph you want properly exposed. (Spot metering is very handy when you have a subject that's backlit, or that has a very different brightness, either lighter or darker, than the background.)
By default, exposure is locked at the same time as focus, by half-pressing the shutter button, but you can instead program the Green button to act as an AE Lock button, and lock the current exposure settings whenever pressed. (AE Lock is useful when you want to base your exposure on an off-center subject. Point the camera at the subject, lock the exposure, then recompose your shot however you like. Your subject will be correctly exposed, regardless of what might be in the center of the frame when you finally snap the shutter.)
In situations where exposure compensation is necessary, simply press the dedicated Exposure Compensation button on the rear panel. So long as you're not in Manual exposure mode, the exposure value (EV) will be displayed on the LCD display, and can be adjusted by turning the E-dial. EV compensation ranges from -3 to +3 EV in increments of 1/3 EV. In Manual mode, the exposure compensation button is used to toggle between shutter control (the default) and aperture control. You can also use the Auto Exposure Bracketing function to automatically capture a bracketed exposure with three frames, varying the exposure between shots by as much as 3.0EV in either 1/3 EV increments. You can control the bracketing order for AEB sequences using Custom Function 3. AEB is handy for those times when you want to make sure you get just the right exposure for a critical subject.
It's worth noting that the effects of exposure compensation and auto exposure bracketing are additive -- that is to say, if you dial in 3.0EV of exposure compensation, and shoot a bracketed exposure, it's possible for one frame to vary as much as 6.0EV from the metered exposure.
Neutral Density Filter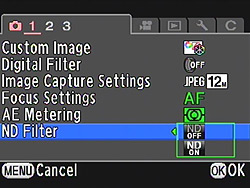 Some lenses for the Pentax Q include a built-in neutral density filter. From the models offered at launch, these include the 01 Standard Prime, and the 02 Standard Zoom. When shooting with either of these lenses, you can enable or disable the ND filter through the camera's menu system, for a two-stop light reduction. This allows either slower shutter speeds with the same aperture, or a wider aperture with the same shutter speeds.
For example, if you were shooting at 1/400 second with an aperture of f/8 without the ND filter, then you could obtain approximately the same exposure either by changing the shutter speed to 1/200 second or the aperture to f/4, with the ND filter active. That's potentially handy if you're trying to obtain a wider aperture to reduce depth-of-field (although with the Pentax Q's tiny sensor, even the widest apertures don't offer a very shallow depth-of-field effect). It's also useful if you're trying to blur a moving subject, since you can leave the shutter open for twice as long.
White Balance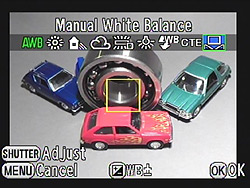 White balance options include Auto (which ranges from about 4,000K to 8,000K), Daylight (5,200K), Shade (8,000K), Cloudy (6,000K), Fluorescent Daylight Color (6,500K), Fluorescent Daylight White (5,000K), Fluorescent Cool White (4,200K), Fluorescent Warm White (3,000K), Tungsten (2,850K), Flash (5,400K), Color Temperature Enhancement (CTE; used to retain and strengthen the color tone of the light source), and Manual.
Pressing the AWB (down arrow) button brings up the White Balance menu. The Manual setting is useful for basing the white balance on a white card. You can also adjust the Q in any white balance mode so as to control the amount of amber, green, blue, and magenta in the color balance using a 2D grid. This ability to "tweak" the white balance, called White Balance Fine Tuning, is very helpful when dealing with difficult light sources.
When using the Q's Auto Picture or Scene modes, white balance cannot be adjusted.
ISO Sensitivity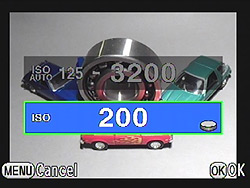 The Pentax Q lets you adjust its light sensitivity in 1/3 EV steps, with options ranging from 125 to 6,400 ISO equivalents. Higher ISO settings are helpful when you want faster shutter speeds under normal lighting, to help freeze fast action.
In exposure modes other than Manual, an Auto ISO mode is provided, in which the camera selects an ISO appropriate to the subject's brightness. The default range for Auto ISO is from the base ISO sensitivity to 3,200, but you can adjust the maximum ISO limit manually.
There are a couple of provisos related to ISO sensitivity in the Pentax Q. If you're shooting in bulb mode or with an exposure longer than two seconds, the maximum ISO sensitivity is 1,600 equivalent. If highlight correction is enabled, the lower limit is raised to ISO 250 equivalent. Several scene modes disable manual ISO sensitivity adjustment.
Noise Reduction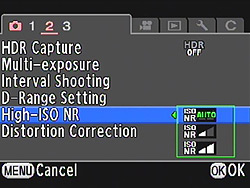 Of course, as with all digital cameras, the higher ISO settings produce photos with more image noise, in much the same way that higher-ISO films show more film grain. To combat this problem, the Q offers a High-ISONoise Reduction option through the Record menu, which reduces the amount of image noise at high ISOs. Options consist of Auto, Low, or High, and it isn't possible to disable the function altogether. When set to Auto, the level of noise reduction is varied with ISO sensitivity, while Low or High provide a consistent noise reduction level, regardless of sensitivity
Unusually, the Pentax Q doesn't include a slow shutter noise reduction function, sometimes referred to as dark frame subtraction. This isn't necessarily a problem, as you can replicate the effect simply by taking an exposure with identical settings immediately before or after your image, but with the lens cap on, then subtracting the result from your image to remote stuck pixels. (Of course, you have to remember to do so at the same time as the original shot, since the locations of stuck pixels vary as a function of temperature.)
Expanded Dynamic Range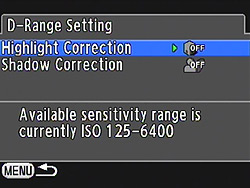 The Pentax Q offers expanded dynamic range functionality, which attempts to preserve highlights and/or shadows in high-contrast situations. Like recent Pentax SLRs, the Q offers separate Highlight Correction and Shadow Correction options. Both Highlight and Shadow correction have Auto, On, or Off settings, and apply to raw and JPEG files alike. Shadow Correction can also be applied to raw files post-capture through the raw development option of the Playback mode palette, whereas Highlight correction must be applied before exposure, even when shooting Raws. When Highlight correction is enabled, the minimum sensitivity is ISO 250.
HDR Capture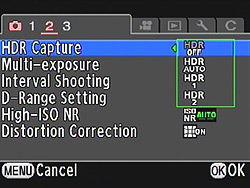 The Q also offers High Dynamic Range imaging, which Pentax first introduced on the K-7, and refined in the K-r. The Q's HDR mode captures three images in quick succession: one properly exposed, one underexposed by 3.0 EV, and one overexposed by 3.0 EV. These are then combined in-camera into a single output image with increased dynamic range, capturing the best highlight detail from the underexposed image, and the maximal shadow detail from the overexposed image. As in the K-r and K-5, the Q automatically aligns the images before combining them, and so is usable handheld, so long as your subject is reasonably static, and your hand somewhat steady.
One notable difference between the HDR functionality of the Q and its predecessors is the level of control available over the effect. The K-7 and K-x offered only three settings (Off, Standard, and Strong), while the K-r and K-5 added an Auto mode, and provided four presets (Standard, Strong 1, Strong 2, and Strong 3). The Q hits a middle ground, retaining the Auto mode while offering two presets (HDR 1 and HDR 2).
When enabled, the HDR mode precludes the use of flash, raw file format, bulb shutter speed, continuous shooting, multi exposure, bracketing, and digital filters. Each HDR capture requires a brief processing time to create the final image, and the three source images can't be saved -- they're discarded when processing is complete, which is something we'd love to see changed in future firmware. (On those occasions where the in-camera HDR merge isn't optimal, it might be possible to do a better job manually on a PC, or it might still be desirable to have a copy of the standard exposure image).
Multiple Exposure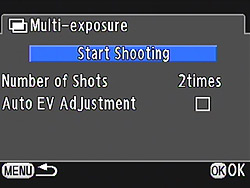 The Pentax Q's Multiple Exposure feature allows you to combine 2 to 9 images into a single JPEG image as they are being captured. If shooting in Live View mode on the LCD display, the previous image(s) are shown as a semi-transparent ("onion skin") overlay on the live view image, as an aid to precise alignment of subsequent images. An option called Auto EV Adjustment can average the exposure of each individual shot so that the combined image has the same brightness as a normally exposed individual shot. When disabled, the process is additive, just like shooting multi-exposures on film. To understand the difference, imagine a two-frame exposure where the same point is mid-grey in one image, and near-white in the other image. With auto EV adjust disabled, the same point in the final image will be completely white (clipped in every channel). With the adjustment enabled, the same area will have a brightness halfway between that of the same point in the brighter and darker images. An interesting usage of this feature is that multiple frames can be combined in-camera with averaged exposure to yield a single image with reduced noise / an effective exposure longer than would ordinarily be the case.
Custom Image The Pentax Q offers users the ability to apply and modify pre-existing image profiles for use on JPEG images. (Raw files are also tagged with the image parameters, but most raw processing software other than Pentax's bundled Silkypix Developer Studio 3.0 will not obey the tags.) You can't control the Custom Image mode when the Q's Mode dial is set to the Scene position.
The camera offers eleven image style settings: Bright, Natural, Portrait, Landscape,Vibrant, Radiant, Muted, Bleach Bypass, Reversal Film, Monochrome, and Cross Processing. The following image parameters can be adjusted for profiles other than Cross Process: Saturation (-4 to +4), Hue (-4 to +4), High/Low Key Adjustment (-4 to +4), Contrast (-4 to +4), Sharpness (-4 to +4), and Fine Sharpness (-4 to +4). Hue can't be adjusted when Monochrome, Muted, Bleach Bypass, and Reversal Film are selected, while Saturation isn't available for Monochome or Reversal Film, and High / Low Key Adjust and Contrast aren't available with Reversal Film. When using Monochrome, instead of Saturation and Hue, Filter Effects and Toning options are provided. Filter effects consist of Green, Yellow, Orange,Red,Magenta, Blue, Cyan, and Infrared Filter. Monochrome can be further modified with a Toning adjustment which allows you to dial in an amount of either selenium style processing (blues) or sepia style processing (browns). The two sharpness options use different algorithms that are suited to varying image types.
The Pentax Q's Cross Processing mode aims to replicate a film technique known as cross-processing. For film photography, the method is to deliberately process one type of film using chemicals intended for a different type, with often surprising effects. The Q's Cross Processing mode replicates this by adjusting the image after capture, and you can preview the result before capture if you're shooting in Live View mode. You can either apply a random effect that will change its results even if the scene doesn't change, or one of three presets whose results are predictable, once you're familiar with them. There are also three Favorite presets in which you can store settings from favorite images created with the Random mode.
Of course, you can also select between sRGB and Adobe RGBcolor spaces in the Image Capture Settings screen, accessed from page 1 of the Record menu.
Blur Control
The Pentax Q's Blur Control function is completely new, and an acknowledgement of one of the shortcomings of the camera's relatively small image sensor, with respect to other interchangeable-lens models. With a smaller sensor, it's more challenging to achieve a shallow depth-of-field effect, and so the Blur Control function attempts to simulate this look in software, instead.
The Q's manual states that this is achieved by capturing multiple images with different focus positions and then merging them, something that must be achieved using an electronic shutter, as the lens shutter only opens once per shot. Since the effect relies on adjustment of focus, it doesn't work for the toy or fisheye lenses, which are all manual-focus only.
Blur Control is accessed via a dedicated Mode dial position, and hence doesn't allow direct control over aperture or shutter speed. Aperture is fixed at the widest available position, as you'd expect. Shutter speed can be controlled after a fashion, though, in that you can set the ISO sensitivity, and the shutter speed will be adjusted to yield the metered exposure. Three strength levels are available for the Blur Control effect, which are selected with the E-dial. We found Blur Control to work surprisingly well in the right circumstances, although it could sometimes produce a rather artificial look, depending upon the subject.
Digital Filters The Pentax Q offers eleven pre-exposure digital filter effects, each of which can tweak the look of images in various (sometimes fairly radical) ways. These include Toy Camera, High Contrast, Shading, Slim, HDR, Invert Color, Extract Color, Color, Water Color, Posterization, and Fish-eye. A variety of parameters specific to each filter can be adjusted.
All of the pre-capture effects can also be applied post-capture through the Playback Mode palette, if you prefer. The Q also offers eight more filter effects that are only available in playback mode, and whose effect can't be previewed before capture. These include Monochrome, Retro, Soft, Sketch Filter, Miniature, Frame Composite, Starburst, and Base Parameter Adjust, with this last option combining some of the functions available in the preset filters. Up to 20 filters can be applied to a single image in playback mode, and it's possible to copy the combination of filters you've applied, then apply the same group to another image, if you create a look you like.
Smart Effect Another new addition to the Q is the Smart Effect function, whose functionality seems to combine the white balance, custom image and digital filter tools into a single control. It can't be accessed through the Menu system, however; the only way to use it is to configure the Quick Dial on the Q's front panel to access it. (And so, if you want to use the Quick Dial for something else, you essentially lose access to Smart Effects.)
Available Smart Effects include Brilliant Color, Unicolor Bold, Vintage Color, Cross Processing, Warm Fade, Tone Expansion, Bold Monochrome, Water Color, and Vibrant Color Enhance. All but Unicolor Bold and Vintage Color provide two-step control over the strength of the effect. Unicolor Bold allows you to select one color that will remain in your image: red, magenta, blue, cyan, green, or yellow. Vintage Color provides three different user-selectable effect types.
There are also three User sets for Smart Effects, which allow you to store three camera settings for later recall: white balance mode, custom image mode, and digital filter. Sadly, it doesn't store any other options, unlike the User mode on some of Pentax's digital SLRs. It's supposed to be possible to save a thumbnail from your captured images that's shown in the Menu system when adjusting User sets, however this wouldn't work for us on a production-level camera with v1.01 firmware. We could select and apply a thumbnail, but it wouldn't appear in the menu system. We never tried setting a thumbnail before updating the camera's firmware, and so can't be sure if it worked with earlier firmware.
Drive Modes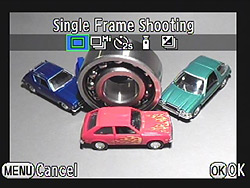 Like most interchangeable-lens cameras, the Pentax Q offers a number of Drive Modes. Modes include Single Frame (where one image is captured when the shutter release button is pressed, even if held), Continuous, Self-timer, Remote, and Exposure Bracketing. There are two Continuous modes, which differ only in terms of frame rate and burst depth. We tested the Continuous Hi mode, which Pentax lists as capable of five frames per second, and actually managed a little better, at around 5.3 frames per second. Burst depth was also slightly better than specified despite our hard-to-compress test target, yielding 5 Large / Best quality JPEG frames. The Continuous Lo mode is rated at a rather sedate 1.5 frames per second, and actually managed just 1.2 frames per second in our testing.
The Pentax Q also offers two Self-Timer modes for self-portraits or those occasions when you don't want to risk camera shake on a long exposure by pressing the Shutter button to trip the shutter. You can choose between a two- or 12-second countdown. The two-second countdown is useful for times when you're taking a long exposure with the camera on a tripod, and you want to minimize any camera shake from pressing the Shutter button.
The Remote Control modes offered are immediate release, 3-second delayed release, and Remote Continuous. Despite its tiny size, the Pentax Q has IR receivers for wireless remotes both on the front and back panels, making it easy to trip the shutter regardless of whether you're going to be in the shot or not. For Remote Continuous mode, the first press of the remote release starts burst shooting, and the second stops it.
Finally, an Exposure Bracketing mode is also provided, where 3 frames can be capture with as much as 3.0 EV steps between frames, set in 1/3 or 1/2 EV steps. The bracketing order can be changed through Custom menu 1. Bracketed exposure sequences can also be captured using the remote control.
Interval Shooting The Q also offers an Interval Shooting mode where the camera can take pictures by itself on a regular basis, used for time-lapse photography. The interval can be programmed between 1 second and 24 hours, the number of shots between 2 and 999, and the starting time can be immediate or at a set time.
The images above were taken from our standardized test shots. For a collection of more pictorial photos, see our Pentax Q Photo Gallery .
Not sure which camera to buy? Let your eyes be the ultimate judge! Visit our Comparometer(tm) to compare images from the Pentax Q with those from other cameras you may be considering. The proof is in the pictures, so let your own eyes decide which you like best!
 Fujifilm GFX 50S Review
 Fujifilm X-T3 Review
 Olympus E-M5 III Review

Follow Imaging Resource