Canon Rebel T2i Modes and Menus
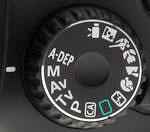 The mode dial on the right side of the Canon T2i's top panel lets you select various exposure modes, with the same range of options presented as on the preceding Rebel T1i, but with a slight change in the order of scene modes on the dial, and returning to the silver-on-black color scheme from the Rebel XSi. Canon divides the dial into "Basic" and "Creative" zones, the Basic range encompassing the Full Auto setting and the six scene modes in what Canon refers to as the "Image" zone. The Canon T2i's Creative zone includes Creative Auto, plus Programmed exposure, Shutter priority, Aperture priority, full Manual control, and the Automatic Depth of Field mode. The Flash Off mode has been promoted to first place among the Scene modes on the dial, with the remainder still listed in the same order as previously. Finally, the Movie mode is at the "Basic" end of the mode dial's range, although we consider it to be an entirely separate mode, rather than part of the Canon T2i's Basic set.
Here's a description of each of the shooting modes:
![]() Automatic Depth of Field AE: Proceeding around the Mode Dial in a clockwise direction, the first option on the Canon T2i's Mode dial is the Automatic Depth of Field AE (or A-DEP) mode. Part of the Creative Zone, A-DEP mode is meant for taking pictures of large groups of people, landscapes with foreground detail, or any subject with elements of interest at varying distances from the camera. This mode puts the Canon T2i in control of both the shutter speed and aperture values, but you can adjust the other exposure variables. (Note that this mode cannot be used if the lens focus mode is set to manual.) When shooting in Automatic Depth of Field AE, the Canon T2i sets both the lens aperture and focus distance to achieve a sharp focus over a wide depth of field. It uses the autofocus system to measure the distance to the subjects covered by each of the nine autofocus zones, and then attempts to set the focusing distance and lens aperture so as to render all subject areas in sharp focus.
Automatic Depth of Field AE: Proceeding around the Mode Dial in a clockwise direction, the first option on the Canon T2i's Mode dial is the Automatic Depth of Field AE (or A-DEP) mode. Part of the Creative Zone, A-DEP mode is meant for taking pictures of large groups of people, landscapes with foreground detail, or any subject with elements of interest at varying distances from the camera. This mode puts the Canon T2i in control of both the shutter speed and aperture values, but you can adjust the other exposure variables. (Note that this mode cannot be used if the lens focus mode is set to manual.) When shooting in Automatic Depth of Field AE, the Canon T2i sets both the lens aperture and focus distance to achieve a sharp focus over a wide depth of field. It uses the autofocus system to measure the distance to the subjects covered by each of the nine autofocus zones, and then attempts to set the focusing distance and lens aperture so as to render all subject areas in sharp focus.
![]() Manual Exposure: This mode provides full control of all exposure variables, including independent control of both shutter speed and lens aperture. If the ISO sensitivity is specified manually, then the exposure is fully manual. If the ISO sensitivity is set to Auto, then the camera varies this variable to obtain a metered exposure with the user-specified shutter speed and aperture. In either case, there is no exposure compensation function. The Main dial adjusts shutter speed by default, and adjusts the aperture when turned while holding down the Exposure Compensation button. The shutter speed range also includes a Bulb setting, allowing long exposures for as long as you hold the Canon T2i's Shutter button down. (The rear display reports the elapsed time in minutes and seconds as the exposure progresses.) A display in the viewfinder reports whether the Canon T2i thinks your settings will result in under, over, or correctly exposed photos.
Manual Exposure: This mode provides full control of all exposure variables, including independent control of both shutter speed and lens aperture. If the ISO sensitivity is specified manually, then the exposure is fully manual. If the ISO sensitivity is set to Auto, then the camera varies this variable to obtain a metered exposure with the user-specified shutter speed and aperture. In either case, there is no exposure compensation function. The Main dial adjusts shutter speed by default, and adjusts the aperture when turned while holding down the Exposure Compensation button. The shutter speed range also includes a Bulb setting, allowing long exposures for as long as you hold the Canon T2i's Shutter button down. (The rear display reports the elapsed time in minutes and seconds as the exposure progresses.) A display in the viewfinder reports whether the Canon T2i thinks your settings will result in under, over, or correctly exposed photos.
![]() Aperture-Priority AE: This mode allows you to manually set the lens aperture (with available apertures depending on the lens in use), while the Canon T2i selects the most appropriate shutter speed. You have control over all other exposure variables, including exposure compensation.
Aperture-Priority AE: This mode allows you to manually set the lens aperture (with available apertures depending on the lens in use), while the Canon T2i selects the most appropriate shutter speed. You have control over all other exposure variables, including exposure compensation.
![]() Shutter-Priority AE: The opposite of Aperture-Priority mode, Shutter-Priority AE allows you to set the shutter speed anywhere from 1/4,000 to 30 seconds, while the Canon T2i chooses the best corresponding aperture setting. Again, you have control over all other exposure variables, including exposure compensation. The Bulb setting that's available in Manual Exposure mode isn't available in Shutter-priority AE mode.
Shutter-Priority AE: The opposite of Aperture-Priority mode, Shutter-Priority AE allows you to set the shutter speed anywhere from 1/4,000 to 30 seconds, while the Canon T2i chooses the best corresponding aperture setting. Again, you have control over all other exposure variables, including exposure compensation. The Bulb setting that's available in Manual Exposure mode isn't available in Shutter-priority AE mode.
![]() Program AE: In its Program AE mode, the Canon T2i controls both aperture and shutter speed automatically, and you have control over all other exposure variables, including exposure compensation. You can also bias the exposure to control depth of field or subject motion blur by turning the Main dial, selecting a different combination of aperture and shutter speed while maintaining the same exposure value. (This is commonly known as Vari-Program, or Program Shift in Canon parlance. The camera won't let you select a combination of exposure parameters that doesn't work, but you retain all the flexibility of shutter- or aperture-priority exposure modes.)
Program AE: In its Program AE mode, the Canon T2i controls both aperture and shutter speed automatically, and you have control over all other exposure variables, including exposure compensation. You can also bias the exposure to control depth of field or subject motion blur by turning the Main dial, selecting a different combination of aperture and shutter speed while maintaining the same exposure value. (This is commonly known as Vari-Program, or Program Shift in Canon parlance. The camera won't let you select a combination of exposure parameters that doesn't work, but you retain all the flexibility of shutter- or aperture-priority exposure modes.)
![]() Creative Auto Mode: For the final mode in the Creative Zone, Canon retains its Creative Auto (or "CA") mode, which we first saw on the 50D, and which made its Rebel-series debut in the T1i. The CA mode is something of a cross between the Program and Full Automatic modes. When set to CA mode, the Canon T2i allows the user to select from a subset of the flash and drive modes. You can also choose from a subset of four Picture Styles, with each given a user-friendly description such as "Smooth skin tones", or "Vivid blues and greens". Program shift and exposure compensation are both available, but must be accessed through the Quick Control screen, with five-step control for each option. They also have friendlier names -- "Background: Blurred <-> Sharp" for program shift, and "Exposure: Darker <-> Brighter" for exposure compensation. You can also select between Raw, JPEG (including several image size/quality options), or Raw + Large JPEG file formats. Through the menu system, you can also enable or disable Peripheral Illumination Correction. The rest of the more complex features remain under automatic control. The Canon T2i's rear-panel LCD display offers text help for each setting while in CA mode, for example prompting the user as to whether they want to blur the background with program shift, or make the picture brighter / darker with exposure compensation, etc. The exposure steps shown on the rear-panel display appear to represent 1/3-stop increments/decrements.
Creative Auto Mode: For the final mode in the Creative Zone, Canon retains its Creative Auto (or "CA") mode, which we first saw on the 50D, and which made its Rebel-series debut in the T1i. The CA mode is something of a cross between the Program and Full Automatic modes. When set to CA mode, the Canon T2i allows the user to select from a subset of the flash and drive modes. You can also choose from a subset of four Picture Styles, with each given a user-friendly description such as "Smooth skin tones", or "Vivid blues and greens". Program shift and exposure compensation are both available, but must be accessed through the Quick Control screen, with five-step control for each option. They also have friendlier names -- "Background: Blurred <-> Sharp" for program shift, and "Exposure: Darker <-> Brighter" for exposure compensation. You can also select between Raw, JPEG (including several image size/quality options), or Raw + Large JPEG file formats. Through the menu system, you can also enable or disable Peripheral Illumination Correction. The rest of the more complex features remain under automatic control. The Canon T2i's rear-panel LCD display offers text help for each setting while in CA mode, for example prompting the user as to whether they want to blur the background with program shift, or make the picture brighter / darker with exposure compensation, etc. The exposure steps shown on the rear-panel display appear to represent 1/3-stop increments/decrements.
![]() Full Automatic Mode: The first mode in the Basic Zone, Full Automatic is indicated on the Canon T2i's Mode dial by a green rectangular outline. In this mode, the camera makes all exposure decisions with the exception of image quality. Autofocus mode is set to AI Focus. (AI Focus evaluates subject movement, sets either one-shot AF or AI Servo AF automatically.) Drive mode is set to Single Shot, ISO and white balance are set to Auto, and the metering mode is set to Evaluative. Both auto lighting optimizer and picture style are set to Standard.
Full Automatic Mode: The first mode in the Basic Zone, Full Automatic is indicated on the Canon T2i's Mode dial by a green rectangular outline. In this mode, the camera makes all exposure decisions with the exception of image quality. Autofocus mode is set to AI Focus. (AI Focus evaluates subject movement, sets either one-shot AF or AI Servo AF automatically.) Drive mode is set to Single Shot, ISO and white balance are set to Auto, and the metering mode is set to Evaluative. Both auto lighting optimizer and picture style are set to Standard.
![]() Flash Off Mode: Flash Off mode disables both the internal flash head and any external flash unit connected. Focus is set to AI Focus mode, drive mode is set to Single, and metering is set to Evaluative. The camera controls ISO and Auto white balance as well.
Flash Off Mode: Flash Off mode disables both the internal flash head and any external flash unit connected. Focus is set to AI Focus mode, drive mode is set to Single, and metering is set to Evaluative. The camera controls ISO and Auto white balance as well.
![]() Portrait Mode: This mode uses a large aperture setting to decrease the depth of field, which blurs the background to emphasize the subject. The Canon T2i's ISO is set to Auto, white balance to Auto, metering to Evaluative, AF mode to One Shot, and auto lighting optimizer to standard. Drive mode is set to Continuous Shooting, and picture style to Portrait.
Portrait Mode: This mode uses a large aperture setting to decrease the depth of field, which blurs the background to emphasize the subject. The Canon T2i's ISO is set to Auto, white balance to Auto, metering to Evaluative, AF mode to One Shot, and auto lighting optimizer to standard. Drive mode is set to Continuous Shooting, and picture style to Portrait.
![]() Landscape Mode: Landscape mode combines slower shutter speeds with smaller aperture settings to increase the depth of field when shooting broad vistas and sweeping landscapes. This mode is also good for night scenes without people in them. The Canon T2i's built-in flash is automatically disabled, even if it's already raised. Because this mode uses slower shutter speeds, a tripod may be needed in less-bright lighting conditions. Metering is set to Evaluative, both ISO and white balance are set to Auto, focus to One Shot, drive mode to Single Shot, and auto lighting optimizer to Standard. Unlike the previous scene modes, the picture style is changed to Landscape.
Landscape Mode: Landscape mode combines slower shutter speeds with smaller aperture settings to increase the depth of field when shooting broad vistas and sweeping landscapes. This mode is also good for night scenes without people in them. The Canon T2i's built-in flash is automatically disabled, even if it's already raised. Because this mode uses slower shutter speeds, a tripod may be needed in less-bright lighting conditions. Metering is set to Evaluative, both ISO and white balance are set to Auto, focus to One Shot, drive mode to Single Shot, and auto lighting optimizer to Standard. Unlike the previous scene modes, the picture style is changed to Landscape.
![]() Close-up Mode (Macro Mode): Turning the Canon T2i's Mode dial to the macro flower symbol sets the camera for capturing smaller subjects such as flowers, jewelry, and other small details. The autofocus mode is automatically adjusted to One Shot, the drive mode is set to Single Shot, and the metering mode is set to Evaluative. Both ISO and white balance are set to Auto, while both auto lighting optimizer and picture style are set to Standard. Close-up mode takes advantage of the current lens's minimum focal distance. However, an EOS dedicated macro lens and the Macro Ring Lite MR-14EX are recommended for better close-up photography. Also, note that unlike the macro mode on most consumer digicams, Macro mode on the Canon T2i has no effect on lens focusing range, as that parameter is entirely determined by the lens being used.
Close-up Mode (Macro Mode): Turning the Canon T2i's Mode dial to the macro flower symbol sets the camera for capturing smaller subjects such as flowers, jewelry, and other small details. The autofocus mode is automatically adjusted to One Shot, the drive mode is set to Single Shot, and the metering mode is set to Evaluative. Both ISO and white balance are set to Auto, while both auto lighting optimizer and picture style are set to Standard. Close-up mode takes advantage of the current lens's minimum focal distance. However, an EOS dedicated macro lens and the Macro Ring Lite MR-14EX are recommended for better close-up photography. Also, note that unlike the macro mode on most consumer digicams, Macro mode on the Canon T2i has no effect on lens focusing range, as that parameter is entirely determined by the lens being used.
![]() Sports Mode: This mode uses a faster shutter speed to capture fast-moving subjects. The autofocus mode is automatically set to AI Servo. Drive mode is set to Continuous Shooting, ISO is set to Auto (and biased towards higher settings, to give faster shutter speeds), white balance is set to Auto, and metering mode is set to Evaluative. Both auto lighting optimizer and picture style are set to Standard. The Canon T2i's onboard flash isn't available in this mode because it can't cycle fast enough to keep up with the continuous exposure mode.
Sports Mode: This mode uses a faster shutter speed to capture fast-moving subjects. The autofocus mode is automatically set to AI Servo. Drive mode is set to Continuous Shooting, ISO is set to Auto (and biased towards higher settings, to give faster shutter speeds), white balance is set to Auto, and metering mode is set to Evaluative. Both auto lighting optimizer and picture style are set to Standard. The Canon T2i's onboard flash isn't available in this mode because it can't cycle fast enough to keep up with the continuous exposure mode.
![]() Night Portrait Mode: This final Basic Zone mode is for taking pictures of people at sunset or at night, letting the flash illuminate the subject, while the longer exposure provides a brighter view of the surroundings. The Canon T2i's autofocus mode is automatically set to One Shot. Drive mode is set to Single Shot, metering mode to Evaluative, focus to One Shot, both ISO sensitivity and white balance to Auto, and both auto lighting optimizer and picture style to Standard. Since slower shutter speeds will be used, a tripod is recommended to prevent movement from the camera. The Canon T2i's built-in flash is automatically enabled and synced with the slower shutter speed, so subjects will need to remain still for a few moments after the flash fires to avoid ghost-like after-images. (For night exposures without the flash, Canon recommends shooting in Landscape mode.)
Night Portrait Mode: This final Basic Zone mode is for taking pictures of people at sunset or at night, letting the flash illuminate the subject, while the longer exposure provides a brighter view of the surroundings. The Canon T2i's autofocus mode is automatically set to One Shot. Drive mode is set to Single Shot, metering mode to Evaluative, focus to One Shot, both ISO sensitivity and white balance to Auto, and both auto lighting optimizer and picture style to Standard. Since slower shutter speeds will be used, a tripod is recommended to prevent movement from the camera. The Canon T2i's built-in flash is automatically enabled and synced with the slower shutter speed, so subjects will need to remain still for a few moments after the flash fires to avoid ghost-like after-images. (For night exposures without the flash, Canon recommends shooting in Landscape mode.)
![]() Movie Recording Mode: When Movie mode is selected, the camera's mirror and shutter open, as in Live View mode, but the Live View / Movie button on the camera's back functions as the start/stop button for movie recording. Unlike most other movie-capable SLR cameras on the market, the Canon T2i can perform single autofocus operations during movie operation, albeit with focusing noise very clearly picked up on the audio track using the EF-S 18-55mm 1:3.5-5.6 IS kit lens. (Like most digital SLR video modes, continuous autofocus isn't available in Movie mode, though.) Another feature of the T2i's movie mode that's rather uncommon is that it allows fully manual control over aperture, shutter speed, and (optionally) ISO sensitivity. The T2i's internal microphone is monaural, but the camera also includes an external microphone jack compatible with stereo microphones. Movie recording capacity varies based on the size of memory card you're using, but is in all cases limited to a maximum of 29 minutes and 59 seconds. (That's thanks to European tax regulations, but as it turns out, the 4GB limit on video file sizes will in practice restrict you to shorter movie clips anyway.)
Movie Recording Mode: When Movie mode is selected, the camera's mirror and shutter open, as in Live View mode, but the Live View / Movie button on the camera's back functions as the start/stop button for movie recording. Unlike most other movie-capable SLR cameras on the market, the Canon T2i can perform single autofocus operations during movie operation, albeit with focusing noise very clearly picked up on the audio track using the EF-S 18-55mm 1:3.5-5.6 IS kit lens. (Like most digital SLR video modes, continuous autofocus isn't available in Movie mode, though.) Another feature of the T2i's movie mode that's rather uncommon is that it allows fully manual control over aperture, shutter speed, and (optionally) ISO sensitivity. The T2i's internal microphone is monaural, but the camera also includes an external microphone jack compatible with stereo microphones. Movie recording capacity varies based on the size of memory card you're using, but is in all cases limited to a maximum of 29 minutes and 59 seconds. (That's thanks to European tax regulations, but as it turns out, the 4GB limit on video file sizes will in practice restrict you to shorter movie clips anyway.)
Playback Mode This mode is entered by pressing the Play button on the back panel. Playback mode lets you view, protect, or erase images and movies. Still images can be magnified, rotated, or set up for printing on DPOF-compatible devices. You can also view an index display of all images and movies, with either four or nine thumbnails per page. A slide show function is available, and allows the user to select whether the T2i should display just still images, just movies, or both together. It also allows the slide show to be restricted to just stills and movies from a specific date. The Info button toggles between displaying the image or movie alone, with a basic information display, with a detailed information display including luminance histogram (which can optionally be changed through the Playback menu to display separate RGB histograms instead), and finally a partial information display plus both RGB and luminance histograms.
Canon Rebel T2i Menu Details
Below are Canon T2i menu options and their descriptions.
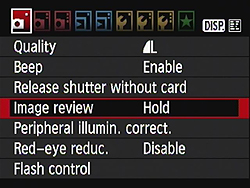
Record Menu 1:
| Record Menu Options: Screen 1 | |||
Top-Level Selection |
Second-Level |
Third-Level |
Notes |
Quality |
- 5184 x 3456, Fine - 5184 x 3456, Normal - 3456 x 2304, Fine - 3456 x 2304, Normal - 2592 x 1728 Fine - 2592 x 1728, Normal - RAW + L/F JPEG - RAW |
Select image size and quality combination. |
|
Beep |
- On - Off |
Turns camera beep sounds on or off. |
|
Release shutter without card |
- Enable - Disable |
If enabled, the camera will fire the shutter even without a memory card installed. |
|
Image review |
- Off - 2 sec. - 4 sec. - 8 sec. - Hold |
Enables an automatic image review after each shot. During review, the Display and Delete buttons act as they would in Playback mode. "Hold" keeps the image displayed until the auto-power off is reached, or you operate any other control. |
|
Peripheral illumination correction |
-Enable -Disable |
If on, the camera corrects for corner shading "vignetting" in JPEGs, depending on which lens is detected (therefore, probably won't work with third-party lenses). If detected, the attached lens model is indicated on the LCD display, along with whether correction data for the lens model is available. |
|
Red-eye On/Off |
- On - Off |
If On, Red-eye reduction lamp illuminates with every flash exposure. |
|
Flash control |
-Flash Firing |
- Enable
- Disable |
Controls a vast array of flash settings for both the internal flash and any attached external flash unit. |
- Built-in Flash Func. Setting |
- Flash Mode - Shutter Sync - Flash Exp. Comp. - E-TTL II Meter |
||
- External Flash Func. Setting |
(if flash is attached, powered on, and supports function)
- Flash Mode - Shutter Sync - FEB - Flash Exp. Comp. - E-TTL II Meter - Zoom - Wireless Setting |
||
- External Flash C.Fn. Setting |
(if flash is attached and powered on, for each available custom function) - Enable - Disable |
||
- Clear Ext. Flash C.Fn. Set |
(if flash is attached and powered on)
|
||
Record Menu 2:

| Record Menu Options: Screen 2 | |||
Top-Level Selection |
Second-Level |
Third-Level |
Notes |
Exposure compensation / AEB (Auto Exposure Bracketing) |
- Select EV variable |
+/-5 EV in 1/3 or 1/2 steps; +/-7 EV scale when AEB is active, bracketing range is three frames in a +/-2 EV range. |
|
Auto Lighting Optimizer |
-Disable -Low -Standard -High |
Sets the ALO level. |
|
Metering mode |
- Evaluative - Partial - Spot - Center-weighted average |
||
Custom White Balance |
- Choose image for reference, then set white balance |
||
WB SHIFT/BKT |
- Set the color shift on a 2-dimensional grid (Green/Magenta, Blue/Amber, 19 steps on each axis) - Choose bracket (+/-3 Magenta and Green, +/-3 Blue and Amber) |
One level of correction is equal to 5 mireds of a color temperature conversion filter. |
|
Color space |
- sRGB - Adobe RGB |
||
Picture Style |
- Standard - Portrait - Landscape - Neutral - Faithful - Monochrome - User Def. 1 - User Def. 2 - User Def. 3 |
- Sharpness (arbitrary units from 0 to 7) - Contrast (9 units from - to +) - Saturation (9 units from - to +, except monochrome) - Color Tone (9 units from - to +, except monochrome) - Filter effect (monochrome only) - Toning effect (monochrome only) - Default set. (except for User Def. positions) |
All picture styles can be adjusted, including preset styles. Monochrome filter effects are None, Yellow, Orange, Red, or Green. Monochrome toning effects are None, Sepia, Blue, Purple, or Green. |
Record Menu 3:

| Record Menu Options: Screen 3 | |||
|
Top-Level
Selection |
Second-Level
|
Third-Level
|
Notes
|
Dust Delete Data |
- Cancel - OK |
Captures a reference image for the dust reduction system, showing where dust is present on the sensor. Dust shadows can then be automatically removed from the images when they're processed through Canon's software. The date that the Dust Delete Data was last captured is shown on the LCD display. |
|
|
ISO Auto
|
- Max.: 400
- Max.: 800 - Max.: 1600 - Max.: 3200 - Max.: 6400 |
Sets a maximum limit for the ISO Auto function. The limit only applies in Creative Zone modes. Basic Zone modes except Portrait will allow Auto ISO as high as ISO 3,200, unless flash is used, regardless of this setting. Portrait mode is fixed at ISO 100. When direct flash is used, Auto ISO is set to 400, unless this would result in overexposure, in which case Auto ISO can range as low as ISO 100. When external bounce flash is used, Auto ISO will ordinarily range as high as ISO 1,600, but will obey a lower limit from this setting.
|
|
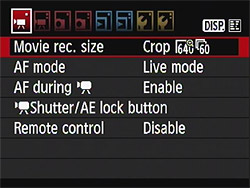
Movie Menu 1:
| Movie Menu Options: Screen 1 | |||
|
Top-Level
Selection |
Second-Level
|
Third-Level
|
Notes
|
|
Movie Rec. Size
|
- 1920 x 1080 (30 / 25)
- 1920 x 1080 (24) - 1280 x 720 (60 / 50) - 640 x 480 (60 / 50) - Crop 640 (60 / 50) |
|
Selects the video resolution and frame rate. Available frame rates depend on Video System setting in Setup Menu screen 2. 30 and 60fps are available only for NTSC mode, 25 and 50 fps are only for PAL mode. 24 fps is available for both modes.
|
|
AF Mode
|
- Live mode
- Face Detect Live mode - Quick mode |
|
"Live" mode uses contrast-detect AF from image sensor data, "Face detect" mode adds face-detection, while "Quick" mode uses the dedicated phase-detect AF module. As well as autofocus, you can manually focus in Movie mode. Up to 10x magnification is available to assist in critical manual focusing before movie capture starts, but is not available during movie recording. This is a duplicate of the option in the Live View function menu, so if the setting is changed there, the value here will also change.
|
|
AF During Movie
|
- Disable
- Enable |
|
Enables or disables autofocus operation during movie recording. Even if enabled, only single autofocus operations are possible. Continuous autofocus isn't available for movie recording. AF operations with the kit lens are very clearly audible in the recorded audio track.
|
|
Movie Shutter / AE Lock Button
|
- AF / AE lock
- AE lock / AF - AF / AF lock, no AE lock - AE / AF, no AE lock |
|
Determines the effect of the Shutter and AE lock buttons. First option locks focus with shutter half-press, and exposure with * button. Second option locks exposure with shutter half-press, and focus with * button. Third option locks focus with shutter half-press, unless * button is held -- allowing a still image to be captured during movie recording without triggering an AF cycle. Final option meters but doesn't lock metering with a shutter half-press, and locks focus with the * button.
|
|
Remote Control
|
- Disable
- Enable |
|
Determines whether movie recording can be started and stopped with the optional RC-6 remote control. If enabled, shooting timing switch must be set to '2' to function as movie shutter button, and will otherwise function as still shutter button.
|
Movie Menu 2:

| Movie Menu Options: Screen 2 | |||
|
Top-Level
Selection |
Second-Level
|
Third-Level
|
Notes
|
|
Movie Exposure
|
- Auto
- Manual |
|
Unlike most video-capable DSLRs, the Canon T2i allows fully manual control of shutter speed, aperture and ISO sensitivity, both before and during movie capture. (The onboard microphone clearly picks up handling noises as controls are adjusted, however -- especially the Main Dial, which has a very firm clicking motion.) It is also possible to use Auto ISO with manual shutter speed / aperture, but exposure compensation isn't possible in this setup. In Auto mode, the camera chooses all three variables automatically, but allows +/-5.0 EV of exposure compensation instead.
|
|
Grid Display
|
- Off
- Grid 1 (2x2) - Grid 2 (5x3) |
|
Allows one of two different grids to be overlaid on the LCD before movie recording, to aid in precise alignment. (The 2x2 grid would also be useful in rule-of-thirds composition). The grids disappear as soon as movie recording starts. This is a duplicate of the option in the Live View function menu, so if the setting is changed there, the value here will also change.
|
|
Metering Timer
|
- 4 sec.
- 16 sec. - 30 sec. - 1 min. - 10 min. - 30 min. |
|
Determines how long the camera's metering system should remain active without user interaction.
This is a duplicate of the option in the Live View function menu, so if the setting is changed there, the value here will also change.
|
|
Sound Recording
|
- On
- Off |
|
Determines whether movies should be recorded with or without an audio track.
|
Highlight tone priority |
- Disable - Enable |
Available only when Movie exposure is set to Manual. If enabled, dynamic range is expanded for highlight areas above 18% gray. Lower ISO sensitivity limit is raised to ISO 200, and Auto Lighting Optimizer is disabled. |
|
Playback Menu 1:

| Playback Menu Options: Screen 1 | |||
Top-Level Selection |
Second-Level |
Third-Level |
Notes |
Protect images |
- Set |
Sets or removes protection mark. Protected images can only be deleted by reformatting the memory card. |
|
Rotate |
- Set |
Rotates selected image clockwise, either 90 or 270 degrees. |
|
Erase images |
- Select and erase images - All images on card |
||
Print order |
- Sel. Image - All image |
Marks images on the memory card for later printing on a DPOF (Digital Print Order Format) compatible printer. |
|
- Set up |
- Print type - Date - File No. |
||
Slide show |
- Select images |
- All images - Stills - Movies - Date |
Sets up Slide Show feature. Users can choose to play both still images and movies, stills only, movies only, or stills and movies taken on a particular date. The Menu button stops playback. |
- Setup |
- Display time - Repeat |
||
- Start |
|||
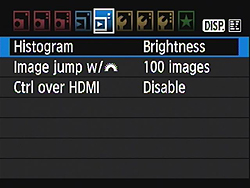
Playback Menu 2:
| Playback Menu Options: Screen 2 | |||
Top-Level Selection |
Second-Level |
Third-Level |
Notes |
Histogram |
- Brightness - RGB |
RGB option displays individual histograms for each color channel, brightness shows only a single graph. |
|
Image jump w/ dial |
- 1 image - 10 images - 100 images - Date - Movies - Stills |
Selects how image jump works using the Main Dial.
|
|
Ctrl over HDMI |
- Disable - Enable |
If enabled, certain playback functions of the Canon T2i, such as selecting images and initiating a slideshow, can be controlled using the remote control of an attached HDMI CEC-compatible display. |
|
Setup Menu 1:

| Setup Menu Options: Screen 1 | |||
Top-Level Selection |
Second-Level |
Third-Level |
Notes |
Auto power off |
- 30 sec. - 1 min. - 2 min. - 4 min. - 8 min. - 15 min. - Off |
Amount of time to wait before automatically turning off to save power. |
|
Auto rotate |
- On (Camera, Display) - On (Display) - Off |
Camera, Display - vertical images are rotated on both the camera's LCD and on the computer (in applications that understand "Rotate" tags in the files' EXIF headers.) Display - vertical images are only rotated on the computer. |
|
Format |
- Cancel - OK - option for Low level format |
Erases all files on card, even protected ones. |
|
File numbering |
- Continuous - Auto Reset - Manual Reset |
Continuous numbers image files sequentially.
Auto Reset resets the numbering every time a card is formatted or a new card inserted. Manual Reset resets numbering at any time to 0001. |
|
LCD auto off |
- Enable - Disable |
Controls the sensor that turns off the LCD display when you bring the camera up to your eye. |
|
Screen color |
- Select from 4 screen color schemes - OK |
||
Setup Menu 2:

| Setup Menu Options: Screen 2 | |||
Top-Level Selection |
Second-Level |
Third-Level |
Notes |
LCD brightness |
- Set brightness level from darkest to brightest |
Seven brightness settings. |
|
Date/Time |
- Set Date - Set Time - Set Display Format |
||
Language |
- English - German - French - Dutch - Danish - Portuguese - Finnish - Italian - Ukrainian - Norwegian - Swedish - Spanish - Greek - Russian - Polish - Czech - Hungarian - Romanian - Turkish -Arabic - Thai - Simplified Chinese - Traditional Chinese - Korean - Japanese |
|
|
Video system |
- NTSC - PAL |
||
Sensor cleaning |
- Auto cleaning |
- Enable - Disable |
Auto cleaning options determines if sensor cleaning occurs automatically when power switch is turned off or on. |
- Clean now |
- Cancel - OK |
||
- Clean manually |
- Cancel - OK |
OK triggers mirror to lock up so you can clean the sensor manually. Use of the optional ACK-E8 AC adapter kit or a fully charged battery is recommended. Cleaning is not possible when using a portrait grip with AA / LR6 batteries. |
|
Live View function settings |
- Live View shoot |
- Enable - Disable |
Along with three types of autofocus ("Live" mode uses contrast-detect AF from image sensor data, "Face detect" mode adds face-detection, while "Quick" mode uses the dedicated phase-detect AF module), you can manually focus in Live View mode. Up to 10x magnification is available to assist in critical manual focusing. The Grid Display, Metering Timer, and AF Mode options are duplicates of the same options in Movie Menus 1 and 2, so if these settings are changed, the value there will also change. |
- Grid display |
- Off - Grid 1 (2x2) - Grid 2 (5x3) |
||
- Metering timer |
- 4 sec - 16 sec - 30 sec - 1 min. - 10 min. - 30 min. |
||
- AF mode |
- Live mode - Face Detect Live mode - Quick mode |
||
Setup Menu 3:

| Setup Menu Options: Screen 3 | |||
Top-Level Selection |
Second-Level |
Third-Level |
Notes |
Custom Functions |
- Goes to Custom Function menu (See Below) |
||
Copyright Information |
-Display copyright info -Enter author's name -Enter copyright details -Delete copyright information |
Copyright info can be embedded into image files. |
|
Clear Settings |
- Clear all camera settings - Clear all Custom Func. (C.Fn) - Cancel |
||
Firmware Version |
- Update firmware version |
|
Updates firmware version if a properly-prepared SD card is in place. Current version number is shown alongside item title in Setup menu screen. |
Custom Functions Menu:
| Custom Functions Menu Options | |||
Top-Level Selection |
Second-Level |
Third-Level |
Notes |
|
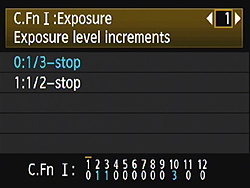
C.Fn I: Exposure
1: Exposure level increments |
- 0: 1/3 stop
- 1: 1/2 stop |
|
|
|
C.Fn I: Exposure
2: ISO Expansion |
- 0: Off
- 1: On |
|
When enabled, an ISO 'H' setting is added, corresponding to an ISO level of 12,800.
|
|
C.Fn I: Exposure
3: Flash sync. speed in AV mode |
- 0: Auto
- 1: 1/200-1/60 sec. Auto - 2: 1/200 sec. (fixed) |
|
Auto: Shutter speed may vary from 1/60 to 1/200 second.
1/200: Shutter speed is fixed at this setting. |
|
C.Fn II: Image
4: Long exp. noise reduction |
- 0: Off
- 1: Auto - 2: On |
|
Controls additional noise-reduction processing for exposures 1 second and longer. When set to On, Canon notes that noise may be higher than with Auto or Off options when using ISO 1,600 or higher.
|
|
C.Fn II: Image
5: High ISO speed noise reduct'n |
- 0: Standard
- 1: Low - 2: Strong - 3: Disable |
|
Enables additional noise-reduction. Applied at all ISOs, but particularly effective at reducing chroma noise at higher ISOs, or shadow noise at lower ISOs. When set to Strong, maximum burst depth will be greatly reduced.
|
|
C.Fn II: Image
6: Highlight tone priority |
- 0: Disable
- 1: Enable |
|
Enables Highlight tone priority, which helps retain highlight detail in JPEGs by expanding dynamic range in highlight areas above 18% grey. When enabled, ISO 100 position is disabled, and the ISO range is 200 - 6400. Cannot be used together with Auto Lighting Optimizer function.
|
|
C.Fn III: Auto focus / Drive
7: AF assist beam firing |
- 0: Enables
- 1: Disable - 2: Enable external flash only - 3: IR AF assist beam only |
|
Turns AF assist beam on or off, and determines whether it comes from the built-in flash or from an external strobe unit. IF AF assist beam only prevents less expensive strobes from firing a burst of low-power flashes to assist autofocusing.
|
|
C.Fn III: Auto focus / Drive
8: Mirror lockup |
- 0: Disable
- 1: Enable |
|
Raises the mirror with the first press of the shutter button, releases the shutter with the second. (Useful for reducing mirror shake when using a tripod and remote release with a long telephoto or macro lens.)
|
C.Fn IV: Operation / Others 9: Shutter/AE lock button |
- 0: AF/AE lock - 1: AE lock/AF - 2: AF/AF lock, no AE lock - 3: AE/AF, no AE lock |
Determines the effect of the Shutter and AE lock buttons: 0: * button locks exposure until shutter release or metering system powers down. Shutter half-press locks focus and (unless already locked) exposure in One Shot or AI Focus modes. In AI Servo mode, focus operates continuously while shutter button is half-pressed, and exposure lock isn't possible with shutter button half-press. 1: * button locks autofocus (or operates continuous autofocus while held, if in AI Servo mode), and shutter half-press locks exposure. 2: In AI Servo mode, Shutter button half-press triggers continuous AF operation, and simultaneously holding * button stops AF operation momentarily. Exposure is set when the shutter is released. In One Shot or AI Focus modes, shutter button half press locks focus and exposure, and simultaneously pressing and releasing the * button triggers a new AF and AE lock to be determined. 3: In all modes, shutter button half-press has no effect. In AI Servo mode, continuous autofocus operates while holding * button, and exposure is determined when shutter is released. In One Shot or AI Focus modes, focus and exposure are locked when * button is pressed. |
|
C.Fn IV: Operation / Others 10: Assign SET button |
- 0: Normal (disabled) - 1: Image quality - 2: Flash exposure comp. - 3: LCD monitor On/Off - 4: Menu display - 5: ISO speed |
Controls the functions of the SET button in record mode. |
|
C.Fn IV: Operation / Others 11: LCD display when power on |
- 0: Display on - 1: Previous display status |
Controls whether the LCD active state is remembered or forces it on when camera is powered-up or when exiting the Quick Control menu screen. |
|
C.Fn IV: Operation / Others 13: Add image verification data |
- 0: Off - 1: On |
Add image verification data On option appends data to verify an original image. Original Data Security Kit (OSK-E3) required to verify image is original is sold separately |
|
My Menu:

| My Menu Options | |||
Top-Level Selection |
Second-Level |
Third-Level |
Notes |
Register to My Menu |
- (Full list of options that can exist in My Menu) |
Register your own frequently used menu items and custom functions to appear in My Menu. |
|
Sort |
Changes the order of registered items in My Menu.
|
||
Delete item / items |
|||
Delete all items |
|||
Display from My Menu |
- Enable - Disable |
When Enabled, the My Menu tab is displayed first when pressing the Menu button.
|
|
 Fujifilm GFX 50S Review
 Fujifilm X-T3 Review
 Olympus E-M5 III Review

Follow Imaging Resource