Canon T3 Operation
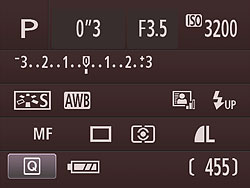
Like the Rebel XS before it, the Canon T3 relies on its modestly sized 2.7-inch color LCD screen for all user interaction. This makes for a clear, highly visible user interface, but probably does contribute to slightly shorter battery life, since the LCD has to be fired up any time you want to change anything beyond the most basic settings. (Exposure mode, aperture, shutter speed, exposure compensation, and exposure lock are the only things that can be configured without using the rear-panel display). One feature we miss from Canon's mode advanced models that's missing from the XS is the infrared proximity sensor that turns off the LCD screen when you hold the camera up to your eye. It would not only conserve battery life, but would also reduces glare from the LCD when using the optical viewfinder. The Rebel XS instead disables the LCD when the shutter button is half-depressed. (You can optionally leave it on until the DISP or Set button is pressed.)
Overall, the control layout places a few main controls (Power switch, Shutter button, Main dial, Mode dial, and Flash button) on the right side of the Canon T3's top panel, with most of the other controls on the back of the camera. Let's take a closer look at some of the user-interface elements:
Canon T3 Rear-Panel LCD Display
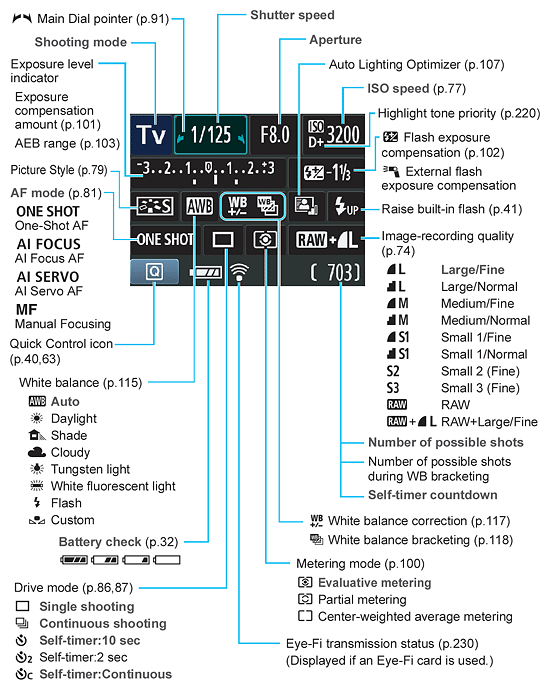
The image below shows callouts for all the information shown on the Canon T3's rear-panel display, by default. (Illustration courtesy Canon USA.)


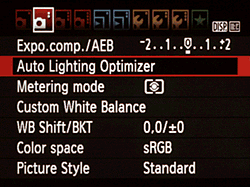
There are four Screen color options on the Status display, adjustable in the first Settings menu, under Screen Color. The color choices--and indeed, the information layout--on the Canon T3 are pretty radically different from those on the XS. I found myself preferring the default color scheme (top left in the group of shots above) in the daytime, thanks to its strong contrast. Color scheme 4 (bottom right) was similarly useful for shooting at night, reducing the contrast just slightly so as not to tire my eyes.
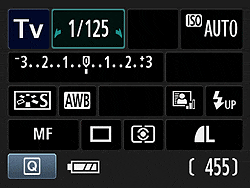
Whatever exposure parameter is currently being controlled by the Canon T3's Main Dial is highlighted with arrows in the corners of its box, to indicate that it can be changed by rotating the dial. Here, we're adjusting the shutter speed, marked by the outlined box. Note the arrows. (They're pretty subtle; we would have liked to see them a bit more prominent.)
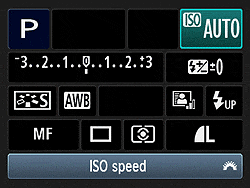
The rear-panel display on the Canon T3 is also used for Canon's Quick Control menu system, first introduced in the Rebel T1i. As with the later T2i model, though, nstead of using the SET button to enter the Quick Control menu, there's a Quick Control button dedicated to this purpose. Regardless of whether the LCD display was active or disabled, pressing the Quick Control button on the Canon T3 while in capture mode takes you to the Quick Control menu system, where you can adjust various settings shown on the rear-panel display. You navigate between the various setting options with the arrow keys, and the chosen setting will be highlighted as shown above. Once a setting has been selected, you can change it either by rotating the Canon T3's Main Dial, or by pressing the SET button, and then using the arrow keys to choose from the available options. The Quick Control menu is dismissed with a second press of the Quick Control button.
Pressing any of the arrow keys to the right of the Canon T3's LCD screen (if available in the current exposure mode), or the Set button while making changes in the Quick Menu, immediately brings up a screen for the exposure parameter associated with that button. Once the option screen is displayed, you can use either the arrow keys or the Main Dial to scroll the cursor highlight through the options presented. You can continue to press the same arrow-key button, or turn the Main Dial in the same direction, and the highlight will scroll through all the options, wrapping around when it gets to the end of the list. When you've made the choice you want, pressing Canon T3's Set button confirms it and returns you to the main shooting display or Quick Menu, as appropriate.
Canon T3 Playback & Record Review Displays
Like the Rebel XS, the Canon T3 shows each image as it's captured, though you can turn off this function through the Record menu. The display mode in Record Review defaults to the same as was last used in Playback mode, or you can hit the DISP button to cycle to a different mode. Likewise, in Playback mode, you can cycle between the available display options by pressing the Canon T3's DISP button repeatedly. (Display mode selection is persistent across both record and playback modes, no matter which mode you make the selection in.) You can also select between the normal luminance-based histogram and the RGB histogram option via a Playback-mode menu item. The screenshots below show the various displays and options available.
| Canon T3 Image Display Options | |
 |
 |
This is the default display in playback mode. The folder and file number is displayed upper right, and the shutter speed, aperture, and exposure compensation (if applicable) in the upper left, while the file sequence number and quality are shown below left. |
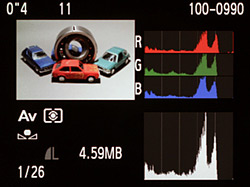
Pressing the DISP button cycles through the four available displays. This is the second option, which shows a histogram and more detailed exposure information. A setting in Playback Menu 2 lets you choose between a conventional luminance-only histogram, or the separate red, green, and blue displays. If there are any blown highlights, they'll blink in this mode. |
 |
 |
The Canon T3's third playback display option shows both RGB and luminance histograms side by side, along with an intermediate level of exposure information. If there are any blown highlights, they'll blink in this mode. |
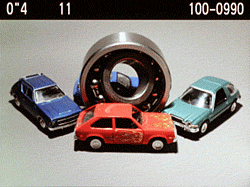
The final playback display option is image with no overlay. Since the T3's screen doesn't match the aspect ratio of its images, this still leaves a bar at the top of the image with the shutter speed, aperture, exposure compensation (if applicable), folder numbre, and file number. |
 |
 |
If you press the Zoom Out button while viewing a single image on the LCD screen, it'll take you first to a 4-image thumbnail display, and then to a 9-image one, if you press it once again. The arrow keys let you navigate among the thumbnail images. The text above the thumbnails displays the same basic exposure info for the currently-selected image as does the default single-image display. Pressing the DISP button in this mode overlays the image size/quality and file number for the currently selected image, as in normal playback mode. |
You can also zoom in on an image, up to 10x at the highest resolution. The small navigator window in the lower right-hand corner shows you what part of the larger image you're currently viewing. The arrow keys let you navigate around the full image, and the zoom in / zoom out keys increase or decrease the magnification level. We like that you can step between images with the main dial while maintaining the zoomed display. This makes it easy to compare focus or other fine details from one shot to the next. |
 |
 |
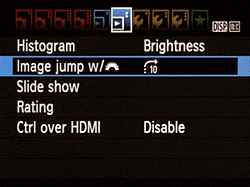
By turning the Main dial on the Canon T3 in Playback mode, you can "jump" through images in a variety of ways. An option on the Playback menu sets options of jumping through images 1, 10, or 100 images at a time, between shots captured on different dates or stored in different folders, between groups of movies, or groups of still shots. You can also jump between images by rating, either viewing only rated images, only unrated images, or only those with a specific rating. The jump menu setting only applies when you're in single-image playback mode. In thumbnail display mode, the Main Dial always jumps ahead one screen of thumbnails at a time, regardless of the menu setting for the Jump option.
|
Pressing the Delete button brings up this display, giving you the option to erase the current image, or cancel out of the delete option. The Delete display will show either the full image, a thumbnail plus histogram, or a screen of thumbnails with border highlighting the selected thumbnail, depending on the playback mode you've selected. |
 Fujifilm GFX 50S Review
 Fujifilm X-T3 Review
 Olympus E-M5 III Review

Follow Imaging Resource