Panasonic LX10 Image Quality
Color
Saturation & Hue Accuracy
Below average mean saturation but with very good mean hue accuracy.
 |
||
|
ISO Sensitivity
|
||
|
In the diagram above, the squares show the original color, and the circles show the color that the camera captured. More saturated colors are located toward the periphery of the graph. Hue changes as you travel around the center. Thus, hue-accurate, highly saturated colors appear as lines radiating from the center. Mouse over the links to compare results at different ISOs, and click on the links for larger images.
|
||
Saturation. Overall, mean saturation levels are lower than average from the Panasonic LX10 using default settings, at only 3% oversaturated at base ISO (most cameras oversaturate by about 10% to make colors more vibrant than real life). The LX10 pushes dark blues the most, but not by as much as most cameras, and only oversaturates red, orange and dark green by very small amounts, while it undersaturates yellow, light green and aqua tones. Mean saturation also slowly declines as sensitivity rises, to a minimum of only 91.3% (or 8.7% undersaturated) at ISO 25,600. Most consumer digital cameras produce color that's more highly saturated (more intense) than found in the original subjects. This is simply because most people like their color a bit brighter than life.
Skin tones. Here, the Panasonic LX10 did fairly well, producing reasonably natural-looking Caucasian skin tones, but they were a bit warm and yellow with both manual and auto white balance settings under simulated daylight. Where oversaturation is most problematic is on Caucasian skin tones, as it's very easy for these "memory colors" to be seen as too bright, too pink, too yellow, etc.
Hue. The Panasonic LX10 shifts cyan toward blue by quite a bit, but most other shifts like red toward orange, orange toward yellow, and yellow toward green are small. (The cyan to blue shift is very common among the digital cameras we test; we think it's a deliberate choice by camera engineers to produce better-looking sky colors.) The LX10's handling of yellows is one of its weaknesses, though, and is typical of Panasonics: Yellows are undersaturated, and shifted slightly toward green which can make them look a bit dingy. With a mean "delta-C" color error of 3.85 after correction for saturation, overall hue accuracy is however very good at base ISO, but as usual, hue error does increase as ISO rises, though not dramatically so. Hue is "what color" the color is.
 |
 |
 |
| See full set of test images
with explanations See thumbnails of all test and gallery images |
||
Sensor
Exposure and White Balance
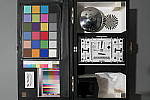
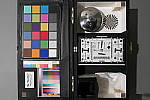
Indoors, incandescent lighting
The Auto white balance setting produced warm results and Incandescent was quite warm. Manual was pretty accurate, just slightly cool. Average exposure compensation required.
 |
 |
| Auto White Balance +0.3 EV |
Incandescent White Balance +0.3 EV |
 |
|
| Manual White Balance +0.3 EV |
Indoors, under normal incandescent lighting, color balance was a bit warm with the Auto white balance setting, while results with the Incandescent setting were very warm and orange. The Manual setting was by far the most accurate, just slightly on the cool side. (Note: The LX10 also has a Kelvin Temperature White Balance option, however we did not test that mode.) The Panasonic LX10 required +0.3 EV exposure compensation which is about average for this scene. (Our test lighting for this shot is a mixture of 60 and 100 watt household incandescent bulbs, a pretty yellow light source, but a very common one in typical home settings here in the U.S.)
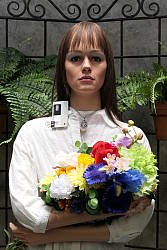
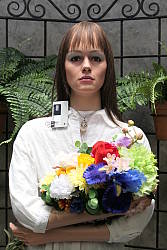
Outdoors, daylight
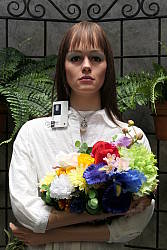
Decent color and exposure accuracy under harsh lighting, though with high contrast.
 |
 |
| Auto White Balance, +0.7 EV |
Auto White Balance, 0 EV |
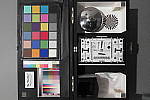
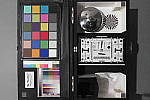
Outdoors, the Panasonic LX10 performed fairly well for its class. +0.7 EV exposure compensation was required to keep the mannequin's face reasonably bright in our "Sunlit" Portrait shot, which is about average among cameras we've tested. However default contrast is a quite high and the camera ended up clipping some highlights in the white shirt and flowers, and also produced some very dark, discolored shadows as well, though they are fairly clean. Auto color balance performed well in our "Sunlit" Portrait shot, though skin tones are just a touch yellow. Manual and Daylight white balance produced slightly warmer skin tones. The Far-field shot with Auto white balance looks a bit cool, and default exposure is slightly underexposed producing some very deep shadows that are noisy and discolored, however almost no highlights were blown as a result.
See full set of test images with explanations
See thumbnails of all test and gallery images
Resolution
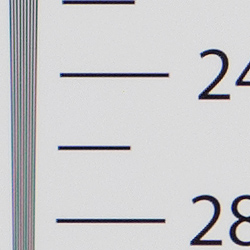
~2,500 to ~2550 lines of strong detail.
 |
 |
| In-camera JPEG: Strong detail to ~2,500 lines horizontal |
In-camera JPEG: Strong detail to ~2,550 lines vertical |
 |
 |
| ACR converted RAW: Strong detail to ~2,500 lines horizontal |
ACR converted RAW: Strong detail to ~2,550 lines vertical |
An in-camera JPEG of our laboratory resolution chart revealed sharp, distinct line patterns up to about 2,500 lines per picture height in the horizontal direction, and to about 2,550 lines per picture height in the vertical direction. Some may argue for more, but lines begin to merge at that point. Complete extinction of the pattern didn't occur until about 3,000 lines. An Adobe Camera Raw conversion produced similar results, but complete extinction of the pattern was extended to about 3,200 lines and color moiré is more visible. Use these numbers to compare with other cameras of similar resolution, or use them to see just what higher resolution can mean in terms of potential detail.
Sharpness & Detail
Slightly soft images but with good detail; some sharpening artifacts are visible. Moderate noise reduction at base ISO.
 |
 |
| High-contrast edges have moderate sharpening halos. |
Subtle detail: Hair Noise suppression tends to blur detail in areas of subtle contrast. |
Sharpness. The LX10 produces slightly soft-looking images at base ISO, however obvious sharpening halos can still be seen around high contrast transitions, such as the lines and text in the crop above left. Edge enhancement creates the illusion of sharpness by enhancing colors and tones right at the edge of a rapid transition in color or tone.
Detail. The crop above right shows good detail for the class of camera, with moderate levels noise suppression in the darkest areas of the mannequins's hair, and almost no chroma noise. Some individual strands are smudged together in areas of low contrast at base ISO, but performance here is actually quite good considering the size and resolution of the sensor. Noise-suppression systems in digital cameras tend to flatten-out detail in areas of subtle contrast. The effects can often be seen in shots of human hair, where the individual strands are lost and an almost "watercolor" look appears.
RAW vs In-Camera JPEGs
As noted above the Panasonic LX10 produces slightly soft images with noticeable sharpening halos. Let's see how an Adobe Camera Raw conversion at base ISO compares.
|
Base ISO (125)
|
|
 |
 |
 |
 |
 |
 |
|
Camera JPEG, defaults
|
RAW via Adobe Camera Raw
|
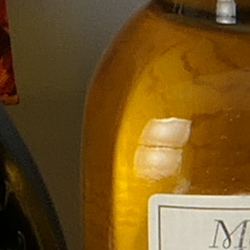
In the table above, we compare an in-camera JPEG taken at base ISO using default noise reduction and sharpening (on the left) to a matching RAW file converted with Adobe Camera Raw 9.1 via DNG Converter 9.8 using default noise reduction, then sharpened in Photoshop.
As you can see, ACR produced additional detail that isn't present in the JPEG from the camera. Perhaps the most dramatic increase in detail is in the fabric crop, where ACR was able to resolve much of the thread pattern in the red-leaf swatch which the camera's JPEG engine presumably treats as noise. ACR also did a bit better reproducing fine detail in the pink fabric, as well as producing more accurate color. But as is usually the case, much higher levels of luminance noise can be seen in the RAW conversion particularly in flat areas as shown in the bottle crop, thanks to ACR's light default noise reduction and the relatively strong sharpening required to keep the somewhat soft RAW images crisp-looking (we used 300% USM with a radius of 0.5 pixels and a threshold of 0). You can of course apply stronger noise reduction (default ACR NR used here) to arrive at your ideal noise versus detail tradeoff. Bottom line: As is almost always the case, you can do noticeably better than the camera with a good RAW converter, provided you're willing to apply your own noise reduction and sharpening to taste.
ISO & Noise Performance
Good high ISO performance for its class.
|
Default High ISO Noise Reduction
|
 |
 |
 |
| ISO 80 | ISO 100 | ISO 125 |
 |
 |
 |
| ISO 200 | ISO 400 | ISO 800 |
 |
 |
 |
ISO 1600 | ISO 3200 | ISO 6400 |
 |
 |
|
| ISO 12,800 | ISO 25,600 | |
ISOs 80 through 200 produce similar results, with detailed images containing low levels of fine-grained luma noise and almost no chroma noise. ISO 400 shows a more noticeable drop in image quality as noise reduction ramps, but fine detail is still quite good. ISO 800 shows another step down in image quality with additional blurring of fine detail and stronger luminance noise, but is still pretty good. ISO 1600 is noticeably softer thanks to much stronger noise reduction and more visible luma noise, but chroma noise is still fairly low. At ISO 3200, image quality takes a larger hit with higher noise, both luma and chroma, and the camera's processing starts to produce images with a somewhat crystalline look. Image quality drops off very quickly from here, with ISOs 6400 through 25,600 being quite noisy with strong luma noise and chroma blotching.
Overall, though, high ISO performance is pretty good for its class, but the LX10's default noise reduction is a bit heavy-handed at higher ISOs. We're of course pixel-peeping to an extraordinary extent here, since 1:1 images on an LCD screen often have little to do with how those same images will appear when printed. See the Print Quality section below for our evaluation of maximum print sizes at each ISO setting.
Note: We used to shoot this series at f/4 because of the relatively low light, but we now shoot it at f/5.6 or f/8 for 1"-type and larger sensors, as lens performance well away from center where we take the above crops is often not optimal at wider apertures. The added depth of field for a scene with this depth is also a better compromise than the potentially slightly sharper but shallower focus depth that a larger aperture would produce.
Extremes: Sunlit, dynamic range and low light tests
Decent dynamic range for its class in JPEGs. Excellent low-light performance, capable of capturing bright images and focusing in near darkness.
 |
|
 |
| +0.3 EV | +0.7 EV | +1.0 EV |
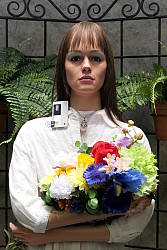
Sunlight. The Panasonic LX10 fared fairly well under the deliberately harsh lighting in the test above. To keep facial tones reasonably bright, +0.7V compensation was required, which led to some clipped highlights in the mannequin's shirt and flowers, though not as many as we often see in this shot. Detail is quite good in moderate shadows at +0.7 EV, though very deep shadows are noisy and discolored.
Because digital cameras are more like slide film than negative film (in that they tend to have a more limited tonal range), we test them in the harshest situations to see how they handle scenes with bright highlights and dark shadows, as well as what kind of sensitivity they have in low light. The shot above is designed to mimic the very harsh, contrasty effect of direct noonday sunlight, a very tough challenge for most digital cameras. (You can read details of this test here.)
| Face Detection | ||
 |
 |
 |
| Aperture Priority, f/5.6, 0 EV Face Detection Off |
Aperture Priority, f/5.6, 0 EV, Face Detection On |
iAuto, f/2.8, 0 EV |
Face Detection. Like most cameras these days, the Panasonic LX10 has the ability to detect faces (up to 15 in a scene), and adjust exposure and focus accordingly. As you can see from the examples above, face detection improved exposure in both Aperture Priority at f/5.6, and in iAuto mode where the camera had control over aperture, choosing f/2.8.
|
Far-field Highlight/Shadow Examples
|
|||
 |
|||
Highlight/Shadow Adjustment
The above shots are examples of Panasonic's Highlight/Shadow adjustment at work on our high-contrast Far-field subject, with no exposure compensation. There are four settings: Standard (default), Higher Contrast, Lower Contrast and Boost Shadows, along with 3 Custom settings which allow you to modify and recall custom tone curves. As you can see, it's a nice feature that offers much more control over highlights, midtones and shadows than the camera's basic contrast settings.

Intelligent Dynamic Range
The above shots are examples of Panasonic's Intelligent Dynamic Range Control (or iD-Range) at work, with no exposure compensation. Note that the camera does not take multiple shots and merge them as HDR mode does (see below). It's a system that adjusts local contrast and exposure more akin to Nikon's Active D-lighting, Canon's Automatic Lighting Optimization or Sony's Dynamic Range Optimization.
There are three levels of iD-Range available on the Panasonic LX10: Low, Standard and High, plus Auto and Off. It's automatically invoked in iAuto and some scene modes and manually selectable in PASM modes. As you can see, manual levels of iD-Range progressively attenuated highlights without impacting shadows and midtones, however the Auto setting produced very little change.
|
Far-field HDR Examples
|
||||
 |
||||
HDR mode
Here, you can see the Panasonic LX10's High Dynamic Range mode at work with our Far-field shot. HDR mode takes three images at different exposures and combines them to increase dynamic range. Mouse over the links, and click on them the view the full resolution files.
Auto mode chose +/-1 EV for this scene according to EXIF, however results don't match to +/-1 EV manual setting. +/-1 and +/2 EV produced very similar results, while +/-3 dimmed the entire image. Oddly, the +/-1 and +/-3 settings show more noise than the +/-2 and Auto settings. There were very few blown highlights to begin with, though, so this isn't the best subject to test HDR mode. Notice the double images and ghosting of the flag or people moving between frames, something to be aware of. Also notice the angle of view is narrower in the HDR images, likely because the images have been cropped and upsized during the optional auto alignment process.
| 1 fc 11 lux |
1/16 fc 0.67 lux |
1/16 fc No NR |
|
|---|---|---|---|
| ISO 125 |
 1.6s, f2.8 |
 25s, f2.8 |
 25s, f2.8 |
| ISO 3200 |
 1/15s, f2.8 |
 1s, f2.8 |
 1s, f2.8 |
| ISO 12800 |
 1/60s, f2.8 |
 1/4s, f2.8 |
 1/4s, f2.8 |
Low Light. The Panasonic LX10 performed well in our low-light tests thanks to its fast lens coupled to a 1"-type sensor, capturing bright images at the lowest light level (1/16 foot-candle), even at the lowest native sensitivity setting (ISO 125) and at f/2.8 (please accept our apologies as we normally take this series wide-open for fixed-lens cameras). As expected for a 1"-type sensor, luma noise is a little high at ISO 3200, but fairly fine-grained, while chroma noise is well-controlled. The LX10's highest native ISO of 12,800 is quite grainy with noticeable noise reduction artifacts, but that's no surprise.
Color balance is quite good with Panasonic LX10's Auto white balance setting, just a touch cool. We didn't notice any significant issues with pattern noise or heat blooming, however a few bright pixels can be seen at base ISO even with long exposure noise reduction active; high ISO noise reduction takes care of them at the higher ISOs.
Low-light AF: The camera's AF system was able to focus on our low-contrast and high-contrast AF targets unassisted down to an incredible -8.0 EV light level at wide angle, which is outstanding thanks to its fast aperture, though it does take a while to focus in such dim conditions. And with the AF assist lamp enabled, the LX10 can focus in complete darkness. Performance with the AF assist lamp of course will vary with subject and distance, though.
How bright is this? The one foot-candle light level that this test begins at roughly corresponds to the brightness of typical city street-lighting at night. Cameras performing well at that level should be able to snap good-looking photos of street-lit scenes.
NOTE: This low light test is conducted with a stationary subject, and the camera mounted on a sturdy tripod. Most digital cameras will fail miserably when faced with a moving subject in dim lighting. (For example, a child's ballet recital or a holiday pageant in a gymnasium.) For such applications, you may have better luck with a digital SLR camera, but even there, you'll likely need to set the focus manually. For information and reviews on digital SLRs, refer to our SLR review index page.
Output Quality
Print Quality
Nice, large 24 x 36 inch prints up to ISO 200; Pleasing mid-range ISO prints up to 13 x 19 inches until ISO 800; Usable 5 x 7 inch prints up to ISO 6400.
 ISO 80 prints look very nice up to an impressive 24 x 36 inches, with a lot of fine detail and pleasing colors. Upon close inspection, you can see some minor pixelation since we're pushing the limits of a 20-megapixel sensor here. However, it's very minor, and at the typical viewing distance for a print of this size, it doesn't affect the overall print quality.
ISO 100 images, much like ISO 80, look nice up to 24 x 36 inches. We couldn't see much discernible difference in print quality between this and the lower ISO level.
ISO 125 prints look practically identical to ISO 80. There's a very, very subtle increase in shadow noise, but it's so minor that it has no impact on print quality. Prints up to 24 x 36 are therefore very good at this base ISO, with prints showing lots of detail and nice colors.
ISO 200 images are, again, very similar to the previous ISO, yet with just the faintest hint of increased shadow noise. Still, prints look great up to 24 x 36 inches.
ISO 400 prints top out at 20 x 30 inches. Background and shadow noise are a bit stronger now, and we see a slight drop in overall fine detail. Prints up to this maximum size, however, are crisp with lots of detail and noise is well-controlled.
ISO 800 images start to display a more noticeable drop in detail due to noise and noise reduction processing. While 16 x 20-inch prints might work for less critical applications or with careful post processing, we'll play it safe and call it at 13 x 19 inches here.
ISO 1600 prints display quite a bit of softening due to noise reduction, though the camera does a nice job of removing visible noise and grain, at the expense of fine detail, unfortunately. Colors also start to look a bit on the blander side at this sensitivity. Therefore, at this ISO, we're calling it at 8 x 10 inches for the maximum print size.
ISO 3200 images show an even further reduction in fine detail due to noise and NR processing, keeping us from calling a good print larger than 5 x 7 inches.
ISO 6400 prints should also be kept at 5 x 7 inches at maximum. Noise is quite apparent and really hurts fine detail at larger sizes.
ISO 12,800 / 25,600 images, unfortunately, are too soft and lacking in detail for us to comfortably consider usable for prints.
Competing against the wildly popular Sony RX100-series and Canon G7X-series, the LX10 is Panasonic's take on the premium compact camera. Also sporting a 20-megapixel 1-inch-type CMOS sensor, the Panasonic LX10 has a similar showing to the RX100 IV, for example, with comparable print sizes up to ISO 800. At extended low ISOs and through ISO 200, the LX10 offers nice, high-resolution prints up to 24 x 36 inches, which is quite impressive even though they are pushing the limits of its sensor. At ISO 800, the LX10 offers pleasing prints at up to 13 x 19 inches. However, past that ISO level, the LX10 begins to show some noticeable print quality degradation due to strong noise reduction processing, which does a good job of removing noise but at the expense of fine detail and color saturation. ISO 1600 prints top out at 8 x 10 inches, while ISO 3200 and 6400 are limited to 5 x 7 inches. At the maximum native ISO of 12,800 and extended ISO 25,600, the LX10's prints are too noisy and lacking in detail for usable prints.
The images above were taken from our standardized test shots. For a collection of more pictorial photos, see our Panasonic Lumix DMC-LX10 Photo Gallery .
Not sure which camera to buy? Let your eyes be the ultimate judge! Visit our Comparometer(tm) to compare images from the Panasonic Lumix DMC-LX10 with those from other cameras you may be considering. The proof is in the pictures, so let your own eyes decide which you like best!
 Fujifilm GFX 50S Review
 Fujifilm X-T3 Review
 Olympus E-M5 III Review

Follow Imaging Resource