MS. CONGENIALITY AWARD
HP C8180 -- All-in-One (Plus)
 By MIKE PASINI
Editor
The Imaging Resource Digital Photography Newsletter
Review Date: June 2008
The HP C8180 is the company's top of the line all-in-one device, mating a 9600-dpi scanner capable of both reflective and transparency scanning with a printer that also includes CD/DVD burning and label printing with LightScribe. But it also wins the Ms. Congeniality Award for its touchscreen interface, card reader and its connectivity options: Hi-Speed USB, Ethernet, PictBridge, Wireless G and Bluetooth.
The C8180 has no standalone fax capability. It can, however, scan legal-size documents and print photos with HP's Vivera six-color ink set. And it can also print lined school paper (graph paper, notebook paper, task checklist and music paper) right from the control panel.
It isn't the least expensive all-in-one we've reviewed, but the $399.99 printer is currently available with an $80 instant rebate from HP for $319.99 (although we've seen it as low as $239.99).
FEATURES | Back to Contents
To appreciate just what a bargain that is, take a look at the main features of the C8180:
- 96-bit, six-color reflective and transparency scanning
- Lab-quality, fade-resistant photos and laser-quality documents in six-ink color
- Interactive 3.5" touchscreen to edit, save, print, and share
- Save photos to discs and print from them
- Label discs by applying silkscreen-quality text, photos, and graphics directly on CDs and DVDs
- Print up to 34 pages per minute in black and 33 in color; get photos in as little time as 10 seconds
- Print from compatible memory cards, Bluetooth-enabled devices, CDs, DVDs
- Edit, print, and share photos with the included Photosmart Essential software
- Start HP Photosmart Express to quickly share, save, and print photos
- Ensure that photos print on the correct side of the page with the right quality settings with HP Auto Sense and HP Advanced Photo Paper, HP Premium and Premium Plus Photo Papers and HP CD/DVD Tattoos
- Share and print from your networked computers using the built-in wireless and Ethernet connectivity
- Remove red eye from photos with the touch of a button
- Print Web pages without truncated edges with our Smart Web Printing
- Switch between 4x6 photos and documents without having to swap the paper
- Touch a button to reprint photos and get crisp copies
- Smudge-resistant prints when using HP Advanced Photo Paper
- Six individual ink tanks; print even more affordably with optional high-capacity black cartridges
- One-year limited warranty
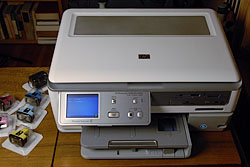
Unpacked. It fits nicely on an old typing table.
SPECIFICATIONS | Back to Contents
The C8180's technical specifications include:
- Real Life technologies include HP Adaptive Lighting, HP Auto Red-eye Removal, HP Scratch and Dust Removal
- 3.5-inch touchscreen LCD
- LightScribe
The C8180's printer specifications are:
- Print speed: Color up to 33 pages per minute, black up to 34 ppm
- Print resolution: black only up to 1200 dpi when printing from a computer; color up to 4800x1200 when printing from a computer
- Optional duplex printing
The C8180's scanner specifications are:
- Scanner resolution: Optical: up to 9600 dpi; Interpolated: up to 19200 dpi
- Scanner bit depth: 96-bit
- Maximum document scan size: 8.5 x 11.7 inches
- Scanner input type: Flatbed
The C8180's copy specifications are:
- Copy speed: Color: 33 cpm; Black: 34 cpm
- Maximum number of copies: Up to 50 copies
- Copy scaling: 50 to 400 percent
The C8180's photo specifications are:
- Borderless printing up to 8.5 x 11 inches
- Direct photo printing to CD, DVD, memory cards, PictBridge cameras, USB-based mass storage devices
- Memory card support for CompactFlash, xD, Secure Digital (SD)/Multimedia Card (MMC), SDHC, HDMMC, MMCPlus, Memory Stick (MS), MS Pro, MS Duo, MS Pro Duo, with adaptors (not provided, purchase separately): miniSD, SDmicro, MMCMobile, MS micro
The C8180's paper specifications are:
- Supported paper sizes: Letter, legal, executive, No. 10 envelopes, cards, borderless photo (4 x 6-in, 5 x 7-in, 8 x 10-in), borderless panorama (4 x 10-in, 4 x 11-in, 4 x 12-in) - Recommended monthly volume: Up to 3000 pages
- Paper handling: 100-sheet multi-purpose tray, 20 sheet photo tray
The C8180's connectivity specifications are:
- Networking: Standard (not an option)
- Connectivity: Hi-Speed USB, Ethernet, PictBridge, Wireless 802.11g, Bluetooth
The C8180's general specifications are:
- Dimensions: 17.6 x 15.4 x 8.5 in (with paper tray retracted, power cable not installed)
- Weight: 25 lbs.
- Supported operating systems: Windows 2000 (SP3 or higher, some features not available), Windows XP Home, Windows XP Professional, Certified for Windows Vista(TM); Mac OS X v 10.3.9, Mac OS X v 10.4 or higher
- Compatible Vivera cartridges: HP 02 Black Ink Cartridge (10 ml), HP 02 Cyan Ink Cartridge (4 ml), HP 02 Magenta Ink Cartridge (3.5 ml), HP 02 Yellow Ink Cartridge (6 ml), HP 02 Light Cyan Ink Cartridge (5.5 ml), HP 02 Light Magenta Ink Cartridge (5.5 ml)
CONSUMABLES & ACCESSORIES | Back to Contents
The C8180 uses Vivera inks (the 02 designation). Black cartridges cost $17.99 and color cartridges (cyan, yellow, light cyan, magenta and light magenta) are $9.99 each.
HP offers the following ink and photo value packs compatible with the C8180:
- HP Custom 02 Series 150-sheet Photo Value Pack for $35.99
- HP 02 Twinpack Black Vivera ink cartridge for $32.99
- HP 02 Inkjet Color ink cartridges color combo pack for $44.99
Also available are HP Photo Books, something we liked very much for their attractiveness and simplicity:
- HP 8.5x11 Photo Book in any of five colors for $24.99
- HP 5x7 Photo Book in any of five colors for $14.99
Accessories include:
- $19.99 inkjet/all-in-one cleaning kit, which includes a pouch, 10 swabs, 10 dry cloth, five pre-moistened cloths, a user guide and a 20ml bottle of cleaning solution
- HP ph5582 two-sided printing accessory for $79.99
- A two-year ($39.99) or three-year ($59.99) next-day-exchange extended service plan
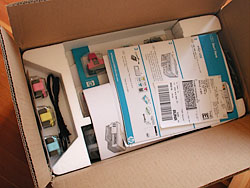
In the Box. The first thing you see is the instruction poster.
IN THE BOX | Back to Contents
Included in the C8180 All-in-One shipping box are:
- The C8180 All-in-One
- Power cord
- Starter ink cartridges that must be used first
- Set-up guide
- User guide
- Sample paper pack
- Installer CD
In addition, you may need a USB cable if you are not planning to use the printer wirelessly. This may be one of the few printers that does not ship with a USB cable for a good reason.
INSTALLATION | Back to Contents
The C8180 comes with an easy-to-follow installation booklet, which we always applaud, although this one is a bit complex. But so is the printer. Do you want to connect it to your network or a computer? And if a network, do you want to connect with a cable or wirelessly?
The wireless feature in this day of broadband routers is a tremendous advantage in placing the printer. It can go anywhere, really, as long as your router can find it. Since it also operates without a computer to copy photos or documents, you don't have to keep it with the computer gear. All you need is an electrical outlet.
The power brick is not small but it isn't as large as the one that ships with the Kodak all-in-ones.
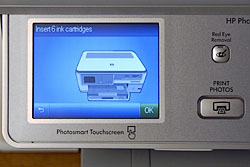
Follow the Directions. The touch screen takes you through installation.
The first step in installing the device is to unpack it. At 25 lbs. that isn't trivial. Lay the box on its side and slide the printer out so it is upright. Remove the plastic bag and then take off all the tape and protective film (covering the light plastic color and the LCD).
There's no need to worry about unlocking the scanner. There's no lock.
The second step (well, step five in the booklet) is to provide power to the printer so you can install the ink cartridges. The power cord to the wall outlet is quite short but the thin power cord from the brick to the printer is quite long. Just connect the power cord and the adapter to the back of the printer and press the Power button in front to turn it on.
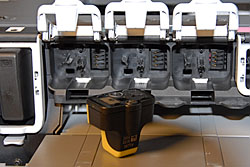
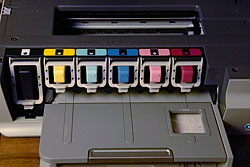
Ink System. The top image shows the large black cartridge snapped into place with the first three color cartridge slots open and cartridge standing on end in front of them. The bottom image shows all the cartridges installed.
After selecting a language, you can open the access door (just lift it up) and open all six ink cartridge latches.
HP supplies a set of starter inks that are chemically distinct from their regular cartridges. The ink in these cartridges, which are all packed together, is formulated to mix with the ink already in the print head assembly. When they're depleted, you can install normal Vivera 02 cartridges.
If you mistakenly install real ink, the printer will wag a finger at you. Just put the right cartridges in. Like we, uh, finally did.
The latches are color coded. Match the ink cartridge to the color coded latch and push the cartridges in, then close the latch securely. They only go in one way (with the HP logo upright) and they don't have to click into place. Just push them in until they stop and then close the latch. The latch does click into place, providing the tension needed to hold the cartridge in place.
With all the cartridges in place, you can then close the access door.
Mixing the normal cartridges with the starter cartridges, which is inevitable, didn't cause any problems.
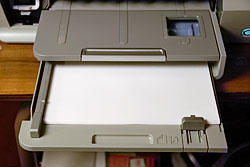
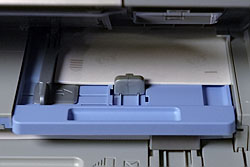
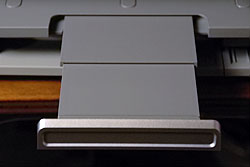
Paper Tray. The letter size tray (top) pulls out. You can see the 4x6 photo tray (middle) through a window on the output tray (bottom) which extends to catch letter-sized sheets.
To load paper, you pull out the paper tray from the bottom and put plain white paper in to print the calibration page. You can also load the photo paper tray by lifting the photo tray lid, pulling out the photo tray and inserting the paper with the printing surface down. Push the tray back in and lower the lid. Then pull out the tray extender and lift up the paper catch to make sure your prints don't hit the floor.
The paper trays are the weakness of the C8180, which is otherwise stoutly engineered. It's easy to forget when you have to lift the tray lid and how to get to the photo tray. It seems like the trays should pull out further than they do and it's hard to tell when they're fully inserted.
It takes about four minutes for the printer to prime the new print head.
The next stage of the installation is interesting. The road diverges into three connection choices: USB, Wireless G or Ethernet. Pick one, just one, to survive.
Unfortunately, the guide is, while technically correct, quite confusing about this. It's much to easy to confuse Step B with Section B. So pay no attention to the guide and listen to us.
For a USB connection, install the software on the green CD and then connect the printer to your computer with a USB cable.
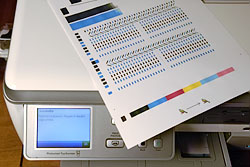
Calibration. The calibration page.
For an Ethernet connection, connect the printer to your router with an Ethernet cable. There's a little yellow insert to remove on the printer. Then install the software on the green CD.
But for real fun, just make a wireless connection.
WIRELESS | Back to Contents
To make a wireless connection, you have to know what your router's network name is (sometimes called the SSID) and what the password is (WEP or WPA). If you don't have a password, you should. Take this golden opportunity to set one up.
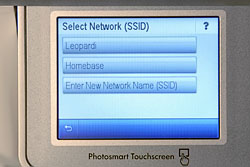
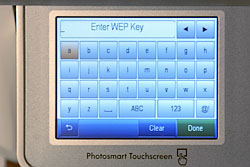
WiFi Setup. It found the available networks with no problem and let us enter our password using a virtual keyboard.
You use the touchscreen LCD to enter this information in the printer's Network settings. There's actually a Wireless Setup Wizard to help you.
You can enter the network name of your router manually if the printer can't find it. But in either case, you'll have to manually enter the password. Make sure you observe the correct case when you type it in. The virtual keyboard makes a nice clicking sound.
If you aren't in love with the touch screen by the time you get this far, you must be in a committed relationship.
Then you can insert that green CD in your computer and install the software.
CONFIGURING THE PRINTER | Back to Contents
There are some other configuration options you should be aware of before using the printer. You can access all of them from the printer's LCD menu, just as you did to setup the wireless connection.
The most important ones we found in using the printer involved setting up the CD/DVD drive to be used by either the computer, the printer or shared by both. When the drive is set up to be shared and after backing up a memory card to it, we would get an error message on the computer through the HP Message Center that only one memory device at a time was supported.
We ignored that but if it bothers you the solution is not to share it with the computer. There was no error reported on the printer itself.
The other important settings have to do with how much automatic editing the printer does to your photos. You can, for example, set the printer to always scan for and fix red-eye (which is not a bad idea unless you never have red-eye). There's a big Red-Eye button on the control panel, too.
You can also tell the printer to use HP's Photo Fix technology to enhance your images. We found that to be a large pain, partly because turning it off on the computer seemed to have no effect on the printer setting.
We printed an image first directly from the card with Photo Fix enabled on the printer and then we printed the same image from the computer, disabling Photo Fix in the print setup dialog box. The first print looked good but the second was grossly oversaturated.
Bluetooth takes a separate configuration step using the Web-based interface to turn it on and assign a password, if you want. We had great fun copying cell phone images to the printer, which spit out 4x6 prints (but we had to wait until each print was done before sending the next image).
HARDWARE TOUR | Back to Contents
The C8180 puts everything you need in front of you but the back side has a few things worth pointing out.
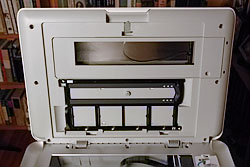
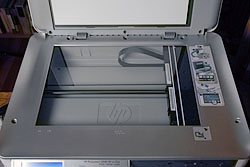
Glass. The sticker on the right reminds you how to scan film. The slot in the lid (top) is the window for film scanning. The holder is visible just beneath it.
Those include the Slide and Negative Film light power port, the Ethernet port, the Rear USB port and the Power connection in the lower left corner and the Rear door for clearing paper jams or installing the duplexing option. Make your physical connections (which may just be the AC cord) and you can forget about the rear of the machine.
The C8180's lid contains a light source for one strip of 35mm film. The Lid backing provides a white background to scan reflective material but it also detaches to reveal the light source and a slide and negative film holder that you lay on the scanner glass.
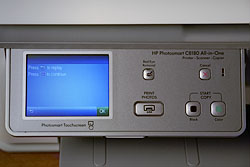
Control Panel. The screen is the 'big' button. A red-eye removal button sits above the Print Photos button. Next to them a Cancel button is above the Smart Copy button for Black or Color copies. We spent all of our time on the touchscreen, though.
The paper trays are built-into the C8180. There is a small 4x6 photo tray that uses tabbed sheets for full bleeds. It sits above a small capacity letter-sized tray. The output tray with an extension to catch longer sheets is also the cover to the paper trays. It lifts up to provide access to the paper trays. And the large tray slides out a bit for full access.
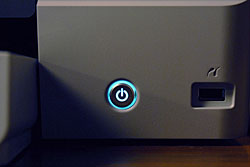
Power Button. Nicely illuminated, as are the connection indications for WiFi, Bluetooth and Ethernet.
Next to the trays is the Power button. There is a USB port just to the right of it, as well.
Just below the lid and above the trays is the Control Panel on the left and the card reader of the right with the CD/DVD writer just below the card reader. A series of status lights is below the CD/DVD writer.
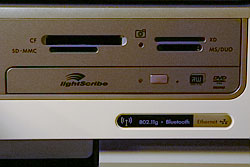
Card Reader. The card reader ports are above the CD/DVD writer with is just above the indicator lights for the WiFi, Bluetooth and Ethernet connections.
The layout is very clean and straightforward and the status lights make it possible to monitor operations from across the room.
The top section of the printer lifts up to reveal the ink cartridge bays. A latch holds each cartridge in its color-coded bay. Installation and remove of the cartridges is easy but it can be a little unnerving to simply slip the cartridge into the bay because nothing snaps into place until you lower the latch.
LIGHTSCRIBE TECHNOLOGY | Back to Contents
With a specially-coated CD or DVD, a LightScribe drive can, using special software, etch a grayscale image on the top of the disc, which is available in several colors, as its label. The etching starts from the center of the disc and moves outward using an encoded ring around the hub for precise alignment.
Images do not burn very darkly to the disc (although you can, thanks to that alignment code, burn them more than once to darken them) and they can take quite a while to burn, too. Like 20 minutes.
The labels are susceptible to heat, humidity and direct sunlight, fading in as little as two months if not properly stored in a cool, dark place.
But the greatest problem we had with LightScribe was finding software to run on OS X. There really aren't any LightScribe-enabled applications or drivers. You can build a nice label in Photoshop, but getting it to burn is another story.
You can, however, created a text label in about nine minutes at the printer itself. It isn't fancy, but it works.
INK & PAPER | Back to Contents
There's been a lot of discussion over the relative merits of pigments vs. dye-based inks. The longevity of HP's Vivera dye-based inks when used on HP's Premium Plus photo paper exceeds 100 years, according the tests by Wilhelm Imaging Research, Inc.
That mates the dye-based Vivera inks to a swellable sheet that should not be handled right away. We let them sit for 24 hours, actually, before framing or stacking them. That's quite a bit less convenient than Kodak's pigment-based system, which lets you handle the prints right away (and doesn't have tabs that have to torn off the 4x6 sheets).
GETTING TO WORK | Back to Contents
Card Reader. We had a little trouble inserting an SD card into the SD card slot. We did finally figure it out, but it should be a smoother operation.By default, the HP applies some photo smarts which it calls Real Life Technologies to the images it prints directly from a card. Changes include adjusting the brightness of the image, lightening dark images and sharpening blurry images. In our case, a normal scene looked pretty good but a shot of the ocean taken into the sun was printed so dark it looked like a moonscape.
You can turn off this special treatment from the Photo Fix menu in the Edit screen.
One of our tests was to take a set of 100 photos, select about 30 of them and print them from the card inserted into the card reader.
The 3.5-inch screen was perfectly adequate for viewing the images one at a time and selecting them for printing (much as you'd do with a PictBridge-compatible camera). It was also enough real estate for showing crops.
Part of the test was to trick Joyce into doing it. They were her pictures, after all. But she enjoyed it (once we found a stool for her to sit on). Older HP all-in-ones would print out an index sheet of what was on the card and you'd mark up the ones you wanted to print then scan the marked up sheet.
But on the C8180, you use the LCD to walk through the contents of the card, selecting various images to print (or all of them with one tap of the screen). That has the advantage of letting you do some basic but essential edits like cropping the image. It's very easy to either move the frame around to crop in one edge or the other or to zoom into a smaller part of the image (something that large megapixel digicams make quite feasible). And when you're done, the C8180 remembers where in the queue of images you were so you can continue right where you left off.
The only hitch was it takes a while to actually make the print. You can "get photos in as little as 10 seconds," HP says, but high-quality prints take a good deal longer. Our first print took about 16 seconds longer than subsequent prints because the 4x6 photo paper tray had to be engaged. Total time for a borderless 4x6 from the card reader was two minutes three seconds.
Backup. You can easily backup the contents of a memory card to a CD or DVD just by following the CD/DVD menu option on the touchscreen to the Backup option. Push the Open/Close button on the disc tray to open the tray and drop in a disc.
We used a rewritable CD to copy a card with no problem. We used the same CD to copy another card and again the backup was completed with no issue. The printer uses a multisession format so you can keep writing to the disc until it fills up. Each card's contents is recorded as a different album on the disc.
That turns out to be an excellent way to archive your images because it's very easy to do and you don't have to use a computer (or choke a computer's hard drive with images). We still recommend copying your images to multiple devices and storing a set or two off site, but you can get a head start on the whole thing with the C8180's disc drive.
Photo Reprints. We were able to copy a 4x6 print on our third try. We loaded a 4x6 landscape print on the scanner bed in the orientation you would use to look at it (landscape). Then we hit the Copy option. That printed it on the lettersized paper, but only at 100 percent.
We tried the Scan option's Scan and Reprint, which printed it on the 4x6 paper, but in portrait orientation. So we turned the landscape print to portrait orientation, scanned again and got our borderless copy print. It looked quite nice, actually.
Only later did it occur to us to wonder how you enlarge an image. Fit to Page is the option. There's no percentage increment you can select. It's either original size or Fit to Page (which may be either an enlargement or reduction). We popped a small 2x3-inch image attached to a magnet into the scanner and printed it on a 4x6 sheet of Advanced Photo Paper. It looked very good.
So to copy photos, you really want the Scan option. That takes you to the normal options for photo printing.
Scanning Film. Unlike the Kodak all-in-ones, the C8180 can scan a strip of 35mm film or slides. One of the beauties of this capability is that you can make prints directly from your film negatives. And slides, too.
Remove the white lid cover from the inside of the lid and detach the Slide and Negative Film Holder. It has two strips, one for four mounted slides and another for a strip of film.
There's no indicator on the holder, but the proper orientation is to load the emulsion up. You're doing it right if the base is rubbing against the holder as you slip a filmstrip in. Don't rub the dull, emulsion against the film holder -- you can scratch your film.
You should also orient your originals so the bottom of the image is adjacent to the edge of the holder, not the middle of the holder. You don't have to worry about pushing a short strip of film all the way in because the scanner finds the film just fine. Same for slides. Use any holder spot you like.
There's a big white arrowhead on the corner of the holder that should be aligned with the corner of the scanner bed.
The first time we tried to scan to a thumbdrive, we just picked the Scan to Memory Device option. That scanned an image of the scanner bed to the thumbdrive. So we wised up and told it to Scan Film and then to Scan to Memory Device.
That took a lot longer to scan. The C8180 scans an 18.4-MB image, saving it as a 944K file.
We also tried scanning to print. The entire filmstrip is presented much like a memory card of images. You can make some adjustments (red-eye, Photo Fix, crop) and select images to print and then print them.
We weren't happy with either of the first two prints. The very first was unedited (except for Photo Fix) and was acceptable, although the skin tones leaned toward green. The second print was very yellow, completely different from the preview.
Our first scan of a 35mm slide was of a difficult, high-contrast scene. The C8180 did well to hold the highlights and reveal shadow detail but there were faint horizontal lines through the shadows in the high resolution scan.
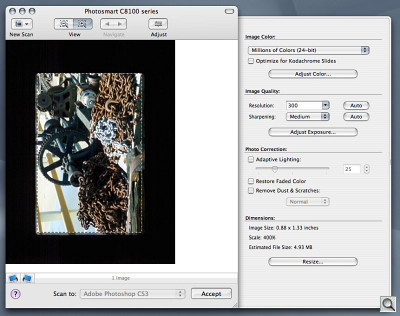
So instead of scanning to a thumbdrive, we tried using HP Scan Pro, a TWAIN driver, through Photoshop CS3. That was interesting. The interface is fairly straight-forward, although like other HP scanning products, it does the thinking for you, asking what resolution you want and what output size.
The surprise, though, was that the image was mirrored compared to the thumbnail scan. No accounting for that.
The scan itself was just a 10-MB scan for 5x7 reproduction at 300 dpi, so it didn't exhibit the faint horizontal lines.
While we wouldn't want to rely on the C8180 to scan our film archive, we do think it does a good enough job to scan your film for prints. And by that we mean at least as good as a one-hour photo lab. That's an improvement over other HP film scanners we've seen.
MAINTENANCE | Back to Contents
Inkjet machines have a reputation for being temperamental, but a few simple procedures can just about eliminate the problems. For any inkjet:
1. Do not use a power strip to control the printer, use the printer's own Power button. The printer button, unlike the power strip button, initiates a shut down procedure that parks the print head where it won't dry out.
2. Use it. Letting the printer sit for weeks between uses will degrade the print head. Run a job every week. If you've let the printer sit as long as a month, you may have to run the print head cleaning maintenance utility to flush the print head out. Which just dumps ink through the head, so you might as well print something every now and then.
By following those two simple procedures, you can eliminate many print quality problems and printer performance issue. If you do discover a problem, HP's printer utility provides commands to check the nozzle pattern, flush the print head, do deep cleaning of the print head and realign the print head.
Our experience with the C8180 was remarkably trouble-free. It became our everyday printer when we returned the Kodak 5500 but we don't print every day. The cartridges lasted a long time and we didn't experience any clogs or print defects we could attribute to maintenance issues.
All-in-ones have a couple of other cleaning requirements often overlooked. The first is to clean the glass. Fingerprints, smudges, hair and dust can all degrade a scanned image. HP recommends using glass cleaner sprayed onto a cloth to avoid any chance the liquid will seep under the glass and into the scanner.
At the same time, clean the lid backing, which can pick up all kinds of dirt from the glass and the backs of the items you've been scanning. HP recommends using mild soap and water to clean the backing gently without scrubbing.
CONCLUSION | Back to Contents
| Pro: | Con: |
|---|---|
|
|
The HP Photosmart C8180 All-in-One printer is a complex device that is actually pretty simple to use. A lot of the credit for that goes to the wonderful touchscreen menu system HP has designed. You need no training to figure it out. And that's saying a lot because there are a lot of things you can do with this printer from backing up your memory card to a CD or DVD to saving 18.4-MB scans of your film strip images to a thumbdrive.
Even better is the unit's connectivity options. With USB and Ethernet it has wired connections covered for both the home user and the office network. But with Bluetooth and WiFi, it also offers a convenience factor that surpasses its competitors.
So what about image quality? We were generally very pleased with the six-color prints that came out of the C8180. In some cases we preferred the C8180 prints to the pigment-based B9180 prints of the same image. So no complaints about print image quality.
The C8180 does the job in an imperfect world. It was a valued assistant here for the several months we tested it.
