TROUBLE-FREE JUMBO PRINTS
Canon CP510 & CP710 --
Compact 4x6 Photo Printers
 By MIKE PASINI
Editor
The Imaging Resource Digital Photography Newsletter
Review Date: July 2006
Once upon a time, the only company that made a 4x6 dye sub photo printer was a little firm called Fargo. Eyup, that's right. The Foto Fun, they called it -- and it lived up to its name, making genuine continuous tone prints (just like the drugstore) and offering clever applications like transfers to mugs you cooked in your oven.
That was in the last century, though, when the only way you could get an image on your computer was to scan it. And only geeks with an artistic flair (a rare breed) had scanners.
Then came the digicam and then the messy inkjet and then the bright idea that 4x6 dye subs were all anyone really needed to flip through their latest pictures. Industry luminaries like O'Reilly's Derrick Story would even bring along one of the compact little marvels to lectures. Trouble-free, no mess, you can put the print in a glass of water and it will survive!
Now, just about everybody with a logo makes a 4x6 compact printer. In this crowded field, the competition is heated (no pun intended) and the results depend on whether you're swayed by quality, speed, cost per print or extra features. The first three of which are, frankly, indistinguishable, while the last continues to astonish.
Kodak's EasyShare printers are clearly the most feature-ridden exemplars of this breed with camera docks and WiFi capability. Hi-Touch has maintained its reputation for quality, still winning PMA shootouts even after all these years.
Canon, of course, enjoys staunch brand name loyalty, and they've capitalized on that feature and a few unique ones with their $99.99 SELPHY CP510. The slightly fancier $149.99 CP710 adds a card reader and 2.5-inch color LCD screen to the basic CP510 package. Both can print 4x8 panoramas and be battery powered (battery not included), a couple of unique twists.
SPECIFICATIONS | Back to Contents
Features on the SELPHY CP710 and CP510 include:
- Print Method: Dye-sublimation thermal transfer with overcoating
- Resolution: 300x300 dpi
- Gradation: 256 gradations per color
- Ink: Proprietary dye ribbon in a cassette with yellow, magenta, cyan dyes plus a UV overcoating
- Feeding System: Auto feed from sheet paper cassette with tear-off margins
- Paper Eject System: Auto paper ejection on top of the paper cassette
- Print Modes: standard one-screen print, either bordered or borderless, and multiple eight-screen label prints
- Print Sizes: Variations on the basic 4x6 with an optional 4x8 wide size
- Print Speeds: Borderless 4x6 in about 58 seconds, wide size about 74 seconds
- Interface: Canon Direct Print port, USB to computer (cable not included), PictBridge via retractable USB cable; CP710 includes a card reader that can directly read CompactFlash, Memory Stick, Memory Stick Pro and SD/MMC (an adapter is required to read miniSD, xD Picture, Memory Stick Duo and Pro Duo).
- Power: AC 100-240 volts (50/60 Hz) consuming 60 watts (4 watts when idle)
- Dimensions: 7x5.2x2.5 inches (178x131x63mm)
- Weight: CP510 is 33.2 oz. (940 grams); CP710 is 34.6 oz. (980 grams)
Specifications for the optional Battery Pack (which attaches to the back of the printer) include:
- Type: Rechargeable Lithium Ion
- Nominal Voltage: DC 22.2 volts
- Nominal Capacity: 1200 mAh
- Charge Cycles: Approximately 300
- Number of Prints: About 36 4x6 prints or 24 4x8 sheets
- Dimensions: 4.3x1.6x1.5 inches (110x40.7x37.5mm)
- Weight: 8.1 oz. (230 grams)

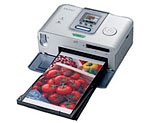
Compact. The CP510 itself is compact but don't forget to pack its power brick and paper cassette, too.
IN THE BOX | Back to Contents
Packaged in the retail box are:
- The SELPHY CP510 or CP710 printer
- Paper cassette
- Five sheets of postcard size paper
- Ink cassette with a capacity for five postcard sheets
- Plastic cleaner stick
- CP Printer Solution CD
- Power adapter brick and power cord
- Dust cover for back opening (a hinged cover protects the front opening)
SUPPLIES | Back to Contents
As with all dye-sub printers, media is sold as a set including a ribbon with enough dye to print the included sheets of paper.
Canon sells three different paper cassettes (postcard/4x6 size, credit card size and wide size), five paper kits (36 or 108 postcards (printed on the back), 36 4x6 prints, 36 credit card prints, 24 4x8 prints), two label kits (18 credit card size label sheets, 18 credit card 8-label sheets).
The company also sells an optional battery pack (NB-CP2L) and a Bluetooth unit (BU-20) for these printers.
The firmware is upgradable, with updates posted at http://web.canon.jp/imaging/information-e.htm.

Paper Cassette
HARDWARE TOUR | Back to Contents
Canon sent the CP510 for testing, so let's take a tour of hardware features.
The baby blue front dust cover flips down to reveal the paper cassette slot and, above it to the left, the retractable USB cable to the PictBridge interface. The cable stretches out about 10 inches and grabs. To retract it, just yank it back out a bit and it will zip back in.
On the right side of the front panel is the flip down cover for the ribbon cassette compartment.

Ribbon Cassette
The back of the printer has an air vent and a paper slot to let the printing sheet extend out as it passes through the printer. The back cover has a latch on the left side to remove it when connecting the optional battery pack. The clear plastic dust cover protects the printer from dust entering the air vents or paper slot when not in use. The power cable plugs into the port in the top right of the back panel.
Continuing right, the side of the printer has a rubberized port cover that protects the USB port and a Canon Direct Print port. We did try to print to the CP510 via USB from an Airport Express but, despite finding the printer via Bonjour, we weren't able to actually print anything. Other USB connections worked fine.

Ribbon Cassette
The top of the CP510 printer, from the front, hosts the Power button (which glows green when on) and a Display Window (showing the label of the cassette under blue light). On the CP710, the Display Window is replaced with an LCD monitor with Mode, Layout and Date buttons in a row below it with a Print/Stop button below them and an Operation button to navigate memory card contents.
INSTALLATION | Back to Contents
While the printer box itself is compact, you do need an addition 7.5 inches in front of it for the paper cassette and a good four inches behind for the sheet being printed. You also need some clearance on the side for a USB cable, if you're printing from a computer.
To prepare the printer for printing, install the ribbon cassette, load the paper cassette, connect the power cord and then make any data connections you want.
Loading the ribbon cassette is simple. Remove it from its clear protective wrap and give the supply spool a little twist to take up any slack in the ribbon by pressing in on the blue spool end and turning it in the direction of the arrow embossed on the bottom. Then just slip it into the print after opening the cartridge door on the side. Push it in until it clicks. You should see the cassette label in the Display Window on the top of the printer. Then close the cover.
The paper cassette is a bit more complicated. It has two covers, a top one and a middle one. Start by flipping the top cover over on its back. Then gently push the middle cover toward the back (there's an arrow embossed on the cover to indicate just where). You can then flip the middle cover back, too. But watch out for the top cover.
Fan the paper without touching its surface and put it into the cassette with the glossy side up.
Then return the middle cover to its closed position. Leave the top cover open to install the cassette in the front of the printer. It functions as an output tray so you can print multiple sheets unattended. Close it only for storage to keep dust out.
The power brick is another compromise with compactness, but at least you can leave it out of sight. Just plug the power cord into the brick and a wall outlet, then plug the brick's plug into the back of the printer.
If you want to use the printer with your computer, install the CP510/710 driver from the included CD. Otherwise, you're all set to print from the PictBridge port.
While you're at it, install Canon's Easy-PhotoPrint application, too. It makes batch printing a pleasure. Canon also supplies its PhotoRecord and PhotoStitch utilities on the same CD.
The Power button is a bit lazy. Just hold it down until the green light either comes on or goes off.
THE DYE SUB DIFFERENCE | Back to Contents
Dye sub printing is actually continuous tone printing (like real prints), not screened printing (as on an inkjet). It uses a heating element to heat dye impregnated in a ribbon to over 350 degrees, at which point it turns into a gas and migrates into the surface of the specially coated photo paper. Temperature controls how much dye transfers at any point on the paper.
In addition to yellow, cyan and magenta dyes, the ribbon contains a clear coating that protects the dyes from UV light and waterproofs them, sealing the dyes into the paper.
IN ACTION | Back to Contents

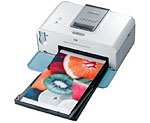
Printing. It's quick and clean. Here I'm printing from the computer.
A 4x6 dye sub doesn't provide many complications. These Selphies do provide a few sheet size options, but the 4x6 print is the gold standard and the option most likely to do duty.
Printing is trouble-free and quick. And the results just delightful.
Printing from your computer can be a bit confusing. You have to set the image resolution and resize for a 4x6 print. Here's the simple step-by-step version:
- Find the Image Size command in your image editor
- Uncheck any Resample option. You want the image to remain exactly the same number of pixels for the next step.
- Change the Resolution to 300 dpi.
- Note the dimensions of your image. If they aren't 4x6, enable the Resample option and change the dimensions to 4x6 (make one 4 or the other 6).
You'll also want to sharpen the image using Unsharp Masking or a sharpening plug-in, especially if you went as far as Step 4.
I printed directly from a Nikon D70s using the PictBridge option without any problems.
MAINTENANCE | Back to Contents
Like any dye sub, the enemy of the SELPHY CPs is dust. The front is quite exposed when the paper cassette is installed, but well protected by the baby blue cover when not working. When you're done printing, be sure to:
- Remove and close the paper cassette
- Close the baby blue cover
- Attach the clear dust cover to the back.
Occasionally, you'll want to wipe the printer case with a soft, dry cloth. You shouldn't need anything stronger than a cloth dampened in water to keep it clean.
The printer ships with a cleaner stick to clean dust off the printer's internal rollers. To use it, remove the ribbon cassette and insert the cleaner stick instead. To clean, just slide it in and out of the printer two or three times.
CONCLUSION | Back to Contents
The SELPHY CP510 and CP710 can print trouble-free 4x6 prints (and even 4x8 panoramas) from your computer or directly from your PictBridge or Canon Direct Print-capable camera. The CP710 adds a card reader and LCD to navigate the card's contents.