EASYSHARE PRINTING FOR ANY DIGICAM
EasyShare Photo Printer 500
 By MIKE PASINI
Editor
The Imaging Resource Digital Photography Newsletter
Review Date: December 2005
INTRODUCTION
Kodak's EasyShare printers are among the most popular 4x6 printers on the market. But until the EasyShare Photo Printer 500, they were primarily of interest to owners of Kodak digicams, who could dock their cameras on the printer to get 4x6 prints.
With the $199.95 EasyShare Photo Printer 500 the convenience of EasyShare printing has been unthethered from a Kodak digicam. The 8-in-1 card reader and the large LCD accommodate every format except Smart Media. And you can even connect PictBridge digicams or USB pen drives to the 500 -- or print wirelessly to it, too.
The documentation that comes with the 500 is not extensive and, unfortunately, support at Kodak's Web site is minimal, although you can download both the driver software and firmware. This review, happily, covers those operational tidbits that are hard to find otherwise.
FEATURES | Back to Contents
The 500 may only make 4x6 prints, but it's one of the most versatile photo printers we've seen when it comes to accommodating media.
- It's two media slots can handle CompactFlash, SD/MMC, Memory Stick and xD Picture card formats (Smart Media is missing, a trend we've observed in cameras as well as SD takes over the amateur market).
- But if you have PictBridge-enabled digicam, you can just connect it with a USB cable plugged into the side of the 500 to print directly from your camera.
- You can also just plug a USB flash drive to the 500 to print using the 500's LCD to make your wishes known (including zoom and crop).
- If you have a Bluetooth camphone, you can print wirelessly from your phone.
- You can print via WiFi from your EasyShare One camera, a laptop without a network (an Ad Hoc network) or through your router (an Infrastructure network). But you do have to buy the $99.95 WiFi card, an SDIO card.
In short, it's a mini Kiosk (no computer necessary) that's small enough to tag along with you for onsite prints at special events, parties and vacations.
The editing functions are worth noting, too, particularly the built-in Red-Eye elimination.
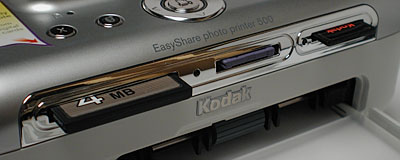 |
| The 8-in-1 Card Reader |
The specifications include:
- Compatible with PictBridge-enabled cameras, Kodak 8-in-1 card reader, Bluetooth 1.1 enabled devices with Object Push Profile
- Prints 4x6 borderless prints using continuous tone thermal dye transfer without the need for a computer at about 60 seconds a print
- Transfers pictures to compatible computer
- USB interface to print from a compatible computer
THE DYE SUB ADVANTAGE | Back to Contents
Prints from the 500 are continuous tone, not screened as on any inkjet, using dye diffusion thermal transfer (photo dye sub) at 300 dpi. These aren't your inkjet's dpi, though, because the density of each dot is variable (somewhat like your monitor's pixels). These are dot-free prints.
Dye sub printing uses a heating element to heat dye impregnated in a ribbon to over 350 degrees, at which point it turns into a gas and migrates into the surface of the specially coated photo paper. Temperature controls how much dye transfers at any point on the paper.
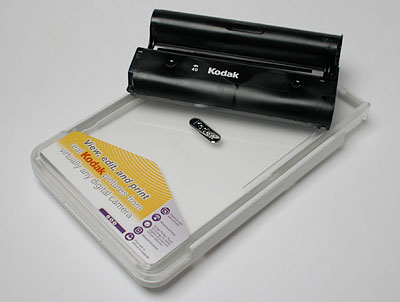 |
| Paper Tray & Color Cartridge No mess, no fuss |
In addition to yellow, cyan and magenta dyes, the ribbon contains a clear coating, which Kodak calls XtraLife Lamination, to protect the dyes from UV light and waterproof them, sealing the dyes into the paper.
With no messy inks, dye sub printing is very clean and trouble free. If all you want are 4x6 prints, dye sub is the way to go.
That's particularly true if your photo project requires handling the photo. If, for example, you want to mount your images on something like Strathmore's Photo Mount Cards with double-sided tape, a dye sub print won't show any evidence of handling.
SYSTEM REQUIREMENTS | Back to Contents
You'll find these on the bottom of the box, oddly. But don't ignore them <g>.
Windows 98/98SE/ME/2000/XP with Explorer 5.1 or higher and at least a 233-Mhz processor are required.
Macintosh OS X 10.2.8 or higher and Safari 1.0 or higher are also required.
Minimum hardware requirements for either platform are 128-MB RAM (256-MB recommended), 200-MB hard drive space, CD-ROM drive, available USB port (a hub will do), EasyShare 5.1 for WiFi.
IN THE BOX | Back to Contents
The 500 ships with the following items in the box:
- Kodak EasyShare photo printer 500
- Paper tray
- 24-volt AC power adapter and cord
- 10-sheets sample media pack with color ribbon cartridge
- CD with software and drivers
- Quick Start poster, User's Manual
- USB cable
Except supplies, of course. The EasyShare printers all use the same media, a color ribbon cartridge and sheets of 4x6 print paper (slightly larger to feed through the printer, with perforated tearoff tabs at each end). Three quantities are available: 40 sheets for $19.95 (50 cents a print), 80 sheets for $32.95 (41 cents a print) and 160 sheets for $42.95 (27 cents a print), each with sufficient cartridges to print them all. You can beat the per print price at most fotofinishers (online and brick-and-mortar) and other dye subs (like the Hi-Ti printers) do better on supplies. Twenty cents a print seems to be the sweet spot. But the 160-sheet kit isn't unreasonable and the material ages well.
DESIGN | Back to Contents
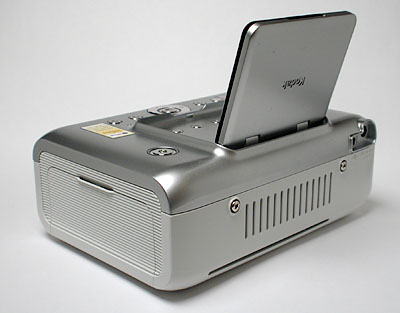
Weighing 2.1 pounds and taking up just 12.17x7.40x3.27 inches space with the tray installed, the 500 qualifies as a small printer, nearly identical in size to the s3. With the tray removed, the two pieces are about as bulky as a hefty hardback, small enough to pack in a camera bag and bring along to the party. A plastic door protects the interior from dust, even though the slot in the rear remains exposed.
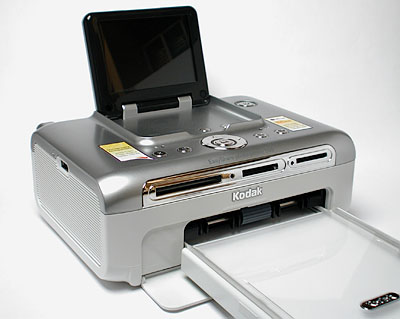 |
| Top and Left View LCD in raised position |
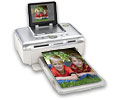
The top of the printer is, for once, not occupied by a docking area. Instead, the folding 3.5-inch LCD, hinged at the back, lays face down on the top panel. Lifting it up reveals four buttons: the Menu, Rotate, Slide Show and Crop buttons.
To the right of the LCD bevel is a large Power button, as requested by many previous dock owners. On the front of the LCD bevel are the Paper and Color Cartridge status lights.
On the front edge of the top panel, the four-way navigator rings the Print button. To the left of that are the Cancel button and the Bluetooth status light. To the right of the navigator are the Red-Eye Reduction button and the Transfer button.
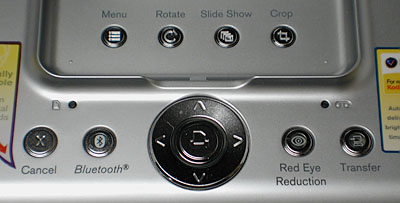 |
| Controls |
The front of the 500 has a thin media card reader with slots for CompactFlash and SD/MMC/Memory Stick/xD cards with a status light, and separately an SDIO card slot and status light (so you can use the printer wirelessly and still read SD/MMC cards). Below that is the paper tray door. The door flaps freely when released, so be careful when you move the printer with the tray installed that you don't break the hinge when you put it down.
The left side of the printer hosts the USB device connector, which supports PictBridge-compatible digicams and USB pen drives.
The right side of the unit has the Cartridge door, which provides access to the Color Cartridge.
On the back at the top right corner are the power connector and, just left of it, the USB connector for cable connections to a computer. A cooling vent occupies most of the real estate, but just below it there's a slot for the paper to slip through during printing.
 |
| Back and Right View |
The paper tray itself is a two-piece plastic tray that is not meant to be taken apart. Instead, you slide its cover back one or two clicks, depending on what you want to do. In the closed position, the clear cover protects the print paper. Slide it back one click to open the tray for printing and back another to load it with paper. There are feet under the tray to position it at just the right height to slip into the printer.
INSTALLATION | Back to Contents
Place the printer where it has about five inches clear behind it for the paper to travel as its being printed. You'll also need room on the side to replace the ribbon cartridge, but you can lift the printer to do that. With a dye sub especially, it's wise to avoid high traffic areas where dust could easily get into the printer. And keep it out of direct sun, too -- you don't want the cartridge to get any warmer than 85 degrees.
Installing the 500 takes just just two small steps.
First, get power to the printer by plugging the power adapter into the power port on the back panel, attaching the cord to the brick and plugging the other end of the power cord into a wall outlet.
Second, get media. Load the ribbon cartridge and the paper tray. First take up any slack in the ribbon by rotating the full spool in the reverse direction. Then slip the cartridge into the side of the printer until it clicks into place. Open the paper tray by sliding the top back. It doesn't lift off but provides enough clearance to slip the paper in. Fan the paper without touching the glossy surface and slip it into the paper tray facing up. Then slide the tray cover back to its closed position. There is a fill line to observe but the standard paper pack fits just fine. With the cover pulled back one click, slide the tray into the printer.
That's all you have to do to print without a computer. But to print directly from your computer, install the software before connecting the two devices with a USB cable. That way the computer can find the drivers when it sees the printer is attached.
And if you haven't heard it before, don't bother with the included CD. Download the latest drivers from the Kodak Web site.
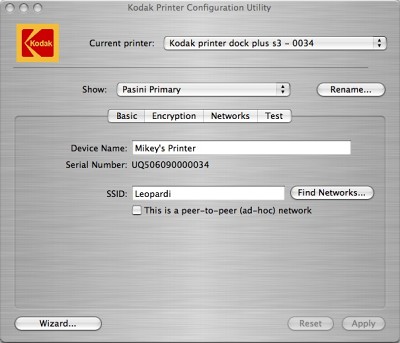
WIFI SETUP | Back to Contents
To use the 500 wirelessly, you use the printer utility program installed with the driver to create profiles for it that are stored in the printer. There are two possible profiles, Primary and Secondary, which you can rename. You can share the printer with any networked computer on which you've installed its driver. That is a very nice feature -- you can print 4x6 prints from any computer on your network.
To define them, connect your printer with its USB cable to a computer with the driver installed. Then launch the Configuration Utility.
Although the Configuration Utility includes a Wizard to step you through the process, no magic is really necessary. After optionally renaming the profile, there are just four steps (screen shots from our s3 review):
 |
| Find Your Router The utility will look around for a router, if you want |
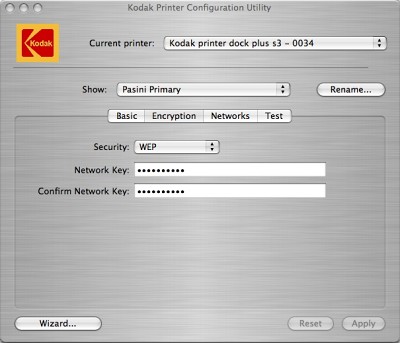 |
| Enter the WEP Password (only WEP, sorry) |
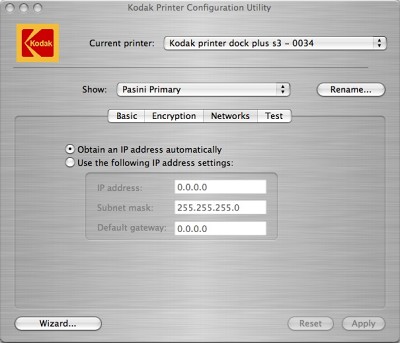 |
| Always Ask for an IP Address |
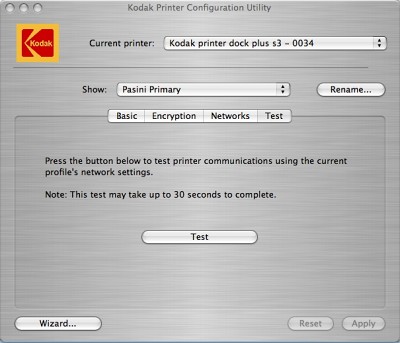 |
| Test |
This information is stored in the printer and can be confirmed using the Menu button under the WiFi option or when you print out a test sheet by holding down the Print and Transfer buttons for five seconds.
The s3 handled network WiFi printing and WiFi printing from the EasyShare One digicam effortlessly. The nice thing about that is you can put the printer any where you like. We took it to whichever room we were taking pictures and during a lull in the action, printed a few and passed them around.
To print wirelessly through Kodak's free EasyShare software, you do have to use version 5.1.
We were able to create and store the profiles on the printer, but the printer failed to respond to actual print requests. Our contact at Kodak wasn't able to isolate this to either a hardware or firmware failure, but we suspect it's isolated to this printer.
Our suspicion is based on our experience with Kodak's Photo Printer Plus Series 3, which handles network WiFi printing effortlessly. Kodak knows how to do this on an EasyShare printer, but this 500 couldn't.
OPERATION | Back to Contents
Kodak recommends setting up your camera to use its 3:2 aspect ratio setting, which is the aspect ratio of a 4x6 print. Using a 3:2 aspect ratio, your images won't require cropping at any of the sizes the s3 can print.
Find some pictures to print! You can deliver images to the printer from a USB drive, media cards or a PictBridge compatible camera. Flip up the LCD, press the Power button on and connect the device with the images on it.
Use the navigator to select an image to print, set the number of copies you want with the Up arrow and press the navigator's center Print button to do the deed.
With the optional WiFi card installed in the SD slot, you can print from any computer on your network that has the s3 driver installed or from the EasyShare-One WiFi digicam. To print from a computer, you simply select the printer as you would any other to be the active computer and use your application's Print command. Printing from the One is covered in our EasyShare One Diary.
To transfer images from a card to your computer, just press the Transfer button.
The Menu System. The 500 packs a few editing features and printing utilities under its hood, too. And with the large LCD, they make it easy to enhance images stored on the card. Here are a few improvements:
- Red Eye Reduction. This is a little tricky. First, if you're printing from a computer, the feature is disabled. Kodak recommends handling red-eye in EasyShare software. But if you're printing from a card, you can press the Red Eye Reduction button just before the Print button to affect an image shot with flash. Or you can hold the button down for five seconds to toggle it on for all pictures. The status light will glow when its on.
- Rotate. Press the Rotate button to turn your image 90 degrees clockwise.
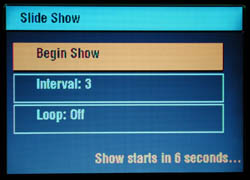
- Slide Show. You can set the Interval or Loop option for slide shows from images on an inserted card of USB device.
- Cropping. With a card or USB device inserted, the Crop button displays a box over the current image. You can press the Crop button to cycle through other crop box sizes or the Rotate button to change the orientation of the crop box. Arrow keys move the crop box around the image. To crop, press the Print button or the Cancel button to abort. The image file is not altered.
- Picture Size. While there isn't a button to cycle through print size options, the 500 does offer 1/2/4/9-up options from its Menu system, providing one 4x6 borderless, two 3x43 bordered, four 2x3 borderless or nine 1.3x2 borderless prints per sheet. If you select more than one image per sheet, you can duplicate the same image or load different images.
- Color Mode. From the Menu system, you can change the Color mode to Natural, Enhanced, Sepia or Black and White.
- Donor Level. The Menu system also lets you ask the printer to estimate how many prints you can still make with the current cartridge.
- Print Tagged Prints. The Menu system makes it easy to print Tagged prints, which are images you've tagged on the card (in your camera) for printing.
- Check Wireless Settings. You can confirm the printer's WiFi settings from this Menu option, but you have to cable the 500 to a computer to set them.
- Language. Options include English, German, French, Italian and Portugese.
- Default Settings. This option restores the printer's factory default settings.
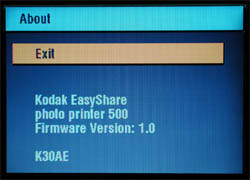
- About Screen. The About Screen reports the current firmware version. So does printing a status page, which you do by holding down the Print and Transfer buttons until printing starts.
 |
 |
|
| About Screen |
Menu Options |
|
 |
 |
|
| Slide Show Options |
Rotate with Crop |
The only maintenance the printer requires is an occasional cleaning of the feed roller. You can't get inside this printer to clean the printing element.
Dave experienced quite different behavior in Atlanta than we did in San Francisco with paper feeding, however.
"No matter how many times I fanned and fluffed the stack of paper," Dave reported, "by the time three or four prints had been made, enough static charge built up on the remaining paper that the sheets wanted to stick together. Once jammed, there seemed to be no graceful way to clear the jam, short of forcefully yanking the paper out the back. Eventually, this forcible removal of jammed paper seems to have shifted a shaft encoder (my interpretation of the symptoms), such that the printer now thinks that the paper is clear of the mechanism and all is ready for the next print when a sheet of paper is actually projecting halfway out the back.
"If there is some way to gently clear jams, it needs to be made a lot more obvious in the manual. If there isn't some way, they need to make sure that there is one on the next generation," he added.
CONCLUSION | Back to Contents
All 4x6 dye sub printers, regardless of manufacturer, make superb drugstore quality prints. These trouble-free printers themselves require almost no maintenance and supplies are reasonably priced.
What makes Kodak's EasyShare printers special are the added features. The card reader with support for everything but Smart Media is the 500's big attraction. The LCD Menu system provides rudimentary but useful image enhancements and editing, but it's real role is showing you what will print. But the 500 is also a compelling addition to your wireless network, providing a 4x6 photo printer to anyone on your network. And its small size and independent nature mean it can tag along with the camera (even an ordinary PictBridge-enabled one), not the computer.
Those are extras that matter. And now Kodak has made them available to every digicam owner. Bravo!