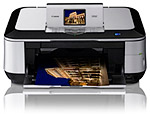
Canon PIXMA MP640
-- Faster But Still Affordable
By MIKE PASINI
Editor
The Imaging Resource Digital Photography Newsletter
Review Date: January 2010
It's just a little bigger than the MP620 we called "quite a deal" in our review a year ago, but Canon claims the new MP640 is much faster. But duplex printing returns to this PIXMA, we're glad to see.
There's still no film scanning or high definition printing (just four-color printing) but you also still get quite a bargain if those things aren't important to you.
Canon recently shipped an MP640 review unit to us. While we work on the full review, here's the rundown on features, specifications and system requirements.
FEATURES | Back to Contents
The MP640's ChromaLife100 ink system may not be high fidelity with light magenta, light cyan (or even red and green) inks, but it does include four dye-based inks (black, yellow, cyan and magenta) and a pigment-based black text ink. Canon claims the MP640's tiny picoliter droplet size eliminates the need for light magenta and light cyan, also eliminating their costs. Without the red and green inks found in Canon's Pro line of printers, it won't quite achieve their color gamut.
Print longevity tests indicate photos printed on the MP640 may last up to 300 years when stored in an archival photo album.
It prints at the same high resolution the MP620 did but more quickly with 4,416 nozzles working on each pass, compared to 2,368 on the MP620. So a 4x6 photo now takes about 20 seconds instead of 40 seconds.
Duplex printing returns to this entry-level multifunction device, another advantage over the MP620.
And the LCD is now 3.0 inches instead of 2.5 inches. So if you've been squinting at that MP620, you've got another reason to upgrade.
Built-in Ethernet and USB 2.0 Hi-Speed makes fast connections as simple as plug and play, but the MP640 is also a Wireless G device, so you put it anywhere you've got an electrical outlet and share it with every computer in the house.
You can, of course, use the MP640 without a computer, plugging almost every known memory card format into its card reader or cabling your PictBridge-compatible camera directly into the PictBridge port on the front. You can also plug a thumbdrive in there (and use it just how you might think, to print from or scan to).
And the MP640 is Energy Star qualified, as well.
SPECIFICATIONS | Back to Contents
Printers specifications include:
- Print Speed: 4x6 borderless photo as quick as 20 seconds; 9.2 ipm black and 8.1 ipm color using ISO/IEC 24734, 24735 standards
- Number of Nozzles: 832 Black, 3,584 Color, 4,416 Total
- Picoliter Size: 1, 2 and 5
- Print Resolution: Black: 600 x 600 dpi; Color: 9600 x 2400 dpi
- Paper Sizes: 4x6, 5x7, 8x10, Letter, Legal, U.S. #10 Envelopes
- Automatic Sheet Feeder: 150 Sheets; Cassette: 150 Sheets
- Printer Features: Auto Duplex Print, Auto Photo Fix II, Borderless Printing, Calendar Print, Document Printing, ID Photo Print, Photo Index Sheet, Photo Direct Print (Memory Card/Camera/USB Flash Memory), Photo Printing, Template Print
Copier specifications include:
- Copy Speed: Approx. 22 seconds in color
- Reductions Enlargement: 25 to 400 percent
- Copy Features: 4 in 1 and 2 in 1, Auto Duplex Copy, Auto Exposure/Intensity Copy, Continuous Copy, Face Brightener/Fading Correction, Fit-to-Page, Image Repeat, Intensity, Manual Color Adjustment, Masking Copy, Multiple Copy: 1-99 Pages, Photo Reprint, Preset Copy Ratios, Trimming Copy, Zoom
Scanner specifications include:
- Scanner Type: Flatbed
- Scanner Element: Contact Image Sensor
- Max. Resolutions: 4800 x 9600 dpi optical; 19,200 x 19,200 dpi interpolated
- Scanner Features: Auto Scan Mode, Gutter Shadow Correction, Network Scan, Push Scan, Scan to Memory
- Color Depth: 48-bit internal/24-bit external
- Max. Document Size: 8.5 x 11.7
Photo Card specifications include:
- Supported Media Formats: SD, SDHCm MultiMediaCard, MultiMediaCard Plus, miniSD, miniSDHC, RS-MMC, microSD, microSDHC, USB Flash Memory, CompacFlash, Microdrive, Memory Stick, Memory Stick PRO Memory Stick Duo, Memory Stick PRO Duo, Memory Stick Micro, xD-Picture Card, xD-Picture Card (Type M), xD-Picture Card (Type H)
General specifications include:
- Other Features: Wi-Fi LED, 2-Way Paper Feeding, 3.0" LCD, Auto Sheet Feeder, Dual Color Gamut Processing Technology, Easy-Scroll Wheel, Ethernet, Self-Opening Paper Output Tray, Quick Start
- Connectivity: Wireless LAN (IEEE 802.11b/g1, also compatible with IEEE 802.11n12), Ethernet, USB 2.0 Hi-Speed, Card Slots (See Photo Card Support Media), PictBridge (Cable not included), Bluetooth® v2.013 (Optional), IrDA4
- Dimension: 17.8 x 14.5 x 6.9 inches (WxDxH)
- Weight: 19.4 lbs.
- Warranty: One-year limited warranty with InstantExchange program. One-year Toll-free technical phone support
SYSTEM REQUIREMENTS | Back to Contents
The MP640 supports Windows Vista, Windows XP/2000 and Mac OS X v10.3.9 to v10.5x11 Standard Interface.
In the box...
IN THE BOX | Back to Contents
The retail box contains:
- PIXMA MP640 printer
- Document kit with Cross Sell Sheet, Getting Started, Important Information Sheet, Network Troubleshooting Guide, Safety Environment Information, Setup Software & User's Guide CD-ROM, Warranty Card
- Ink tanks: PGI-220 Pigment Black, CLI-221 Cyan, CLI-221 Magenta, CLI-221 Yellow, CLI-221 Black
- Power cord
- Print head
- Sample Media (two sheets of MP-101 8.5 x11)
While there is no USB cable included, the printer is a WiFi device and does include Ethernet.
CONSUMABLES | Back to Contents
The CLI ink cartridges are $12.99 each except for the larger pigment black ink cartridge, which is $14.99. Canon bundles the color cartridges in a $47.99 Color Pack and bundles three black pigment cartridges in a $41.99 Triple Pack.
A wide variety of media is available including 50 sheets of 4x6 Photo Paper Plus Glossy II for $12.99.
HARDWARE TOUR | Back to Contents
The MP640 is compact for a duplexing multifunction printer, ideal for a dorm room or a den. Let's take a tour of the hardware itself.
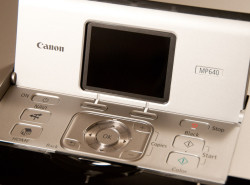
Control Panel
The top of the unit has a control panel in front that closes flush with the unit. Open it up and you'll see a large LCD (with easy-to-read type sizes) on the lid and a set of buttons surrounding a four-way, rotating navigator wheel around an OK button.
The button layout is identical to the MP620 but the buttons themselves are not. Rather than round black buttons, the MP640 uses silver rectangular buttons with rounded corners. And the Back, Plus and Minus buttons are now corners of a large button surrounding the navigator wheel.
The wheel itself seems a bit improved, too, although we still found ourselves overshooting and clicking incorrectly. We've really come to prefer a touch screen interface that eliminates scrolling entirely.
The two soft buttons are a good case study of the problem. Hardly anyone ever realizes their labels are on the LCD, so they go unused. But they're soft because their functions are relevant (important even) to the task at hand. It's a poor design solution compared to a touch screen, where you simply tap the label itself and there is no separate button.
Duplexer
The top itself is the scanner cover and lifts up to reveal the scanning glass. There is no transparency unit built into the MP640 cover for film scanning, however. The cover can be lifted up a bit less than an inch to accommodate thicker materials (like an opened paperback) but it can't be removed. After all, the control panel has to remained wired to the base.
The scanner bed itself can be raised when the scanner lid is closed. That's how you install the print head and ink cartridges. It doesn't come up very far at all, making it difficult to see inside, but there's enough room to do what you have to do.
On the front of the MP640, the output tray folds down with a small insert the flips out to catch lettersize sheets.
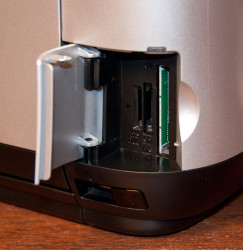
Card Reader
To the right of the output tray is a large silver cover over the card reader. Canon distinguishes itself by accommodating a wide range of cards, including CompactFlash, xD Picture Cards and Memory Sticks. Not everybody does.
Below the card reader is the PictBridge port. You can connect your PictBridge-compatible digicam to the MP640 with a USB cable and use the digicam's LCD in Playback mode to print directly from the camera.
Or you can connect a Bluetooth dongle to the port and print from your Bluetooth camera directly to the printer, too. Canon doesn't claim Bluetooth support, but we were able to copy photos to the printer from our phone, printing them on 4x6 photo paper. All we needed was the dongle.
On the same side of the printer but on the back corner you'll find the Ethernet and USB 2.0 Hi-Speed connections. You can wire the MP640 into your network if you prefer not to make it available wirelessly.
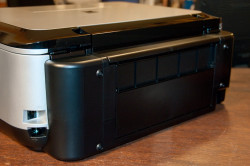
The back protrudes a bit because of the built-in duplexer. We're so glad to have the duplexer that we really don't mind that a bit.
And at the other back corner you make your power connection with just the six-foot power cable. It isn't a very long cable, but it was long enough.
There is, along the top of the back or the back of the top (however you like to look at it), a second input paper tray for photo paper. The piano black border lifts up to reveal the photo paper input tray.
Big sheets of photo paper need a little more support in the rear tray. Just lift it up and, fully extended, you'll get a full tray.
Everything in the rear tray is centered by the guides. Move one guide in and the other moves in, too. That probably exercises the printer parts a bit more than using a common side and sliding one guide only. Which is probably good for the printer.
INSTALLATION | Back to Contents
As with any printer, there are two parts to the installation. Unboxing and setting up the hardware is the first task. Installing the driver on your computer is the second.
With the MP640, hardware installation may include network setup, although as soon as you get the print head aligned, it's ready for stand-alone duty.
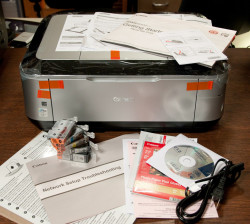
Unboxing. Although it's a large box, the MP640's box has some cutouts on the side to make it easy to lift and transport it. Why doesn't everybody do that?
Inside the box, everything we needed was easy to find except the print head itself. But don't worry, it's in there, tucked into the printer itself behind the paper output tray.
There is an awful lot of orange tape securing the various moveable parts. And there's even more securing non-moveable parts. Like the tape that covers the little bumps on the bottom of the cover so it won't mark up the scanner bed, apparently. It's nice to know such care is taken in packing your baby.
Once everything was removed, the next trick was to find a place to put the printer. The only real requirement is for a nearby electrical outlet. Unlike our experience with the MP620, you don't need a USB cable to complete installation. You can do the whole thing wirelessly if you have a wireless network setup to begin with.
And we do, so we found a cozy corner and plugged it in. One very nice thing about Canon printers is that there's no brick. Just a power cord.
With power available, we opened the control panel, which now sports a larger screen with larger type, and pressed the Power button. We were shortly prompted for a language and being the wiseguys we are, we picked English.
Canon resorts to a lot of confirmation screens ("Press OK and ...") where a Congratulations message would suffice, but don't let that rattle you.
Print Head. The next task is installing the print head. Print heads are delicate and there are flyers with warnings floating all over the place to make sure you appreciate that before you tear open the foil package and get your grubby little hands on those pristine electronics.
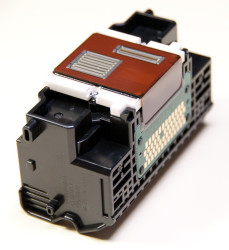
Print Head
A print head, however, is nothing more than a plastic box that holds the ink cartridges. It does have two sides you should not touch: the bottom with the nozzles and the side with the array of electrical contacts. Not only should you not touch them, but you should make sure they don't come into contact with anything else.
But before we opened the foil and risked anything, we opened the paper output tray and lifted the scanning unit cover to get the print head holder to run over to the middle (or so) of the unit. The cover does not open very far (and you should have the scanner cover closed, too).
When the holder is accessible, you have to raise its lock lever, as the installation manual explains. At the hinges of the lever, you'll notice a couple of metal springs that hold the lever down. The manual instructs you to "firmly raise" the lever and it isn't kidding. The springs are strong and it takes some will power to lift the lever up out of the way. Don't be shy.
Apparently those strong springs are what hold the print head in position as it flies back and forth across the sheet. So when you gently set the print head into the holder, you don't click it into place or firmly push it into anything. You just sit it down gently after tilting it back toward you to get it under the lock lever.
Once it's sitting there, you can lower the lock lever.
Cartridges. Installing the ink cartridges is very easy on any Canon printer. They simply snap into place -- and they are easy to slide into place to begin with. Just tuck them in where they belong and snap the high end down. A red LED lights up when they're correctly seated.
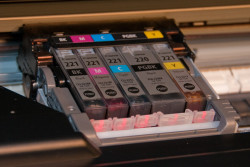
Ink Cartridges Installed
You should avoid touching the electrical contacts on the cartridges, of course, and keep clear of the round ink pad, too.
Align the Print Head. Canon has improved the print head alignment process from the MP620. There is a pack of two alignment sheets (Matte Photo Paper MP-101, a heavy paper with a notched corner to correctly orient the paper in the printer).
Load one sheet of the paper and follow the directions on the LCD (you know, Press OK) and in a few minutes, the printer will both print and scan the alignment bars.
With your print head aligned, the unit is ready for standalone duty.
NETWORK CONNECTION | Back to Contents
You have a variety of choices for connecting to the MP640.
The simplest is just to run a USB cable from your computer to the rear USB port of the printer. You'll have to find your own USB cable, though, because Canon doesn't supply one.
You can also, as mentioned above, plug a USB Bluetooth dongle into the PictBridge USB port in the front of the printer to enable Bluetooth connections, say for your camphone.
The simplest network connection would be to plug an Ethernet cable into the back of the printer from your Ethernet hub or router. Then you simply use the Control Panel to change the LAN settings to Wired.
But not much more complicated is connecting the printer wirelessly to your network. You can't connect wirelessly to a single computer, however. You must go through a wireless router.
As our installation gallery shows, the Wireless LAN setup in the Settings option of the Menu system provides a choice of three methods: Easy, WPS or WCN. Pick one and the printer will scout out the available networks, asking you to pick one. You'll have to provide the password to complete the connection.
Easy requires you to know the name of your network (its SSID) and your password (WEP, WPA/WPA3 or pre-shared key) while WPS lets you skip that by pressing the WPS button on your router or entering a PIN number. WCN requires a USB flash drive with your network settings.
Once the printer is connected to your network, you just have to load the driver on any computer you want to print from.
DRIVER INSTALLATION | Back to Contents
If you don't have all the Canon utilities and printing applications already installed, you can use the Easy installation button. If you just want the driver, use the Custom button to select just that.
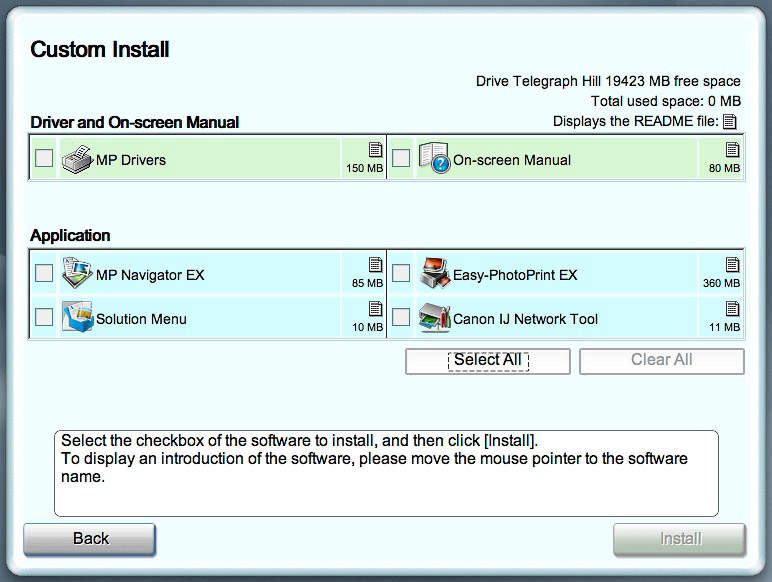
Installer. Drivers, manual and four applications.
The installation process is no more complicated than that, a progress bar giving you an idea of how far along the whole process is and how far along each individual install is.
Wireless setup was a bit complicated on the MP620, requiring a restart, but the process on the MP640 was straightforward. We applauded the Kodak EPS 5250 for its easy WiFi setup but this version of the Canon installation software is very close to it. It takes a few more steps (like checking the connection for adequate speed) but we didn't mind them at all. And it didn't require a restart.
We've put up a Flash gallery of the installation screens so you can see for yourself.
Mac users, incidentally, should run Disk Utility after installing the Canon software to repair permissions.
COPYING | Back to Contents
Our real-life daily use of the MP640 involved using it in a variety of ways. The simplest was making copies (without using the computer). There isn't even a lightness/darkness control to worry about.
Document Copying. Copying a document is one of the most common unattended uses of a multifunction device. Inkjets make very nice copies (no scumming from toners, no paper warping from the heat) and with a built-in scanner they can perform some useful tricks, too.
We copied a color flyer two ways. First we copied it in black and white. Then we copied it in color. Both versions were sharp and clear. The black and white color conversion kept the document readable while the color copy was faithful to the original. No complaints.
Duplex Printing. We had a 14-page manuscript laying around, so we fed it to the MP640 using automatic duplex printing. The option is enabled in the printer when you set plain paper from the casette as the media type and source.
The MP640 did a beautiful job, collating the document so the last page printed first and was on the bottom. After printing the first side of a sheet, the page was drawn back into the printer and the second page printed.
Duplex printing is not just a great way to save paper, we've found, but it makes a very nice presentation as well. Bravo to Canon for including it in the MP640.
Photo Copying. High on the list of standalone uses is making copies of old photos. Someone visits, you go through your old albums just for fun, they want a copy of a picture of themselves when they looked good and ... well, you just pop it on the scanner bed, put some photo paper in and make a copy.
The MP640 does make it that easy to copy old photos. Just select the Easy Photo Reprint option and put them on the scanner glass (it will advise you how to lay them out). It scans them and then presents them on the LCD so you can select them for printing (and indicate the number of copies you want with the Plus button).
The process from there is identical to printing from a memory card. But the beauty of the workflow is that you can preview the scan to see before printing if it's all right. Some printers just copy as if they were copying a document, so you don't realize you placed the image in the scanner in the wrong orientation.
The quality of our test photo just blew our socks off. It was a difficult image with a bright red background and a yellow pillow and a child's face in the middle. The skin tones were an excellent match, the detail like eyelashes perfect and contrast just slightly subdued (the blacks were not quite as black).
Backing the original away from the edges of the scanner glass minimizes the enlargement, we've found.
PRINTING | Back to Contents
Card Reader. We popped a CompactFlash card into the card reader and arrowed through a few Raw+JPEG images. The card reader can handle the JPEGs, of course, but not the Raw images.The MP640 knew a card had been inserted, read the JPEGs and displayed the last one to us. We found one we liked and pressed the OK button to print it, changing a setting to improve the print quality. There's no point editing the image (unless you want to crop it) because the LCD just isn't up to displaying accurate color.
But the printer is. The 4x6 print of the sunset we had selected was just gorgeous.
Importing from Reader. When you pop a card into the MP640 it does not, by default, function like a USB card reader to transfer images to your computer unless you have a USB connection.
That's good behavior for a network printer. After all, how would it know which computer to transfer the images to?
You can set it up to function as a card read, though, using the Canon IJ Network Tool. The utility will let you set up the card slot as a network drive.
Bluetooth Printing. Printing from a wireless device like a cellphone was simple, too. We popped a D-Link Bluetooth adapter into the USB port of the MP640, turned on our cell phone and copied the image to the printer. The printer printed it on a sheet of 4x6 paper (as set by default in the Device Settings) and that was that.
WiFi Phone Printing. If your phone has WiFi capability, you can, of course, transmit images to be printed to the MP640 via WiFi.
PictBridge Printing. Cabling a digicam to the USB port of the printer lets you use the camera itself as your kiosk rather than the printer. Camera LCDs display images a good deal better than the printer LCD, so that might be an attractive alternative. And if you have several cameras with shots to print, it might even be more efficient, since each camera can select which images to print and how many to print before connecting to the printer.
Computer Printing. But by far the more common operation will be printing from any computer that can access your network.
One option for doing that is Canon's Easy-PhotoPrint EX, an easy-to-use application for creating prints, albums, calendars, stickers and layouts. It provides image editing features, too, including the ability to reduce noise, correct red-eye, brighten and sharpen faces (or even smooth them), remove blemishes and automatically adjust the image. It can also print a date on the image.
Albums offers a number of different layouts and backgrounds for your images and captions, providing rudimentary scrapbooking functions.
Canon also provides a driver for other applications and that's primarily what we used from our computer.
With one-picoliter droplets and 9600x2400 dpi, the MP620 makes very nice prints from just four dye inks: cyan, magenta, yellow and black. To some extent the small droplet size compensates for the ink set, we've been told. But we really had no issues with the image quality.
Black and White. We were very pleased with the rich tonality of black and white prints on the MP620 and the MP640 maintains that unexpected delight. This is particularly appreciated when copying old black and white photos. You can get a sharp enlargement, often with better tonality than the aging original. And because few of those old prints are still near their negatives, it's an even more important benefit.
Templates. The MP640 can print a number of standard page templates including several varieties of ruled paper (blue lines with a red margin guide), graph paper and musical staff paper. But it can also print checklists and calendars in a variety of formats, too. And it can print them on both sides of the sheet.
SCANNING | Back to Contents
As noted above, the MP640 can not scan film. You'll have to pay a little more for one of its big brothers to get that. But scanning images was no more trouble than copying photos.
The difference between scanning and copying is worth explaining. Scanning records an image file. Copying merely prints the image the scanner captures (and stores in the MP640's memory temporarily).
Placement. The MP640 requires you to place documents in the top right corner of the glass bed but photos should be placed away from the sides of the glass bed. You can put up to 12 photos on the platen that are slanted as much as 10 degrees and the MP640 will batch scan them into correctly cropped individual files.
Standalone Scanning. In this situation, you are standing at the MP640 with a document you want to scan. You can scan it to a USB Flash drive (FAT-16 formatted drives work fine), a memory card (SD, CompactFlash, etc.) or to a networked computer with the driver installed. In the latter case, the data can be compressed for quicker transmission (unless you want to convert the image of some text into a text document using OCR software).
The process is pretty straightforward. Put the original on the glass. Attach a thumbdrive. Use the control panel to select Scan, pick the destination and confirm or change the settings for type of original, size, etc.
The MP640 does a quick prescan and displays the result, setting the function buttons to Rescan and Rotate if you need them. For a PDF, it will not close the document until you indicate, after the scan that there are no more pages to scan.
If you send the scan to a computer, it will at least be saved as a file on the computer's hard drive by Canon's MP Navigator EX software. But you can also specify further processing like attaching it to an email or opening it in an application. Navigator can also perform OCR.
Computer Scanning. If you're sitting at your networked computer and have installed the MP640 drivers, you can scan wirelessly from the MP640. You can also, of course, scan via USB.
Again, we had no where near the issues we had with the MP620 scanning wirelessly. It worked immediately after installation without a problem whether we were using Navigator or the ScanGear scanning driver.
It's worth pointing out that unlike some multifunction devices without transparency units, the MP640 offers very high resolution (4800 x 9600 optical) and excellent color depth (48-bit internal, although you only get 24-bit files). Kodak's ESP series limits itself, in contrast, to 1200 x 1200 dpi and 24-bit color. So if you do any enlargement of small images or have images with a lot of detail in the shadows or highlights, you'll get better results with the MP640.
ScanGear. Most of our scanning was done with the ScanGear driver through Photoshop CS3. The driver provides three modes: Basic, Advanced and Auto Scan. It also provides Preferences for its Scanner, Preview, Scan and Color settings behavior across all three modes.
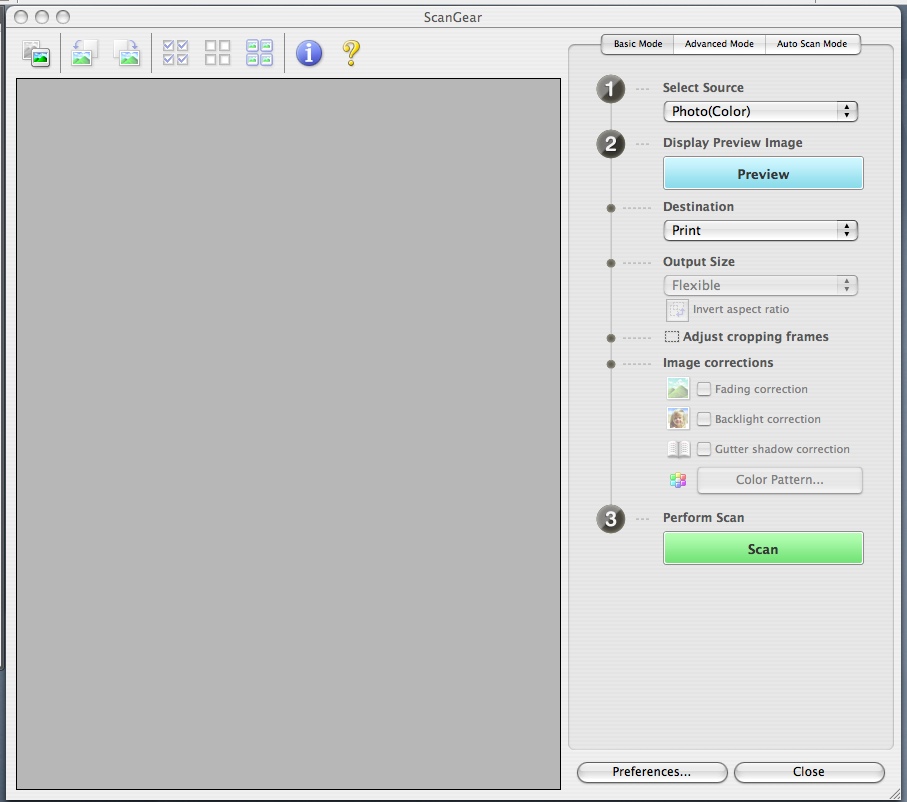
Basic Mode. Three steps to a scan.
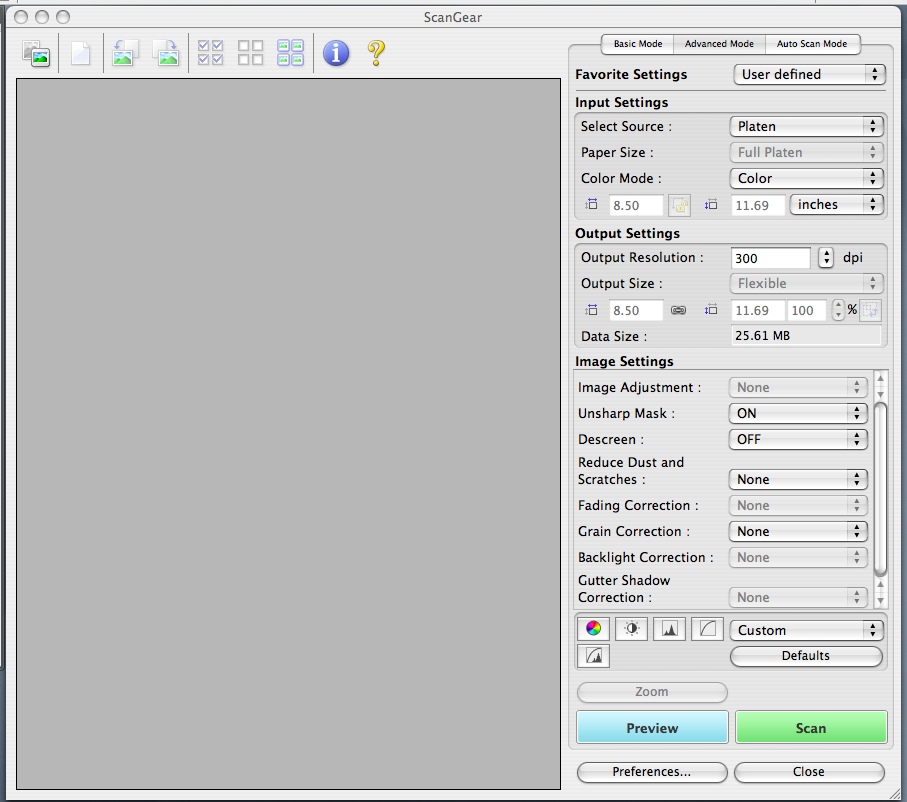
Advanced Mode. The kitchen sink.
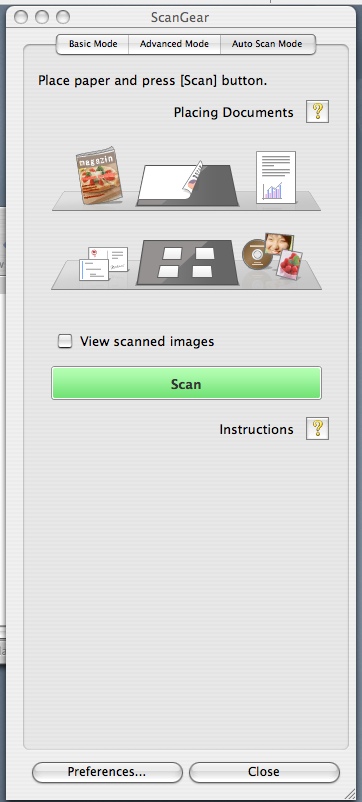
Auto Mode. The scanner figures out the right settings.
Basic is a good choice if you're new to scanning. You simply tell the driver what you are scanning (a document, color photo, magazine, newspaper), tell it to display a preview, tell it whether you want (a print, image or OCR), pick the output size, crop, correct the image (fade, backlight, gutter shadow for books, color pattern corrections) and finally perform the scan.
Advanced can save settings and is a bit more specific about them so you can set the resolution or adjust the color yourself. Image Settings, for example, can toggle unsharp masking and descreening. It can also set the level of dust and scratch removal, fade correction, grain correct on, backlight correction and gutter shadow correction. It's something like a manual mode for the driver compared to Basic. Auto Scan lets the scanner figure everything out for itself. You just load the scanner and click the Scan button in the driver.
Auto Scan employs intelligent scanning that can detect the type of original you're scanning (photo, business card, form, etc.) and automatically save the image with the appropriate settings. It's a good option if you're new to scanning and don't have a clue what type of original you have.
ScanGear is a pretty thorough scanner driver. Although there's no color calibration for reading IT8 targets, you can specify color matching profiles for the scanner and the target in the Color Settings Preferences.
Third party scanning software like VueScan didn't work wirelessly with the MP640, but that didn't surprise us. But VueScan did work when connected via USB cable to the MP640. So anything you can't find in ScanGear, you can find in VueScan (like calibration).
MAINTENANCE | Back to Contents
Inkjet machines have a reputation for being temperamental, but a few simple procedures can just about eliminate the problems. For any inkjet:
1. Do not use a power strip to control the printer, use the printer's own Power button. The printer button, unlike the power strip button, initiates a shut down procedure that parks the print head where it won't dry out. 2. Use it. Letting the printer sit for weeks between uses will degrade the print head. Print something every week. If you've let the printer sit as long as a month, you may have to run the print head cleaning maintenance utility to flush the print head out. Which just dumps ink through the head, so you might as well print something every now and then. By following those two simple procedures, you can eliminate many print quality problems and printer performance issue. If you do discover a problem, Canon's printer utility provides commands to check the nozzle pattern, flush the print head, do deep cleaning of the print head and realign the print head.
Our experience with the MP640 was remarkably trouble-free. The cartridges lasted a long time and we didn't experience any clogs or print defects we could attribute to maintenance issues. Canons and HPs, which tend to use dye inks, tend to clog less than Epsons, which rely on larger pigment inks. But the same rules apply. Kodaks use pigment inks but they are ground much finer than Epson inks, so less frequent use doesn't clog them as quickly.
All-in-ones have a couple of other cleaning requirements often overlooked. The first is to clean the glass. Fingerprints, smudges, hair and dust can all degrade a scanned image. Use a glass cleaner sprayed onto a cloth to avoid any chance the liquid will seep under the glass and into the scanner.
At the same time, gently clean the document cover (the white lid backing), which can pick up all kinds of dirt from the glass and the backs of the items you've been scanning. Use mild soap and water to clean the backing gently without scrubbing. Exterior cleaning is becoming a real specialty with all the high-gloss surfaces. Canon warns against using "tissue paper, paper towels, rough-textured cloth, or similar materials, as this may scratch the surface."
Canon also recommends cleaning the bottom plate (see the Maintenance menu) by folding a piece of letter-size paper in half width-wise and running it through the printer from the rear tray until the fold is not smudged with ink.
The MP640's Maintenance menu also has an option for cleaning the paper feed roller to resolve any feed problems. The first part of the process cleans the feed roller without paper and the second does it with paper.
There is also a pad in the paper cassette that has to be cleaned to resolve the problem of two or more sheets being ejected.
We didn't need to perform any of this extended maintenance.
CONCLUSION | Back to Contents
Our review of the MP620 complained that it lacked film scanning, high fidelity printing and duplex printing. The MP640 brings duplex printing to the entry-level multifunction PIXMA printer but there's still no film scanning. We're less concerned than we had been about high fidelity printing because Canon does a great job with four colors and there are less ink cartridges to buy.
The MP640 improves on the MP620's WiFi installation experience, too. It's much easier to both get the printer on your network and install the networked printer on your computers than it was. The process is not quite as simple as Kodak's but it's just as easy and we didn't mind the extra steps like testing our network's performance a bit.
The larger LCD makes it easier to follow the simple directions for any of the many things this device does. It's worth pointing out how few things the Kodak ESP printers can do in comparison (they can't, for example, scan to a card or thumbdrive). Canon doesn't scrimp on functionality even with their least expensive box.
We loved the MP620 and we love the MP640 even more. It can handle your 4x6 and larger photo printing, duplex plain paper printing, photo copying and enlargement and reflective scanning even over a wireless network with ease. Outright prolonged applause!