Minolta Dimage 5The "little brother" to the Dimage 7 - same great features, but 3.3 megapixels and a (much) lower price...<<Operation & User Interface :(Previous) | (Next): Image Storage & Interface>> Page 9:Camera Modes & MenusReview First Posted: 9/14/2001 |
Camera Modes and Menus
![]() Still Capture Mode: Accessed by turning the Mode dial to the red camera symbol, this is the mode for all still-image capture operation. (Programmed AE, Aperture Priority, Shutter Priority, and Manual exposure modes are selected via the Function Dial.)
Still Capture Mode: Accessed by turning the Mode dial to the red camera symbol, this is the mode for all still-image capture operation. (Programmed AE, Aperture Priority, Shutter Priority, and Manual exposure modes are selected via the Function Dial.)
![]() Playback Mode: Indicated by the green arrow symbol, enables playback of previously captured images.
Playback Mode: Indicated by the green arrow symbol, enables playback of previously captured images.
![]() Movie Mode: Enables capture of (silent) movie sequences.
Movie Mode: Enables capture of (silent) movie sequences.
![]() Setup Mode: Displays an LCD menu system, allowing configuration of deeper camera operating modes, memory card formatting, menu language choice, etc.
Setup Mode: Displays an LCD menu system, allowing configuration of deeper camera operating modes, memory card formatting, menu language choice, etc.
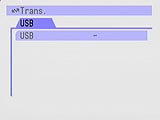
![]() Data-Transfer Mode: Activates the Dimage 5's USB port for downloading images to a host computer.
Data-Transfer Mode: Activates the Dimage 5's USB port for downloading images to a host computer.
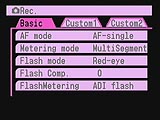 Still Picture Shooting Menu Basic Options
- AF Mode: Controls AF mode operation. Options are AF-Single, to focus when the shutter is pressed, or AF-Continuous, to engage the autofocus system continuously.
- Metering Mode: Selects from Multi-Segment (default), Center-Weighted, or Spot metering modes.
- Flash Mode: Choose from Fill-Flash, Red-Eye Reduction, and Rear Flash Sync. (Rear-Flash is commonly known as rear-curtain sync, in which the flash fires just before the shutter closes, rather than just after it opens. With rapidly moving subjects, this produces motion blurs that trail the sharp, flash-exposed image, rather than preceding it.)
- Flash Comp: Exposure compensation adjustment for the flash. Range is +/- 2 EV, in one-third-step increments.
- Flash Metering: Selects the flash metering method. Options are ADI
Flash, which uses distance information from the autofocus system to control
flash exposure, or Pre-Flash TTL, which uses a preliminary metering flash
to gauge exposure before the shutter opens.
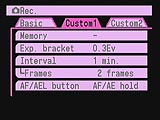 Recording Mode Menu -- Custom 1
- Memory: Stores currently selected camera settings in memory. Selecting this menu option brings up the Store-in-Memory screen with three memory options. You select the desired memory option (1, 2, or 3) and press the controller to complete the operation.
- Exposure Bracket: The Dimage 5 offers an automatic exposure bracketing option. This menu item sets the size of the exposure step between shots. Options are 0.3, 0.5, and 1.0 EV.
- Interval: The Dimage 5 also has a built-in intervalometer that lets you snap photos at preprogrammed intervals. This control sets the interval between exposures from 1 to 60 minutes.
- Frames: The second half of the intervalometer control, this option sets the number of frames to be acquired, from 2 to 99.
- AF / AE Lock button: As mentioned in the main text, you can reprogram the function of the AF / AEL button on the camera's back panel. Options are as follows:
- AF / AE Hold - Locks focus and exposure while you hold down the button
- AF / AE Toggle - Toggles the AF / AE lock on and off with successive presses.
- AE Hold - Locks exposure only when the button is held. (AF activated by shutter button.)
- AE Toggle- Toggles exposure lock on and off with successive presses.
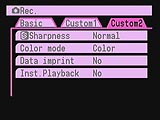 Recording Mode Menu -- Custom 2
- Sharpness: Lets you select varying degrees of in-camera sharpening of captured images: Soft, Normal, or Hard.
- Color Mode: Lets you choose between Color and Black-and-White image capture
- Data Imprint: When activated, imprints information on the photos themselves. Options are No, Year / Month / Date, Month / Day /Hr:Min, Text, or Text with a numeric ID string.
- Inst. Playback: When activated, automatically displays the most recently recorded image for either 2 or 10 seconds after it's captured.
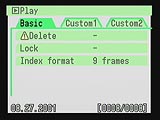 Playback Mode Menu -- Basic
- Delete: Enables you to delete a single image, all images, or marked images.
- Lock: "Locks" one or all recorded images to prevent accidental erasure, also unlocks images. (NOTE: Protects against "delete" operations, but not against card formatting.)
- Index Format: Lets you choose between 4- or 9-frame thumbnail image displays.
 Playback Mode Menu -- Custom 1
- Slide Show: Initiates a slide show of photos on the memory card. Pressing the center of the Five-Way Controller pauses the presentation, while pressing the Down arrow returns to the Playback mode menu.
- Play: Chooses whether to play all photos or only marked ones in the slide show.
- Duration: Sets the duration for each "slide" in the slide show, from 1 to 60 seconds.
- Repeat: Chooses whether or not to repeat the slide show after all photos have been displayed.
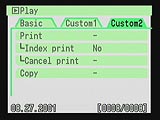 Playback Menu -- Custom 2
- Print: Set up photos for DPOF (Digital Print Order Format) printing. This selection lets you choose whether to print the current photo, all photos, or only marked photos.
- Index Print: Chooses whether or not to order an index print of all photos.
- Cancel Print: Deletes all print orders on the card or in a folder.
- Copy: Makes a duplicate copy of either the current photo or of all marked photos.
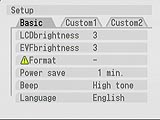 Setup Mode Menu -- Basic
- LCD brightness: Adjusts LCD backlight intensity in 5 steps (arbitrary units).
- EVF brightness: Adjusts EVF brightness in 5 steps. (Useful to preserve night vision when shooting in low light, or for being able to see the display clearly when in bright sun.)
- Format: Formats the memory card. (NOTE: Erases all photos, even if they've been "locked.")
- Power Save: Sets idle delay before the camera enters low-power mode. Options are 1, 2, 5, or 10 minutes.
- Beep: Sets annunciator beep volume to high, low, or off.
- Language: Sets language for menus. Options are English, German, French, or Spanish.
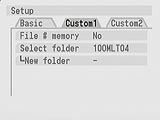 Setup Mode Menu -- Custom 1
- File#Memory: Chooses whether or not to number images sequentially across memory cards. If set to "yes," the camera will remember the last number used to name a file, even if a different card is inserted. (A common feature, but very handy to prevent accidentally overwriting images when they're copied to your computer.)
- Select Folder: As an aid to organizing large numbers of photos, the Dimage 5 lets you set up separate folders on the memory card. If you have more than one folder defined, this menu selection lets you choose the one to which you want to save photos.
- New Folder: Lets you create a new folder to save photos on the memory card.
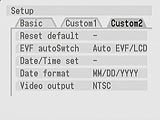 Setup Mode Menu -- Custom 2
- Reset default: Resets all menu choices to their factory default values.
- EVF AutoSwitch: Changes the behavior of the EVF and LCD when the Display Mode switch is in the "auto" position. Options are:
- Auto EVF/LCD - switches between EVF and LCD. (One turns off as the other turns on.)
- EVF auto ON - EVF comes on when your eye is at the eyepiece, but the LCD remains powered up. (Use this if you like *really* short battery life!)
- Date / Time Set: (If you need us to explain this one, you'd better think again about buying a digicam. ;-)
- Date Format: Choose between YYY/MM/DD, MM/DD/YYYY or DD/MM/YYY date formats.
- Video Output: Select either NTSC or PAL video timing for the video output signal.
 Data-Transfer Menu
- Sets up the camera to interface directly to computer for transfer of image files from the memory card to the computer hard drive.

Follow Imaging Resource: