SLIDES, PRINTS, NEGATIVES
Epson Perfection V600 Photo Scanner
-- Scanning For Fun
By MIKE PASINI
Editor
The Imaging Resource Digital Photography Newsletter
Review Date: September 2009
I've just retired and I've got a lot of old slides and negatives I want to digitize," this frequent request starts. "What scanner do you recommend?"
Frankly, we don't recommend a scanner at all. Figure an hour for every roll of film on your high-end flatbed scanner or even a dedicated 35mm scanner and, well, you retired too late. If the tedium doesn't kill you, something else will.
And scanning software is so difficult to use, you'll beg to be put out of your misery.
But nobody listens. They all want to buy a scanner. For $99, say.
So in the second round of the exchange, we try to explain the difference between a cheap flatbed scanner that can handle Jumbo prints and a real film scanner. That doesn't discourage anybody either.
Not that they'll buy a scanner that can handle film. No, no, no. They'll grab a multifunction printer or an inexpensive flatbed with a transparency unit on top.
We never hear from them again.
ENTER EPSON | Back to Contents
Our personal forays into this wilderness are worth pointing out. A $100 HP G3010 did scan our test slide but it was no match for the $556 Epson V700. We did get surprisingly good results from a $285 Canon MP980, though.
That might make you wonder if there isn't a sweet spot around $300 that can actually do the job now and then.
Epson has aimed its new $250 Perfection V600 scanner at the photographer who finds its V700 too rich for their blood but still wants a serious photo scanner. Like the Canon MP980, it's an LED light source, but it's twice the area of the Canon's light source for film.
The company sent us a pre-launch sample and we've been putting it through its paces. It should be available around Oct. 12.

Compact. It's not very big next to an M1.
HIGHLIGHTS | Back to Contents
In a nutshell, the V600's more impressive features include:
- 6400x9600 dpi optical resolution
- 3.4 Dmax
- Film scanning up to 120/220 film size (medium format)
- LED light source requiring no warm-up
- Digital ICE for both prints and film
- Photoshop Elements for a complete photo retouching solution
- USB 2.0 Hi-Speed
Epson Product Manager Rick Day admitted that the V600 does not produce film scans that are as good as the company's V700/V750 high-end flatbeds. But, he said, it outperforms inexpensive flatbeds. We were particularly curious to see how it measured up to Canon's MP980 all-in-one, which is about the same price.
SHORT COURSE ON SCANNING | Back to Contents
You can skip our Short Course on Scanning if you know this stuff already. But scanning itself remains a black art and this brief discussion of some of the darker corners can help keep frustration at bay.
Resolution. Two numbers represent optical resolution: the number of sensors in the sensor array and how finely the stepper motor can move the sensor down the scanner bed. The second one is usually higher -- and inconsequential.
So if a scanner touts an optical resolution of 4800x9600, it's the 4800 that matters.
An inexpensive flatbed may have an optical resolution as low as 1200-dpi (although the trend is upward). If you scan a 35mm film frame (which is 1.0x1.5 inches) at that resolution, your image size will be 1200x1800 pixels. Simple math.
Find out how many dots per inch your printer requires to make a high quality print. Do some tests to confirm the manufacturer's recommendation.
If you need 150 dpi to make a good print on your inkjet printer, the biggest print you can make with your 1200x1800 images is an 8x12 (on, say, 9x13 paper).
But if your printer needs 300 dpi (like a 4x6 dye sub printer), the largest print you can make from that same image is just 4x6. To get an 8x10 from that 35mm frame, you have to be able to scan 2400 dpi.
The 6400 dpi of the V600 easily exceeds that requirement.
Sharpness. One of the more misunderstood aspects of scanning is sharpness. A raw scan will always look softer than the original. It's no fault of the scanner. As Taz Tally explains the phenomenon in his excellent SilverFast: the Official Guide, "Because a scanner does not capture all of the available image data but rather samples an image and averages the values, it tends to slightly lower contrast along high-contrast edges and smooth out the image."
The solution to this has always been to apply some sharpening to the scan. You can specify the amount of brightness to add to the edge pixels, the brightness difference to define an edge and how wide a border to be affected. In most Unsharp Masking dialogs those are Amount/Intensity, Threshold and Radius settings.
But in sharpening a scan (rather than a digital photograph), you'll want to affect higher contrast edges more than lower contrast edges. To avoid adding grain or noise to the low contrast areas of your scan, you'll want to increase the Threshold dramatically.
It's important to put this in perspective. There are three kinds of sharpening you can subject an image to. We usually talk about output sharpening, the last step in image editing, which is tailored to the output device, print size and viewing distance. But with a Raw image capture or a scan, you want to indulge in a little input sharpening as well. Between the two is the third form, which Bruce Fraser in his excellent Image Sharpening with Adobe Photoshop CS2 called creative sharpening.
But input sharpening is essential to scanning. Your scans will look disappointingly soft without it.
Dmax. To capture as much detail as possible from film, you need a very high Dmax, the maximum density at which shadow detail can be distinguished. Otherwise everything in the shadows is just black.
Most flatbeds brag about a 3.x Dmax, which is more than enough for reflective material. But dedicated film scanners have a Dmax as high as 4.2.
Density range is really what this game is all about. It's calculated by subtracting the Dmin or minimum density at which detail can be distinguished, from the Dmax. Dmax numbers are often inflated by cranking up the exposure so high that highlight detail is burned out (which would be represented by a much higher than normal Dmin). But it's hard to find a range rating from a scanner manufacturer, even when they underwrite independent tests.
You need a dynamic range of 2.0 for reflective material like prints. Slides can have a dynamic range of 3.2 to no more than 4.0 and negs a little less.
Assume a fairly common Dmin of 0.3 and handicap the Dmax figures you see. Yes, we're giving the manufacturers the benefit of the doubt (they didn't burn out the highlights). Then subtract the published Dmax to get the dynamic range. That brings the V600's 3.4 Dmax to 3.1. That's just shy but in the ballpark of what you need for slides but probably in range for color negatives. Certainly there's no margin for error.
But that's why you read a review like this. To see how much detail the scanner could really hold in our tests.
Color Depth. Color scanners were using more than eight bits per channel a long time ago. If your red, green and blue channels each have 8-bit color, you have 24-bit real color (millions, in Mac parlance). Color scanners routinely read more than 8-bits per channel, although how many more is not often disclosed.
You can't see or print more than 8-bit channels but they're immensely useful for choosing which tones and colors you do want to see. So scanners usually offer a 48-bit scanning option using three 16-bit channels that evaluates the 48-bit data before delivering an optimized 24-bit image using 8-bit channels.
The V600 will scan and deliver a 48-bit image.
Connection Speed. High resolution scans result in very large files, so you need a fast connection to transfer that data from the scanner to your computer. Our test slide scans were about 61MB, in fact.
With Hi-Speed USB 2.0, the V600 does its part but your computer has to have a USB port that fast, too. Not all USB 2.0 ports are Hi-Speed (and Full Speed is slower than Hi-Speed), so you'll have to do a little research to see if your computer is up to this task.
We actually tested the V600 with an older machine that had just USB 1.1 ports and it ran just fine. If we were scanning a lot of film, we might wish we had a faster USB connection, but for single scans, you'll survive.
Batch Scanning. A high-end flatbed like the Epson V700 can batch scan up to a dozen 35mm slides or negatives at a time. Less expensive flatbeds like the V600 can scan either four slides or two strips of six-frame negatives. That beats the four-frame single strip of some low-end film scanners and high-end multifunction devices like the Canon MP980. And it saves you time.
That Canon MP980 can take one film strip at a time, for example, but the V600 can do two. That's a big help.
Software. Scanning software remains a good bit behind the times, much as if no one has done anything interesting yet in user interface design. The hardware control is there and the options, too, but you just can't find them, remember them or set them. It ain't easy. Even for us.

Full Auto Mode. One click. |

Recognizing |

Scanning |
One solution to this is to buy and stick with Ed Hamrick's VueScan. It works with nearly every scanner ever sold and can squeeze more juice out of a scan by accident than most programs can with infinite tweaking and twiddling. VueScan now has the added benefit of being able to save its Raw scans as Adobe DNG files.
But VueScan doesn't work with pre-launch scanners so the V600 is not yet supported.

Pro Mode. Options. |
Expanded Options |
Another solution we've long recommended is LaserSoft's SilverFast Ai. The latest version creates a high density range file from two samples (one exposed for the highlights and another for shadow detail) that is faster and more effective than most multi-pass approaches. It can also automatically calibrate the scanner using a special IT8 target barcoded by LaserSoft.
Again, it's not yet available for the V600.
We don't like to use any other software to test scanners. But in this case, we were obliged to stick with Epson Scan 3.80, which is not in the same league as either of the other two products, unfortunately.
Film Carriers. One of the advantages of using the manufacturer's software, however, is it's usually aware of the location of the film frames in the product's film carriers. The frame finding technology in SilverFast leaves a lot to be desired (at least on the Mac version) and VueScan's approach is more like shooting in the dark. You end up selecting what you want scanned in the scan area.
There are two other film carrier concerns.
Scanners don't autofocus (with the exception of the Microtek M1/F1). So how do you make any necessary focus adjustments when scanning film? The V700 included small feet to change the elevation of the included film carriers but the V600 doesn't. Third party carriers offer screw height adjustments. In a pinch, you can stick paper or board risers under the carrier to see if the change improves things.
Finally, the larger the piece of film you are scanning, the more trouble film curl is. Some carriers apply tension to the film to flatten it but others (like those on the V600) don't. The V600, instead, provides a flexible but firm piece of plastic to help flatten film in the 120/220 carrier. It's not as functional as tension since it merely sits on the base of the film, forcing it flat, and therefore has to be moved away from the image area. But it helps.
Calibration Targets. Much as we like to see the inclusion of IT8 reflective and transparent targets (with the associated data files on CD) with any scanner, it's a rare thrill. And they aren't included with the V600.
We admit to being impressed with the V600's out-of-the-box color balance performance, much as we were with the Canon MP980, in fact. Both are LED scanners and we half wondered if that explained anything.
In the end, though, any device in your color workflow should be calibrated and profiled. You need to know what the device can do, not presume what it can do.
We wish every scanner came with IT8 targets and software that knows how to read them to create a scanner profile. Lacking that, you have to buy these expensive tools yourself to actually calibrate your scanner. With its ability to scan bar codes the company imprints on its IT8 targets, SilverFast makes this easier than other tools. But VueScan can do it pretty efficiently, too.
Epson Scan doesn't actually help much here. It will apply a color profile but it won't help you make one.
Still game? Then let's go through the full specifications and then install the scanner.
SPECIFICATIONS | Back to Contents
With an estimated street price of $249, Epson has targeted the V600 for advanced amateur and semi-professional photographers. Here are the official specifications:
Performance
- 6400x9600 dpi maximum hardware resolution with Micro Step Drive
- 48-bit depth (internal/external)
Key Features
- Built-in transparency unit for 35mm slides, negatives and medium-format panoramic film up to 6x22 cm
- Digital ICE Technology removes the appearance of dust and scratches from film, plus tears and creases from damaged photos
- ReadyScan LED light source for fast scanning and no warm-up time; lower energy consumption and mercury-free so it's better for the environment
- Four customizable buttons can instantly copy, scan-to-email and create PDFs
Software Bundle
- Epson Scan driver and with Easy Photo Fix technology for one-touch color restoration
- Adobe Photoshop Elements to edit and enhance images
- ABBYY FineReader Sprint Plus optical character recognition software for converting scanned documents into editable text
- Epson Creativity Suite
Scanning Speed (at 6400 dpi (high-speed mode)
- Black and white: about 21 msec/line
- Full Color: about 21 msec/line
Light Source
- White Light Emitting Diode
- Infrared LED (for Digital ICE)
Photoelectric Drive
- 12-line Epson Matrix CCD
Maximum Scan Area
- Flatbed 8.5x11.7 inches with 2.7x9.5-inch transparency unit
Zooming
- 50 percent to 200 percent (one percent step)
Dimensions
- 11 x 19 x 4.6 (W x D x H)
- 9.04 lbs.
Interface and Power Supply
- Hi-Speed USB 2.0
- AC adapter (100V and 200V type)
Compatibility
- TWAIN compliant
- Microsoft Windows 2000 Professional, Windows XP Professional, Windows XP Professional x64, Windows XP Home Edition, Windows Vista, Windows 7
- Mac OS X 10.3.9, 10.4.x, 10.5.x or later
Eco-Features
- LED light source with lower energy consumption than a fluorescent lamp
- Designed to be recycled
- Mercury-free LED light source
- Energy Star qualified
- For more information on Epson's environmental programs, visit http://www.epson.com/environment
Warranty/Support
- One-year limited warranty, toll-free automated help line
IN THE BOX | Back to Contents
The V600 ships with:
- The V600 scanner itself with integrated transparency unit
- 35mm filmstrip and slide template
- 220 filmstrip template with film decurler
- Power adapter with cable
- USB cable
- Installation poster
- CD with scanner software manual, Photoshop Elements software CD and warranty
SETUP | Back to Contents
We have a gallery of the unboxing, setup and installation of the pre-launch sample V600 Epson provided. It arrived in a plain white box but the contents were neatly packed.
You don't have to slide the scanner out with the foam that grabs it on either end. You can just lift out the foam and then lift out the scanner. That's because the foam surrounding the ends is split in half. Brilliant.
Also very nice is the inclusion of a USB cable. And it's a good long one, too.
There's quite a bit of blue shipping tape to remove. Anything that moves has been taped down. And there's also some clear protective film to spare the V600 from any scratches. Make sure you remove all of it.
The installation poster is very clear. Unpack. Install the software. Connect the scanner and turn it on. Scan.
Although the scanner is very light and small, you really should not move it around once you've set it up. Scanners are delicate that way. The V600 has a lock on the back panel to protect the scanner from damage when it is being moved. The lock cleverly obscures the USB port when in the locked position. Make sure you lock the scanner whenever you do move it.
Software installation was pretty straightforward. On our system, Epson Scan wasn't the only thing installed. The HTML Guide was also installed. And the Epson Scanner Monitor application was installed. A directory with more Epson software was installed, too, but that was support software with items like Event Manager, Common and Copy Utility directories.
The V600 has a set of four buttons that can be defined by the Event Manager. You define a button by setting the action that's launched when you press the button on the scanner.
We've never been big fans of scanner buttons. They aren't as functional as those buttons on copy machines used to be. Launching an application isn't nearly the same thing as completing the task. So you end up pressing the Scan button, then going to the computer to complete the scan operation anyway. This saves you time?
A TWAIN data source was also installed in our TWAIN data sources folder. In Photoshop that spawned an Epson Scan session that delivered the scanned image back to Photoshop.
HARDWARE TOUR | Back to Contents
The V600 cover is finished in an attractive flat black with piano black highlights on the control panel. The base is just black plastic. It's one of the more attractive flatbed scanners we've seen, with a four-inch blue light bar right under the buttons that lets you know when it's working. A small green Power LED and another Error LED under it are the only other two status indicators on the front panel.

Buttons. Useful for PDF scanning.
The four buttons are marked with icons representing PDF, Email, Print and Scan functions. What application is launched when you press them is set by the Epson Event Manager software.
The Power switch is near the back along the right side.

Lock. To plug it in, you unlock the scanner.
The back panel has the gray scanner lock above the USB port and a round connection for the power adapter brick. It's light enough to be, as Epson claims, wall mountable, but there are no screw holes in it. It didn't get warm to the touch during normal operation.
The transparency unit connects to the base at the back as well, but the cable is not removable. Just as well, really.

Transparency Unit. The white back lifts off easily.
When you open the cover (which is also the transparency unit), it locks in the upright position at 45 and 90 degrees.
To scan film, you must remove the white foam-backed background from the lid by simply grabbing the handle at the top end and sliding it up and away. It's held in place by four small tabs near the corners. Very simple.

Negative Holder. Nicely designed, easy to use.
That reveals the transparency lamp, which is large enough for two six-frame strips of negatives. The V600 includes two film carriers, one for 35mm filmstrips or slides and another for 120/220 film. They align to the glass platen with three pin locations on the left side of the glass marked A, B and C. Pop the A tab of the template onto the A pin on the scanner to scan filmstrips. C does slides (turning the same template around) and B on the second template is for 120/220 film.
While filmstrips are held in the frame, mounted slides are merely aligned to the glass by the frame. You put the template into position first and then drop your slides into the four holes marked for them.
The scan bed on the V600 is 8.75 x 12 inches. That won't quite handle legal-size paper. But it's bigger than letter-size scanners.


IT8 Target. The V600 (top), the Canon MP980 (middle) and the Microtek M1 (bottom). We had no control over the crop of the V600 image in Epson Scan.
USING THE SCANNER | Back to Contents
After setting up a scanner, the first thing we normally do is scan our reflective and transparent color targets to profile the scanner. But because Epson Scan doesn't know how to read the values on the IT8 targets, you'll have to settle for a comparison of the IT8 scan with a couple of others.
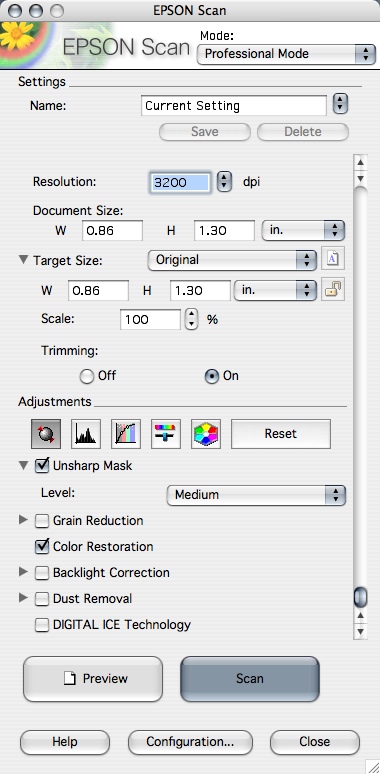
For our tests, we worked from Photoshop CS using the TWAIN plug-in to access Epson Scan. Epson Scan has four modes: Full Auto Mode, Home Mode, Office Mode and Professional Mode. We chose Professional Mode for our more exacting tests, although we did use Full Auto Mode extensively.
Full Auto Mode is a great idea because people new to scanning could use some help. If cameras can figure out how to set themselves for half a dozen different situations, why can't scanners?
We tried document scanning by loading the scanner and pressing the front panel button to create PDFs. That worked well because PDF creation isn't handled by Epson Scan.
CASE STUDIES | Back to Contents
Our first scan was the IT8 slide. We found it surprising Epson Scan would not let us edit the output dimensions, so we picked a resolution that delivered a scan as close as possible to the MP980 and M1 IT8 scans.
By default, Epson Scan also insists on auto cropping the image very tightly. To change this, click Epson Scan's Configuration button to bring up a panel with four tabs. The Preview tab (the first one) has a Thumbnail Cropping Area slider with three settings: Small, (medium, not labeled) and Large. Set it to Large to get the full frame. (Thanks to reader John Mack for pointing this out to us!) .
Slides. Our first image slide was the Yosemite shot we featured in the G3010 review. Again, we couldn't match the settings, but we did specify 48-bit scanning at 3200 dpi.
We also enabled a few Adjustments. Unsharp Masking (a checkbox with three selectable levels) is essential for slide scanning. But we also tried Color Restoration (another checkbox) because this is a very old slide.

V600. Good color balance. |

HP. Unacceptable quality. |

V700. The flatbed standard. |
Other options not particularly appropriate to this slide were Grain Reduction, Backlight Correction, Dust Removal and Digital ICE Technology.
Epson Scan reported that it would take four minutes to perform the scan. And that for film scanning, it can not adjust skew (an option buried in the Preferences).
On this test, the V600 most resembled the V700 rather than the G3010. Color balance was excellent, detail clear and the image pleasantly rendered.
We did convert to 8-bit channels, resize to match the other samples and did an unsharp mask at the new size.
The Maserati. Beating the G3010 isn't much of a test, but the MP980 (which also uses an LED light source) made a very nice scan of a Maserati shot on Kodachrome (4128x2570 full res version). It's a high contrast image whose color is difficult to get right. The red of the car paint and the green of the grass make for a difficult combination.

V600. More shadow detail, if bluer. |

MP980. A better red and contrast. |
|
Again the V600 did very well. Color balance was very good, detail nicely captured. It's a bit bluer than the MP980 capture with less contrast but still credible.

Film Flattener. The dark plastic (left) holds the film flatter.
A Rose. Our 120 film shot of a rose needed a little flattening. So when we slipped the front corners under the small fingers of the holder, we also laid the plastic flattener on the rear edge of the film. When we closed the holder, it helped flatten the film (as you can see in our illustration).
For this scan, we thought we'd pull out all the stops, scanning at the full 6400 dpi resolution.
It's a black and white image, so we restricted the scan to 16-bit grayscale. Just as using 16-bit channels in color gives you some room to play with tone and color, using a 16-bit channel on a black and white gives you some room to play with tone.
Scanning at 16-bits and full resolution took a long time, however. Epson Scan estimated 30 minutes for what turned out to be a 226-MB file. This is one of those tasks that would have been faster on a fast USB port, no doubt. But even then, you can see from this one example why you should retire early.

B&W 120 Film. Click for the 6400-dpi 6.7MB full resolution image. |

100 Pct. Crop. Along the bottom of the middle petal. |
|
The image itself was a pleasure to work with. We made a large midtone shift to darken the petals, did a little dust removal (hadn't cleaned the negative very well, apparently) and indulged in some creative sharpening that delivered a gorgeous 112-MB image.
Color Negatives. Despite the wider latitude of color negative film, the conversion to positive makes this a more difficult scanning task. The orange mask necessary for making prints complicates things but each color negative emulsion requires a different curve to optimize the conversion. High-end software usually prompts the user for the particular emulsion to apply just such a curve.

V600. Full Auto Mode. |

V600. Professional Mode. |

MP980. For comparison. |
Epson Scan doesn't. And while the scans show the same resolution as slide scans, the color balance can be quite a bit off. Color negative scanning was the one disappointment we had using the V600 but we can't blame the V600 entirely. This is one of those areas where the software's limitations also plays a role.

V600. Full Auto Mode. |

V600. Professional Mode. |

MP980. For comparison. |
For our first test, we scanned eight negatives using both the Full Auto Mode and Professional Mode. In Pro Mode we could enable the color restoration feature, which helped punch up the saturation. But the negatives themselves didn't call for color restoration.

V600. Much better color balance with just an S-curve tweak.
For a real-world comparison, we scanned the same film in a Canon MP980. The Epson tended to neutralize the blue channel and since these were primarily seascapes, we got monotone images of gray skies and brown water. The Canon kept the blue and gave us more recognizable images of the sky and sea.
Neither LED device delivered a very credible color negative scan, though. That's unfortunate because if there's one thing hiding in shoe boxes, it's a lot of color negatives.
Our second test was simply to switch film. The second emulsion we tried scanned with a much better color balance, although the curve needed some work to get the results you see here.
We simply applied a slight S curve to bump up contrast and the images came alive after 12 years in the dark.
Neither color negative scan experience was adequate straight from the scanner. And we shudder to think an inexpert user would have to know curves to get good results.
Prints. The prints from the same negatives scanned much better than the negatives. They were in pretty good shape, having enjoyed storage in a dark shoe box for nearly 20 years. And reflective scanning is a lot less taxing on the scanner than film scanning.

V600. Full Auto Mode. |

V600. Professional Mode. |
But again the Full Auto Mode delivered an almost monochrome scan while the Professional Mode scan came closest to the print. Which again suggests the software may be the culprit here.
We can't wait to try this again when VueScan supports the V600.
Documents. Document scanning is also not a very taxing task and the V600 handled it easily. Being able to create a PDF of a document is very handy but the V600 merely creates images of documents. It won't, for example, create a text PDF with HTML links. Just a picture of one.
CONCLUSION | Back to Contents
We didn't really expect to spend as much time with the V600 as we did. Let that be a lesson to you if you're planning to scan your film collection. The software can turn what seems like a straightforward task into a frustrating experience. You know you should be getting better results but you just don't see how.
Epson Scan was simple to use but like most manufacturer-devised software, the interface was barely functional. Our favorite third-party solutions hadn't caught up to the V600 yet, so we were obliged to run our tests using Epson Scan. That should be a very big disclaimer on this review.
We were very pleased with both the slide scanning and the black and white negative scanning (particularly with 120/220 film, which all-in-ones can't handle). We were not at all disappointed by the print scanning. But the results scanning color negatives produced unreliable results, some of which were salvageable only with advanced techniques.
The Epson V600 is an affordable, lightweight, compact flatbed with a larger transparency scanning area than usual. Its LED illumination provides fast startup with low energy requirements and the film holders are easy to use without endangering the emulsions.
While the Epson Scan software was able to deliver very good results from slides and black and white negatives, it failed to reliably produce a credible color negative scan. And that made our experience with this promising scanner a disappointment.
V600 WITH VUESCAN | Back to Contents
The saga continues. If you remember our last installment, the damsel in distress was the Epson Perfection V600 photo scanner, already in stock at a few online vendors. We'd gotten our hands on a pre-release model and wondered how a device that could do so well with slides could have so much trouble with color negatives.
We suspected it was a software issue. Epson Scan, which ships with the scanner, has two shortcomings. It can't profile the V600 using IT8 targets and it doesn't know anything about color negative emulsions. We had hoped that LaserSoft or VueScan would soon support the scanner because both of them can create a scanner profile and know all about color negatives.
On Monday, when Hamrick Software released a version of VueScan with support for the V600, we downloaded it and got back to work.
The first thing we did was simply scan a print. And that went well, so we knew VueScan and the V600 were getting along.
PROFILING | Back to Contents
The second thing we did was to profile the scanner using VueScan and a 35mm IT8 target.
Let's take a second to explain this.
Profiling describes how the scanner sees a range of colors and tones that have actually been measured.

VueScan: Profiling. A grid is aligned over the Preview scan of the 35mm IT target.
The target image whose values have been measured is an IT8 target. It was created on a certain date and is accompanied by a text file that contains readings for all the values in the pattern. We used a slide to calibrate the transmitted light source but you would use a printed IT8 target for the reflective light source.
The scanner comes up with readings, too. That's what scanners do. They scan. But how are the scanner's readings different from the measured readings in the text file? You know, the actual values?
The ICC profile created by this calibration process is the answer to that question. Without that profile, you just don't know the answer.

ICC Profiles. Compare the color gamut bounded by the triangle of the Microtek i900 (left) with conventional illumination to the V600's LED gamut (right).
Now there is one hedge here. You could argue that manufacturing standards are so well controlled that every V600 off the line scans those values almost exactly the same, so Epson Scan would know the color gamut of any V600. But we wouldn't rely on that.
Using VueScan to create a transmissive scanning profile for the V600 is simple. You set VueScan to Profile the Scanner, preview the slide, align the IT8 guide to the preview and select the Profile the Scanner option from the Scanner menu. VueScan Help has the details, but it goes quickly.
VueScan writes an ICC profile (by default called scanner.icc but you can make up your own name) in a location you can designate and uses that profile to get the best possible results from the scanner.
Our big problem with the V600 wasn't slides, but the profile is for film scanning in general (rather than reflective scanning). With our profile loaded, we were ready to try our problem Kodak Gold 400 negatives again.
COLOR EMULSIONS | Back to Contents
Epson Scan doesn't care what kind of film you are scanning. It just wants to know if it's positive or negative, color or black and white.
Unfortunately, there's a whole lot more to scanning film than that. If you want a scan you don't have to edit, that is.
We used Epson Scan in both Full Auto and Professional modes to scan what turned out to be some difficult color negatives. And we weren't happy with the results. We weren't happy with the scans a Canon MP980 (also an LED light source) did, either.
So to tell if the problem was the scanner or the software, we switched software.
Unlike Epson Scan, VueScan knows about film emulsions. You tell it what kind of film you are scanning and it will optimize the scan conversion curve for that particular emulsion. There are dozens of choices, organized by manufacturer. So it was easy to find Kodak and Gold 400. There were a few generations of that emulsion, which the film doesn't reveal, so we just picked an early one.

Scan. The proof is in the pudding. Here's the VueScan scan of the kayaker (see comparison below).
We didn't crank out a 48-bit, high resolution scan. Instead we kept things simple with a 24-bit scan suitable for printing. But we did experiment with color restoration, fading correction and various white balance settings. And we also tried scanning with multiple passes (something else Epson Scan doesn't offer), which can dramatically extend the dynamic range of your image.
Our Epson Scan results for the kayaker and for the cliffs both had color casts we found unacceptable. The color cast was warm in Auto mode and cool in Professional mode, but it was always there, as our thumbnails show.
In VueScan, we finally got a result that looked like the well-preserved print. For the first time, we were pleased with a color negative scan from the V600.
But VueScan doesn't simply give you a credible scan. It gives you control over the image much like an image editor so you can optimize the scan. You can actually manipulate the conversion curve after you've scanned the image, although the control is a little less responsive than what you might have become used to in Photoshop or Lightroom or some other recent image editing package.
|
V600. Epson Scan Auto |
V600. Epson Scan Pro |

V600. VueScan with profile |
We didn't need to use VueScan's color modifications of restoration, fade correction or an altered white balance. So the film wasn't in quite as bad shape as we had thought it was.
To recap, VueScan offered us two advantages over Epson Scan. First, it let us profile the scanner, creating an ICC profile for it, so the color gamut it sees was known to our image editing software. And second, it let us specify the particular negative film emulsion we were scanning to optimize the conversion curve for it.
WHAT TO SCAN | Back to Contents
As we mentioned in the first part of this review, we don't recommend you buy a scanner like this to digitize decades of film strips and slides. That solicited a few interesting emails from Newsletter subscribers who read the review.
Mark Alan Wilson wrote, "Have you reviewed any of the services that scan film? I think this would be a great article; I found some other 'reviews' online, but I like many others have come to trust your site over the years and would like to hear your opinion on this topic."
In fact, we do recommend finding a lab to digitize your collection. For almost everyone, that works out better than pretending you will live long enough to get through your images at 36 frames an hour.
One exception is worth noting, though. With the right lens (nope, not the kit lens) and a reliable setup (you need more than a tripod), you can use a dSLR to digitize your slides. You need a bit more help to digitize color negatives, but it's possible if not exactly feasible (converting negative is not simple). The trick with this approach (which is faster than using a scanner) is building the rig, which not all of us can do. In our July 17 issue, we pointed you to Derrick Story's Canon setup. It probably cost more than the V600, though.
So back to the lab.
There are two criteria to score: the equipment and the personnel. You don't want to use a lab that relies on the same equipment you might use because you'll be paying too much for labor. High-end scanning equipment (like the gear used to create Kodak PhotoCDs) can quickly create high resolution scans. But the lab has to invest in that gear. As for personnel, start with the pro labs in your area first. You know, the places you'd want to work if you were working at the other labs.
We recommend you look for a local lab because these are your one-and-onlys. You don't have copies of this stuff. So you don't want to risk sending them through any delivery service. And to minimize the risk, do it in batches. Whatever fits on a DVD, say.
But if there's no local lab, you may find Mitch Goldstone's ScanMyPhotos.com and (maybe) ScanCafe worthwhile. ScanCafe, apparently, sends your originals to India for scanning, which is a delivery that really makes us nervous.
Reader Richard Sroda wrote, "What do you recommend for someone who has a 50-plus year career in film and wants to scan some edits from old negs (35mm, primarily black and white) for prints for several shows. I don't want to scan every frame I ever shot."
Now that approach makes sense. Have your collection digitized or not but there will always be a few images you want to tinker with yourself. After all, for some of us, scanning these old treasures and twisting every little bit of beauty out of them is a pleasure.
And that's exactly what the V600 is for at about half the price of the V700/V750. But if you have to buy SilverFast or VueScan to get the V600 to deliver good scans, why not just get the V750, which comes with SilverFast?
Even with competent scanning software, the interface you have to deal with is confused and complex. SilverFast relies on several windows with lots of little icons you need a palm reader to explain -- and still basic settings like the color mode is hidden away. VueScan, with characteristic candor, organizes your options in tabs that reveal long, long lists of settings.
But the good news for Richard is that the V600 does black and white film very well. It has the resolution at 6,400 dpi and the density range (barely) to handle film. We'd still want to profile it but our scan of a rose shot on 120 film sure looked nice.
CONCLUSION | Back to Contents
To sum up, have a serious chat with yourself if you plan to scan a large film collection with a flatbed scanner. Consider using a local lab for the collection and investing in a high-end scanner with good software to tweak special images.
The V600 is a valiant attempt to deliver the goods at half the price of the flagship V700/V750 but Epson Scan won't let you profile the scanner and couldn't deliver reliable results from a variety of Kodak color negatives we tried. The V600 itself did much better when run from VueScan, but if you have to buy software to use the scanner, it puts the flagship scanner back in the picture.
But if you can live with an unprofiled device and primarily want to scan black and white images or slides, the V600 did well enough to make prints to hang at home.
V600 Driver Updated | Back to Contents
When Marco L reported a problem scanning 120mm color negatives in the forum of the Epson Perfection V600 scanner review, we wondered how that could have escaped our notice.
The problem was that each half of any scan seemed to have different densities, the right side lighter than the dark. "You can see examples in the Flickr Epson V600 User Group: http://www.flickr.com/groups/1269720@N20/discuss/72157622753647845/," Marco wrote.
We'd asked our contacts at both VueScan and LaserSoft but neither had observed it. Ed Hamrick, author of VueScan, thought it might have to do with blocking the calibration area of the glass bed.
But Epson has responded to our inquiry with an explanation and a fix:
"This error has to do with the in-box version of the Epson Scan software. As we speak Epson is finalizing a replacement CD to rectify this issue. All units shipping from the end of January moving forward will include the new CD.
"Existing customers can access the latest driver on Perf V600 Drivers and Downloads. The latest driver will fix the glitch. Here is the link:
So why hadn't we seen it? We were using a different version of Epson Scan, from the prelaunch version of the scanner.