 Review:
ImageMatics Still Motion Creator
Review:
ImageMatics Still Motion Creator(Windows platforms only) :-(
By Dave Etchells
Review Date: May 2002
Get it now! Special deal for Imaging Resource readers! $40 off the product! CLICK HERE.
Try it now! Download a demo copy that has the special "Dave's Deal" discount code!
What is it ?!
| Created by Tom Radcliffe (WWW.PointofViewStudio.com) using ImageMatics StillMotion Creator |
Movies from your scanner? Say what?
I have to admit this one sounded a little strange the first time I heard about it. Once I saw what the program did though, a host of applications leapt to mind. - And there's a definite, eye-catching "cool factor" when you see the output.
So what is it? It's Imagematics Still Motion Creator (ISMC), a program that creates animated movies from any digital still image. If you've ever seen one of Ken Burns' documentaries, in which the camera pans across old photographs, you've seen the effect. You start with standard digital photos in any format, and end with "Flash" animated .swf files or standard AVI-format video files.
For digicam or scanner owners, this is a slick trick, the perfect way to make *really compact* movie files from your still images that can play through most web browsers and many email systems. Think of it as a slide show and guided tour combined into one. Rather than emailing huge JPEG group shots from the next family gathering (that clog emails and are hard for many people to open and view), how about a compact file that pans a "virtual camera" across the faces of everyone in the picture? It's also a natural for the 'web, adding interest to static shots, and letting you selectively show tiny details in images without subjecting viewers to megabyte downloads.
While its files can be very small, it'd be a mistake to think of Still Motion Creator solely as a tool for making tiny moving images for web or email use: It's also a powerful tool for creating higher-resolution movies to play from a hard drive or CD-R disc. - You could assemble a feature-length slide show of family moments from the last year, burn it onto a CD-R and ship the whole thing to the grandparents as a gift. Pros are using ISMC to create sophisticated "electronic portfolios" to give to art directors and others interested in their work. It really breaks you out of the standard "slide show" mentality and opens a whole new realm of creativity. (See the beautiful slide show at the top of this page, created by Tom Radcliffe of Point Of View Studios. - The file is only 80K.)
One of the most natural (not to mention profitable) applications of ISMC is in creating "virtual tours" of vacation, rental, or resort properties. No need for expensive panoramic lenses, or per-photo charges for "virtual reality" software: Just snap a collection of still photos with your digicam, showing the property in question, and then make a movie from them, panning and zooming to show details, and working in artful fades and transitions to help tell the story. (At least one Imagematics customer has already made a business of this.)
The list of applications goes on and on: Add a pan and zoom effect to a family portrait; turn a collection of still photos into a movie showing stages of a project, or the kids growing up; make a professional documentary out of that last trip; create a virtual tour of a house, resort, or rental property; add interest to your product shots, or just show Fido being Fido. Up to sixty-four still images, (each of which can be as large as 4K x 4K pixels (16 mega pixels)) in color and black or white can be used (mixed) to create a movie that tells a story or just entertains.
Get it now! Special deal for Imaging Resource readers! $40 off the product! CLICK HERE.
Try it now! Download a demo copy that has the special "Dave's Deal" discount code!
How does it work??
Since nobody reads directions it better be easy to use - Is it? I went to the ImageMatics website and downloaded the program to find out. The demo is a full version of the product with no limitations to its features, but it adds a watermark to the movies, which will go away when the product is purchased. After downloading the product, the first thing I saw was a Read Me file, saying "nobody reads me or the directions but check out ours and we think you won't regret it" - A nice touch of realism that all "readme" authors would do well to learn, and they're right: I didn't regret it.
A single page "Quick Start" gives a literal 1 - 2 - 3 - you've-got-a-movie introduction to StillMotion Creator. It introduces the underlying concept of the application, keyframe animation, and takes you by the hand through the menus. A couple of mouse clicks later, and you've created your first movie. In the Quick Start guide, all the terms are linked back to the online reference and user guides back on Imagematics' website.
At first contact, still photographers may find the many references to "keyframes" and "moves" in the ISMC documentation a little foreign, but the basic concepts are very straightforward and easy to assimilate. Spend 15 minutes playing with the application (after reading the QuickStart guide), and you'll figure it right out.
The Quick Start gives you a six-example tutorial that takes you through the whole product and process. Source files and sample results for all the examples can be downloaded from the ImageMatics site so you can get started playing with the app very quickly.
To begin, Go to the File Menu and select Load Image. You select the image file you want to start your movie with and it is loaded into the "Stage" in the upper right hand corner of the ImageMatics screen.
Here's what the StillMotion Screen looks like after you've loaded an image
to begin working with. (You gotta love that photo there, one of the more "interesting"
couples I've seen in recent memory! ;-) - It's part of the Quickstart file set
from Imagematic's site.)
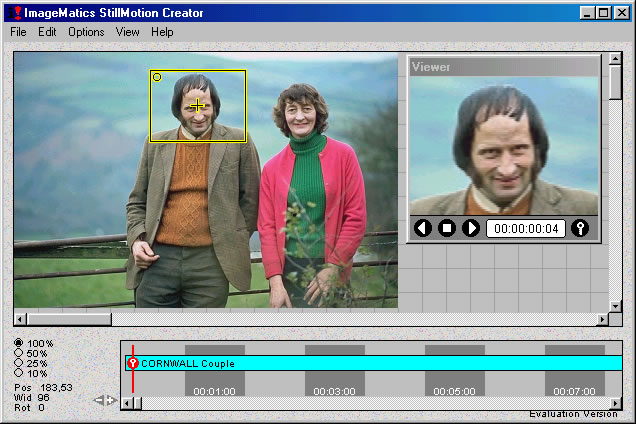 The
key elements are the Stage (upper right), where the image is loaded, the Timeline,
(bottom) where the movie is composed and the View Window (left) , which lets
you preview movies and set Key Frames.
The
key elements are the Stage (upper right), where the image is loaded, the Timeline,
(bottom) where the movie is composed and the View Window (left) , which lets
you preview movies and set Key Frames.
The whole concept of Key Frames will be new to still photographers, but very familiar to anyone who's had any contact with animation in the past. The idea is very simple: For any motion you want to build into your movie, you just decide what you want the screen to look like at the start of the move, as well as at the end, and then the computer "fills in the blanks" between, creating a smooth transition from one to the the other.
The starting and ending views are called "keyframes," since they're "key" (meaning important or significant) frames in the animation. Change the starting or ending keyframe changes the view at the start or end of the animation. Decreasing the time interval between keyframes speeds up the motion, while increasing it slows it down.
In ISMC, you specify keyframe views of your subject by clicking and dragging an interactive "Camera Window" that appears as a yellow outline box within the View Window. The effect of your actions on the Camera Window are shown in the Stage window. When you've got the image looking the way you want it to, you click the key icon in the lower right hand corner of the Stage window to mark a keyframe.
To make your first movie, you'll need to specify just two keyframes, a starting one, and an ending one. You tell the program where you want the keyframe to occur in the movie by clicking on the timeline, to position the red cursor bar. (You don't have to click on the timeline for the first keyframe, the timeline cursor always starts out at zero. BUT, you DO need to click the key icon, or your changes won't register for the first keyframe.)
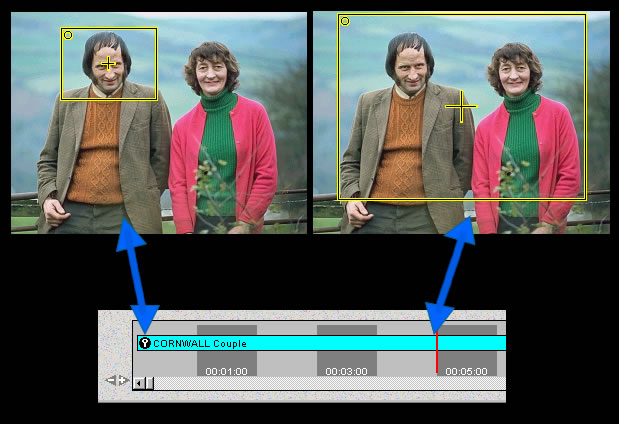 Suppose
we wanted to make a movie of our favorite Cornwall Couple, starting with a tight
shot of the gent's face, pulling back to a wider view including his paramour
(or wife, as the case may be).
Suppose
we wanted to make a movie of our favorite Cornwall Couple, starting with a tight
shot of the gent's face, pulling back to a wider view including his paramour
(or wife, as the case may be).
The process is illustrated in the composite screen shot above, showing the two separate steps in the process side by side. We begin by resizing the Camera Window to just capture our subject's face, clicking the "key" icon in the View Window when we've got things framed to our satisfaction. We then click our cursor on the timeline at a point corresponding to how long we want the zoom to take (5 seconds in this case). Once there, we resize the Camera Window to frame the wider shot we want to end with. A last click on the key icon, and we've set up our movie. (The timeline above was shot just before clicking the key for the second time, so you could see what the cursor looks like as you're about to set a keyframe.)
Your First Movie!
Now we're all set to make our first movie. Go to the File Menu, and select Make an SWF Movie, leave all the settings at their defaults and click OK... That's it, it really is that easy! (The ReadMe was right it actually is easy, but even easier if you take a few moments to look at the instructions.) Selecting Save Movie File saves the work in progress and remembers the images and the moves that you have created. (The demo version works just the same, but it puts a bright red bar across the middle of the image.) By the way, as you play with the program, you'll notice that you can avoid some of the "jumpy" look of the flash animation by doing your zooms and pans a little faster. Fades are very smooth, but the way Flash does its pixel interpolation leads to somewhat "jumpy" pictures during slow zooms.
Not happy with how the action unfolds? Changes are easy, since all you have to do is change the keyframes, and the program does the rest. Change the views to zoom in or out more, or just slide the key icon along the timeline to make things happen quicker or more slowly.
Get it now! Special deal for Imaging Resource readers! $40 off the product! CLICK HERE.
Try it now! Download a demo copy that has the special "Dave's Deal" discount code!
Multiple Images and Fades
Now comes the cool part: You can have as many moves as you like on a single, as long as you have at least two keyframes to create a movie. You can also combine multiple iamges and fade between them. To add another image, select Load Image from the File Menu and choose the image you want loaded into the Work Area. The Time Line color codes each new image and shows its name in the Time Line itself. The Viewer Window lets you preview any moves you've created at any time, just by using the VCR-like controls along its bottom. You can also drag the cursor or drag the mouse (the video jocks call this "scrubbing") over the Time line to preview the movie - The movie will play in sync with the timeline cursor, jumping forward or backward to match the movement of the cursor along the timeline.
Transistions are dead easy too: Each new image appears on the Time Line with a green arrow at its start. Moving the cursor over this arrow (the Fade control) creates a transition equal in time to the distance you stretch it along the Time Line. The fades look very professional. The Examples section in the online documentation shows you how to fade through from one image to another, to black, or to any other background.
No Holds Barred
So far, we've just talked about movies, even though many still photographers will be equally interested in pure slide shows. - What if we don't want any panning or zooming? It turns out a slide show is just a special case of a movie, one in which there's no movement between the keyframes. What's neat about this is that you have complete control over how long each image displays and how long the transitions last between them, using the controls I described above. No rigid "5 seconds per frame" slide show format, you can choose to linger on any given image, or jump quickly past several. All with artistic transition effects to enhance the experience.
To make a slide show with static images, just load an image, click the key, move the cursor five seconds along the time line (or whatever distance corresponds to how long you want that shot to be displayed), click the key again, and a line appears that say Hold. That image will now be held in place for five seconds. A string of these and you have a basic slid show with about a minute's effort.
Spin Control
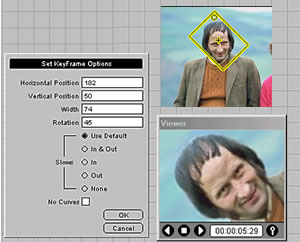 Not
enough? How about a little rotation with that movie? The Camera Window that
controls pan and zoom also has a handle on it for rotation. (A little yellow
box in its upper left hand corner.) Just like any other move you simply set
the start and end views and StillMotion Creator fills in all the tweens. (What
the video/animation jocks call the in-between frames.) You can rotate the window
to any specific angle you want easily and accurately by right clicking in the
Camera Window. This brings up a handy dialog box that lets you manually set
the position, the size of the window and the exact angle. If you want the view
to spin more than a full turn, just plug in an angle greater than 360 degrees.
Set your image spinning by plugging in a really large rotation angle.
Not
enough? How about a little rotation with that movie? The Camera Window that
controls pan and zoom also has a handle on it for rotation. (A little yellow
box in its upper left hand corner.) Just like any other move you simply set
the start and end views and StillMotion Creator fills in all the tweens. (What
the video/animation jocks call the in-between frames.) You can rotate the window
to any specific angle you want easily and accurately by right clicking in the
Camera Window. This brings up a handy dialog box that lets you manually set
the position, the size of the window and the exact angle. If you want the view
to spin more than a full turn, just plug in an angle greater than 360 degrees.
Set your image spinning by plugging in a really large rotation angle.
Putting It All Together and Just Add Sound
It's easy to combine pans, zooms, rotation, fades and image changes to create
very sophisticated animation effects. Cut and Paste and of course delete make
editing straight forward. The online Examples show a neat trick for making a
"looping" movie: Copy the first image and key and paste it in at the
end of the movie you want to loop. Having the identical image and keyframe at
start and end of the movie means that there'll be no abrupt jumps when it loops
from the last frame back to the first one again
The six Examples Imagematics provides on their website do an excellent job of
putting it all together and showing you how to do just about anything you'd
want to with the product.
Another cool feature: When you have the movie the way you like it, adding sound is as easy as dropping in a WAV soundtrack file. Click here to view a movie with a soundtrack added. (Just make sure the potato chips are locked up first. ;-)
Advanced Features
Beyond the basics I've just described, Still Motion Creator offers some advanced features to add a professional moviemaker's touch to your productions. These include control over the in-between motions, through options that allow for constant speed or "easing" in and out (speeding up and slowing down) at Key Frame points. You can also choose whether to force the in-between motion to straight lines or to have it follow curved paths. There's also a variety of advanced features for video out put.
Making Videos
The basic version of ISMC is limited to swf file output, for display via web browser. For an extra $50, the "Plus" version also lets you output your movies as AVI files, which produces much smoother animation effects by avoiding the limitations of the Flash format. (The Professional version can generate output at higher resolutions, up to and including HDTV.) Any Movie created with ISMC can be output as an AVI file for use in Streaming video, Video CD, DVD, broadcast video and HDTV. In the advanced versions of the product, selecting Make Movie File instead of SWF Movie provides you with a set of menus and options that let you control every aspect of AVI file construction. Any Windows compatible CODEC may be used with the program so MPEG formats for use with professional editing system are easily accommodated. Do note though, that AVI support is only available in the Plus and Pro Versions of the product.
Using StillMotion
Once you get it, you've got it. The process is fast, easy and interactive… all art and very little science. Come up with an idea, make some moves, check it out, edit it a little, and make a movie. If you don't like the movie, edit it again. Its very fast and everything is WYSIWYG (what you see is what you get)…instantly.
After showing the program to some Flash power user friends of mine, they told me that you could do all of this in Flash (except the video output), without a separate program. When we got into what it would take to do it though, it rapidly became clear that they could do it, but there was no way I'd have time to either learn how in the first place, or to futz with the Flash code on a regular basis. The Flash demo on Imagematics site really helps you understand why StillMotion Creator's design makes sense. StillMotion was designed to do pan and zoom animation…period. By contrast, Flash does all sorts of stuff and requires scripting in many cases to put it all together. StillMotion creates animations from the cameras point of view. What the camera sees the viewer sees. In Flash, you animate character (objects) that appear, "act" and leave the fixed perspective of the stage. It's an entirely different milieu, and you just can't get the kind of intuitive, interactive control you do with StillMotion. A beginner with Flash could create the same sort of final output as one could with StillMotion, but it would probably take ten times (or more) as long.
Have it Both Ways
The good news is that SWF files created with StillMotion are pre-assigned a "layer" that Flash recognizes, so your StillMotion movies can be dropped into other Flash animations, and have all of Flash's text and graphics effects added to them. (Here again, examples are given on Imagematics' Website.) In fact, you can even use Flash to add "hotspots" to StillMotion's SWF movies that can be used to embellish virtual tours. Click on a door and see the next room, etc.
Limitations
Of course, nothing's perfect, and Still Motion Creator is no exception. A lot of its limitations are imposed by the realities of Flash animation. The most evident one is the "jerky" motion you saw in my animation of the Cornwall Couple above. This jumpiness is caused by the way Flash interpolates pixels when scaling (zooming) and panning. There was a tradeoff to be had between execution speed and smoothness of animation, and the developers of Flash went more toward the speed end of the scale. NOTE that this jumpiness isn't a factor at all in AVI output from the Plus and Pro versions.
Another limitation becomes evident when you add sound to a Still Motion presentation. Depending on what's going on in the animation, the video playback could either lag or race past the sound playback. There can also be a differential between the two, depending on how fast or slow the computer running the animation is.
Wish List
The StillMotion Creator is a Windows only product, I think Mac users would scarf this product up, a little hint to the folks at ImageMatics. I'd also like to see more variety in the transitions and maybe a few more "hot keys" for frequently repeated operations like panning across a whole image or zooming to the center. Or maybe I'm just spoiled and lazy.
Recommendations
Imagematics Still Motion Creator is a hard product to peg to any particular category. It's not just another image editing product, but rather creates a whole new category of its own. (At least I'm not aware of another product out there that does the same thing.) Its kind of like getting the other half of your camera you didn't know was missing.
Check it out!
And here's a special deal for Imaging Resource readers! - Click here to visit their site via a link that'll get you a discount code (DD02XL, by the way) that'll guarantee you $40 off the product, and that's valid through the end of 2002. (Imagematics current promotion (as of 5/17/2001) expires on 5/31/2001.) - Better yet, a portion of your purchase will go toward supporting this site!
Want to try it first?
Here's a link to download a demo copy (636K download) right away, that has the special "Dave's Deal" discount code on its splash screen, so you'll have it handy when you whip out your credit card! ;-) As described above, the demo version is fully functional, but it puts a red bar across the middle of your movie.
(By the way, a minor bug in Imagematics site means that the DD02XL discount code may appear on the home page with the expiration date wrongly listed as 5/31/2001 - Don't worry, it really is good until the end of the year!)