NEVER A DULL MOMENT
TECHnik's nik Sharpener
 By MIKE PASINI
Editor
The Imaging Resource Digital Photography Newsletter
Review Date: August 2001
There are two kinds of people in this world: those who use Unsharp Masking and those who've never heard of it. Once you understand it, you won't be without it.
It's so important, in fact, that you'll probably find it everywhere: in your camera, your scanner software and your image editing program.
But unless you're mathematically inclined, you're not liable to have much confidence using it. Until today, that is. Because today, we're introducing you to nik Sharpener, a plug-in from TECHnik (http://www.tech-nik.com/) that handles it with style, smarts and elegance.
But first, what is Unsharp Masking?
THE DEVIL DEFINED
A blurred image suffers poorly defined, soft edges. This can, to some extent, be corrected, by sandwiching a soft mask of an image (made by exposing a sheet of film through the original negative with a glass plate in between, creating a positive but blurred image with no fine detail) with the original image. The final image enjoys the detail of the negative and the more uniform density modulated by the mask. A sharper image, in short.
This technique translates very well to and enjoys some enhancement in the digital darkroom where the edge areas can be mathematically discovered and extended by any factor at all with the effect reined in by yet another variable.
The trick is to effectively calculate these three variables to improve the image. We should probably say to sharpen the image because the image may be just fine until you reproduce it (on press or on your printer). The mechanics of reproduction introduce some blur. USM hedges your bet against that.
Using USM isn't easy but it's always worth the trouble. And after resizing an image, it's essential. Although it is often harmful to apply it too early in the editing process (in camera, say) and almost always fatal to do it twice (you can overdo it).
SHORT CUTS
Your image editor may define them differently, but the three variables are commonly called Amount, Radius and Threshold.
Amount, a percentage, is simply the change in exposure or density you want. Radius, in pixels, is how wide a swath you want to affect around the presumed edge. And Threshold is the cutoff level for determining what an edge is (zero means all pixels get sharpened, which can create noise).
 |
 |
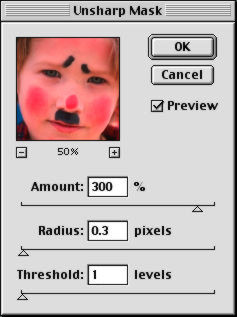
| Dave's USM |
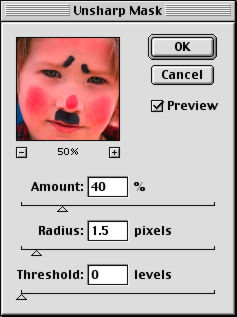
Mike's USM |
Common superstition suggests using an Amount between 150 and 200 percent, a Radius between 1 and 2 pixels and a Threshold between 2 and 20. But on a recent Jerry Springer episode, Dave confessed he likes to go crazy with 300 percent, 0.3 pixels and 1. And Mike (later on Nightline) revealed he likes to slide between 20/40/60 percent with a Radius of 1.5 pixels and a Threshold of 0.
If you're going to press (where USM is not optional), conventional wisdom is to use an Amount of 100 percent with a 1 pixel Radius and a Threshold of 4 for an offset press. Alternately, you can try an Amount of 200 percent with a pixel Radius of 0.5 to 0.7 and a Threshold of 4. Keep the Amount at 200 percent and the Threshold at 4 but modify the pixel Radius to 1 for newsprint on a web press.
This is, strictly speaking, oversimplifying. Each image likes its own USM tweak. And you should always consult your printer (they know what works best on their presses) for recommended USM values.
In addition to the image itself, these superstitions ignore some other very important factors: the resolution of the image, the quality of the output and how far away the image will be viewed.
If you're getting the feeling the very same image might be sharpened quite differently for printing or displaying on the Web, you're getting the message. How much USM to apply to any given image is directly related to output, not the inherent quality of the image.
NIK SHARPENER
Enter nik Sharpener. This Adobe plug-in uses artificial intelligence to scan the image, set the variables, provide you with easy-to-use controls to adjust its settings, gives thorough feedback and is quick and resource efficient. It protects the image from oversharpening, safeguards anti-aliased type and avoids hue shifts (which typically require you to convert your image to LAB mode and do USM on the luminosity channel only). In short, it doesn't just make it easy to use USM, it makes it easy to optimize USM.
SYSTEM REQUIREMENTS
The plug-in runs under Mac OS and Windows 95/98/NT. TECHnik recommends 32-MB RAM (modest, considering image editors today like 64-MB). Sharpener runs under any program that conforms to the Adobe plug-in architecture, including Photoshop, Illustrator, Corel Photo-Paint and Corel Draw.
INSTALLATION
Installation is so simple we almost screwed it up. Just copy the folder of filters to the Filters folder of your Plug-ins folder. Do it right and you'll see a set of options fly out from the nik Sharpener option in your Filters menu.
The options you see depend on which version of the program you buy. The Pro version has seven options: color laser (autoscan or not), inkjet (autoscan or not), Internet (autoscan), offset press (autoscan or not). But these options are a bit more generic than they might seem. You can, for example, use the Internet option when the output device is unknown and if you are printing on a black and white laser printer, the manual suggests which inkjet or offset settings to use.
USAGE
We always recommend working on a copy of your original image. Think of the original as a musical score which can be interpreted in performance many different ways. Keep an archival copy of that score so you can perform it later in a different way.
But when you are done editing your image (crop, final size, color correction, etc.) for any particular "performance," it's time to sharpen.
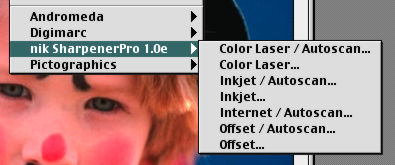 |
| Your Options May Vary |
Just select the appropriate filter and the plug-in will present a dialog box.
AUTOSCAN
If you select an option that autoscans, Sharpener Pro analyzes the image before displaying the dialog box.
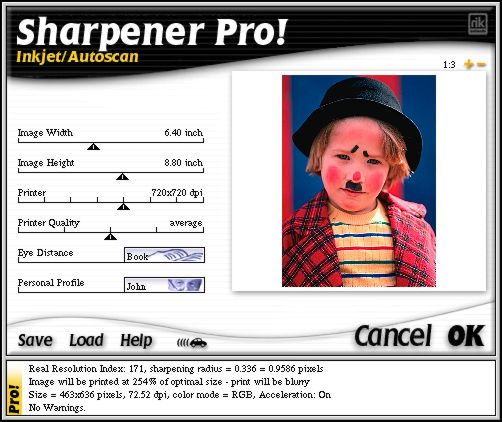 |
| nik Sharpener |
Autoscan determines the type of image source (slides, digicam images, scans, etc.) and the "real" resolution of the image (which TECHnik defines as the level of detail in the image, regardless of the number of pixels, expressed as a number between 1 and 500 and usually between 90 and 250). Sharpener will sharpen the image differently based on the quality autoscan detects.
One of the most valuable benefits of autoscan is learning whether or not the image has sufficient detail (not to be confused with sufficient quality) to print. A lot goes into this calculation: image content, resolution, printer type and distance viewed.
And some things get tossed out: up to three scratches, for example (which could skew the sharpening).
A small text window at the bottom of the dialog box gives you instant feedback on what Sharpener Pro has found, its USM settings and any pertinent warnings. You can easily adjust the sliders to alter the effect.
SLIDERS
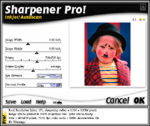
Sharpener's interface displays from one to several sliders alongside a zoomable image preview.
The image preview, warns president and developer Nils Kokemohr, is "a bit of a contradiction." You can't, he notes, evaluate sharpening for print output based on screen appearance. But as a relative indicator of the various settings, it's useful.
The settings (which vary by filter) include:
- Print Width (determined from the image settings).
- Print Height (determined from the image settings).
- Image Source (set automatically during autoscan). APS film, small to large transparencies and slides, low- to high-end digicams, low- to high-end scans. For digicam users, a low-range setting applies to images under one million pixels; mid-range to images of one to two million pixels; and high-end to two to 4.2 million pixels (above which, TECHnik recommends using the larger slide/transparency settings).
- Image Quality. Bad, below average, average, above average and good. Burred images and images with little detail are sharpened differently than images with fine detail.
- Printer. An important setting to describe your output device. TECHnik warns that the Radius for a 360x360 dpi inkjet printer is about 10 times that of a 600x600 dpi color laser printer. So don't skip this setting.
- Printer Quality. Bad, below average, average, above average and good. Inkjet print quality can vary tremendously (Fast or Best quality, type of paper, etc.). This slider accommodates that variation very nicely.
Our single complaint (OK, it's just a sigh) about Sharpener is that it doesn't remember our settings. You can save and load settings in the Pro version but we'd just like it to remember them. No big deal, really, but we're spoiled. If we tell the inkjet filter that our printer is a 600x600 dpi printer, we don't think we should have to load and save a setting.
VIEWING DISTANCE
The factor most often missing from most output calculations is the distance at which the image will be viewed. Sharpener Pro doesn't make that mistake.
It does however, make it a little obscure. There are five settings: Book, Small Box, Large Box, Small Poster and Large Poster. We prefer to think of them as a scale of 1 to 5 from Near By to Far Away.
PERSONAL PROFILE
Meet Anna, John and Zap (he's the dude in the shades). They're "styles" of sharpening in the Pro version that range from the modest to the radical. Well, more radical than modest, at least. The real function of these "personalities" is to let you nudge the program in a direction you, personally, are comfortable with. We tend to prefer Anna, as a general rule. Most of our friends, we suspect, would prefer Zap.
We're not showing you screen shots of these various settings for a reason. The test of proper sharpening is how it works on the print, not the screen. (But we do have a comparison of screen sharpening below.)
IMAGE PROTECTION
Sharpener Pro's artificial intelligence can apply USM settings selectively. Not all edges are edges. Sharpening foliage or a beach of pebbles can obscure the real subject of an image. Tiles, checkerboard patterns and fences, likewise.
Sharpener Pro also includes a hue protection process to minimize color changes (artifacting) that can occur during USM.
And it sports anti-aliasing protection to miraculously avoid confusing anti-aliased edges (commonly employed to render fonts) with blurred ones.
ACCELERATION
You can control how long Sharpener Pro spends sharpening with the "accelerator" button. It's quick enough that you needn't accelerate it when sharpening individual images, but if you are batch processing a group of images, running Sharpening in accelerated mode will get good results quickly.
BATCH PROCESSING
You can record the nik Sharpener filter in a Photoshop Action to subsequently batch process a group of images. TECHnik suggests using the Autoscan Internet filter (which sharpens independently of output) to get both a safe and effective effect for large numbers of images in the shortest period of time.
ONLINE HELP
Help is very nicely integrated into the plug-in. It even restricts itself to discussing the filter you've selected.
PRICE
Are you sitting down? The Pro version runs $329.95 while the Standard version is $129.95. The Standard version, in our less-than-humble opinion, lacks too many important features to satisfy us as either a consumer or prosumer product. TECHnik does, fortunately, offer the Pro Internet Autoscan filter with its Inkjet filters for $199.95. If it was up to us, it would be bundled with every digicam.
THE VERDICT
So how has Sharpener Pro done in the few months we've used it?
First, we haven't been sharpening for offset printing around here lately. We're sharpening for monitor display (the Web) and for prints (both inkjet and dye sub). If you try the shortcuts above, you'll see the modest but noticeable improvement we look for in our images. But we generally don't sharpen digicam images unless we change size. Then we always do it, inertia or no.
 |
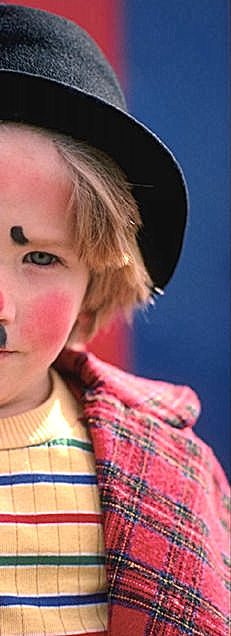 |
| Original |
Internet/Autoscan 'John' |
Well, we took this 463x636-pixel scan of a kid clowning around and prepped it to send via email (Web quality here). We asked Sharpener to work its autoscanning Internet magic and it came up with a setting for each of its personalities (the only setting in the dialog box) that we would never have divined.
In all of the following cases Sharpener Pro figured the Real Resolution Index of the image at 171.
Anna produced a lovely effect with a sharpening Radius of 0.147 or 0.4194 pixel. John came in politely but a little sharper with a Radius of 0.184 or 0.5242 pixel. Zap came in with a loud thud using a Radius of 0.211 or 0.6028 pixel. Comparing Sharpener's results to those of our suggested ones above confirmed Sharpener is operating at a different level of sophistication.
Using just the Inkjet Autoscan filter and a 600x600 printer setting with "good" printer quality (the highest setting) and "book" eye distance with an Anna personality, we got a Radius of 0.260 or 0.7422 pixel.
The same settings without Autoscan yielded a Radius of 0.090 or 0.2579 pixel. No printing information was available without Autoscan, but Sharpener added the Image Source slider (small slide).
We obviously got a bit of USM culture shock leaving things in nik Sharpener's hands. But both our screen images and print images weren't just sharper, they were etched and polished without degrading anti-aliased type overlays or creating color artifacts. Had it been developed in a different era, who knows, the f64 Group (who prided themselves on the sharpness of their images) might have called themselves the nikNacks. We're content just to call ourselves lucky to have found nik Sharpener.