=================================================================
To subscribe, unsubscribe or change your email address, visit:
http://www.imaging-resource.com/IRNEWS/index-subs.html
Support the Newsletter!
- Find the best price for anything at http://ir.pricegrabber.com
- Shop Amazon, Adorama at http://www.imaging-resource.com/buynow.htm
=====================================================
THE IMAGING RESOURCE DIGITAL PHOTOGRAPHY NEWSLETTER
=====================================================
Volume 16, Number 5 - 07 March 2014
----------------------------------------------------------------------
Copyright 2014, The Imaging Resource. All rights reserved.
----------------------------------------------------------------------
Welcome to the 382nd edition of The Imaging Resource Newsletter!
For those of you wondering why you're receiving an IR newsletter just a week after the last one, this is a bit of a make-up edition, to keep us on track for the number of issues we're scheduled to publish this year. Our schedule was a little disrupted by a flood of new-camera announcements on the site, and the general chaos around the CP+ show in Japan, so we ended up missing an issue in the muddle. We should be on track from here on out, though; you'll receive our next regular issue on or shortly following March 21.
In this edition, we'll share a couple hot cameras reviews with you. We start things off with the third and final Shooter's Report installment from Dave Pardue on the Olympus Stylus 1, as well as our completed review and verdict on this powerful compact bridge camera. We also have David Schloss's Sony A7 shooter's report -- see how this faster-focusing but lower-res (compared to its big brother the A7R, at least) full frame mirrorless camera performs.
On the feature side, we've got a double header in this issue. First, writer and photographer Joshua Cogan takes us through his recent trek through the Himalayan country of Bhutan and how the photo gear he hauled along held up. It's a long story, so we're bringing you the first part of his adventure in this issue. We also have a very popular tale from publisher Dave Etchells about his trials, tribulations and ultimate triumph of losing a boatload of camera gear on a recent trip to Japan.
In the Quick Hits section, you'll find a new lens review -- a nice little kit zoom lens from Fujifilm -- as well as an excerpt from our completed Nikon Df review.
Finally, we share some of the most popular news stories from this past week.
Happy reading!
TOPICS
----------
- Get Social with IR
- Sponsors
- Camera Reviews:
- Olympus Stylus 1 Review Excerpt
- Sony A7 Shooter's Report Excerpt
- Feature:
- The Journey to Bhutan, Part I by Joshua Cogan
- Dave Etchells' tale of Japanese disaster-turned-delight
- Quick Hits:
- Fujinon 16-50mm lens review
- Nikon Df complete review
- Popular News
- Next Issue
- Signoff
GET SOCIAL WITH IR
---------------------------
If you want to stay up-to-date with the latest camera and photography news, get notified when IR posts its latest camera or lens review, and much more, get social with us on your favorite networking sites by:
By doing so, you'll also be supporting our efforts to deliver the best camera and photography content on the planet. (Google in particular appears to pay lots of attention to Google+ in deciding site/page relevance for its search results, so "circling" us there and +1-ing our site and pages would be an especially big help.) Thanks! We appreciate it!
SPONSORS
--------------
This issue is sponsored in part by the following companies. Please show your appreciation by visiting the links below. (Visiting our sponsor's links really helps support this newsletter, thank you for your attention!) And now a word from our sponsors:

* Sigma *
� �------
� � Sigma's approach to photographic equipment is based on quality, craftsmanship, value, customization and
� � � �responsibility to photographers and the environment. All encompassed in our breakthrough, award winning
� � � � Global Vision lenses:
� � � � 18-35mm F1.8 DC HSM
� � � � 35mm F1.4 DG HSM
� � � � 17-70mm F2.8-4 DC Macro OS HSM
� � � �
120-300mm F2.8 DG OS HSM
� � � � USB Dock
� � All designed to deliver the highest optical quality and performance.
-----------------------------------------------------------------------------------------------------
Are you in the digital photo business? This newsletter is read by more than 47,000 direct subscribers (plus additional pass-along readers), all with a passion for digital photography. For information on how you can reach them, contact us at editor@imaging-resource.com.
-----------------------------------------------------------------------------------------------------
Camera Review: Olympus Stylus 1 Shooter's Report Part III
by Dave Pardue
Shooter's Report Part 3 - Ergonomics, lens comparison testing and conclusions
Posted: 03/07/2014
For this third and final chapter shooting with the Olympus Stylus 1 I'll write more about the handling and controls onboard the camera, and take a closer look at some of the additional features and functions. I'll also explore how its incredible i.Zuiko lens compares to a high-end Olympus Four Thirds lens (the beautiful and pricey 300mm eq. f/2.0 prime), and also to the lower-priced and smaller-sensored Panasonic FZ200.
| Olympus Stylus 1�- Super Macro Mode |
 |
| 42mm eq., f/2.8, 1/30s, ISO 200 |
Up close and personal. Let's start with a quick look at focus modes. There are five general focus modes, including Single AF, Continuous AF, Continuous AF with Subject Tracking, Super Macro and good ol' fashioned manual focus. Super Macro allows focus to be achieved at just 5cm (~2"), which is quite a tight range. For the Spanish doubloon image above I had the lens barrel right up against the bottom of the coin itself. You are not able to use zoom while in Super Macro mode, nor use the flash, but as you can see from this shot you're still afforded a very nice dose of bokeh (background blur) if it's desired. Clicking on the image will take you to a page where you can then click to see the full resolution image up close (and it's quite revealing in doubloon detail).
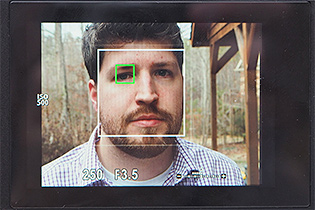
There are also no less than 4 face priority focus modes. You can choose from Face, Face and Eyes, and Face + either left or right eye, and somewhat to my surprise these worked quite well. As you might expect, this last mode is able to lock in more quickly the closer you get to your subject. Not too close of course, but as you begin to move in, the camera puts a large focus box over the subject's face and a smaller green box over the eye that you've chosen. Portrait shooter's will undoubtedly find this feature helpful since it's so easy to employ.
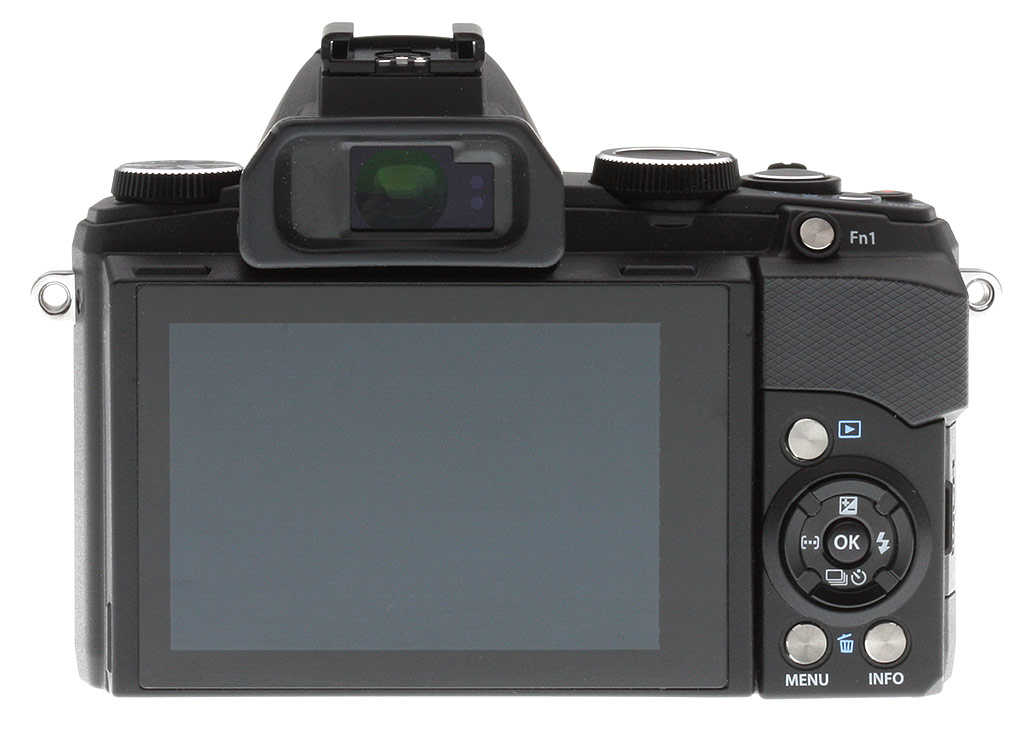
Ergonomics. I wrote briefly in the first installment of this report about how useful I found the overall control scheme, and wanted to expound upon that just a bit. The small size and relatively light weight of the Stylus 1 is naturally a big reason that so many people have become interested in this camera to begin with, given its capabilities. I'd like to add that the controls themselves have a very precise and reassuring feel.
The mode dial has just the right amount of stiffness to not be accidentally bumped in a bag, but is not too tight either. The primary control dial up top is situated where it is unlikely to be accidentally bumped, unlike some other cameras I've tested recently. And the tilt-screen itself feels super-solid and well-built. I also like the rather substantial front grip and rear thumb rest, as they provide quite a bit more heft than the XZ-2, but not too much to be distracting.
The Fn1 button is nestled comfortably above the rear thumb rest, while Fn2 is on the front panel within the focus mode toggle switch. Each are customizable to varying degrees and serve somewhat different purposes. I also like the simplicity of the Playback, Menu and Info buttons around the 4-way dial. So many cameras I have tested in the past year (including one Olympus model) have moved the Playback button away from this area, but to me it only makes sense to position it where it is naturally used, beside the screen and near the 4-way pad.
One last thing to mention on the ergonomic side of things is just how enjoyable it is to not have a lens cap to lose! The automatic cap that covers the Stylus 1 is not a perfect protector, and can be pushed in if enough force is applied, so you'll still want to be careful with it and not let anything protruding near the cover itself. But not needing an external lens cap is a nice little added luxury. Oh, and by the way, for anyone who doesn't like the appearance of the lens cover while the lens is extended (to some the appearance may be a bit clunky-looking) the entire cover can be easily removed by simply unscrewing it.
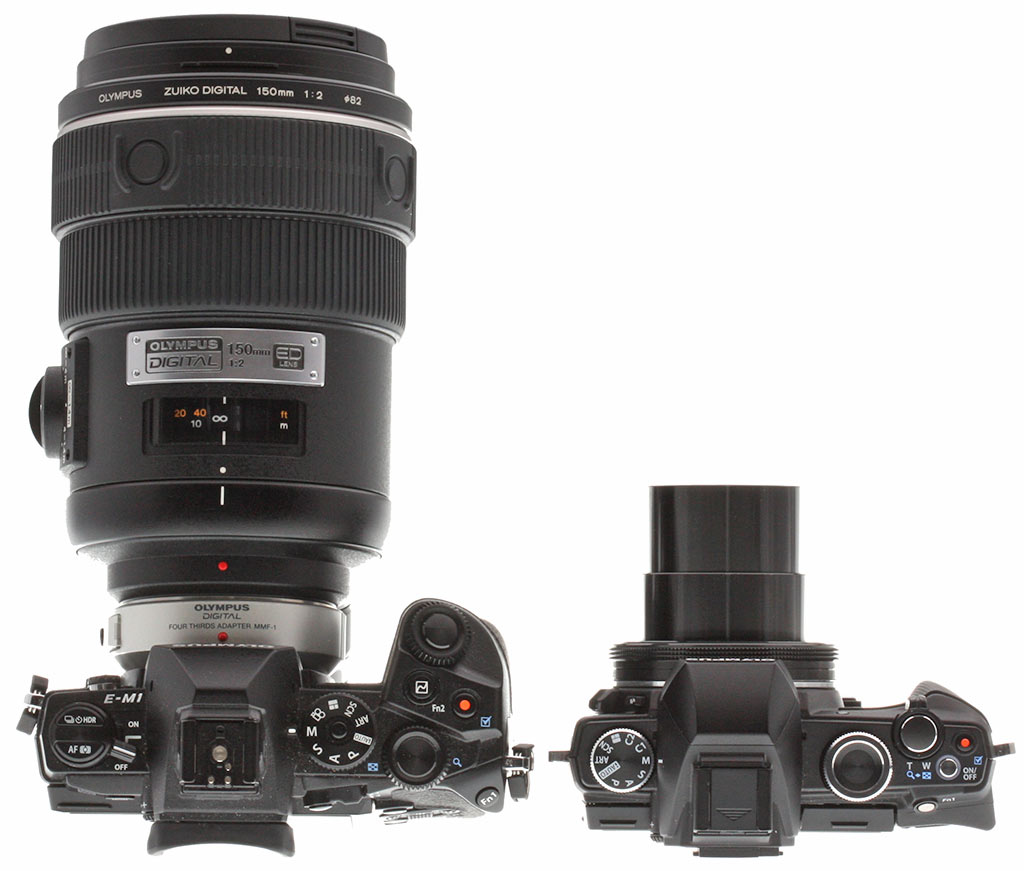
Lens love. Working for IR has increased my love for both cameras and photography, but nothing has increased more than my desire to own and shoot with great lenses. While the sensor may indeed be the heart of a camera, that light portal sitting out front is surely the soul, and the lens on the Stylus 1 has plenty of it. This lens is in fact so good at delivering the goods, that it seemed imperative to compare it to a higher-end lens for fun, and we're fortunate to have an Olympus 150mm (300mm eq.) f/2 Four Thirds lens in-house. This gorgeous and heavy piece of glass (as shown below) will set you back more than twice what the Stylus 1 costs, and then you'll still need a body to attach it to, so the assumption going in is that it should produce a better overall shot. And, I'll save you the suspense: indeed it does, so the question becomes how close can the Stylus 1 get to that level.
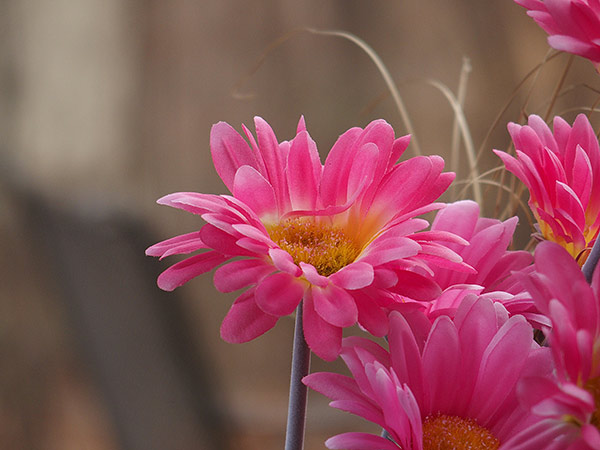
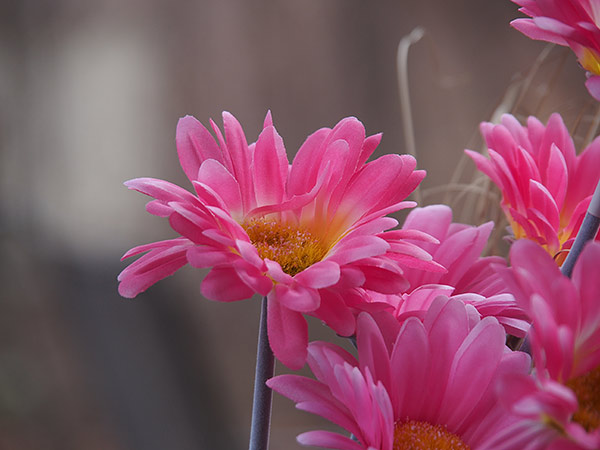
It's the middle of winter as of this report, so I pulled out some faux flowers for the test and chose some immediate foreground for close background blur, set against some distant trees to see how each lens rendered these as well. I dialed each camera to aperture priority at f/2.8 with a focal length of 300mm eq. range and fired away. Below are the results, which are interesting and also, for the most part, as we would expect based on the price differential of the Stylus vs the competitors.
Testing the Stylus 1's i.Zuiko lens against a high-end Olympus
Four Thirds lens and the Panasonic FZ200 at equivalent settings |
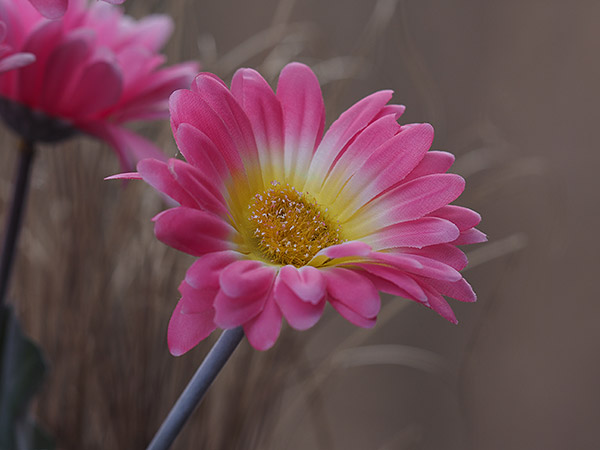 |
Olympus Four Thirds 150mm (300mm eq.) f/2 on the Olympus E-PL5
300mm eq.; manual exposure: f/2.8, 1/200s |
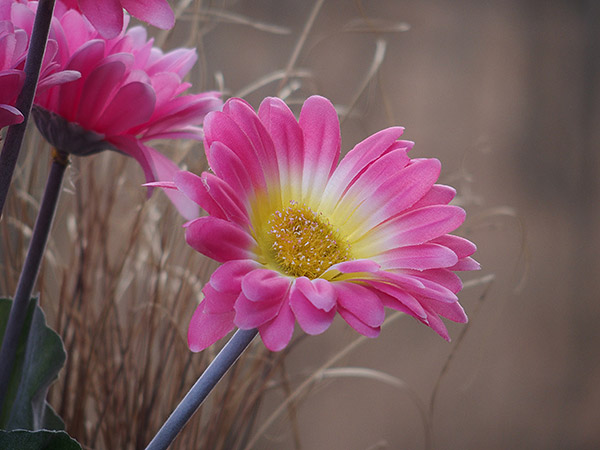 |
Olympus Stylus 1
300mm eq.; manual exposure: f/2.8, 1/200s |
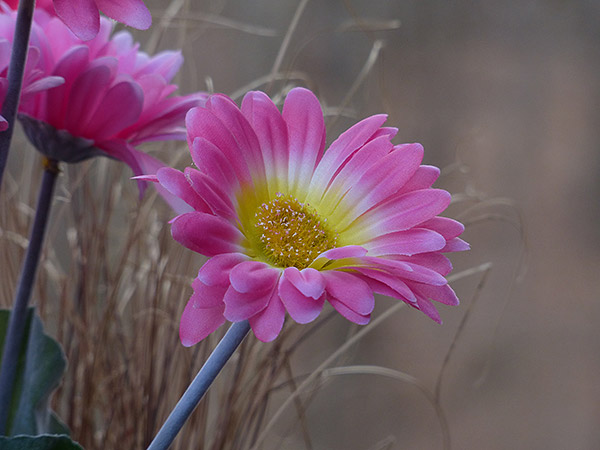 |
Panasonic FZ200
323mm eq.; manual exposure: f/2.8, 1/200s |
You get what you pay for.�The expensive Olympus Four Thirds 150mm f/2 prime lens shot with the larger-sensored Olympus E-PL5 renders a gorgeous image with incredible detail paired with sublime background blur, while the Panasonic FZ200 renders an image with background blur that is not quite as pleasing in nature, but still not bad for its price and small sensor size. The Olympus Stylus 1 comes in between these two, as we might expect, but appears just a bit closer to the somewhat more expensive Four Thirds lens in quality than to the lesser-priced FZ200.�[Editors note: We tried for exact settings but the FZ200 was difficult to set precisely at 300mm eq, so we got it as close as we could.] |
| Olympus Stylus 1�- size comparison vs a 300mm eq. f/2.0 Four Thirds prime lens |
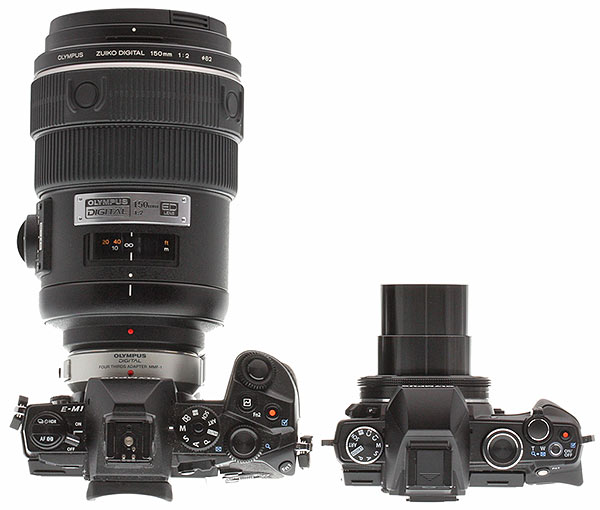 |
Big reach, small package. This is one example of the type of glass you'll need to get to a 300mm equivalent focal with a bright aperture in the Micro Four Thirds world (this is a Four Thirds lens with an adapter). And the size and weight is similar or larger if you step up to the APS-C world on a camera like the Canon EOS-M. You'll spend thousands of dollars on the lens itself, still need a body, and will be required to deal with weight and size elements. Of course, you will acquire better low light performance in the process, and will experience stronger and richer background blur potential as well. |
After performing this lens comparison test, IR reader Laszlo wrote to request a test that is just as pertinent as the ones above, namely with a lesser-priced zoom lens attached to a Micro Four Thirds body. I had not thought to perform this test because the zoom lenses in this price range (such as the one he suggested, the Olympus 14-150mm (28-300mm eq.)) are not constant aperture zooms and tend to fall to f/5.6 at full tele. But it occurred to me while thinking about his request that the difference in sensor size might more than balance the scales, so I took a quick look at both low light performance and background blur potential at full telephoto.
While the Stylus 1 at f/2.8 gives you two more stops of available light at 300mm eq. focal range than the 14-150mm at f/5.6, the Four Thirds sensor is so much larger than the Stylus 1's 1/1.7" sensor (more than 5 times the surface area, actually) that it more than balances the playing field. Below, therefore, is a comparison of the Stylus 1 at ISO 400 with the E-PL5 at ISO 1600 (2 stops different) to show you the noise level comparison. To my eye the noise levels are comparable, but the E-PL5 image crop looks a bit sharper with more fine detail (it was shot with a very sharp prime, though, so there are differences in lens performance as well as resolution at play here as well). You can currently buy the E-PL5 with a 14-42mm kit lens and add the Olympus 40-150mm (80-300mm eq.) lens for about the same price as the Stylus 1, though that means even more bulk and the inconvenience of two lenses. The 14-150mm lens is considerably more expensive than the 40-150mm, at about $
600.
ISO comparison vs the Olympus E-PL5 in order to show the 2-stop difference
available with f/2.8 as opposed to f/5.6 at telephoto on the Olympus 14-150mm lens |
 |
Olympus Stylus 1
ISO 400 |
 |
Olympus E-PL5
ISO 1600 |
Note that the above E-PL5 image was taken with a very sharp 50mm f/2 prime lens, and is only meant to compare noise levels at the two ISOs. |
Background blur also looks quite similar in nature between the Stylus 1 at 300mm eq f/2.8 and the E-PL5 with the 14-150mm (300mm eq.) at f/5.6. The much larger sensor and longer actual focal length balance the scale and allows for enough added blur to make the two appear almost identical, as seen in the comparison below.
Testing the 300mm eq. i.Zuiko lens against the
Olympus 14-150mm (300mm eq.) on the Olympus E-PL5 |
 |
Olympus Stylus 1
300mm eq.; auto exposure: f/2.8, 1/1000s, ISO 200 |
 |
Olympus 14-150mm (28-300mm eq.) on the Olympus E-PL5
300mm eq.; auto exposure: f/5.6, 1/320s, ISO 200 |
A $700 Olympus showdown.�For around $700 (the same price as the Stylus 1) you can buy the Olympus E-PL5 with the 14-42mm kit lens and add the 40-150mm f/4.0-5.6 in order to achieve the same 35mm equivalent focal length range provided by the Stylus 1 of 28-300mm, but you're unable to achieve f/2.8 at any focal length and have to carry around two lenses. (Note that the 14-150mm lens used above to illustrate background blur is much more expensive than the 40-150mm, and doesn't perform nearly as well at 300mm eq. Its bokeh may also be different.) |
Given that the results for low light and background blur potential are about the same, you are therefore left with a choice: do you want the flexibility of interchangeable lenses including the ability to add faster primes down the road, or would you prefer the convenience and smaller size of an all-in-one package? We can test the cameras for you all day long, but this is a choice only you can make.
More reader requests. Thanks to our reader Bertrand for requesting some attention to the Stylus 1's flash capabilities, specifically of the fill-flash variety. Many shooters shy away from using a camera's flash in auto for portrait shots, as the flash tends to blow out and often flatten subject faces. But dialing the compensation down to allow for just the right amount can be a great aid in both day and night portrait shots, as seen below.
Olympus Stylus 1�- Flash capabilities |
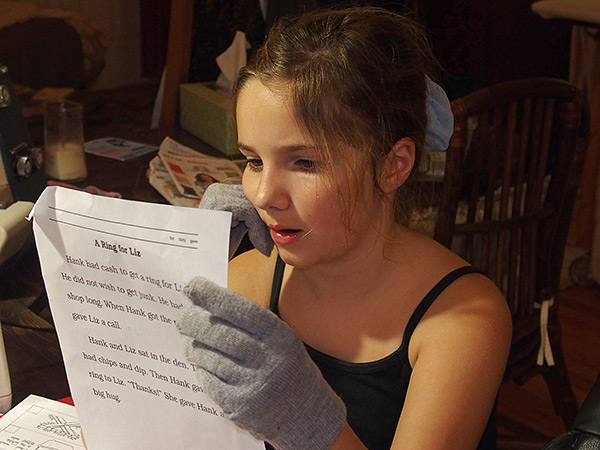 |
Nighttime Fill Flash. For this shot of my daughter studying there was enough ambient light from a lamp to allow for a compelling enough shot at ISO 640 with a 1/60s exposure time at f/2.8, but dialing in just a touch of fill flash (-2 EV) balanced the photo while still leaving the contrast and depth I wanted. |
 |
 |
Daytime Fill Flash. Dialing the flash compensation down to -0.7 allowed me to provide just enough flash to illuminate my subject's face to smooth out some of the shadows without washing him out entirely. |
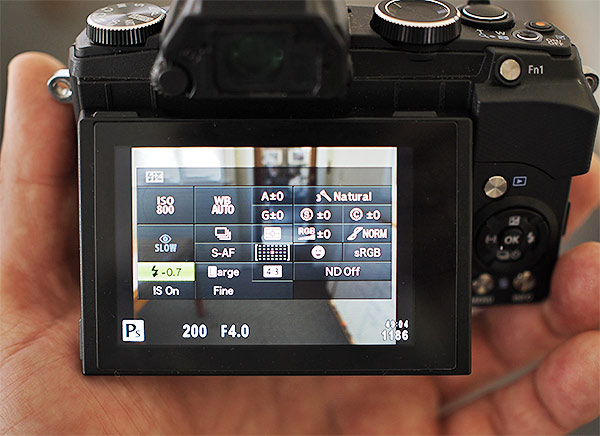
The Stylus 1 with its Super Control Panel makes it quite easy to alter settings quickly, including flash mode and compensation directly from the panel itself. I've found the best way to accomplish this is by using the 4-way buttons to navigate to the parameter or mode you'd like to alter and then using the lens ring to adjust the settings directly on the panel itself. The other options are to tap the buttons using the touchscreen in order to select a parameter, and to then use the lens ring to make the adjustment or click the OK button to bring up a separate screen where you can then use the lens ring or the 4-way buttons to make adjustments. If this sounds confusing, it's actually not in practice. The Stylus 1 simply offers several different methods of achieving the same adjustment depending on your preference. [A special thanks to our reader Pauline M. for helping me discover that the Stylus 1 behaves just a bit differently while engaging the Super Control Panel than the
Olympus XZ-2 when using the touchscreen, and no longer allows repeated tapping to adjust settings.]
| Olympus Stylus 1�- Super Control Panel |
 |
Stopping down. I got so obsessed early in the testing of this camera with the background blur possible at 300mm eq. and f/2.8 that I nearly forgot it was capable of any other settings. Fortunately, our senior technical editor Zig Weidelich never forgets anything, and has been kindly and persistently reminding me that other readers may be interested in other settings too. As such, below is the same shot taken with the range of full f-stops possible on the Stylus 1 (f/2.8, f/4, f/5.6 and f/8) in order to give you an easy comparison of just how the bokeh looks at the various f-stops. Please visit our�Stylus 1 Gallery page�for more examples of images stopped down a bit.
| Olympus Stylus 1�- Background blur at full f-stops |
 |
 |
| f/2.8,�242mm eq., ISO 200 |
f/4,�242mm eq., ISO 200 |
 |
 |
| f/5.6,�242mm eq., ISO 200 |
f/8,�242mm eq., ISO 200 |
How do you take your bokeh?�Clicking on any of these images will bring you to a carrier page where you can click on that image to access the full resolution JPEG as delivered straight from the camera. Use these to analyze the background blur at various apertures for evaluation and comparison purposes. |
|
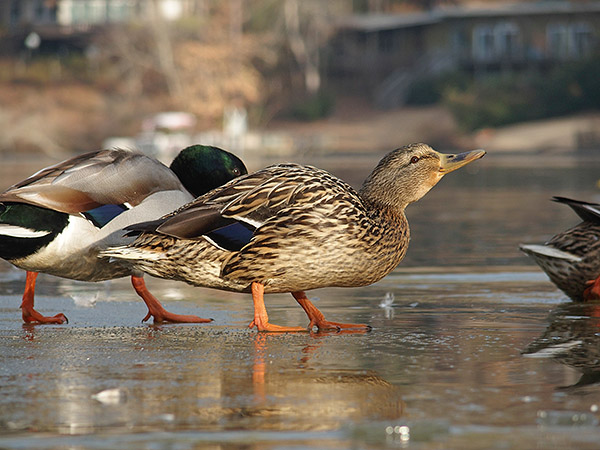
| 300mm eq., f/4, 1/320s, ISO 100 |
Skating ducks. Here's another real-world example of background blur when stopped down to f/4. |
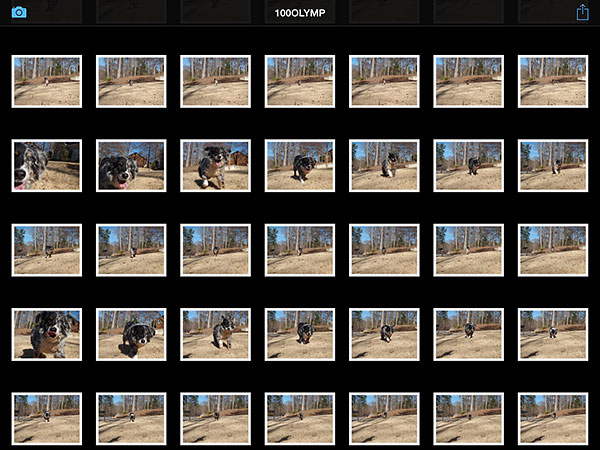
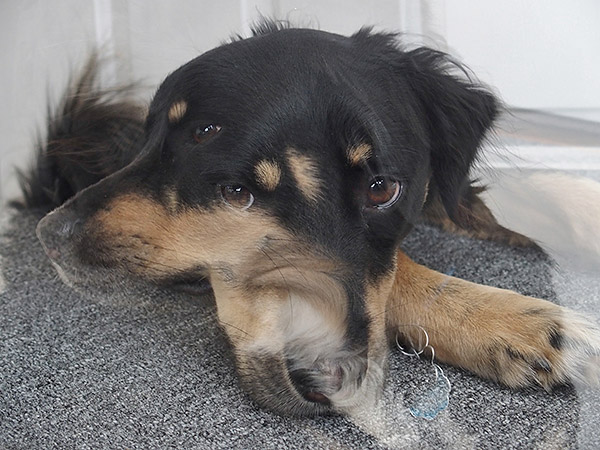
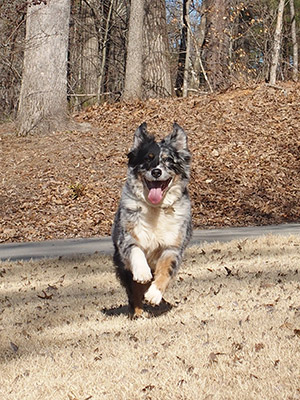
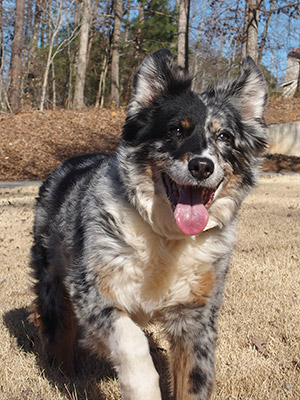
Outdoor sports. Our reader Bob C and a few others asked if we could weigh in on the Stylus 1 as a potential outdoor sports camera. Given the need for very fast shutter speeds to freeze most sports action, a camera with a sensor this small isn't going to excel at indoor sports shooting given its limitations at higher ISOs, even with a relatively fast aperture. But how does it do outdoors? Being mid-winter I was unable to locate any organized outdoor sporting events to use for testing, so I grabbed our faithful test-dog Charlotte (who loves to run and also garner the dog-treat rewards afterwards) and set out to test several key aspects of the camera: burst mode, continuous AF and EVF performance.
As EVF's go, this one works quite well in real-world shooting. The eye sensor is quick to switch back and forth between the EVF and the LCD, with hardly any delay at all, which is of course critical for sports. Tracking and panning is fairly seamless and fast, with no noticeable artifacts or delays due to rapid panning. There is a typical "mechanical" look to the EVF display as well as a slight decrease in saturation, but not enough to detract from the overall usability. There are 3 info display options including a histogram display, and a convenient diopter adjustment that allows you to adjust the EVF to accommodate your eyesight (-4 to +2m-1). You can allow the EVF to come on automatically with the eye sensor, or set it to toggle manually. All in all, a nice display with a solid range of adjustments and options and a practical aid to action photography.
Sequential shooting (burst) mode performs pretty much as advertised, although it's mentioned a bit differently in the manual than how it actually fares in terms of continuous autofocus performance. The manual clearly states that in sequential shooting, focus, exposure, and white balance are locked at the first frame of a burst, with no special mention for how it behaves in C-AF. But in our tests, continuous AF actually did operate during sequential mode, albeit with somewhat mixed results.
Just how fast is the Olympus Stylus 1? Find out by clicking here to see our full battery
of rigorous, objective speed and operation tests conducted in the IR Lab.
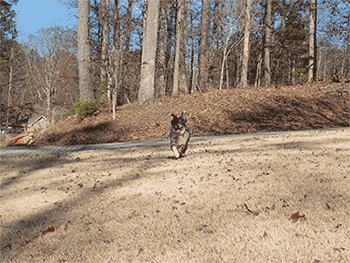
| Olympus Stylus 1�- Burst mode with C-AF |
 |
 |
Catch me if you can. Continuous AF while in sequential shooting (burst) mode works well some of the time. It's not perfect, but on some sequences the Stylus 1 adjusted and found good focus on most frames. Above is one of the better examples, as these are the first and ninth frames in a sequential (one shutter press) burst that covered about 20 feet in just a few seconds time. Unfortunately, this was not the norm, and more of our test-runs had fewer in-focus frames than not. |
The user manual suggests that sequential mode will yield roughly 5 frames per second, while the online technical specs suggest 7fps, and our lab tests managed just over 8fps. At any rate, it certainly provides solid burst performance, and the quiet shutter operation as mentioned previously is quite welcome as well. �Buffer depths were generous, too, at over 40 JPEGs, 32 RAW and 26 RAW+JPEG frames in our lab tests. The one thing that left me yearning was the mixed C-AF performance, and if using this camera to catch key moments of a child's soccer game, I would certainly try and snap many burst series in order to make sure I got some that were, indeed, in focus. On the other hand, the user manual did say focus is locked at the first frame of a burst, so the fact that it attempted to track focus in sequential mode was a pleasant surprise.
Video. The Stylus 1 comes packed with video capabilities to go along with that long fast lens, though frame rate is fixed at 30fps for high-def movies. Full HD (1920 x 1080 at 30p) is available of course, as well as HD (1280 x 720 at 30p), both delivered in the computer-friendly MOV format to a maximum 4GB file size or 29 minutes. There are also a couple of high-speed Motion JPEG modes (640 x 480 at 120fps and 320 x 240 at 240fps, both limited to 20 seconds) for slow-mo playback.
Hop on over to our YouTube channel to check out the sample video.
You can start recording a video in most exposure modes (but not all, such as the new Photo Story mode), however exposure is always under automatic control even in A/S/M�modes, though exposure compensation is available before recording starts. Art Filters are supported for videos, which I personally find really cool.
Optical zoom and image stabilization are supported. Zooming in video mode is far, far slower than in normal shooting, though. �But this is likely to reduce noise, as it's almost non-existent (but it does creep along). There is a zoom speed menu setting, but that appears to only affect stills shooting and not video. Autofocus is fairly slow, but it does focus continuously. Also, half-depressing the shutter prompts it to reacquire focus.
Sound is recorded in 16-bit 48KHz PCM stereo though you can choose to disable audio and record silent movies. You can adjust microphone sensitivity and there's a wind noise reduction feature as well, though as mentioned previously there's no support for an external mic.
Wi-Fi. With the assistance of our senior lab technician Luke Smith I was able to get Wi-Fi working on an iPad, (iPad 2, iOS 7) but the task was not straightforward nor intuitive. My biggest gripe with Olympus is undoubtedly their manuals, as they tend to often be counter-intuitive and even misleading at times, and Wi-Fi was no exception. We were forced to resort to using tidbits of user advice we found on the internet, but were finally able to get it activated.
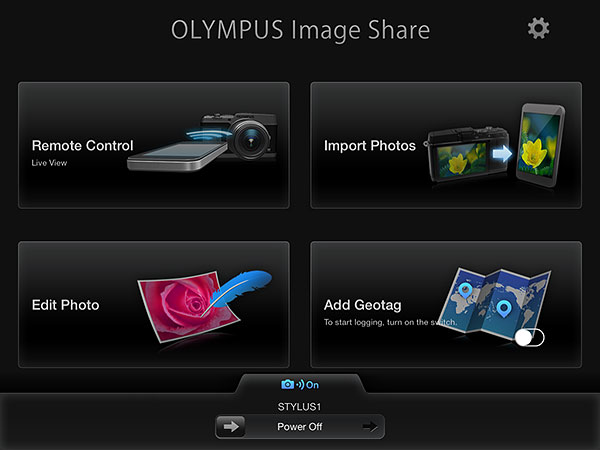
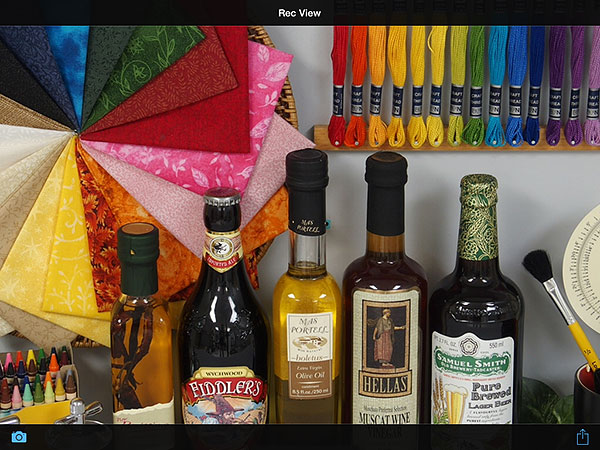
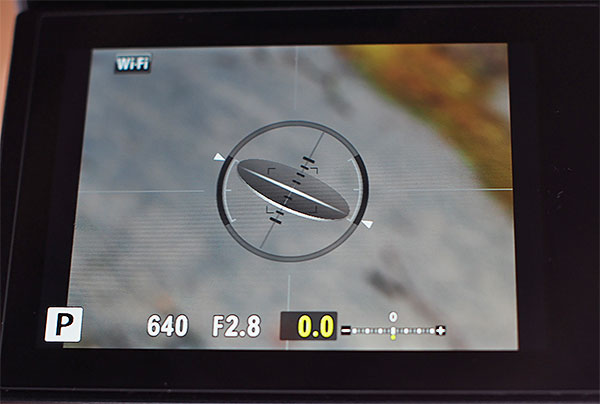
Downloading and installing the Olympus Image Share application was straightforward and simple enough. After that, though, the application prompted us to scan the QR code on the camera, but neither the camera nor the manual could guide us on how to make the camera display the code. We found out how to achieve this online, and learned that you need to tap the "Wi-Fi" icon on the Stylus 1's LCD, which again is not referenced by the camera or manual. (We later discovered this step is listed in the manual in a different section than the Wi-Fi section.)
Once installed and connected, the software works well and the camera controls are fairly good. You are only presented with a very low-res JPEG of the image, however, for shot composing (see above), which is somewhat distracting, but this is really the only issue we found overall. You can press the focus option to tap focus on the screen for any point on your image, which is very fast, zoom the lens as desired with the zoom bar on the left side of the screen, and then snap the photo when ready. Basic parameters such as ISO can also be controlled from the software as well.
Transferring and viewing images is also straightforward, and you can bring them in one and a time or as a group and then display them at varying zoom levels. In short, once we were able to get past the set-up hurdles and get used to the low-res viewer image, the rest of the experience was surprisingly good.
"3D" level gauge. The Stylus 1 is equipped with a 2-axis level sensor, and if you are patient enough to be able to actually find the 3D-style level gauge setting in the custom menu and activate it (there are two versions of level gauge available) then you will likely be very pleased with the end result. Once activated, you can use the "Info" button to toggle these on or off, as with the histogram and other display settings. The first type of level gauge display uses familiar bar graphs on the horizontal and vertical axes along the bottom and right side of your screen, while the second option displays a 3D version which is what you see below and is quite useful.
Shown in these images are what it looks like while the camera is heavily tilted, and also the green display once fully level. Note that you can also aim the camera downwards and the display adds a white ball (bubble) similar to a carpenter's level gauge, and is level when the ball is in the center of the cross-hairs.
Nothing's perfect. We're always on the lookout for the "perfect camera" but as of this writing we have yet to find it. While the Stylus 1 has many facets that are high on the scale (great lens, great size, etc.) there is one area that leaves me wanting, and that is high ISO performance. As you can see from our print quality write-up in our Image Quality section in the full version of this review on our site, ISO 800 is the highest ISO that will allow for a good 8 x 10 inch print. Go above that and you'll quickly begin to introduce noise into your prints, and by ISO 3200 the camera simply can't produce much of anything worthwhile for printing (although, as seen in the first report above, you may still be able to get good images for lower resolution online use up to about ISO 5000).
By way of comparison, the Olympus E-PL5 and its Four Thirds sensor (which has more than 5 times the surface area for light gathering than the Stylus 1 sensor) is able to produce a good 8 x 10 inch print all the way up to ISO 6400, 3 full stops above the Stylus 1, and at a lower price tag as well (although without the long, constant aperture lens). This is where the big trade-off mentioned in the comments below the online copy of this review by our reader Bigk comes into play. The Stylus 1 is so good for what it can do, and yet it's just not a great choice for low light photography unless you can control your lighting to a degree, learn to use the flash to its best potential, and don't have fast-moving subject matter.
Shooter's report conclusion. Ah, parting is indeed sweet sorrow, as I very much enjoyed my time shooting with the capable and clever little Olympus Stylus 1 and do not want to give it back. It really is just chock full of cool for what it is and allows you to do in this price range and relatively small, light body. It's a 300mm eq. f/2.8 lens on a capable body that fits comfortably in a coat pocket and delivers high quality photographs in favorable light.
It feels solid and ergonomically sound, delivers incredible background blur when desired and is hugely customizable. The dial around the lens ring is both versatile and practical, as is the dedicated focus mode toggle. The practicality of the built-in EVF, tilt-screen and hotshoe for expandability round out the professional all-around quality of the camera. Drawbacks include less than stellar low-light performance and marginal capabilities for continuous autofocus, but these are natural trade-offs you'll encounter with virtually any sensor this size. The lens is also not as wide as many compacts for getting to optimal landscape focal lengths.
Drawbacks aside, however, at the time of this report the Stylus 1 is in a class of its own in terms of the capabilities it possess at this price point and size. I suppose it's time to start saving up for one of my own.
 |
| 300mm eq., f/2.8, 1/400s, ISO 320 (slightly enhanced for shadows/highlights) |
I'll conclude the Shooter's Report just as it began, by zooming in and cranking open that bright lens!
(*potential shooters beware: this can be very addictive*) |
If you'd like to explore the real-world images further, head over to the�Stylus 1 Gallery page�for a closer look at all of the sample gallery images, including some not on display here. And, as always, feel free to write out any questions you might have about the Stylus 1 in the comments section at the bottom of this page.
What's our final verdict of the Olympus Stylus 1? Read our detailed, complete review online to find out! http://www.imaging-resource.com/PRODS/olympus-stylus-1/olympus-stylus-1A.HTM
-----------------------------------------------------------------------------------------------------
Camera Review: Sony A7 Shooter's Report
by David Schloss
The Sony A7 and its sibling the A7R (which we've also reviewed) together mark a pivotal moment in the photographic world. Though at first glance it looks for all the world like a particularly nice fixed-lens camera, the A7 is in fact a full-frame, interchangeable-lens mirrorless cam. Its semi-pro grade body fires a shot across the bow of Nikon and Canon, both of which have taken a more cautious approach to mirrorless than some of their customers would have liked.
A more versatile option.�At first glance the Sony A7 might not seem like a game changer, but it most certainly is. The camera pairs a 24-megapixel, full-frame image sensor and phase detection technology to create a camera that, in my opinion, is more versatile and groundbreaking than the higher-res (but slower-focusing) Sony A7R.
In my�Sony A7R review, I noted that camera to be perfect for portraits and relatively-slow-moving subjects. It's great for wedding photographers, event photographers and enthusiasts photographing the occasional little league game. With its phase-detection autofocus capability and emphasis on greater performance, the A7 tries to capture a wider market.
It's pretty successful, although it doesn't have the performance of a professional-grade camera. It's more akin to a Canon 6D than it is to the flagship EOS 1D X, but for many users that's more than sufficient. While it would be nice to have the extra resolution of the A7R, it's more important to have a camera that can keep up with your subjects -- and the A7 can do so more often than its higher-priced sibling.
|
The Sony A7�might have lower resolution than the A7R, but it still captures plenty of detail. Look at the basket of the second-nearest bike, which falls within the depth of field for a nice example. |
Reasonably swift burst shooting.�In its fastest drive mode with focus locked, the Sony A7 will shoot at five frames per second for, effectively, as long as you like at full resolution. With my 60MB/second Lexar UHS-I flash card, I managed 75 frames before the capture rate slowed somewhat, but as with most cameras, reviewing those images is an asynchronous function -- I had to wait for the entire buffer to write to the flash card before I could review even the first image in the burst.
Nor could I access the main menu system until the buffer had cleared, and although the Function menu could be accessed, most options were greyed out. Only metering mode, focus area, DRO mode, and Creative Style could be adjusted before the buffer was empty. But on the plus side, if there was space remaining in the buffer, I could start shooting again straight away -- so I wasn't missing shots unless I needed to change camera settings before continuing.
More sophisticated autofocus.�The topic of phase detection autofocus versus contrast detection is a bit technical, but it's worth knowing how it works, because it's directly related to one of the key differences between the Sony A7 and A7R.
In years gone by, conventional wisdom had it that contrast detection -- while more accurate -- was much slower than phase detection. With powerful modern processors and aggressive algorithm development, though, contrast detection has now reached performance parity -- at least, for some brands. There are still areas where each system has advantages or disadvantages.
How it works.�Contrast detection works by calculating the level of contrast at the autofocus point location, then adjusting focus slightly and repeating the process. If contrast increases, you know you're heading towards correct focus; if it decreases, you're going in the wrong direction.
Phase-detection systems superimpose two images seen from opposite sides of the lens. If they overlap, then the subject is in focus. If not, then you can tell both the distance and direction to focus from the mismatch in phase between the images. That's important, because it means that there's no need to hunt around the point of focus to determine precisely where it lies.
|
The A7's photos�couple great detail with pleasing color, good auto white balance, and spot-on exposure at default settings, most of the time. This scene is exactly as I remember it in person. This particular image was shot with the Zeiss 35mm f/2.8 lens. |
This ability to determine the distance and direction of the point of focus means that phase-detection systems can track moving subjects more easily, making them better suited to shooting moving subjects. In an SLR camera, phase detection is performed with a separate, dedicated autofocus sensor. In a mirrorless camera, it's performed using the image sensor itself.
The best of both worlds.�Sony's Hybrid autofocus system in the A7 uses both phase-detection and contrast-detection together for subjects located towards the center of the frame. The PDAF system provides the camera with information about the distance and direction to focus, while the CDAF system fine-tunes for maximum precision. Nearer the edges, only contrast detection is used. The result, when compared to the CDAF-only system in the A7R, is more confident and quicker autofocus, with less focus hunting.
The A7 shares the same autofocus settings as the A7R, plus one addition: an on/off menu item rather confusingly named "Phase Detect. Area". This doesn't enable or disable phase detection, but rather controls an optional overlay on the live view showing the outer limits of the phase detection area.
|
High ISO shots�show plenty of detail, too. In this image at ISO 6400, you can clearly make out striping from the pixels on the in-focus portion of the monitor. |
Not the fastest, but better than the A7R.�I set the A7 to continuous autofocus and continuous shooting, then enabled the phase-detection area display so I could see where to frame my subject, and was able to capture a fast moving subject at a little under three frames per second for as long as I held down the shutter button.
Admittedly, that's a bit sedate in terms of performance, but the camera continued to focus on my subject just fine as it moved around the frame. (And by way of contrast, the A7R manages a rather lethargic sub-2 fps.)
The electronic viewfinder wasn't completely able to keep up with the action of the subject, stuttering a bit as it tried to display between shots, and blacking out between frames for longer than I'd like, but it still managed to maintain focus.
|
Shooting moving subjects�is noticeably easier with the Sony A7 than its higher-res sibling. Here, the extremely animated Ben Folds is tack-sharp. Sadly, with the side view and glasses to contend with, I didn't manage to place focus on his eye, but I wasn't far off. |
Great viewfinder.�I'm a big fan of the Sony A7's electronic viewfinder, which makes EVFs of old seem like looking at video from the moon landing. It has plenty of resolution, and I think in many ways it's more useful than an optical viewfinder. Seeing a real-time histogram, for example, is impossible with a TTL optical viewfinder.
That's not to say its perfect. I felt that I had to increase the brightness in order to give me more visible detail for focus confirmation, at the expense of a slightly less accurate preview of exposure. But putting that aside, the EVF on the A7 is the most vibrant I've tried, and it's a pleasure to use. It's my belief that we're now only a generation or two away from the point at which the EVF/OVF debate is settled once and for all.
Tilting monitor.�The rear-panel LCD screen is just as vibrant as the EVF, albeit with a lower resolution. Because the viewfinder is so good, I only used the LCD screen for playback, navigating menus, and for occasional over-the-head or waist-level shots. It's clear and bright even in outdoor, sunny-weather shooting, and isn't unusually fingerprint-prone.
The LCD monitor is articulated, but since it's not a tilt/swivel design it's useful only for landscape shots, and not those in portrait orientation. I must admit that I'd have preferred a tilt-swivel screen, but only if it could be installed without significantly increasing the depth of the camera.
No touch? No problem.�I've become so accustomed to testing cameras with touch-screen displays that I usually find non-touch screens a step backwards in usability, but thanks to its great (and very configurable) physical controls and mostly well-considered menu system, this isn't such an issue with the A7.
One of reasons I typically prefer a touch-screen interface over a non-interactive panel is that many cameras force you to dig down through multiple menu levels to change settings, but the A7 negates the need for most of this with a smart user interface. For example, when in the AF Area menu, the vertical arrow buttons change focus mode, but you can also cycle through the different AF point sizes for the Flexible Spot setting with the left and right arrows. In some cameras, there would be an extra layer in the menu for the latter, or it would be accessed via a separate menu item.
|
The FE 28-70mm�kit lens -- shooting here at its 70mm focal length and stopped down to f/6.3 -- can yield some deliciously smooth, creamy bokeh. |
The physical controls help out, too. To adjust sensitivity, many cameras first require that you press an ISO button to toggle ISO control with a dial or buttons, or even send you running to the menu system. The A7 instead allows for ISO adjustment by spinning the dial on the face of the four way rocker. (Another function can, optionally, be assigned, and some modes don't allow ISO control. Hence, a small icon on the LCD or EVF indicates what the dial currently controls.)
It takes a little while to learn these controls, though. During my review, I've shown the A7 to several friends who are professional photographers. They've all been impressed, but they've also all asked "Why can't I change the sensitivity without using the menu," because they didn't know about this dial's hidden purpose.
Occasionally illogical.�The menu system is fairly straightforward, but its organization isn't always the greatest. For example, I'd expect to find the Format option on the first or last page of the setup menu, but it's actually on the fifth of six pages. And the seven options related to focusing are scattered across three different tabs of the Record menu, with 11 items completely unrelated to focusing interspersed between them.
Translations are occasionally a little clumsy, as well -- for example, the recommendation to "Shoot with fitting into the face frame" when registering a new subject for face recognition.
Thankfully, the quick menu (accessible by pressing the Fn button) has direct access to the most common shooting functions, and eliminates much of the need to jump into the menu once the camera is set up.
Loud shutter.�The Sony A7 has a surprisingly loud shutter, which may be an issue if you're shooting in environments where noise is frowned on, or with a skittish subject. In fact, even for street photography -- a genre for which the A7 is otherwise extremely well suited -- you're not going to sneak up on anyone with the A7, once you've tripped the shutter for the first time nearby.
One thing worth noting, though, is that the A7 has an electronic first curtain shutter function, which makes it a little better in this respect than its sibling, the A7R. Electronic first curtain can be disabled, but when active it makes the shutter sound both slightly quieter, and of significantly shorter duration.
Great new lenses.�I tested the A7 with the new FE-mount Carl Zeiss Sonnar T* FE 35mm F2.8 ZA lens, which costs $800. I quickly fell in love with this optic: It only projects a little less than three inches from the front of the camera, and it's one of the sharpest pieces of glass I've used. That's to be expected from Zeiss, a company with which Sony has a long partnership.
|
Shooting moving subjects�is noticeably easier with the Sony A7 than its higher-res sibling. Here, the extremely animated Ben Folds is tack-sharp. Sadly, with the side view and glasses to contend with, I didn't manage to place focus on his eye, but I wasn't far off. |
Even though I found it hard to tear myself away from the Zeiss glass, I also used the Sony-branded kit lens that's available with the A7. The kit lens is a 28-70mm f/3.5-5.6 optic, and it feels much more durable and substantial than most other kit lenses I've tried. Depending on the focal length, you lose 2/3 to 2 stops over the f/2.8 Zeiss lens, but the zoom is still a great and efficient piece of kit.
Plenty of detail.�Images from the A7 are wonderful, though slightly less detailed than those from the A7R. That's understandable -- with 24 megapixels instead of 36, there's a lot less data in the A7's images, although it's still providing as much (or more) resolution than you'll get from the majority of cameras on the market. And that's borne out by my experiences.
Mount the 35mm f/2.8 Zeiss lens, and the A7 produces images that are indistinguishable in quality from what I'd manage with my professional cameras. Tonal and dynamic range of the A7's images are great, as are detail and exposure. That's not surprising to me, as my experience has been that Sony's cameras typically provide some of the best-in-class images. Still, it's amazing when this full-frame camera system is smaller than some Micro Four Thirds bodies.
For my money, that's one of the most intriguing things about the A7: It provides full-frame SLR-quality images without the bulk of a professional camera, or even of an APS-C DSLR. It's something that experienced shooters like myself have been clamoring for.
Great exposures.�The metering system in the A7 is incredible, just as it is in the A7R. Even intentionally presenting it with difficult subjects to to try and throw it off, I couldn't get the A7 to make a bad shot. Everything was at least in the ballpark.
A comfy fit.�The Sony A7 looks like it's made out of a single piece of carved metal -- there's a feeling to it that's not unlike grabbing the first MacBook, which was CNC-milled from a slab of aluminum. The body has a reassuring solidity, despite its small size.
The grip is a perfect fit for my hand, although it might not be as comfortable if you have bigger mitts. The camera is just tall enough that my pinky wraps underneath the handgrip, for added support. All controls are well within reach without adjusting my grip, with the exception of the dedicated video button, which is on the outside rear of the camera. The allows the A7 to be used one-handed for snapshots and casual use, but I still think it's best used two-handed.
Pro-friendly controls.�I was happy to find that the A7 has a front and a rear control dial along with an exposure compensation dial and mode dial. These two dials, along with the on/off switch, have enough resistance that I didn't accidentally move them in normal shooting or in storage in a camera bag. The dial built into the four-way controller, though, is quite easy to bump. Fortunately, its function can be changed or disabled, or you can optionally lock and unlock it with a press of the center button.
Unusual card slot.�The memory card slot sits behind a door in the handgrip, which I prefer to cameras that place the card slot inside the battery compartment. It makes it impossible to accidentally dislodge the battery while trying to change the card, or to get rain in the battery compartment during a flash card change. It's a bit unusual in that the card ejects backwards rather than sideways, but I got used to it quickly enough.
In-camera charging.�The Sony A7 doesn't ship with a battery charger -- instead the micro USB slot on the side of the camera is used to charge the battery in-camera. While I'm always happy to see an�option�to charge a battery over USB, I'd also like to see a standalone battery charger in the product bundle, because it gives me the ability to charge a second battery while I'm out shooting. It's easy enough to pick up an external charger separately, but with a price tag of US$50, it's a bit of a pricey option.
Movie capture.�Video shot with the Sony A7 shows good detail, and has the same combination of attractive color and good exposure / white balance as do still images. I did notice a little aliasing and false color, but that's typical of cameras which skip rows of pixels during readout in movie mode -- which is to say, almost all still cameras.
Rolling shutter looks to be fairly well controlled, too. In fact, the biggest issue is that the contrast-detection autofocus system induces noticeable hunting around the point of focus. It's also a little slow to catch up when the focus distance changes suddenly. And unfortunately, the phase-detection autofocus capability of the A7 isn't available for movies. Most experienced videographers will simply disable autofocus, and focus manually or use a narrow aperture to expand the depth of field.
Audio.�The built-in stereo mic does a fair job of audio capture, all things considered, and you can adjust the audio levels in 32 steps. You can also monitor levels over a 3.5mm headphone jack, either with near-live or LCD / EVF-synced timing. That's a rather nice touch, and one I haven't seen on many cameras thus far. You can of course attach external mics, and fully manual exposure control is possible too.
Look for much more info on the A7's movie capture capabilities in our video page, coming shortly.
Wireless connectivity.�Sony has built Wi-Fi wireless networking connectivity including NFC for quick setup on Android devices into the A7 camera body, as well as its in-camera PlayMemories Camera Apps. I tested using two Android products: a Google Nexus 10 tablet, and an HTC One X+ smartphone. (Although the latter isn't on Sony's "Verified Mobile Devices" list, it's functionally identical to the HTC One X, which is.)
Just as with the recently-reviewed Sony RX10, the tablet worked fine, but a connection could never be established to the phone. An app for iOS devices -- the iPhone or iPad -- is also available, but you can't use NFC for easy pairing on Apple devices since they lack the necessary hardware.
Keyboard "fun".�Apps must be installed on the camera and updated via a Wi-Fi hotspot or router, and if you have a long Wi-Fi password, entering it on the old-school multi-tap keyboard (similar to that from an old dumbphone) using the four-way controller is a painful experience. And once you're done with that, you have to sign up for a Sony account online, then enter your email address and password on the camera using a different on-screen keyboard more similar to that on a smartphone.
Updatable in-camera apps.�On the plus side, these apps make it easier for Sony to add new features to the camera, and you can choose which of those features are important to you. As of early March 2013, you can choose from an updated Smart Remote Control app, a Direct Upload app, a Flickr add-on for Direct Upload, and a Picture Effect+ app. There are also several payware apps: Time-lapse ($10), Lens Compensation ($10), and Multiple Exposure ($5).
Remote live shooting.�The Smart Remote Control app is the interesting one. It's similar to that which we saw on the Sony RX10, but allows for more features. It also leaves the physical controls on the camera active. You can shoot in Program, Priority, or Manual exposure modes, and can set exposure variables (including shutter speed, aperture, exposure compensation, ISO sensitivity, and white balance) as appropriate from the smart device, be it a phone or tablet. You can also touch on the smart device screen to select a point for focus, and trigger autofocus operation.
In addition, you can enable a self-timer, change the live view feed to prioritize speed or quality, and opt for either 2-megapixel or full-size image transfer. Live view quality, while well below the resolution of a tablet like the Nexus 10, is certainly sufficient to get an approximation of focus. And unlike the RX10, images can optionally transfer to your smart device immediately after capture.
Quick transfer.�Transfer speeds are also much better than those we saw with the RX10, taking only a couple of seconds to transfer a full-res image, while the live view is similarly snappy. (Perhaps a quarter of a second lag, or less.) Wi-Fi range was also better, on the order of perhaps 20-25 feet, although I still couldn't go out of line-of-sight without the live view image becoming too slow to be usable.
And of course, you can also transfer images you've already shot, handy for when you have rattled off a burst of shots with the camera and then want to review them on a larger screen. Here, you can select images either from the camera or the smart device.
Still-image only.�The only area in which the Sony A7 lags the RX10's Wi-Fi feature set is that you can't transfer or shoot movies remotely at all. It's still image or nothing for the A7. But if you're willing to overlook that, and the relatively limited Wi-Fi range -- which could perhaps be addressed with a repeater of some kind -- the feature is pretty handy, and the ability to adjust exposure from your phone or tablet, then focus on your chosen subject remotely, is cool indeed!
|
Having a really large�full-frame sensor makes available-light, handheld shots much more feasible. This shot was taken in a very dimly-lit hotel room, and while auto white balance struggled a bit, there's still a fair bit of detail in the shot. |
Closing thoughts.�The Sony A7 is a groundbreaking camera. It challenges the conventions of what can be done with a full-frame camera body, much like APS-C mirrorless cameras redefined the crop-sensor camera market. Until now, if you wanted full-frame and interchangeable lenses, you had no choice but to buy a bulky DSLR. With the Sony A7 and A7R, that's no longer the case.
Chances are, these cameras will go down in history as having changed the full-frame game. Ultimately, there may be faster, more efficient and more professional mirrorless cameras, but right now, if you want full-frame and phase detection in a mirrorless body, the Sony A7 is simply a camera with no rival.
-----------------------------------------------------------------------------------------------------
Feature: The Journey to Bhutan, Part I
by Joshua Cogan
The flight to Bhutan is not an easy one. Coming on the heels of a 30-day stretch of field and production work, very little of what was left of my mind and body was functioning with any degree of efficiency. The last thing I wanted to do was spend 36 hours crammed in a plane seat.
The first leg took me from my home in Washington, DC to Tokyo; the second from Tokyo to Bangkok; and the third � after a very short night in an airport hotel � from Bangkok to Paro, Bhutan.
It really wasn't until I checked in at the Drukkair � the name of Bhutan's official air carrier � counter that the reality of the trip I was to embark on sank in. Bhutan has been on my life list since I first learned about this seemingly magical place 10 years ago. This small kingdom resonated with the intellectual and aesthetic paths I've followed since I discovered my passion for photography as a young man in Jerusalem. I was drawn to a land that made the decisions to preserve nature, cultural identity and the spirituality inherent in both, while the rest of the world chased “progress” and “development” in its many forms.
 |
| Author on left, guide on right. 5D Mark III, 35mm, f/1.8, 1/40s, ISO 1250 |
Genesis
I made the choice to travel to Bhutan with a few colleagues about a year ago. I'd become a little jaded with the punishing travel and projects in dense cities around the globe. Delhi, Rio and Mexico City had all been on the assignment map in the previous year, and I was feeling a little claustrophobic after months hemmed in with millions of other humans. I needed some time in nature and the Appalachians just weren't cutting it.
 |
Many of my recent projects have been in dense cities like this one.
5D Mark III, 35mm, f/5.6, 1/500s, ISO 320 |
The trip offered me the opportunity to switch gears in another way: I've made my living for years as a portrait and travel shooter and this was an opportunity to hone my skills with landscapes and nature photography.
Portrait photography can be incredibly draining because there is a lot of outward energy required in photographing humans.� In order to really capture their personality you have to bring them out of their shell and make them comfortable. At the beginning of my career, this is what I lived for. Anthropology after all was how I came into this line of work. For me however, I was starting to get a little worn out and felt the need to quiet the mind and stretch myself in new ways. This assignment of mountains and monasteries seemed like an ideal opportunity to do so.
Staying Thirsty
Partnering with a number of Harvard-trained social economists, and one adventure expert, we sought to explore how social and economic development go hand in hand, specifically exploring why Bhutan is considered the 'Happiest Place on Earth.'
Bhutan measures their progress based on the metric of Gross National Happiness rather than the metric of Gross Domestic Product (GDP) used by other countries. As an anthropologist and a photographer I've worked in areas with very different economies and degrees of development, from subsistence and agrarian economies to those that emphasize 'development,' sometimes to the detriment of indigenous cultures. In the era of rapid globalization and economic expansion, there seems to be strong tradeoffs in these areas.
 |
Gross National Happiness looks something like this.
5D Mark III, 35mm, f/2.2, 1/250s, ISO 100 |
The crew I worked with was completely new to me. Sometimes I had worked within larger production teams, but for this trip I was working alongside pure academics, and I would be responsible for gathering all the content for the entire journey. In some ways this was a dream gig. Most of my production work for magazines and commercial clients is very task oriented and doesn't always give me the freedom to go and 'find the story.'
Thanks to the Dos Equis Stay Thirsty grant that funded the trip, we had free reign to explore and be open to discovery. It's amazing how often I find that even within a journalistic or editorial context, we can project our own narrative. Mostly this isn't malicious, but just the result of working with limited production budgets, trying to deliver in a fractured and warp speed media environment. Here we had a chance let the story tell itself.
��������
Bhutan Trek
I've been shooting professionally for years, but packing for Bhutan was no easy task. Despite our best attempts, there was a dearth of clear information about seasonal weather trends and about how to pack for the incredibly varied spring mountain weather.
 |
Overcast days and frequent rain meant that planning was sometimes a challenge.
5D Mark III, 35mm, f/2.0, 1/3200s, ISO 160 |
Our trip consisted of two distinct parts: an 8-day Himalayan trek and a cultural tour. The trek was intended to give us an understanding of the environment that underpins much of the Bhutanese way of life, while the cultural tour would take us through historical and sacred sites to explore Bhutanese tradition.
The upside to this schedule is we'd gain a robust understanding of a country where environment and culture are deeply linked (and largely intact). The downside, of course, was trying to pack travel gear and camera equipment for what was essentially two separate trips. The journey would take me from snowcapped mountains and rarely-accessed monasteries to city streets and urban markets.
 |
We had the unique opportunity to visit rarely-accessed monasteries in mountainous terrain.
5D Mark III, 35mm, f/1.6, 1/30s, ISO 2000 |
Shooting off the grid
The first part of the journey, an 8-day Himalayan trek, presented me with a problem I hadn't encountered since 2009 when I shot in remote parts of Ethiopia: in the age of digital, how do you stay powered up and loaded up with storage capacity hundreds of miles from electricity and the internet?
Power solutions
I looked up a number of solutions prior to my trip and was frustrated with the lack of good options. Back in the film days, a few AA batteries and a frame pack would let you shoot for days. With digital though, it can be challenging and expensive to stay powered remotely. I researched a number of options, including just buying a ton of aftermarket Canon Batteries, to remote storage and power devices. In the end, I decided to try both conventional and alternative options.
Two products seemed to me to be able to handle the workload I would need: the Paul C. Buff Vagabond Mini, and the Goal Zero solar recharging system. I figured the Vagabond would give me a back up if the solar unit couldn't keep up with my power demand, while the Goal Zero Solar system would give me options if and when the Vagabond ran out of juice.
 |
With no power, candles were the primary source of light.
5D Mark III, 35mm, f/2.8, 1/1250s, ISO 100 |
And storage
For storage, I went with a combination of CF and SD. Keeping my photos on solid-state memory rather than worrying about transferring to an external hard drive was a major benefit.
I was a bit reticent to take my MacBook Air. I had bad experiences with the power in India in years past. Batteries wore down and the power was often insufficient to top them off. If I could avoid bringing the computer I would (and did).
Protecting my gear
Additionally, I was particularly nervous about how all my gear would hold up under the cold rains of the Bhutanese highlands. To combat this, I brought ample dry bags, 50 gallon trash bags, a bevy of smaller zip locks, silica desiccant packs, as well as my ThinkTank roller/backpack bag with its own nylon cover.
 |
Protecting our gear was not easy with the constant rain, but the vistas were worth it.
5D Mark III, 35mm, f/4.0, 1/4000s, ISO 320 |
The gear
After a flurry of phone calls to those in the know and several orders to Amazon, I settled on the following photo kit that combined my old gear as well as some new:
- Canon 5D Mark III
- Canon 5D Mark II
- Canon 35mm f/1.4L USM
- Canon 24-70 f/2.8L USM
- Nikon Nikkor 35mm f/1.4 AIS Manual Focus
- Nikon Nikkor 55mm f/2.8 Normal Macro Manual Focus
- Nikon Nikkor 85mm f/2.8 PC-E Manual Focus
- Goal Zero Nomad 20
- Goal Zero Sherpa 100
- Goal Zero Inverter (110V)
- Paul C. Buff Vagabond Mini
- 3 Canon Batteries
- 2 Aftermarket Batteries
- 2 Canon Chargers
- 6 Lexar Professional 400x 64GB SD cards
High in the Himalayas
The landing in Bhutan is nothing short of harrowing. After leaving Bangkok we took a quick layover in Dhaka to refuel and drop off a few passengers. About an hour after our second takeoff, the pilot came over the PA system to tell those of us on the left hand side of the plane that we should look out our window to see the peak of Everest.
It is a unique feeling to be flying as high as this iconic mountain. To see the cragged peaks with their sharp angles jutting out of the sea of clouds below is nothing short of majestic. It was also the first time it really sunk in: this was going to be a very real adventure. Despite all my travels, this would be thoroughly new.
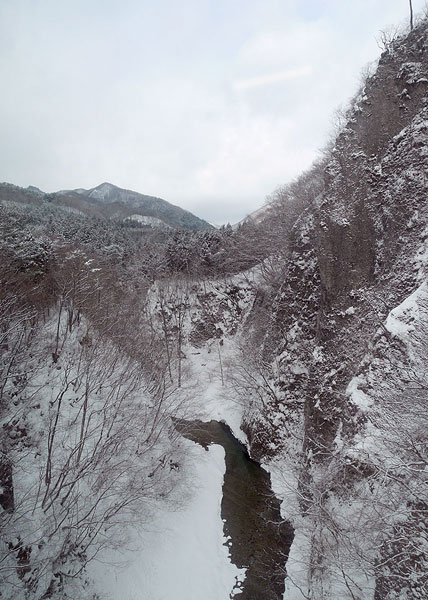
 |
| With valleys like these, flights were harrowing. 5D Mark III 35mm f/5.6 1/500s, ISO 100 |
As the plane started its decent, it banked � hard � to the right and then to the left; while the approach was smooth, navigating the awesome mountains that led to the valley below was pretty thrilling. At each turn, villages and temples flew by, and as the plane kept dropping, the density of the communities increased. After one final hard turn, we landed hard and fast. The elevation of the airport is 7,300 feet, while surrounding peaks stand as high as 18,000ft. It is considered one of the world's most challenging landings, and only eight pilots in the world are certified to land at the airport.
I walked out to greet my team and retired for the night. Unfortunately for me, there wasn't a lot of time to adjust: the departure for the trek was bright and early the following morning.
We drove from the town of Thimpu up to the trailhead where we began our journey. Awaiting us were 9 mules, a horse, and a team that included a chef, 2 porters and a horse master.
Stay tuned for Part II of Joshua's story in the next issue...
-----------------------------------------------------------------------------------------------------
Feature: Why I LOVE the Japanese people: How to lose $7,000 of gear and get every bit back
by Dave Etchells
My most recent trip to the annual CP+ show in Yokohama was my seventh to Japan to date, and the more I visit, the more I come to love the country. The Japanese people themselves are a very big part of that. They're endlessly helpful, exhibit a genuine compassion and caring for foreigners as well as each other, and are just enormously pleasant to interact with.
I'd known these things for years, but recently had an experience that really drove home just how�different�Japanese culture is from most other parts of the world.
It's a long story to tell in full, but there are some useful travel tips along the way, so bear with me.
First, the setup for the mishap: It began as I was heading up to the Yamagata area to visit Panasonic's lens factory there, and meet with their senior lens designer. I was traveling�on the Tohuku Shinkansen (the main bullet train from Tokyo to points north), and it was a double-header: There were two sections to the train, which would split at Fukushima: one part going to Sendai, the other part to Yamagata and Tendo, where I'd be staying that night. Approaching Fukushima, and obviously concerned that I was on the correct section, I asked a fellow (Japanese) traveler if this was, indeed, the part that was going to Yamagata or not. He replied that no, this was the Sendai section, and I needed to go back to the other section to get to Yamagata.
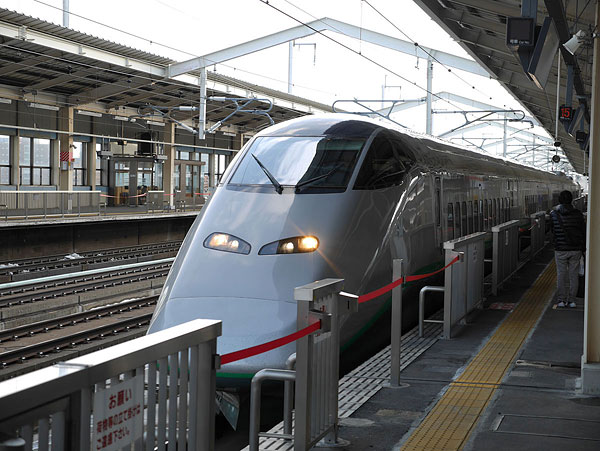 |
| Japan's Shinkansen -- colloquially, the bullet train -- is a high-speed railway network spanning most of the country. This is the E3-2000 series that was my second ride from Fukushima north. |
So, in a great hurry at the Fukushima station, I dashed back to the Yamagata part of the train. It was a�very�long train; I was near the front of the first section, and the cars with unreserved seats were at the back of the second section, quite a distance, so I was in a bit of a hurry.
 |
The lost bag and its US$7,000+ contents: A Fujifilm X100S, Olympus E-P5, Panasonic GM1, Sony RX100 II, Ricoh GR, Canon G16, Sony RX10, Nikon AW1, five interchangeable lenses, three audio recorders, and a whole raft of batteries, filters, cables, and accessories.
(Yes, all that actually fit into that little bag, one reason it's my favorite!) |
Here was my first travel lesson for the day:�The Japanese are endlessly accommodating, but that doesn't necessarily mean they know the right answer. (!) In any question regarding train travel, certainly ask your fellow passengers, but�be sure to double-check with JR (Japan Rail) personnel before making any�consequential changes!
It turned out that the fellow traveler was completely wrong, and I'd just dashed to switch to the *wrong part of the train*. After just a few minutes aboard, the PA system started talking about Sendai, which clearly was not where I was supposed to be going. Checking with another fellow passenger revealed that this was, in fact, the wrong Shinkansen! Argh... So I immediately hopped off at the next station (Shiroishizao), to take the next Shinkansen in the other direction back to Fukushima again, where I could then board a train going to Yamagata. It turned out that Shiroishizao was a bit of a backwater station, so I had to wait 50 minutes for the next southbound train - I probably would have been better off continuing to Sendai, a major terminal that trains leave from much more frequently; I almost certainly would have gotten back to Fukushima faster; maybe another travel lesson learned.
Here's the fun part, though: In the confusion and semi-panic of changing train sections, trains, hopping off and getting back on, I managed to leave my camera bag somewhere along the way! Maybe on the original Shinkansen (I didn't think so, but wasn't positive), on the second one to Sendai, or in the terminal in Shiroishizao. Of course, I discovered this just as the doors of the train back to Fukushima were closing, so didn't have a chance to go search the Shiroishizao station.
 |
An E5-series Hayabusa Shinkansen, capable of speeds up to 200mph (320kph).
This was the type train I was on initially, on the Tokyo-Yamagata route.
(Credit: Wikimedia Commons) |
The tiny bit of good news was that I'd at least put the camera and lens I'd need for the next day in my computer bag, which I had with me. Meanwhile, though, easily US$7,000 worth of camera and audio gear was floating around somewhere within the JR East rail system.
If this were the US, I would have immediately written off any chance of seeing the gear again. Finders keepers, as they say. In Japan, though, I was at least hopeful that I might eventually be reunited with it; the big question was when.
Since I didn't know where I'd actually left the bag, there didn't seem any point in returning to Shiroishizao, so I approached a Fukushima station agent to see how I'd go about registering a lost & found item. He had very little English, but put me in touch by phone with a very nice English-speaking lady at JR East Information. She took all my info, description of the bag, theories of where I might have left it, and started trying to track it down. JR East Info closes at 6pm daily, and I didn't finish speaking with her until 5:30pm or so, yet she still called back just before six to report that she hadn't had any luck yet, but would resume in the AM.
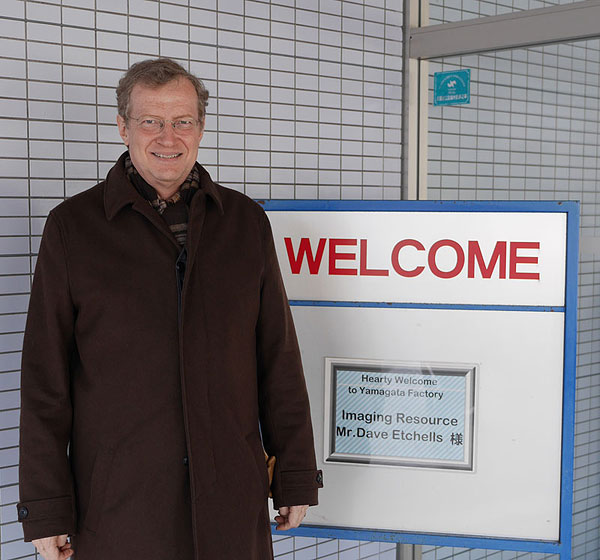 |
Arriving to a warm welcome at Panasonic's Yamagata factory,
albeit with most of my cameras missing. |
I had my phone off in the AM, but checked in with JR East Info just before my afternoon visit to the Panasonic factory -- and lo & behold, they'd found my bag! It turned out I'd left it in the Shiroishizao station, where it likely sat overnight. JR East sent it on to Sendai for me to pick up, as I'd be able to retrieve it and get on my way much faster from there than at Shiroishizao.
I was still more than a little nervous, since the JR person I spoke with described the bag as containing three cameras, whereas it had held eight initially. I crossed my fingers that maybe they just hadn't seen the others, as I had most of them wrapped in microfiber cloths for padding and protection.
So it was with not a little trepidation that I made the journey from Tendo to Sendai first thing the next morning. (Extra-special thanks to Koji Fujita from Panasonic, who accompanied me to Sendai to help in case Japanese translation was needed!) Almost worth it (well, not really, but I was trying to making the best of it), the train ride through the mountains from Tendo to Sendai was really beautiful, on an often winding track threading between snow-draped mountains. Really gorgeous, but hard to capture in pictures, as most of the time there were bare trees between the train & the view.
 |
| Pictures shot through the trees from the Shinkansen train don't really do the view justice, but I tried nonetheless. |
When I got to Sendai, the bag and every single thing in it was there, waiting for me!
Try to imagine this scenario occurring in the US, or perhaps most any country other than Japan: You leave a camera bag with US$7,000+ of gear in it sitting in a train station. (Let's leave aside for the moment what an absolute idiot you are for doing this.) Station personnel may find it that night, or it more likely sits there till morning. The rail line people go looking for it, find it, & forward it to a more convenient location for you to pick it up the next day. When you retrieve & open it, everything is exactly as you left it, all US$7,000+ of gear undisturbed & still inside.
Sadly, it's almost inconceivable to me to think of any of this happening in the US. Not even it just not being stolen, but for the public transit people to be organized enough & care enough to effect its return.
Simply amazing; the more time I spend in Japan, the more I love & appreciate it!
(^-^) - (A Japanese kaomoji, their version of emoticons)
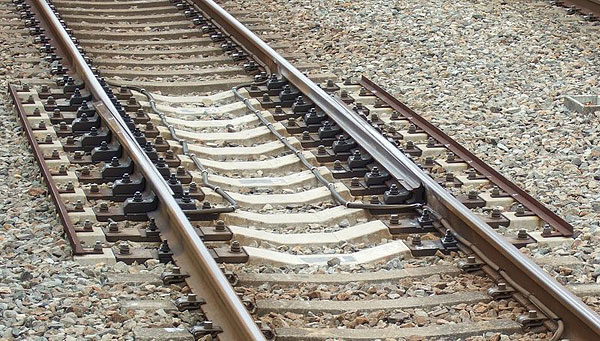 |
A bit of unplanned rail travel later, I was reunited with all of my camera gear. Thanks, Japan!
(That's a rail joint on a high-speed Shinkansen track above; the ride is incredibly smooth.)
(Credit: Wikimedia Commons) |
So, lessons learned:
- Fer cryin' out loud, Dave, always check to make sure you have all your bags with you any time you move (!)
- Double-check travel info with official representatives whenever possible, especially if the consequences would be you going in the wrong direction.
- Non-reserved Shinkansen seats are a must, if you're the least bit uncertain about your schedule (or are a hapless idiot like yours truly). You might end up standing during peak times, but in my book, that's a whole lot better than having to buy a whole new ticket. (Update: Per readers Jeffrey Friedl's and fh's comments on the original story on our site, this isn't the case: A reserved-seat ticket just gives you the right to a reserved seat on the train in question, but you can still travel on a non-reserved basis on any other train on that route. - Thanks for that important note, guys; the incremental cost of reserving a seat is pretty trivial, well worth it on longer trips.)
- If you need to change directions quickly, it's best to wait for a major station.
- Google Maps is your friend, for figuring out connections. Its big limitation is that it only shows routes for trains leaving right around the departure time you specify. Sometimes, an earlier or later train would get you there faster, if it's a Super Rapid vs a Local, for instance. There's a more robust, English-language site out there that I've used before, but I don't recall the URL and didn't want to take the time to search more for it. (For some reason, I think it was a third-party site, not an official one from JR.) So I just made do with Google. A bonus with Google Maps is that it tells you the number of stops between transfers, and also shows you the Japanese names of the stations. Outside major metro areas, station signs are often in Japanese only.
(Per a couple of reader comments, the site I couldn't remember was http://www.hyperdia.com/en/. An anonymous reader also mentioned http://www.jorudan.co.jp/english/norikae/e-norikeyin.html which lets you select what fare class you want up-front. Hyperdia shows you all available fare classes in its results, though, and also provides links for both train and station timetables along the way (something I hadn't noticed previously, thanks, Javbw!), making it easier to figure out other options if you end up running late. Very handy!)
- Extra bonus tip: If you're going to do much traveling around the JR or Tokyo subway system at all, it's well worth it to get a PASMO card. These prepaid e-cards let you breeze through the turnstiles, versus having to visit a ticket machine every time you exit and re-enter the system. The balance never expires, so I just loaded �2,000 on one and will simply save the card itself for my next visit.
Surprisingly, despite my mishaps, I absolutely love the JR train system, feel pretty comfortable with it, and wouldn't hesitate to set out to any part of Japan using it. It's an amazing system that runs pretty much anywhere you'd want to go, is always precisely on time (barring extreme weather), clean, pleasant and efficient. Inside Tokyo, everything is marked in English as well as Japanese, so that's a breeze; just get a subway map and you're golden. For longer distances, Google or the routing site I mentioned above but couldn't recall is the way to go, and really makes it pretty easy.
I'm already looking forward to my next visit (^-^)/
-----------------------------------------------------------------------------------------------------
QUICK HITS
-------------------
Lens Review: Fujifilm 16-50mm Lens Review
This lightweight and budget-friendly Fujinon kit zoom shows impressive image quality
We've just published our review for the�Fujinon XC 16-50mm f/3.5-5.6 OIS, the kit lens paired with the�Fujifilm X-M1�and�X-A1, and we were thoroughly impressed with the results from this lightweight and well-built wide-to-medium-tele zoom lens.
Despite the "kit lens" connotation, this Fujinon lens is another one to break the traditional mold of a mediocre kit optic. With excellent sharpness, even wide-open, as well as minimal CA, and low vignetting and distortion, the Fujinon XC 16-50mm is a very solid performer that produces excellent images. It feels solid, despite its all-plastic construction, and well-balanced on Fuji's lightweight mirrorless cameras.
A fairly straightforward lens, it does feature 3 aspherical elements and 1 ED element like it's more expensive sibling, the XF 18-55mm f/2.8-4 lens, as well as Fuji's EBC coatings for reduced flare and ghosting. Plus, it has built-in Optical Image Stabilization to help with those slower shutter speed shots. It's an all-around great choice for Fuji shooters looking for a high-quality and affordable everyday lens for things like landscapes, travel and portraiture.
Jump on over to SLRgear to read our full�Fujinon XC 16-50mm f/3.5-5.6 OIS lens review�to see our test results and read our final verdict.
This light, solid-feeling and compact zoom lens is currently available, not only as a kit lens with the Fuji X-M1 and X-A1 cameras, but also as a standalone lens in either a black or silver finish for around $399 --Adorama, Amazon (black,�silver), B&H (silver) -- and includes front and rear lens caps.� By purchasing this lens, or any other product, by clicking on one of our trusted affiliates, you help keep these
reviews coming!
In the meantime, check out some sample photos shot by our senior lens technician Rob Murray. You can view more sample photos, plus download the full-resolution files, over at�our Flickr page.
---
Camera Review: Nikon Df review: Is this retro-styled shooter the best available-light camera ever?
No question about it: The�Nikon Df�is an interesting camera. It's based around the same great 16-megapixel full-frame sensor and processor pairing of the professional Nikon D4, and yet carries a list price less than half that of the pro model. You'd think that combination would have everybody cheering, but the Df is actually a camera that divides opinion more than most -- and that's mostly down to its design aesthetic.
Retro styling is all the rage these days, and the Nikon Df's weather-sealed body follows the trend, resurrecting a look akin to Nikon's F-series film cameras. But it's this design that has caused a split in opinions: Some photographers love it for the connection that physical dials provide to key exposure variables; others have concerns about their implementation. For one thing, there are no intuitive Auto positions on the dials. Instead, there's a tiny Mode dial with an unusual lift-and-turn design. And there are questions about the ergonomic design of some of the controls, most notably the locking ISO sensitivity dial and the unusual vertical front control dial.
Of course, we discuss this in our�Nikon Df review, and offer our thoughts on the FX-format DSLR's handling. We also provide an in-depth look at the camera's image quality and performance -- both in the lab, and out in the real world. But if there was one feature that defined our experience with the Nikon Df, it was probably down to that sensor, which allows for available light shooting in conditions where other cameras would have you reaching for your flash. It's incredibly liberating to be able to shoot with available light even in relatively dim lighting, and it yields a much more natural look to your photos. Doubly so because your subjects don't immediately adopt the deer-in-the-headlights look that they normally would just as soon as they see a burst of pre-flash.
In fact, we'd go as far as to say that the Nikon Df is arguably the best available-light shooter around -- and in our book, that makes it a pretty important camera, interface quirks or not. But is it the right camera for you? Read our�Nikon Df review, and find out!
-----------------------------------------------------------------------------------------------------
POPULAR ON THE SITE
---------------------------------
At http://www.imaging-resource.com/news you can keep track of the photo news on our main site. Among the most popular stories over the last couple of weeks:
- Canon recalls 14,000 SX50 cameras due to allergic reactions to viewfinder (http://www.imaging-resource.com/news/2014/03/07/canon-recalls-14000-sx50-cameras-due-to-allergic-reactions-to-viewfinder)
- Getty goes free, decriminalizes photo sharing with new image embed feature (http://www.imaging-resource.com/news/2014/03/06/getty-goes-free-decriminalizes-photo-sharing-with-new-image-embed-feature)
- SLRLounge puts Panasonic GH4 and GH3 in head-to-head high ISO tests (http://www.imaging-resource.com/news/2014/03/06/slrlounge-puts-panasonic-gh4-and-gh3-in-head-to-head-high-iso-tests)
- Orion Nebula through the ages: iPhone vs observatory (http://www.imaging-resource.com/news/2014/03/05/orion-nebula-through-the-ages-iphone-versus-observatory)
- Canon 5D Mark III dynamic range approaches Nikon D800 with Dual ISO hack, but not without consequences (http://www.imaging-resource.com/news/2014/03/05/magic-lantern-hack-brings-canon-5d-mk-iii-image-quality-almost-up-to-par-wi)
- Remote cam captures incredible images of mountain lion family feeding (http://www.imaging-resource.com/news/2014/03/05/remote-cam-captures-incredible-images-of-mountain-lion-family-feeding)
- Chicago Sun-Times hires back four photographers amidst wider job cuts(http://www.imaging-resource.com/news/2014/03/05/chicago-sun-times-hires-back-four-photographers-amidst-wider-job-cuts)
- Pentax Multi Mount resurrects historic lenses from Nikon, Olympus, Contax and more -- without an adapter (http://www.imaging-resource.com/news/2014/03/03/pentax-multi-mount-resurrects-lenses-nikon-olympus-contax-without-adapter)
----------------------------------------------------------------------------------------------------
NEXT ISSUE
---------------
We'll see you next on March 21, with a regularly scheduled edition (and lots more news and analysis to share)!
SIGNOFF
-----------
That's it for now, but between issues visit our site for the latest news, reviews, or to have your questions answered in our free discussion forum. Here are the links to our most popular pages:
Newsletter Archive: http://www.imaging-resource.com/cgi-bin/dada-nltr/mail.cgi/archive/irnews
Daily News: http://www.imaging-resource.com/news
SLR Gear: http://www.slrgear.com
New on Site: http://www.imaging-resource.com/new-on-ir
Review Index: http://www.imaging-resource.com/camera-reviews
IR Photo Contest: http://www.dailydigitalphoto.com
Google + http://plus.google.com/+imagingresource
Facebook: http://www.facebook.com/imagingresource
Twitter: http://www.twitter.com/IR_Lab
Happy snapping!
Dave Etchells & the IR Editorial Team
editor@imaging-resource.com
|