EIGHTH WONDER OF THE MODERN WORLD
Lensbaby 3G -- Fun Refined
 By MIKE PASINI
Editor
The Imaging Resource Digital Photography Newsletter
Review Date: February 2007
When we reviewed the Lensbaby 2.0 selective focus lens last August (http://www.imaging-resource.com/ACCS/LBY/LBY2.HTM), we had only one real complaint. "The problem is that, even when you do find focus, it's hard to hold it," we whined. "There's no detent that locks in the lens position, so you have to freeze your grip."
A couple of months later, the Lensbaby guys took care of that little issue with what can only be described as the Eighth Wonder of the Modern World. They, modestly, call it simply the Lensbaby 3G.

In the Box. With the accordian-folded instructions and a yellow tips list, the 3G is packed in a permanent storage case with a lens pouch and the aperture disc removal tool with a set of alternate discs.
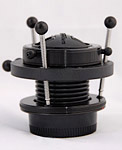
It's a Lensbaby 2.0 in what looks like some sort of painful medical brace designed to redefine image stabilization. Three metal focusing posts with black knobs radiate from the mounting collar through the focusing collar. Careful inspection reveals the front of the lens has a barrel focusing ring but the real genius is on the focusing collar. There you'll find the small locking button that locks the lens position and the two large release pins that unlocks it.

Top View. The stainless steel Focusing Posts surround the Focusing Ring with its three knobs. On the left, the two Release Pins can be clearly seen. An aperture disc is installed over the lens.
The complexity of this engineering marvel accounts for its $270 price, a bit more than the Lensbaby 2.0 at $150. But we have to admire a company that says $270 instead of $269.99. And you can still get the original Lensbaby for just $96. The company also sells an intriguing line of accessories (http://www.lensbabies.com/xcart/customer/home.php?cat=6) that work with all their lenses, among which we highly recommend the $33 Macro Kit.
We should also praise the company's inclusion of a snap on/squeeze off lens cap with the 3G. We complained about the metal screw on cap that came with the Lensbaby 2.0 and should point out that you can upgrade to the new cap for just $7.
SELECTIVE FOCUS | Back to Contents
With little left to complain about, we'll resort to edification. What is, after all, selective focus? And can't you do it in software?
Selective focus, as we argued in our original review, is really how we see the world. Narrowly. We notice something, focus on it, then broaden our sense of the scene out as far as our peripheral vision permits, putting the focus of our interest in context.
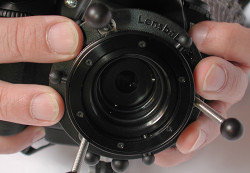
The Grip. You select focus by 1) choosing an aperture with a particular sweet spot and depth of field and 2) manipulating that sweet spot with this grip.
But your ordinary lens focuses on the whole scene at once. It takes a lens like the Lensbaby to focus on just a part of the observable scene, blurring the rest artfully away.
But can't you do that in Photoshop?
Yes, as we pointed out in our previous review (with samples), you can simulate this effect in software using a layer mask and one or another blur. But this is a little like tossing a frozen pizza in the oven instead of tossing some spinning dough in the air, catching it and dusting yourself with flour. One's fun, the other's just frozen.
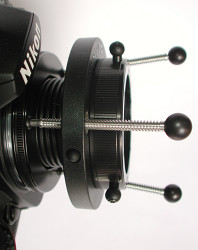
Mounted. Fully extended. The Locking Button is visible on the Focusing Collar.
Here are the details on the Lensbaby 3G:
• Construction: Coated optical glass doublet (same optic as Lensbaby 2.0)
• Focal Length: about 50mm
• Focus Type: Manual/Fingertip with 2 additional types of fine focusing
• Aperture Type: Interchangeable levitating aperture disks
• Apertures: f2, f2.8, f4, f5.6, f8, f11, f16 and f22
• Minimum Focus: About 12 inches
• Maximum Focus: Infinity
• Size: 3" high x 3.25" wide
• Weight: 5.7oz (161.59g)
• Data: No electronic communication between the lens and the camera body
• Mounts: Available in mounts for virtually all digital and film SLR cameras including Canon EF, Nikon F, Minolta Maxxum/Sony Alpha A, Pentax K/Samsung GX, Olympus E1/Panasonic Lumix DMC and Leica R.
• Metering: Automatic light metering is possible by shooting in aperture priority mode for almost all digital and film SLR camera bodies except certain Nikon bodies including the D40, D50, D70, D70S, D80, D100, N50, N55, N65, N70, N75, N80, Kodak 14N and ProN and Fuji S1, S2 and S3.
USING THE LENS | Back to Contents
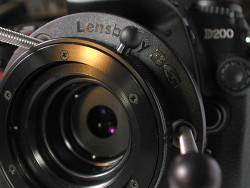
Aperture Disc. The Aperture Disc is clearly visible in this shot.
The lens may be a complex engineering feat, but using it feels surprisingly natural.
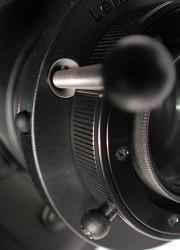
In a Nutshell. The small Locking Button (l) on the Focusing Collar with Focusing Post and Knob protruding through it. The grooved ring is the Barrel Focusing Ring with a Focusing Guide knob at the bottom. A +4 macro converter lens is also attached.
You mount the 3G just as you would any other SLR lens. The trick is focusing it. To do that, make sure you've adjusted your camera's diopter for your eyesight. You're going to using the viewfinder to find focus manually. You can also turn off any autofocus function on the camera body.
Once you've mounted the lens, the next task is learning how to control it. The best advice is, as the Lensbaby guys recommend, to have the middle two fingers of both hands positioned on opposite sides of the Focusing Collar, as the manual says. This leaves your right index finger free to work the shutter, your pinkies to support the camera bottom and your thumbs to hang on to the back of the camera. The Locking Button should be within easy reach of your right middle finger.
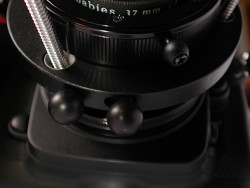
Release Pins. With the 3G mounted on the dSLR, the Release Pins are on the bottom of the lens.
You'll want to squeeze the Release Pins together to free the 3G's bellows, unlocked the lens. Then use your middle fingers to either slightly expand or contract the bellows. Left alone, the 50mm lens focuses about a foot and a half away (a bit farther than the Lensbaby 2.0). Extend it to focus closer (or get the Macro Kit to get really close) and compress it to focus further away. Bend it a little one way or another -- toward the subject -- to move the sweet spot around.
When you've honed in on your subject, tap the little Locking Button on the Focusing Collar. The holds the bellows in position. A slight shift forward or back will compensate for any slip of focus. But there's a better trick.
You can simply fine tune focus by twisting the Barrel Focusing Ring on the front of the lens using one of the three Focusing Guide knobs. It's smart to set the knobs midway between the Focusing Posts before you get serious so you have some room to move in either direction. Bumping into a Focusing Post is a drag.
But say you aren't entirely delighted with where in the frame your sweet spot is. You'd like to shift it a little without releasing it all together. Easy. Just twist one of the stainless steel Focusing Post Knobs to change the bellows.
When you're ready for the next composition, just pinch the large Release Pins together to release the mechanism.
The 3G doesn't communicate electronically with your camera. That makes more than autofocus an issue. Changing apertures must be done manually and setting exposure may be a manual affair on your gear, too, although cameras that meter through the lens can adjust shutter speed in aperture priority mode.

Falling into the Scene
The interchangeable aperture discs, which provide apertures from f2 (no disc) to f22, are held above the front glass element of the lens by three strong magnets. Drop a disc into the lens well and it snaps right into place without touching the glass. The three magnets actually create a magnetic shield that protects the lens.

Pulling Subject Out of Background
To remove a disc, Lensbaby includes a tool with a holder for the other discs and a magnetic finger you touch to the installed disc to simply lift it out.
The bigger the aperture, the smaller the sweet spot. And the shallower the depth of field. Try one of the middle to wide apertures to get the hang of the 3G's sweet spot. BTW, the FAQ on the Lensbaby site has an interesting entry on alternative apertures, including using the plastic nozzle from a salad dressing bottle.

Parade of Roses
Metering depends on your gear. You can always set exposure manually, of course. You know the aperture already, so it's just matter of setting the shutter speed. Which you can do with a test shot and quick review of the histogram.
Cameras that can meter ambient light through the lens can be set to aperture priority. They'll adjust the shutter speed to get the right exposure.
With the Lensbaby 2.0, we shot with both a film Nikon FM2 and a dSLR Nikon D70S but we didn't take any flash shots. With the Lensbaby 3G, we shot exclusively with a Nikon D200 dSLR and did take some flash shots.

Flash. Bounced off the ceiling.
It was pretty simple. The flash itself makes the exposure, so the trick is to have the shutter open before the flash fires and keep it open until after it fires. That's widely known as the flash sync shutter speed and 1/60 second almost always does the trick. Some cameras can sync at faster speeds, but it doesn't matter a lot. We used 1/125 with a monobloc system bouncing off the ceiling and shot without issues.
Bouncing the light eliminated the ambient light issue, but it you want more detail in the background, just slow down your shutter.
Flash. Bounced again with the background nicely obscured.
We used an aperture of f5.6. Instead of changing the aperture, we changed the flash output (because it was quicker). We used the D200's popup flash in Manual mode at the weakest power setting to trigger the monobloc wirelessly. But the same arrangement could be used with any external flash unit or even the pop up itself (set to TTL and at full power).
The point being that we didn't have any particular difficulty using the 4G with flash.


Selective Focus. The 3G makes it a lot easier than its predecessor to hone in on a subject.
WHY SELECTIVE FOCUS | Back to Contents
Actually, there are good reasons for tossing a pizza in the air. Centrifugal force tends to stretch the dough concentrically (and it gives your arms a rest). Likewise, there are good reasons to use selective focus.
Just ask yourself how many shots are ruined by some goombah or pegurgi at the edge of the composition? With a selective focus lens, they merely add visual interest.
The artistic effect is compelling but it's really the visual direction the lens provides the viewer that creates the impact. You can point any lens to a subject of interest but with selective focus, you point your viewer's vision to it emphatically.
It won't be your primary lens, of course, but it sure is a great argument for another camera body if you're shooting event photography.
At every trade show we've visited, the Lensbaby booth is packed with curious photographers trying to get their hands on this unique little lens. Nothing else does what a Lensbaby does and a Lensbaby does that very, very well. It's excellently engineered, well made and a delight to use.