FRONT/BACK FOCUSING BEGONE!
LensAlign Pro --
Fine-Tuning Autofocus
By MIKE PASINI
Editor
The Imaging Resource Digital Photography Newsletter
Michael Tapes has been at it again. The inventor of camera aids like the WhiBal white balance card has devised a clever way to take advantage of the microfocusing feature of some Canon, Nikon and Sony dSLRs.
His new LensAlign device is available in two models, in fact. We received the slightly more elaborate Pro version, which will ship Dec. 16, for review. The simpler Lite model costing a bit less will be available early in January 2009. You can order either model directly from RawWorkflow.com.
The $139.95 LensAlign Pro is a focusing target with three planes that you can mount to a tripod. The $79.95 Lite model uses just two planes. It's designed to help you align the sensor plane parallel to the upright focusing targets and to indicate, on a ruler, the amount of back or front focusing your camera/lens combination suffers.
| Feature | Pro | Lite |
|---|---|---|
| Accuracy, repeatability and compatibility of focus test/calibration | Yes | Yes |
| Tripod mount, mirror sighting (most accurate) | Yes | Yes |
| Front and rear QuickSight camera to LA alignment | Yes | No |
| Tank-like construction | Yes | No |
| Ships/stores flat | No | Yes |
| Price | $139.95 | $79.95 |
| Priority International shipping | ~$25 | ~$13 |
| Source: Michael Tapes | ||
How it helps you align the sensor plane is really the only difference between the two designs. The Lite version uses a mirror. The Pro version uses either a mirror or a two-plane focus target. The Pro's two-plane alignment was developed before the Lite's mirror system but Tapes decided to include the mirror system in the Pro version as well.
Setup can take as little as a couple of minutes, according to Tapes, and results are repeatable, thanks to the unique alignment and focusing aids built into the device, regardless of which model you buy. See Tapes' feature comparison below to help decide between models.
Tapes sent us an early production unit of the Pro model minus the mirror and we've given it a test drive to see just how well it works.
THE PROBLEM | Back to Contents
The Box. Box cutter ready.
But first, let's explain the problem LensAlign addresses. What, in short is back or front focusing?
Back focusing occurs when autofocus locks at a distance further away than what you want the lens to focus on.
Front focusing occurs when autofocus locks at a distance closer than the focus target.
While the difference may be minuscule, it tends to shift the field of focus off (cheating it back or forward). And in precise focusing especially wide open, it's a killer.
Detecting the problem is often more difficult than it may seem. You may confirm the autofocus point in the viewfinder or using software than can display the focus point on your image (typically supplied by the manufacturer) and notice that actual focus was either in front of or behind that point. In short, you have to look for it.
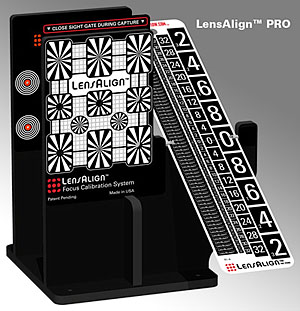
LensAlign Pro
But it can be measured with a variety of targets, including the LensAlign. In fact, that's the job the LensAlign was designed to do. Canon's Director of Media and Customer Relations Chuck Westfall published a manual procedure in the Dec. 2008 Tech Tips column of The Digital Journalist.
The cause of the problem may be in the camera body itself or in a particular lens. Recent Canon and Nikon cameras provide a microadjustment for autofocus with two modes: a default that can be applied regardless of the lens mounted and another for just the particular lens mounted.
The number of lens corrections the camera can remember varies. Nikon stores 12 in the D300 and D700 but 20 in the D3/D3X. Canon stores 20 in the 1Ds Mark III, 1D Mark III, 5D Mark II and 50D. The Sony A900 stores 30.
How do you tell the difference? If every microadjustment is back or front, you can find the common amount and subtract that from every adjustment. So if you have lenses that require an 18, 14, 7 and 4 adjustment, you can use a 4 adjustment for the body itself to limit the specific lens adjustments to 14, 10 and 3.
SOLUTIONS | Back to Contents
Both the body and a lens can be adjusted to correct for either issue. Until recently, you had to send your gear to the manufacturer's service department to find out which one was the culprit and to make the adjustment.
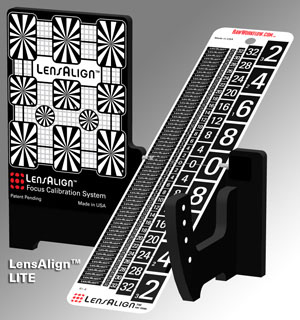
LensAlign Lite
But since the inclusion of microadjustments in recent dSLR bodies, homebrew solutions are legion -- primarily because there has been no other way to attack this problem. But they have their own drawbacks.
One step focus adjustments can be made on a scale of +/-20 units for most cameras. These units represent compensations made by the autofocus system in the camera and do not mechanically alter the lens. The adjustment is also proportional to the maximum aperture of the lens, with the maximum amount applied at the maximum aperture where depth of focus is smaller.
Some homebrew solutions advise you to focus on a tape measure running away from you on the floor, the camera held at a 45 degree angle. But as Westfall points out, "doing so will degrade the consistency of the camera's focusing measurement." Trying to autofocus on a single line on the tape measure, the autofocusing system (which is just multiple pairs of linear pixel arrays) only a few pixels from each active pixel array be able to see the target. "Ideally," he recommends, "the contrast in the reference target should cover the entire area of the camera's center focusing point, and the reference target should be perfectly parallel to the camera's focal plane."
THE PRODUCT | Back to Contents
That, in a nutshell is what LensAlign does. It provides a reference target you can easily align parallel to the sensor plane of your camera with a "tape measure" along side that reports the actual deviation. Tapes has hired two guys to do the job of William Tell's son: one to be the target and the other to say, "Ouch!"
LensAlign is a hardware-only solution to measuring front and back focusing. The tripod-mountable Pro hardware consists of three parts:
- A front focus target with a sighting gate
- A rear sighting panel
- A tiltable ruler aligned to the focus target
The front focus target has holes bored through several locations to let you see through to the rear sighting panel. When you can see the red dots of the rear panel through the holes in the focus target on your camera, you have correctly aligned the camera to the LensAlign, centered on the target hole you're using.
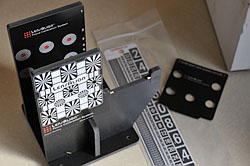
In the Box. Base unit already assembled, stainless steel ruler in bag, sight guide with holes.
To prevent the camera from focusing on the rear papel, the sighting gate blocks the holes in the target.
To help get a rough alignment, you can look through the rear panel back to the camera. Mounting the LensAlign on a tripod makes this adjustment very quick.
Changing the angle of the ruler can make it easier to see the depth of field being captured. A steeper angle gives more units of measurement for any given depth of field compared to a flat angle. Flattening the ruler gives you fewer units.
In the Lite model, the sighting gate and the rear sighting panel is replaced by a mirror:
- A front focus target
- A mirror
- A tiltable rule aligned to the focus target
A mirror is supplied to attach to the front focus target to guide alignment. When you see your camera looking back at you in the viewfinder, you're aligned. It's an old (and effective) trick to which Tapes has added a twist to allow "precision alignment not only to be parallel but also to be lined up with the LensAlign the same each time like the pro version."
Because there is no rear sighting panel with magnets to hold the stainlesss steel ruler at an angle, the Lite model has a finger in the front with magnets drilled into it to do the same job. They just grab the lower end of the ruler.
THE PROCESS | Back to Contents
Step One in the process is to align the plane of the camera sensor to the focus target of the LensAlign. They just have to be parallel. They don't have to be horizontal.
Remove the ruler and look through one of the holes in the back side of the sighting panel, moving the LensAlign until you can see the lens of the camera.
Then go behind the camera and observe the focus target, picking one of them to work with (make sure it's the same one you used for alignment -- it will probably be staring right back at you from the center of the viewfinder or LCD). Live View makes this a little easier. Using the viewfinder can be misleading because the angle at which you are looking through the viewfinder can throw off alignment. So try to keep your eye centered on the eyepiece if you have to use the viewfinder. Tapes recommends taking a shot and evaluating it on the LCD instead.
Step Three is to close the sight gate so the red target on the sighting panel is no longer visible. That prevents autofocus from being confused about which plane to focus on.
Take the shot after throwing focus out and turning on autofocus. Snap the shot with a cable release or the timer to minimize camera shake. Then enlarge the LCD display to evaluate focus on the ruler.
If you have trouble seeing which line of the rule is sharpest, you can open the image in an image editor that has a Find Edges filter to make it easier to find the actual focus point.
CONSTRUCTION | Back to Contents
Our LensAlign arrived Wednesday morning. To our surprise, the unit required no major assembly. We'd expected to find the various pieces shipped flat for assembly but the main unit was fully assembled. All we had to do was remove the metal ruler from its protective plastic bag and slap the Sight Gate on the main unit.
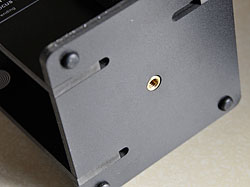
Bottom. Brass tripod mount and four little rubber feet. Note the extruded PVC and slots for the tabbed panels to attach to the base. With glue.
Well, almost all. One of the Little Rubber Feet on the bottom of the unit was missing. But we found it in the box. They aren't attached with an adhesive but pop into small holes in the base. And one of ours had simply popped out (probably when the unit was squeezed into its box). We just popped it back in, but a little glue would be a smart idea.
We were surprised to find the site guide is magnetized. There is, fortunately, a warning on the site guide (you want to keep storage media away from the LensAlign). And the rear sighting panel has magnetized stops drilled into its side to hold the Ruler at five discreet positions. The front focus target has two magnetic pins that function as a hinge on which the Ruler rotates.
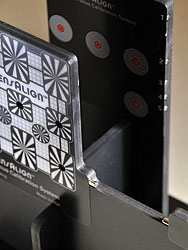
Magnets. Note the pins drilled into the side of the rear panel and the two pins where the ruler will mount. All magnetized.
And that tripod mount? Solid brass.
The black LensAlign panels and base are made of extruded PVC like the WhiBal card (but much thicker). It's seems quite solid, flexing only a very little and probably warp free (not absorbent).
Like his WhiBal, Tapes tests every LensAlign. Every unit is tested for alignment with a laser system. Every piece is verified to be perpendicular, with the laser beam simultaneously going through both front and back holes to ensure they're concentric.
USING THE LENSALIGN | Back to Contents
The review unit did not ship with any documentation but Tapes told us he plans to put videos on a DVD to ship with LensAlign. To get our bearings, we watched an early cut of the video, which is now posted on his video page.
And it's a pretty simply process, as we outlined above. In practice, it was over as fast as a flu shot.
There are really several aspects to doing this right. The first is the general setup, the second is taking the shot, the third is evaluating the results and the fourth is adjusting the camera.
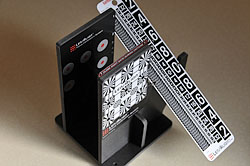
Assembled. It takes only seconds to assemble the parts into a functioning LensAlign.
Setup. We used two tripods. The larger one supported our camera. We used a smaller tabletop tripod on a typewriter stand to support the LensAlign. We might simply have put it on a table or anything else, in fact. There's no need to align the height of the LensAlign with the camera, so you can set up in a variety of ways. Just make sure you can see the camera from the back of the LensAlign and the LensAlign from the back of the camera if you're using the Pro version. The Lite version can point up at you from the floor, really, since it uses a mirror.
We had a vacation lens mounted on the camera. We made sure to turn off the image stabilization (a good idea when tripod mounted anyway). And, lacking a remote release, we set the camera to fire on the self-timer.
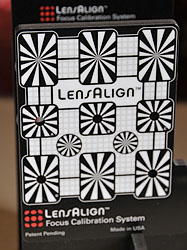
Target. This is what your camera focuses on. The adjacent ruler will reveal how accurately it did so.
Following Westfall's advice in his tech column, we racked our zoom lens out to its full telephoto length. That let us find the proper distance between the two units. We simply spaced them apart so the center of the viewfinder (where the autofocus points are) was filled with the LensAlign. That was about six feet away.
The rule of thumb, however, is that camera-to-subject distance should be no less than 50 times the focal length of the lens. For a 50mm lens, that would be a little over eight feet. For our lens, we probably should have been 30 feet away. But that would have required remodeling.
Then we went behind the LensAlign, lifted the Sight Gate and peered through the center hole. Our camera lens was peering back at us, just slightly off center. We moved the LensAlign until it was perfectly centered. Then we closed the Sight Gate.
Back at the camera, we set the camera's focusing to single point autofocus so we could focus on the target we had just used to align the camera and LensAlign. We also set focusing mode to single (not continuous).
Because we wanted to shoot at our widest aperture, we set the shooting mode to Aperture Priority and then set the f-stop.
Shooting. Once you've got the setup done, shooting is the easy part.
First, we manually set focus to infinity, as both Westfall and Tapes recommend for accuracy of the autofocus operation.
Then we half pressed the shutter button to set focus automatically and looked through the viewfinder to confirm the camera was focusing on the right target. Because we were using the center focus spot in the camera and had aligned the center focus target there, we didn't have to move the focus spot.
Then we started the self-timer by snapping the shutter.
We shot a few of these and we also changed the focal length of the zoom (and the corresponding f-stop) just to see how much the results might vary.
We also tried different angles for the ruler. We found it useful to flatten the ruler where the depth of field was deep. At long focal lengths, wide open is actually stopped down a few stops from wide open at short focal lengths. The magnetic pins in the side of the rear sighting panel made it easy to quickly change the angle.
And we shot with and without a filter to see if that made any difference. In fact, we started to think of all shorts of little tests we could perform to compare autofocus performance once we had a device that could show us where focus actually was.
Evaluating. This is a great task for tethered shooting, but we needed some exercise, so we carried the card to our reader and evaluated a series of shots by opening them in Photoshop and running the Find Edges filter (under Stylize) on each of them.
That just makes it a little easier to see where on the ruler is the sharpest focus. You can certainly just look at the original image (even on the camera's LCD). In either case, you should view the ruler at 100 percent.
Having a few shots helps confirm the results.
Adjustment. Once you've decided that an adjustment should be made, it's time to enter a value using your camera's Autofocus Microadjustment option.
Because the values on the ruler do not correspond to the +/-20 units in your camera's adjustment, you simply have to work by trial and error. Positive values move the focal point away from the camera while negative ones move it closer.
One of the simpler ways for the first attempt is to take several shots over the range of options. Then evaluate focus on those to narrow it down.
DAVE IN THE LAB | Back to Contents
A second review unit was put to work at the Imaging Resource lab in Atlanta. Publisher Dave Etchells explains what they did with it.
Lens Align Pro In Action: Focus Position |
||
 |
 |
 |
| Significant Back Focus | Proper Focus | Slight Front Focus |
We shot the images above with a Canon 1D Mark III in our studio, using our Canon 100mm f/2.8 macro lens from a distance of a couple of feet. The aperture was set at f/2.8, to get the shallowest depth of field, so we could better discern where the actual focus point was. The Lens Align Pro's ruler was at the #2 angle setting, which we've found to provide a good balance between being able to quickly see gross focus errors and making fine focus determinations.
It turned out that this combination of lens and camera was front-focusing slightly when the focus microadjustment was turned off. The first crop on the left was taken with the micro focus adjustment set to +20, the middle one with it set to -9, and the left one with a setting of -20. The differences in the focus position are pretty obvious when shooting with a wide-aperture lens at a fairly close distance like this
Lens Align Pro In Action: Angle Settings |
||
 |
 |
 |
| Angle 1 | Angle 3 | Angle 5 |
As mentioned above, you can set the ruler in the LensAlign Pro to any of five different angles, from almost horizontal to a fairly high angle. The flat setting is handy for quickly getting an idea if a lens is off in one direction of the other, and may be necessary for even relatively fine adjustments when you're shooting from some distance. For really fine focus discrimination, tilt the ruler up to its highest angle setting. (Position 1) Tilted at a high angle, each division on the ruler corresponds to less front/back distance, so you can judge focus much more finely.
Tip: "Find Edges" |
|
 |
 |
| Original | Find Edges |
It's not too much of an issue with this particular lens, but at smaller apertures and with lenses that aren't terribly sharp to begin with, it can sometimes be difficult to tell just where the point of greatest sharpness is located. Using the Find Edges filter in Photoshop makes it a lot easier to see fine focus variations.
-- Dave
CONCLUSION | Back to Contents
LensAlign may look a little intimidating (well, what focus chart doesn't?). But it has been designed with the user in mind. It's very easy to set up and quickly align with the camera. And taking a shot focused on the front focus target is simple.
The real challenge to using LensAlign correctly is at the camera where a number of options have to be neutralized to make sure the image reflects focus and not some other feature. These include image stabilization, focus mode, focus tracking and autofocus start point. But that's true of any method you'd use to measure focus.
The real question is how significant setting microfocus adjustment is. One camera manual mysteriously claims it "isn't recommended for most situations; use only when required." It's required, one would presume, when you notice the image isn't focused where the camera said it was. And this is something you'd most likely notice when depth of focus was narrow, as in low light photography or macro photography.
Still, there is nothing like precision in our fog-banked existence and LensAlign is a measuring tool that can cut through the vagaries of focus to help you fine tune the autofocus accuracy of your gear. Pretty sharp, we say.
(See also Michael Reichmann's LensAlign Review at Luminous Landscape. -- Editor)

