CALIBRATED NEUTRAL CARD
WhiBal -- Secret Weapon For Dazzling Color
By MIKE PASINIEditor
 The Imaging Resource Digital Photography Newsletter
When we cover a trade show, the first thing we do is compensate for the artificial light in the convention center. The way we've done this for years has been to use the camera's custom white balance option to shoot the back of our business card.
That gets us close enough to tweak later in our image editing software (which tends to be Lightroom for its modest hardware requirements and batch processing capabilities). But there are a couple of less than optimal things about it.
The first is that it's a camera setting. If we go outside to take a shot of the building or the event signage and, dazzled by all the cool new things we just saw, forget to reset our white balance setting, we've got a problem.
The second is that our business card is white only in a generic sense. We don't know if it's actually neutral and suspect it isn't. So we aren't getting the accuracy in our color capture that we think we're getting.
We shoot with a digicam so a solution like the Expodisc, which puts a diffuser over your lens, isn't really available to us. But the Expodisc, which isn't inexpensive, has to be fitted to your lens (a different one for different filter sizes unless you use step rings) and you have to take an incident reading of the light (turn around), which isn't always convenient. It does average mixed lighting, but otherwise our business card is a more practical solution.
THE PROBLEM | Back to Contents
What's the problem we're trying to solve?
Artificial light is not pure white. It casts a color over the image. An incandescent light bulb casts a romantic yellow light. Fluorescent office lighting casts an unflattering green light. To give just two examples.
That really doesn't bother us as we wander from home to office and back because our brain knows which objects are white and which black and if there are any of either and makes the correction without having to be clicked or double clicked. Living room lamps don't look yellow to us (unless we're in the street looking in) and receptionists don't look like they're about to lose their lunch.
But our cameras aren't as smart. They dutifully record the yellow and green color casts. We can set them to incandescent and fluorescent white balance settings to overcome this, but those are generic settings. Auto white balance does a great job, but it too is just guessing.
When you're dealing with company logos and colors, you don't want to be just guessing. If you want accurate color, you don't guess. You record.
THE SOLUTION | Back to Contents
There are a lot of solutions to this problem, starting with our custom white balance, continuing with the Expodisc's average white balance and going so far as to include camera calibration for studio lighting.
But what you really need is an object in your image whose values you already know. In this case, all we really need is an object that we know to be neutral.
There are many pretenders to this simple requirement. Among which are an 18 percent gray card (which is not really designed for this application) and a gray microfiber lens cloth (also not designed for this). You may or may not find something in your image that is actually supposed to be neutral (either pure white, pure black or gray). Plug-ins like iCorrect depend on that.
Recently we found a fool-proof, inexpensive solution to this when Michael Tapes sent us his WhiBal (http://www.rawworkflow.com/products/whibal/). It's a great improvement over what we've been doing.
THE WHIBAL | Back to Contents
There are several WhiBal models. The one we used is the least expensive, WhiBal G6 Pocket Kit. It's 3.5x2 inches, includes a lanyard with a quick release latch, simple table stand and very lightweight carrying case for $29.95. A larger Studio Kit (6x3.5) is available for $36.95 and the large Reference Kit (11x8.5) is available for $49.95. The two larger sizes are best for setting custom white balances, the larger one for covering the frame and the smaller one for spot custom measurements. You can also buy combinations of the kits and accessories (which are mainly different carrying devices so you can always take it along).
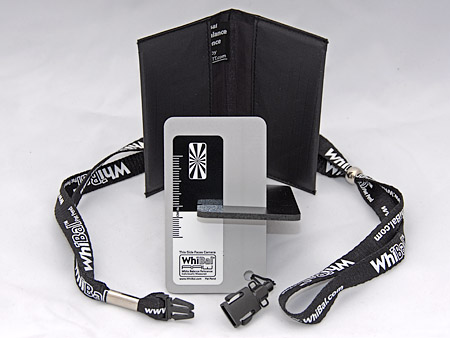
WhiBal. The G6 Pocket Kit includes the lightweight case, stand and quick-release lanyard. Everything you need, in short.
The Pocket WhiBal is a plastic card slightly thinner than a CompactFlash card and about the size of a business card, which makes it easy to take anywhere. The plastic makes it waterproof (unlike paper or cloth, plus it floats) and scratch proof (since the color goes all the way through the material). The luminance value is not 18 percent gray but a lighter gray (70, typically 72 or 73, as measured in Lab colorspace on a D50 two degree observer angle on a precision spectrophotometer) optimized for digital sensors as we'll explain). A label affixed to the front of the WhiBal provides true white (greater than 94 but close to it), black (less than 5, typically 4). The label also includes a measurement scale.
But the most important feature of the WhiBal is that it is calibrated. So each WhiBal is measured on a spectrophotometer in the Lab color space to guarantee it is neutral. To be neutral, the A and B channels in Lab should ideally be zero. Tapes believes a credible white balance reference has to be within one percent of neutral. But the WhiBal is certified to be between 0.5 and -0.5 in both the A and B channel, half the margin of error of the one percent criteria. Each side of the WhiBal is actually measured so the best side is marked with the label.
The WhiBal also features a flat spectral response. It responds the same no matter the light source, exhibiting no metamerism or color shift in differently colored light.
Because it's light gray, more information is captured by the linear capture of any digital camera than would be the case with a darker gray color. White can be clipped, so the color has to be lighter than white.
And it's rugged enough to be sanded if it gets damaged, too.
In addition to online video and PDF documentation (http://www.rawworkflow.com/products/whibal/), the RawWorflow site includes a discussion and support forum.
SHOOTING WITH WHIBAL | Back to Contents
No matter what lighting you're shooting under, all you have to do is take a shot with the WhiBal in the same light as your subject. It doesn't matter if you're shooting JPEGs or Raw, either.
Make sure you aren't getting any glare by looking through your viewfinder or LCD at the black reference patch on the WhiBal. If it looks black and not gray, you're OK.
If you're shooting JPEG, Tapes recommends setting your camera's white balance setting to the light source of the scene (Daylight, Flourescent, Tungsten, etc.) rather than leaving it on Auto. That locks the camera's white balance rendering to just one value. If you shoot with white balance on the Auto setting, it can shift from image to image.
If you're shooting Raw, the white balance setting doesn't change the data so this isn't an issue. You can select any white balance to apply later.
Then just take your reference shot, exposed normally. And take another one whenever the light source changes. You don't have to make the WhiBal shot your first shot, but it saves remembering to take one and makes it easy to find it later. But if you forget to take a WhiBal shot under artificial light, you can always do it later. As long as the light is the same, the WhiBal shot will be valid no matter when you take it.
JPEG HANDLING | Back to Contents
If you're using Photoshop CS3 or Lightroom to adjust your JPEGs, skip this section and use the technique described for Raw images below. Those programs have a White Balance tool that will correctly read the WhiBal value.
If you're using any other program, you might think you could just pull up your favorite tool, either Levels or Curves and select the gray eye dropper and click on the WhiBal in your image. But you can't. The gray eyedropped wants to make the spot you clicked a middle gray of 128 on a scale of 0 to 255. And the WhiBal is much brighter than that.
Instead, you should install the included JPEG plug-in written by Jan Easman of Power Retouche (http://www.powerretouche.com). That does pretty much the same thing as you'd be trying to accomplish with Levels and Curves, but it's optimized for the WhiBal. It knows it's a bright gray.
Once you've clicked on the gray part of the WhiBal card, you should see an instant color shift that eliminates any color cast, turning the WhiBal itself in your image a neutral gray.
Optionally, you can select the black eye dropper and click on a true black in the image. And you can select the white eye dropper and click on a true white in the image.
The plug-in, which requires about 15-MB for quite a few Power Retouche demo plug-ins that are installed with it, lets you save that adjustment and simply apply it to every other image shot under the same lighting.
RAW IMAGE HANDLING | Back to Contents
With Raw images, the process is just a little different. Whether you are using Photoshop Camera Raw with Bridge or Lightroom or any other Raw conversion software, you want to open the reference shot to set white balance to the card and optionally set the black and white points.
Use the White Balance tool to click on the gray part of the WhiBal, whether the image is a JPEG or a Raw file.
In Bridge, you can just click the Done button to affect the image and save the settings in the Develop Settings's Previous Conversion cache. Then select all the other images shot under the same light and simply apply the Previous Conversion. When you open the images, they'll all be corrected.
Any Raw conversion application allows you to copy and paste settings from one image to another. It's just a question of how they do it. Just be smart about whether to include black and white points with the white balance setting.
In Lightroom, which can be puzzling, you use the Photo | Develop | Copy Settings in the Library module or just the Develop | Copy Settings in the Develop module to lift the white balance and exposure settings. You can then use Develop | Edit | Paste in Develop module or Photo | Develop Settings | Paste Settings to apply them to any photos selected in the Filmstrip.
THE MAGIC | Back to Contents
Magic? There's no magic to the WhiBal. It's simply a calibrated color reference that reflects red, green and blue light equally. It's guaranteed to be neutral. Any reference shot with the WhiBal in it will have a known color value.
With that known value, you can correct any color cast by the light source on your scene. You simply tell your image editing software that the WhiBal is neutral and it will do the rest.
SOME EXAMPLES | Back to Contents
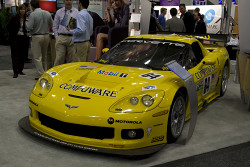
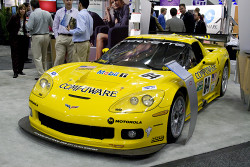
Corvette. Which one do you want?
At a recent trade show, we took the WhiBal along and shot JPEGs on a Canon G9 and Raw images on a Canon Rebel XTi. The lighting was screwy enough on both the tradeshow floor and later at a press event that we left the camera's white balance on Auto. Nothing else was really appropriate.
On the trade show floor our ISO 800 images were all Raw format. They were all underexposed about a stop. The reference shot was taken under the main hall lighting before we got started on our tour of the exhibit hall.
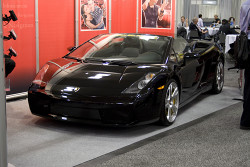
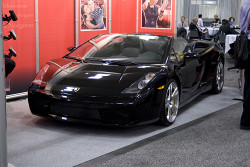
Lamborghini. Just a white balance shift here.
The two images reproduced here are of a yellow Corvette and a black Lamborghini. The light Corvette has spectral highlights and a rather bright sign in the background. The dark Lamborghini is flanked by a red wall.
Applying the reference shot's white balance and exposure modifications really lit up the Corvette. We didn't lose a lot of the insignificant background sign either, but the people in the shot came alive, too. Note that the carpet didn't lose detail either.
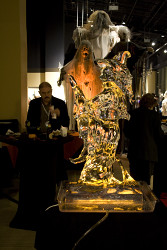
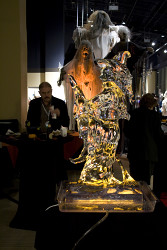
Raw Ice Sculpture. The witch has an orange light. Note the neutralized ghost, though.
Only a white balance adjustment was made to the Lamborghini. Still, we picked up some detail in the shadows of the black car. It's a tricky shot. Open the original image and try to find a neutral black in the car paint. Good luck. It's proof of the necessity of having a calibrated neutral in the image.
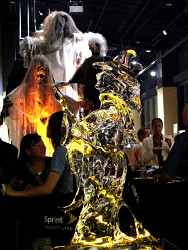
JPEG Ice Sculpture. The G9 took this one.
The press event shots are a mix of Raw and JPEG images. The first image of the ice sculpture with an orange glow is a Raw shot. But you can see the WhiBal modification to the JPEG image of the same ice sculpture resulted in a very similar improvement.
You'll also see the highlights are clipped (the white shirt is blown out). The white reference patch on the WhiBal label was less bright than the subject. Tapes explained to us that the black and white patches are really best used as references rather than to set the levels of your image. The black reflects very little light but you may have darker shadows in your image. And there are plenty of things that can be brighter than the light that reflects off any white label.
Using the WhiBal in the field is very simple. As you set up your camera, just unclick the WhiBal from its lanyard (which you'll want to hang around your neck in case the light changes) and take a shot under the lighting you encounter.
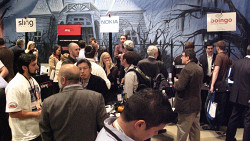
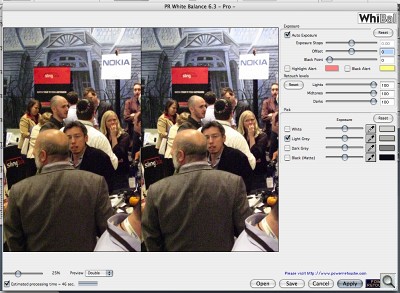
PR White Balance Plug-In. Slight white balance adjustment and an exposure adjustment done by the plug-in for the bottom image.
But using the WhiBal had a funny effect on us. "It's not a camera setting!" we kept whispering delightedly. We didn't have to remember to reset it. And that was a freedom we really enjoyed. We started thinking of it as an unpaid assistant. "Hey, WhiBal, what's the light here?" "Got it, boss!" "Great! Now prop up that model."
SOME QUIBBLES | Back to Contents
As you can see in our product shot (probably the easiest product shot we've ever taken, since it was the calibrated card itself), there's a slightly dark line down our WhiBal, a manufacturing imperfection no doubt. We just avoid clicking there, although it does return neutral values.
It seems easy to misuse the black and white patches as well. This is most obvious when your reference shot shows the WhiBal is not as brightly lit as other objects in the scene. But as Tapes told us, the patches "have little to do with the actual shot." And that's where you want to look for deciding what values to clip, what to leave alone.
Neither of those issues, however, threatens our description of the WhiBal as foolproof.
CONCLUSION | Back to Contents
Tapes invented the WhiBal to solve a problem he had wrestled with shooting Raw. And we're all the better for it. At least those of us who have (and use) a WhiBal.
