| Olympus Camedia P-400 Printer (Review first posted 1/8/2001) |
 |
 |
|
314 dpi resolution, continuous-tone pixels (no "dithering"). |
|
|
16.7 million colors (8 bits per color), 7.68 megapixel print engine resolution. | |
|
|
90-second printing speed. | |
|
|
Cropping, Frame, Background, and Stamp functions. | |
| * | Prints up to 50 copies at a time. | |
EZ Print Page
If you'd like to print a copy of this review to read off-line, click here
for a version minus the navigation bar, tables, etc. - This should let you resize
the page as needed in your browser window, to fit the width of your printer.
Manufacturer Overview
Olympus America Inc. has long been a strong contender in the digital
camera market, with award-winning Camedia products like the C-2020 and C-3030
Zoom cameras and revolutionary digital SLRs like the C-2500L, E-10, and E-100RS.
Its printer line is smaller, but it offers the same high quality and technical
innovation that Olympus has been known for in its digicam models. In July 2000,
Olympus introduced its first digital camera/printer combo with Polaroid -- the
Camedia C-211 Zoom. Only a month later, concurrent with its E-10 and E-100RS
camera announcements, the company announced a battery-powered dye-sublimation
printer designed for making portable, high-quality, 4 x 6-inch prints directly
from SmartMedia or CompactFlash memory cards. The Camedia P-400 printer takes
this concept a step further, increasing the print size to 8.25 x 11.7 inches,
introducing computer connectivity, and delivering a host of creative options
for producing post cards, photo-album pages, and index prints.
The P-400 constitutes a true "breakthrough" product, marking
the first time a true dye-sublimation printer has been offered for under $1,000.
(Until now, typical dye-sub prices have been on the order of $3,000-5,000.)
Not only is the cost of the printer itself far lower than normal, but its media
costs are quite low as well. At $1.80 per A4-sized print, the P-400 is actually
cheaper to operate than most inkjet printers! Early market response has been
good, and the P-400's print quality certainly seems to live up to its dye-sub
heritage.
High Points
- Continuous-tone, dye-sublimation transfer technology provides high-quality photorealistic prints with superb color reproduction and output quality.

- Four-pass printing with three colors (Cyan, Magenta, Yellow) plus clear laminate overcoat to protect prints.
- 314 dpi resolution, continuous-tone pixels (no "dithering").
- 16.7 million colors (8 bits per color), 7.68 megapixel print engine resolution.
- Maximum printable area is 2,400 x 3,200 dots (7.64 x 10 inches or 194 x 256mm)
- 90-second printing speed.
- Parallel port and USB connector interfaces.
- Accepts SmartMedia and PCMCIA PC Type II cards (CompactFlash and MemoryStick cards with PC card adapter).
- Reads DCF, JPEG/JFIF, Exif, or TIFF files, as well as any DPOF (Digital Print Order Format) files.
- Four printing modes: Standard (7.64 x 10 inches; from one to 16 images per page); Card (two or four postcards per page); Photo-Album (one to six images per page, with background image); Index (45 to 260 images per page).
- Black-and-white and sepia printing filters and up to 100 illustrated stamps for greeting cards.
- Cropping, Frame, Background, and Stamp functions.
- Black-and-white LCD display for viewing and selecting images.
- Prints up to 50 copies at a time.
- Five-print-capacity starter cartridge and paper kit supplied with printer; larger paper packs and ribbon cartridges sold separately.
Executive Overview
Finally! A high-quality, easy-to-operate, dye-sub color printer that breaks
the $1,000 price barrier! The Olympus Camedia P-400 may seem pricey to photographers
who are just looking to output family photos (it retails for just under $1,000),
but to professionals who are familiar with the exceptional quality of the continuous-tone,
dye-sublimation, heat-transfer process, the P-400 represents a genuine breakthrough
in affordable photorealistic printing, and the potential to compete with professional
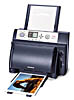
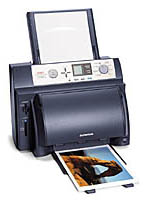
models costing thousands more. Measuring about the size of an average to large
desktop laser printer, the P-400 has a medium-size footprint (10.8 x 16.8 x
12.4 inches/ 275 x 427 x 315mm) and weighs 26.45 pounds (12kg).
One of the most exciting features of the P-400 is that you can print directly
from standard memory cards without going through a computer. (It must be noted
though, that standalone card-based printing is much slower than printing
from a computer.) The printer's operating menus allow you to make layout adjustments,
color corrections, sharpness adjustments, and even add creative filters, frames,
and backgrounds. Two card slots on the front of the printer accept either SmartMedia
(3.3V) or PCMCIA PC cards, plus CompactFlash or MemoryStick cards when used
with a PC card adapter. In addition, the P-400 has USB and parallel ports for
connecting to PC or Macintosh computers. This wide range of interface options
gives the P-400 the flexibility to work with any brand of digital camera or
computer using standard storage options and file formats. (A computer cable
must be purchased separately, if you don't already own one.)
An accompanying P-400 Software Utility CD includes the necessary printer drivers
(compatible with Windows 95, 98, NT 4.0, and 2000, and Macintosh OS 8.6 and
9) and a limited interface application for printing from the computer. The Camedia
P-400 can read DCF, JPEG/JFIF, Exif, or TIFF file types, as well as any DPOF
(Digital Print Order Format) files. A starter kit supplied with the printer
includes five sheets of A4 paper and enough dye to make five prints. (This raises
a major question regarding inkjet vs. dye-sublimation printers -- the cost of
consumables. Our estimates put the per-print cost of an 8 x 10-inch photograph
at about $1.80 for paper and ink. Compare that to an 8 x 10 print from an inkjet
printer which typically falls in the $2 to 2.50 range, although the use of third-party
ink cartridges can reduce that.)
The P-400 uses a three-color (cyan, magenta, yellow) heat transfer process to
produce its continuous-tone, dye-sublimation prints. It requires four passes
of the printer head to produce a complete print, including one pass for each
of the three colors and one for the protective laminate overcoat. Olympus estimates
that the entire process, at its "fastest" speed, is 90 seconds per
print. We found that to be a bit optimistic, especially when printing images
directly from a memory card. Our time for printing typical digicam images was
about two and a half minutes, whether from card or computer. High-resolution
TIFF images though, took as long as four minutes when printed from a card. The
P-400 has a maximum printing area of 2,400 x 3,200 dots, which at 314 dots-per-inch
resolution, translates to 7.64 x 10 inches (194 x 256mm) on A4 size paper. Color
gradations are 24 bits (8 bits per color, 256 levels) to produce approximately
16.7 million colors.
The Camedia P-400 offers four basic printing modes: Standard, Card, Photo Album,
and Index. In Standard printing mode, you can print one image per page at 7.64
x 10-inches (A4 sheets, overall size 8.25 x 11.7 inches) or 7.64 x 6.4-inches
(A5 sheets, overall size 8.25 x 7.9 inches), or you can choose to print up to
16 images on A4 paper and six images on A5. In the Card printing mode, you can
print two or four postcards per page on an Olympus special-purpose card stock.
The Photo Album mode is a little more creative, allowing you to print several
images per page, with a background or border to make it look like a photo album.
Finally, the Index printing mode provides you with a thumbnail index of all
the images on the memory card, with the file name of each image printed on the
page next to it.
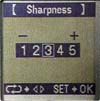
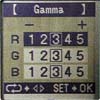
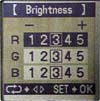
The Image Adjustment menu provides minor image-editing tools to fine-tune sharpness,
gamma, brightness, and contrast. There's also a variety of filters, stamps,
backgrounds, and layouts for creative photographers who want to produce greeting
cards, album pages, or decorative matting to frame their pictures.
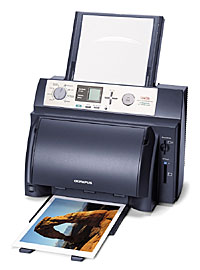 The
Olympus P-400 body measures 10.8 inches deep x 16.8 inches wide x 12.4 inches
high (without the paper trays). The printer's orientation is slightly different
from a standard ink-jet model, in that the paper cassette feeds from the top,
sending the paper down through the printer, where the thermal heads transfer
each dye color (cyan, magenta, and yellow) in a separate pass. The printing
process is completed with the application of a protective laminate overcoat.
The print is then ejected from the bottom of the printer onto an output tray
that sits parallel to the tabletop.
The
Olympus P-400 body measures 10.8 inches deep x 16.8 inches wide x 12.4 inches
high (without the paper trays). The printer's orientation is slightly different
from a standard ink-jet model, in that the paper cassette feeds from the top,
sending the paper down through the printer, where the thermal heads transfer
each dye color (cyan, magenta, and yellow) in a separate pass. The printing
process is completed with the application of a protective laminate overcoat.
The print is then ejected from the bottom of the printer onto an output tray
that sits parallel to the tabletop.The printer cassette cover is the largest single element on the unit. You open it by lowering the two eject buttons on either side of the cover and swinging it out and downward. The thermal head, which uses heat to transfer dye from a carrier ribbon to the paper, and a thermal head sensor to regulate the output, are affixed to the inside of the cover. The large ink cassette has two horizontal bars, one on top and the one on the bottom, with a flat media transfer area in between. The top bar feeds the transfer ribbon down across the thermal head (when the cover is closed) and the bottom bar acts as a take-up spool for the spent ribbon. The cassette is inserted with the flat side facing toward the paper, and the two rolls cradle the thermal head and sensor when the door is closed.
The P-400's paper feeder cassette is of fairly standard design, with a dust cover at the bottom to protect the loaded paper. Each batch of paper comes with a protective sheet on top for handling. Once you remove the protective sheet, you can't touch the receiver papers with your fingers, or the oils from your fingers will cause very visible fingerprints on your final images. Both A4 and A5 papers come in an 8.25-inch width. The A5 sheets are shorter by 3.5 inches, which is accommodated by a retractable paper guide inside the cassette. To load, you insert the cassette as far as it will go into the cassette compartment at the top of the printer.
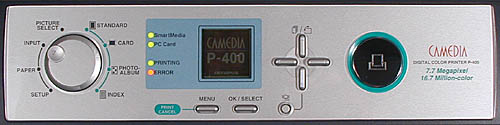
The Operational panel is located between the printer cover and the paper cassette compartment. It includes a Mode dial with four function settings on the left (Input, Paper, Setup, and Picture Select), four printing formats on the right (Standard, Card, Photo Album, and Index), and a Picture Select in the center.
Next to the Mode dial is a set of Access Indicators: SmartMedia, PC Card, Printing, and Error. The SmartMedia and PC Card lamps light up when you select Input on the Mode dial (if the appropriate card is inserted), and flash when the card is being accessed. The Printing light flashes when data is being received or processed, and glows when an image is being printed. The Error lamp lights when a problem occurs with printing. A readout of the error is displayed on the LCD panel.
 To
the right of the Mode dial, the LCD panel previews images that are to be printed
and menu options for various functions. The arrow buttons to the right of the
LCD are used to scroll through images and menus to select detailed parameters
and settings for each mode. A large Print button on the far right starts the
printing process.
To
the right of the Mode dial, the LCD panel previews images that are to be printed
and menu options for various functions. The arrow buttons to the right of the
LCD are used to scroll through images and menus to select detailed parameters
and settings for each mode. A large Print button on the far right starts the
printing process.The LCD panel is one of the few areas we found to criticize on the P-400: It's a monochrome design (black and white), which made it more difficult to see the photos displayed on it. Our feeling was that a $1,000 printer should have had a color panel on it. Then again though, given that the P-400 sells for perhaps a third the price of competing units, we're probably lucky to have an LCD panel of any sort.
Along the bottom of the Operational panel are the Menu/Print button for viewing menus and to cancel printing. The OK/Select button highlights menu selections or switching select on and off when printing a single image. The LCD Adjustment Button adjusts the brightness level of the screen.
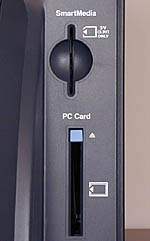 SmartMedia
and PC Card slots for reading memory cards are on the right of the printer cover,
with an eject button for removing the larger PC Cards.
SmartMedia
and PC Card slots for reading memory cards are on the right of the printer cover,
with an eject button for removing the larger PC Cards.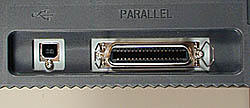 A
USB connector for Macintosh and Windows 98/2000 computers and a Serial Port
for using Parallel cables with Windows 95/98/MT 4.0/2000 computers are stationed
on the back of the printer for direct image transfer from a computer. The AC
power connector is also on the back panel, and the On/Off switch is located
on the front panel, next to the paper output tray.
A
USB connector for Macintosh and Windows 98/2000 computers and a Serial Port
for using Parallel cables with Windows 95/98/MT 4.0/2000 computers are stationed
on the back of the printer for direct image transfer from a computer. The AC
power connector is also on the back panel, and the On/Off switch is located
on the front panel, next to the paper output tray.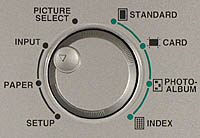 The
Mode dial has four function settings: Input allows you to choose between four
options for image data transfer: Smart Media, PC Card, Parallel Port, or USB;
Paper is used to set up the printer for either A4 or A5 size papers; and Setup
provides four Setup menu options: Image Adjustment, which controls Sharpness,
Gamma, Brightness, and Contrast; Basic Setup, which sets the Date order, reverts
to default All Clear, or provides a Demo Mode for use in showrooms or dealerships;
Background Setup, which enables you to select a background image and then process
it with specific effects, such as fading (Pale All and Pale Edge) and Filter
(B&W and Sepia); and Download, which allows you to import more background
images or illustrative stamps from the P-400 Utility software on your computer.
The
Mode dial has four function settings: Input allows you to choose between four
options for image data transfer: Smart Media, PC Card, Parallel Port, or USB;
Paper is used to set up the printer for either A4 or A5 size papers; and Setup
provides four Setup menu options: Image Adjustment, which controls Sharpness,
Gamma, Brightness, and Contrast; Basic Setup, which sets the Date order, reverts
to default All Clear, or provides a Demo Mode for use in showrooms or dealerships;
Background Setup, which enables you to select a background image and then process
it with specific effects, such as fading (Pale All and Pale Edge) and Filter
(B&W and Sepia); and Download, which allows you to import more background
images or illustrative stamps from the P-400 Utility software on your computer.The Picture Select option on the Mode dial allows you to select a picture, use the left and right arrow buttons to scroll through the index, and confirm it by pressing the OK/Select Button below the LCD Panel.
Operation
The first step in the Camedia P-400 printing process is to select how image source files are delivered to the printer's memory. They can be input directly using the SmartMedia or PC card slots on the front of the printer, or they can be downloaded from an external computer connection using a parallel or USB cable. (We found the PC to be slightly slower when processing JPEG files, but much faster when working with large TIFFs.) If you are using a memory card to deliver the files, you must first insert the card into the appropriate reader and then turn the printer's Mode dial to Input. The LCD display will present a menu of four options: SmartMedia, PC Card, Parallel Port, or USB. (Note that the PC Card slot can be used to read CompactFlash or Memory Stick cards if they are first inserted into the appropriate PC card adapter. The printer ships with an adapter for CompactFlash cards.) Using the left and right arrow buttons, scroll through the menu to choose either SmartMedia or PC Card. The LCD screen will display the word "Reading..." and an adjacent access lamp will flash next to the appropriate selection as it downloads the images.
When the image data is finished downloading, the screen displays the total number of image data files downloaded and the number of images that are formatted as Digital Print Order Format (DPOF) files. If an Error message is displayed, it means the PC card is unrecognizable, or the card was removed from the printer while still accessing image data (a fatal error!).
Next, turn the Mode dial to the Paper position to select one of two paper sizes: A4 (8.25 x 11.7 inches) or A5 (8.25 x 7.9 inches). Make sure the paper in the cassette matches the format you've selected. NOTE: From this point on, printer functions described here are only available for image data provided on a memory card, if the P-400 is set up to download images from a personal computer, the remaining functions must be completed via computer, using the provided printer software.
 Once
the memory card and paper size are established, the next step is to select images
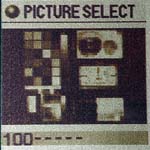
for printing. Turn the Mode dial to Picture Select to initialize the Picture
Select screen on the printer's LCD. This allows you to scroll through the images
on the memory card using the left and right arrow buttons. Confirm the pictures
you want printed by pressing the OK/Select button. If you want to cancel an
image, simply press the OK/Select button again.
Once
the memory card and paper size are established, the next step is to select images
for printing. Turn the Mode dial to Picture Select to initialize the Picture
Select screen on the printer's LCD. This allows you to scroll through the images
on the memory card using the left and right arrow buttons. Confirm the pictures
you want printed by pressing the OK/Select button. If you want to cancel an
image, simply press the OK/Select button again.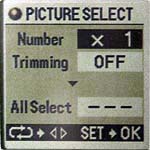 To
choose the number of prints you want made of an image, press the Menu/Print
button. You'll see a menu of options on the screen. In the Number option box,
use the left and right arrow buttons to select the number of images you want
printed. You can print up to 50 copies of any one image.
To
choose the number of prints you want made of an image, press the Menu/Print
button. You'll see a menu of options on the screen. In the Number option box,
use the left and right arrow buttons to select the number of images you want
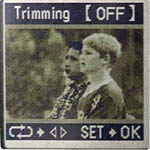
printed. You can print up to 50 copies of any one image.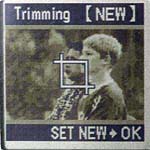 Just
below the Number selection, a Trimming option allows you to crop the selected
image, if necessary. Once the Trimming option is activated, a set of crop marks
appears on the screen, and the arrow keys drive the direction and amount of
cropping (up and down arrow keys crop vertically and left and right arrow keys
crop horizontally). There are five levels of preset cropping in both horizontal
and vertical directions. Once you've determined the trim size you want, press
the OK button to set the crops. (Note: If your image has already been cropped
in DPOF, the printer will automatically set its own crop marks. You can change
those specifications by scrolling to the New option on the LCD display and pressing
OK.)
Just
below the Number selection, a Trimming option allows you to crop the selected
image, if necessary. Once the Trimming option is activated, a set of crop marks
appears on the screen, and the arrow keys drive the direction and amount of
cropping (up and down arrow keys crop vertically and left and right arrow keys
crop horizontally). There are five levels of preset cropping in both horizontal
and vertical directions. Once you've determined the trim size you want, press
the OK button to set the crops. (Note: If your image has already been cropped
in DPOF, the printer will automatically set its own crop marks. You can change
those specifications by scrolling to the New option on the LCD display and pressing
OK.)If you want to print all of the images on the card, you can scroll to the bottom of the Picture Select menu and use the left and right arrow keys to activate the All Select function. Select OK, and all of your images will be printed. Just keep in mind that when using the All Select option, the P-400 doesn't allow you to set the number of prints, crop images, or use the DPOF settings originally selected in the camera.
Once you've selected the images you want printed, you'll need to set the printing mode. The Mode dial provides four printing options -- Standard, Card, Photo-Album, and Index -- to output your images.
Standard Mode
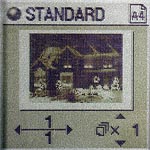 Standard
mode prints one or more images on a single page (up to 16 images on A4 paper,
and up to six images on A5). When the Standard setting is selected on the Mode
dial, the first selected image appears on the preview screen. A number indicator
on the bottom tells you which image is being displayed out of the total number
of selections (for example, #1 of of 2 = 1/2, or #5 of 6 = 5/6). The right and
left arrow keys scroll through the available images as they are displayed on
the preview screen. Also at the bottom of the LCD display is the number of copies
to be printed (x 1, x 2, etc.). This can be changed with the up and down arrow
keys (from one to 50 prints).
Standard
mode prints one or more images on a single page (up to 16 images on A4 paper,
and up to six images on A5). When the Standard setting is selected on the Mode
dial, the first selected image appears on the preview screen. A number indicator
on the bottom tells you which image is being displayed out of the total number
of selections (for example, #1 of of 2 = 1/2, or #5 of 6 = 5/6). The right and
left arrow keys scroll through the available images as they are displayed on
the preview screen. Also at the bottom of the LCD display is the number of copies
to be printed (x 1, x 2, etc.). This can be changed with the up and down arrow
keys (from one to 50 prints).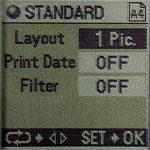 To
view the Standard Menu, press the Menu button. Options include Layout, Print
Data (On/Off), and Filter (On/Off). Select Layout and press OK. The screen will
display one possible page layout on the paper size you are using. Additional
Layout options can be viewed by scrolling through the options with the left
and right arrow buttons. Simply stop at the layout you prefer and press OK.
You will automatically return to the Standard menu. There you can opt to have
the Print Date feature On (prints the date and time on the image) or leave it
Off. Finally, the Filter feature provides two optional printing filters: B&W
(Black & White) and Sepia. B&W gives you a monochrome version of your
color image and Sepia prints a black-and-white image with a sepia tone, reminiscent
of old-time photography.
To
view the Standard Menu, press the Menu button. Options include Layout, Print
Data (On/Off), and Filter (On/Off). Select Layout and press OK. The screen will
display one possible page layout on the paper size you are using. Additional
Layout options can be viewed by scrolling through the options with the left
and right arrow buttons. Simply stop at the layout you prefer and press OK.
You will automatically return to the Standard menu. There you can opt to have
the Print Date feature On (prints the date and time on the image) or leave it
Off. Finally, the Filter feature provides two optional printing filters: B&W
(Black & White) and Sepia. B&W gives you a monochrome version of your
color image and Sepia prints a black-and-white image with a sepia tone, reminiscent
of old-time photography.Once you've selected all of your options, you can return to the Standard printing preview menu by pressing the OK/Select button. The preview will show which image you've selected and how many prints you want. Scroll to the next image, and repeat the process to prepare the next image, and so on. Once you have all of your print orders entered, you can literally "batch-process" your prints and let the printer complete your order. At any time, you can press the Menu/Print button to halt the printing process. (It may take several presses before the cancel order registers.)
Card Mode
The Card printing mode works with Olympus' special printing card stock, which is perforated to create two or four post cards, depending on the paper stock you're using. Select the Card setting on the Mode dial to bring up the selected images on the LCD preview screen. Two Size options are available: Post Card and 4 Precut. The Post Card setting accommodates two images on the page, and the 4 Precut fits four images.
Like the Standard menu, the Card menu offers Print Date and Filter options, plus it offers a Stamp feature that allows you to put whimsical icons anywhere on the print. Ten stamps are provided in the printer's memory and you can access up to 100 more on the accompanying software CD. The printer's internal stamp options include bars of music, a birthday cake, fireworks, palm trees, and more -- all accessible by scrolling through the Stamp options with the left and right arrow buttons. Once you select a stamp you like, you can set the print size (50 to 100 percent), orientation, and position on the image.
Additional stamps are downloaded by going to the Setup menu and scrolling to the Download option. You must designate the download source using the left and right arrow buttons. Choose either a USB or parallel connection and press OK. Start up the P-400 Utility software on your computer. It will give you the option of downloading Backgrounds or Stamps. When you've selected the category, you'll have the opportunity to click through all of the selections and view them in the dialog box. Click Download for those files you wish to install on the P-400.
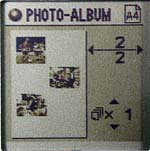
Photo-Album Mode
 |
 |
 |
The Frame feature provides seven "picture frame" options to border your images. Choices include: Off, Black Line, White Line, Shadow, Shade Off (blurs the edges of the image), Metal, and Wood. The Background feature allows you to select an image to be printed in the background of the layout. You can select from images already stored in the P-400's memory, download additional images from the Utilities CD provided with the printer, or use one of your own images once it's been processed and registered through the Background Setup feature.
To process your own images as Background images, simply select the printer's Setup mode and scroll to the Background Setup option. Select the images you want to use as backgrounds from a SmartMedia or PC card (you can also transmit them to the P-400 from your computer or CD using the Download process described in "Card Mode" above), press the Select button to confirm each one, run Background Setup Pale or Filter options to make any adjustments you may want, and press OK/Select when the background processing is complete. The menu will ask if you want to register the image. Select Yes with the left arrow key and press OK/Select again. You'll see the background go through a Registering process. When it's complete, your image will be available under the Background option of the Photo Album mode.
The P-400 also offers a Background Tile feature, which arranges small images in tile form over the entire background of the page. You can set the tiles to have the same color density throughout the background, or have the density change gradually from dark to light. The printer comes pre-loaded with five types of background tile files. As with other Photo-Album images, the background tiles can be rotated 90 degrees at a time (as long as they have not been gradated).
Index Mode
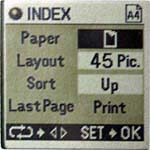 The
Index mode allows you to print a complete thumbnail index page of all the images
saved on a memory card. When you select the Index position on the Mode dial, the
image data in the card is displayed as small gray squares on the LCD panel. You
select the Paper orientation to be either vertical or horizontal. Depending on
the size of the paper and the Layout selected, each page can hold up to 260 images,
along with file names and dates (if space permits). For example, the vertical
A4 setting can hold either 45 or 260 images.
The
Index mode allows you to print a complete thumbnail index page of all the images
saved on a memory card. When you select the Index position on the Mode dial, the
image data in the card is displayed as small gray squares on the LCD panel. You
select the Paper orientation to be either vertical or horizontal. Depending on
the size of the paper and the Layout selected, each page can hold up to 260 images,
along with file names and dates (if space permits). For example, the vertical
A4 setting can hold either 45 or 260 images.The page number indicator on the preview screen reports the number of pages needed to display the index. A Sort option prints the index in either ascending (Up) or descending (Down) order, by the date and time of the images' original creation. If the index takes up more than one page, and only a few images are printed on the last page, you can program the printer to not output the last page, to save on paper and ribbon costs.
Image Adjustments
 |
 |
 |
 |
Once you've selected the paper size, printing mode, and any image adjustment options, press the Print button to begin the printing process. The Menu button cancels the print job at any point.
Printing From a PC
The P-400 accommodates both USB and parallel port cables for connection to a PC or Macintosh. Just like printing from a memory card, the Input selection needs to be set on the printer. Begin by installing the printer driver software on your computer. Connect the printer to the computer with either a parallel or USB cable (the parallel cable must be connected to the printer before turning on the computer), then turn the printer's Mode dial to Input. The LCD display will present a menu of four options: SmartMedia, PC Card, Parallel Port, or USB. Select either the Parallel or USB option. This will automatically disable the remaining printer settings, as they can now be controlled directly by the computer.
Printer functions are controlled via the printer driver software provided on the accompanying CD. Olympus' Camedia software allows you to choose the paper size (A4, A4 Postcard, A5), the number of copies, paper orientation (horizontal or vertical), print size (percent enlargement or reduction), image sharpness, and color adjustments (Gamma, Brightness, Contrast). As with the Image Adjustment options on the P-400's printing interface, adjustments can be made to individual Red, Green, or Blue color channels, or to all of three of them together. The interfaces vary between the PC and Macintosh applications, but the same options are available on both platforms. Sliding adjustment bars are provided for color adjustment. All special effects must be while printing from a computer also gives you direct access to the 100 additional Stamps on the CD, as well as a few other background selections, however, the Standard, Card, Photo Album, and Index printing modes are not available through the printer driver.
Performance
Olympus bills the P-400 as having a print time of 90 seconds. As we're finding with most printers we test though, "print time" is subject to some interpretation. (And essentially all printer manufactures choose the most wildly optimistic interpretation available.) In the case of the P-400, it appears that Olympus is counting as "print time" only the time that the print engine spends actually laying down color on the paper. No file-preparation or transmission time is included in the 90 second estimate. On the other hand, the actual print times are a lot closer to the quoted print time than those of many competing inkjet models.
In actuality, the P-400 is quite a bit faster at outputting high-quality photo prints than any inkjet we've yet seen. Printing from a host computer via the USB port requires only about 2:24 (minutes:seconds) regardless of the input image size. (Assuming a reasonably fast computer, at least Pentium-II class.) When printing from memory cards, the P-400 is actually slightly faster, at 2:14 for smaller files (digicam JPEGs). We did find that the printer slowed somewhat when we printed a 15MB RGB TIFF file from a memory card, taking a total elapsed time of 3:55. We also found the menus to be very sluggish when printing TIFFs from a memory card. This is probably not a common workflow though: People interested in printing Tiffs are much more likely to do so via the host computer than directly from memory cards. The table below summarizes the times we found for printing a couple of different file sizes from both the computer and a memory card.
| Operation |
(From Computer) |
(From Card) |
(~660KB JPEG) (From Card) |
| Spooling to Disk |
|
|
|
| Printer Start |
|
(incl. pic. select) |
|
| 1st color done |
|
|
|
| 2nd color start |
|
|
|
| 2nd color done |
|
|
|
|
3rd color start
|
|
|
|
| 3rd color done |
|
|
|
| Print finished |
|
|
|
While not quite rising to Olympus' quoted specifications, the print times achieved
by the P-400 are lightning-fast when compared to the print times of many photo-quality
inkjet printers. (Which generally have print times measured in many minutes
in their highest-quality printing modes.) Overall, the P-400 is pretty close
to as good as it gets when it comes to photo-quality print times.
Media Cost
This is an area that's difficult to evaluate accurately for inkjet printers
(due to widely varying ink coverage in different photos), but quite simple to
assess for dye-sublimation printers like the P-400. In the case of dye-subs,
the print cost is always the same, whether you're covering the entire page with
color, or just printing type. This is because dye-sub printers use an entire
"page" of their ribbon for each print, regardless of whether they're
just printing a few words of printed type or a full photograph. (The ribbon
contains enough pigment to produce the maximum black at every point of the page.
Unused dye just remains on the carrier ribbon and gets spooled onto the take-up
reel when the print is completed.)
In the past, in addition to the high cost of the print mechanism itself, dye-sublimation
printers had fairly high consumables costs as well. Dye-sub media cost has steadily
dropped over time, from the $5 or so per sheet of several years ago to an average
of several dollars today. The P-400 has assumed a leadership role in this respect
as well though, with a total per-print cost of a little under $1.80.
A per-print cost of $1.80 actually compares quite favorably with consumables
costs of typical photo-quality inkjet printers. Inkjet users frequently have
a poor sense of just what each print they make costs them, and manufacturers
have generally been reluctant to raise the issue. Beyond a cost of $1 per sheet
for the highest-grade inkjet paper (and some premium brands go higher than that),
typical ink costs for full-coverage photographs can easily run $2 or more, using
manufacturer's ink sets. (Third party inks can significantly reduce that price,
but to date we personally have had bad luck with third-party inks, clogging
the heads on two printers.) Thus, comparing manufacturer-supplied media, the
P-400 comes out looking very good relative to the photo-quality inkjets.
Print Longevity & Durability
This is a rather uncertain area, but one of great concern to our readers, thanks
in part to the bad name inkjet technology has generally gotten for itself, arising
from prints from some devices that fade noticeably in less than a year even
in brightly-lit home and office interiors. (Some excuse could perhaps be made
for fading in direct sunlight, but just hanging on the wall in a home or office?
Really!)
Dye-sublimation printers generally have somewhat more stable dye sets than traditional
inkjet printers, and some (like the P-400) also incorporate a UV-resisting overcoat
later to provide further protection. Unfortunately, there is no reliable third-party
data available yet on the P-400's print life, so we're a bit up in the air on
fade resistance. The images are quite durable though, resistant to damage through
scratching or exposure to water, thanks to the transparent overcoat layer that
the printer deposits across the entire image area of the print as a final step
in the printing process.
Bottom line, the P-400's prints are likely to be both more durable and longer-lasting
than those of most inkjet printers, but perhaps less so than the latest, pigment-based
ink sets. Overall, we'd expect P-400 prints to last about as long as conventional
color photo prints, stored under similar conditions.
Operation and User Interface
The P-400's user interface is relatively simple, though it did take some time
with the manual to completely understand the controls. (At 150 pages, this manual
uses a lot of illustrations to walk you through each function from start to
finish. We can't complain about the detail, but it was a little hard to navigate)
The black-and-white LCD panel functions well as a menu display, but having the
image previews in black-and-white was somewhat limiting, especially when we
wanted to use the image enhancement functions to tweak gamma, brightness, and
contrast.
The printer features relatively few control buttons, each of which is clearly
labeled as to its function. The only button we missed was a Cancel button to
back out of menu options. Instead, you have to turn the Mode dial to another
setting to cancel out the menu. This worked just fine once we figured it out,
but it would be much simpler to include a Cancel button. LED lamps beside the
LCD panel report what type of memory card the printer is reading, as well as
the printing and error status. The P-400 has a very informative demo mode, which
should be beneficial to first time users.
Control Enumeration
Mode Dial: Located on the far left side of the operation panel, this
dial selects the printing mode, as well as various camera settings modes. The
following options are available:
- Setup: Displays a setup menu on the LCD panel. Options are:
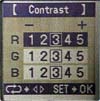
- Image Adjustment: Allows you to adjust the Sharpness, Gamma, Brightness, and Contrast of an image on a memory card. Adjustments can be made to individual Red, Green, or Blue color channels, or to all of three of them together.
- Basic Setup: Sets the printer date and time, clears all the printer settings, and offers an option to enter the printer's demo mode.
- Background Setup: Allows you to scroll through the available images on the memory card, and select one to use as the background when printing in Photo Album mode. You can also set the background image's orientation and edge format.
- Download: Downloads additional backgrounds and image stamps from a computer, via the USB or parallel port connection.
- Paper: Selects the paper size and type for printing. Choices include A4 and A5 Wide.
- Input: Selects the type of input for the printer to read from. Choices are SmartMedia, PC Card, Parallel Port, or USB. If SmartMedia or PC Card is selected, the LCD monitor displays the number of images on the card, and the number of images selected to print. When Parallel Port or USB is selected, the remaining on-printer controls are disabled.
- Picture Select: Lets you select an image on the memory card to be printed. (Press the Select button to select the currently displayed image, or use the arrow keys to scroll through images.) You can also select all images on the card. Individual images can be rotated and cropped using the arrow buttons.
- Standard: Puts the printer into Standard printing mode, which prints one or more images on a single sheet of paper. Once in this mode, you can choose the number of prints to make, as well as the layout and printing features (date stamp or filters).
- Card: Sets up the printer for printing postcards on Olympus' special, perforated paper. As with the Standard mode, you can set up the layout and various printing features.
- Photo Album: Allows you to print several images in a more creative, photo album-type format. You can select an image to use as the background, and select the placement of the other images on the page.
- Index: Puts the printer in the Index printing mode, which prints a full index of the images on the memory card, complete with filenames.
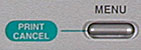
Menu/Print Cancel Button: Just beneath the LCD panel, this button accesses the settings menus when in any of the four printing modes, and also cancels printing once the printer has begun the printing process.
![]()
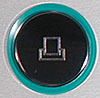
OK/Select Button: To the right of the Menu/Print Cancel button, this button confirms menu selections. In Picture Select mode, this button selects images on the memory card for printing.

LCD Adjustment Button: Calls up an LCD adjustment screen, for increasing or decreasing the brightness of the display.

Arrow Buttons: These four arrow buttons (one in each cardinal direction) are located on the right side of the LCD panel. They navigate through printer settings menus and options. The top arrow button allows you to rotate images, as well as change the number of copies to be printed.
Print Button: To the right of the arrow buttons, this very large button starts the printing process when printing from a memory card.

Power On/Off Button: Located on the bottom left of the printer's front panel, this button turns the printer on or off.
Printer Mode Menus
These menus are accessed by pressing the Menu button when the Mode dial is set to the following printing modes.
Standard Mode Menu:
- Layout:
Sets the image layout to print one or more images to a page. The number of
images varies with the paper size setting.
- Print Date: Turns the date printing function on or off. When turned on, the date and time are printed in the lower right corner of the page.
- Filter: Sets the printing filter to B&W (black-and-white), Sepia, or Off (normal color mode).
Card Mode Menu:
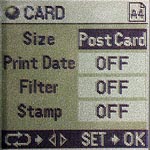 Size:
Sets the card size to Post Card (two images) or 4 Precut (four images to the
page).
Size:
Sets the card size to Post Card (two images) or 4 Precut (four images to the
page).
- Print Date: Turns the date stamp function on or off.
- Filter: Accesses the B&W or Sepia filters, or turns the filter setting Off.
- Stamp: Turns on the Stamp feature, which places a clip-art style mark on the post card. A selection of stamp themes such as birthday cakes, flowers, etc. is available. Once a stamp is selected, you can set the size, orientation, and printing position in the frame.
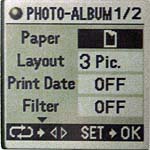
Photo Album Mode Menu:
- Paper:
Sets the printing orientation to vertical or horizontal.
- Layout: Selects the layout of the album page, with choices from one to eight images on the page, and a variety of layout options.
- Print Date: Turns the date stamp function on or off.
- Filter: Activates the B&W or Sepia filters, or turns them Off.
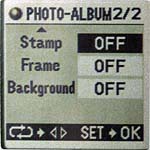
- Stamp:
Offers a variety of small theme stamps to place on the album page, from birthday
cakes to flowers to cars.
- Frame: Selects a picture frame-like border to print around the image. Choices are Black Line, White, Shadow, Shade Off (blurs the edges of the image), Metal, Wood, and Off.
- Background: Allows you to choose the background for the album page (actual image backgrounds must be set up through the Setup menu). You can also determine the background orientation and edges.
Index Mode Menu:
- Paper:
Sets the printing orientation to vertical or horizontal.
- Layout: Sets the printing layout; the number of thumbnail images varying with the paper size.
- Sort: Sorts images in ascending or descending order, by file creation date.
Picture Select Mode Menu:
- Number:
Specifies how many copies of the current image to print.
- Trimming: Allows you to crop the image by using the arrow keys to move cropping marks.
- All Select: Selects all images on the memory card for printing.
Test Results
The P-400 produced beautiful prints in our testing, easily living up to our expectations based on its dye-sublimation heritage and technology. It has been our experience that, regardless of ever-finer droplet sizes, inkjet prints are always distinguishable from photographic ones by their finish and tonality. Inkjets may boast a broader color gamut (range of reproducible colors), but they never quite convince us that they're photographs. Output from dye-sublimation printers such as the P-400 on the other hand, generally do a better job of "fooling" us into viewing them as photographic prints.
As noted, the P-400 seemed to hold very true to this heritage, producing prints with beautiful tonal gradation, and particularly delicate renderings of pastels and shades of off-white. (A particular problem area for inkjet printers.)
That said, the tonal range of the P-400 didn't extend as far into the deep blacks as we're accustomed to seeing in either photographic or inkjet prints. The three-color (cyan, magenta, and yellow dyes, no separate black) printing process of the P-400 results in blacks that are slightly murky and shallow-looking to our eye, falling short of the jet-black that we prefer.
To its credit though, while P-400 doesn't produce blacks as deep as those from some inkjet printers, it does seem to carry more color information in them. Many inkjet printers have poor black generation that tends to obscure subtle color differences in deep shadows. By contrast, the P-400 maintains very good hue accuracy all the way into the darkest shadows.
Like all dye-sublimation printers, the P-400 has a lower addressable resolution (314 dots per inch) than inkjet printers, but more than makes up for it through its ability to produce continuous-tone gradations for each color in every pixel. (Inkjet printers generally need to "dither" tiny dots of ink across a larger area to achieve smooth tonal gradations. This can lead to a graininess in highlight areas, where fewer droplets of ink are deposited.) Printing from memory cards, or from the host computer in situations where the computer image resolution exactly matched that of the print engine(314 dots per inch), image resolution was everything we could ask for: Edges of objects were rendered smoothly, and fine detail in images was crisp and sharp.
We did encounter rather anomalous resolution behavior when we printed from the
computer (either Mac or PC, we tried both) and the incoming file was scaled
to something other than the engine resolution. (Either higher or lower image
resolutions produced the same results.) When the image and print engine resolutions
didn't match, computer-generated prints showed noticeable "jaggies"
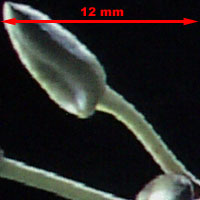
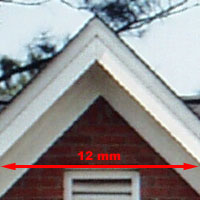
along high-contrast edges in the image. The photos below show this behavior
in two images. The image of the house is taken from the ultrahigh resolution
scan we used to produce the House poster used in our digital camera tests. For
this test, it was scaled down to 31 megabytes, a good bit more resolution than
the printer itself provides. The photo of the flower is from the ISO "SCID"
standards disk, converted to RGB via Photoshop before output, at about 15.7
megabytes, a little less than the resolution of the print engine.
 |
 |
|
|
|
 |
 |
|
|
|
|
The P-400 showed some "jaggies" when printing image files from the computer at other than the engine's native 314 dpi resolution. It didn't seem to matter whether the source images were higher or lower resolution, both conditions resulted in jaggies. Printing the same images from a memory card in standalone mode resulted in perfectly smooth edges. (Note the very large scale of these macro shots though: The jaggies are so small that it's quite likely many users wouldn't notice them.) |
|
Both of these extreme close-ups were shot with multiple close-up lenses attached
to an Olympus E-10 4 megapixel SLR we also had in-house for testing about the
same time. In both test images, there's a quite noticeable stairstep effect
along the edges of objects. This is particularly visible along the eaves of
the central dormer from the house, and along the green flower stem against the
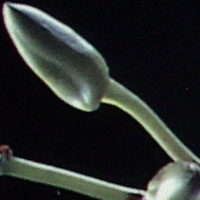
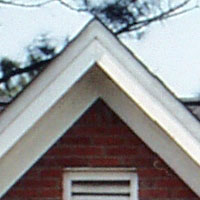
black background. This is evidently caused by the resampling algorithm used
in both the Mac and Windows printer drivers: When the image is resampled to
314 dpi in Photoshop™ first, the stairsteps disappear, as seen in the lower
set of photos. Likewise, printing the same images from a memory cards resulted
in smooth edges with no stairsteps. This is somewhat bad news for anyone wanting
to just queue up images from Photoshop and let the printer crank away: For best
results, you'll need to resample your photos to 314 dpi before printing. On
the other hand, the good news is twofold: 1) You can eliminate the stairstepping
by resampling -- There's nothing wrong with the print mechanism itself. 2) Given
that the problem appears to be in the Windows and Mac print driver software,
it's a software issue and therefore amenable to an easy fix. (Release new print
drivers.)
Colorimetrically, the P-400 seems fairly accurate, with good, accurate color, albeit not the extreme gamut of some high-end inkjet printers. Bright greens and blues are a little muted, but the overall impression is quite pleasing.
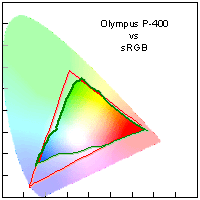
The illustration below shows a projection of the P-400's gamut map in Yxy color coordinate space onto a two-dimensional xy color plane. This gives a basic idea of how broad a range of colors a printer can reproduce, particularly in relation to the RGB color spaces employed by digital cameras and image-editing programs. In the figure, elongated colored area represents the total range of colors that can be seen by the human eye. (For the techies out there, this plot is done in the "Yxy" color space, in which equal distances correspond to equal differences in perceived color value. Thus, it fairly accurately represents the range of human vision.)
|
(Yxy perceptually uniform color space, 2D projection onto xy plane) |
|
|
|
|
| Relative to the Kodak Personal PictureMaker 200 (low-end standalone photo-grade inkjet), gamut is actually slightly larger, better in the bright reds, greens, and some blues, slightly weaker in purples and some yellow-reds. |  |
| Relative to a standard SWOP color space (standard web offset press - conventional 4-color printing presses), the P-400 shows stronger performance in the blues, much weaker in the green-cyan region. | 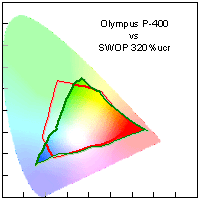 |
In each panel of the table, we compare the range of color the P-400 can reproduce with the range of another device. In the first panel, we see a comparison relative to the "sRGB" color space used by many computer monitors. In the middle panel, we compare the P-400's performance with a competing standalone inkjet printer, the Kodak Personal PictureMaker 200. Finally, in the third panel, we compare the P-400's color range with that of a commercial printing press, the so-called "SWOP" standard.
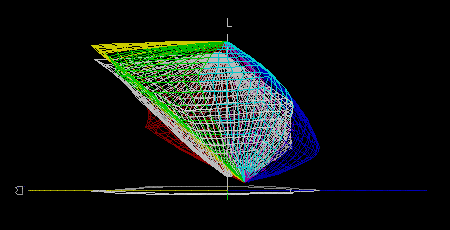
Overall, the P-400 performs very well in the two-dimensional plots, although we can see where it loses some of the bright greens and cyans, as we observed visually. It's also somewhat deficient in the extreme purples, a difficulty apparently shared with many print devices. It's important to note though, that the 2-D plot above only shows the ultimate limits of the printer's gamut, and tells nothing about how well it does across the full tonal range. If you think about it, it's obvious that color rendition will certainly vary as a function of the tone or brightness of an image. Thus, to get a really complete view of what a printer can do color-wise, you really need to look at a three-dimensional plot of its gamut.
 |
|
This is the comparison between the P-400
(colored outline) and standard SWOP (white) color gamuts, seen in 3-D
color space ("Lab" space, in this example). This view clearly
shows the extent to which the P-400's color gamut exceeds that of a
commercial-grade printing press. This is not at all unusual for a photo
printer. One aspect of the P-400's gamut plot that is significant is
the way in which the low-luminance area (bottom of the 3-D figure above)
covers a fairly broad range of chrominance values, as evidenced by the
relatively flat bottom. (Some inkjet printers tend to "neck down"
at low brightness values, due to overaggressive black generation algorithms.)
|
The illustration above shows a three-dimensional plot of the P-400's color
gamut in "Lab" color space, again with the SWOP gamut overlaid on
it. In this view, the printer's gamut is shown by the colored lines, while the
SWOP gamut appears in white. (Even animated like this, it's still hard to see
all the details of the graph: Ideally, this would be a VR object that you could
twirl around in your browser, to see it from all angles. We don't have the software
to do that yet, but as an alternative, Mac users can download the 3D
data file in Rotater
format. The freeware Rotater
program will let you view the gamut map interactively.
The 3-D plot shows just how good the P-400 is, compared to a conventional printing
press: The green/cyan limitation shows mainly in the midtone region (admittedly
an important area, for accurate rendition of sky colors), while we can now see
how much more total color "volume" is covered by the P-400 than by
the printing press. Relative to the Kodak Personal PictureMaker 200, the comparison
(not shown here) is much closer, with the P-400 winning on some reds and yellows
through greens, but losing on purples and dark green through cyan colors.
Overall, we felt that the P-400 had a surprisingly broad gamut, particularly
relative to inkjets. (It's been our impression that inkjet printers usually
outperform dye-sublimation units, although we'll know more on that score as
our printer-testing effort develops.) The colorimetric data did reflect the
weakness in midtone cyans and greens that we observed visually. (Cyan is traditionally
a tough dye color to fabricate, so this a weakness there is perhaps not hard
to understand.) All in all though, very good color.
Conclusion
The Olympus P-400 is a genuine "breakthrough" product, offering full-page
(A4) continuous-tone, dye-sublimation printing at an unprecedented price. Not
only is the printer itself inexpensive, but at $1.80 per full-size page, the
media cost is lower than we've seen before as well. Considerably faster than
typical photo-quality inkjet printers operating in their "high quality"
modes, the P-400 looks like a good choice for professionals or advanced amateurs
looking for high-quality continuous-tone photo printing.
Overall, the Olympus P-400 is a versatile, relatively easy-to-use printer that
outputs excellent quality images. We loved being able to print directly from
any type of memory card, and the ability to choose from an wide range of page
layouts and creative options. The built-in color adjustment and B&W and
Sepia filters are nice, but the monochrome LCD limits the image enhancement
capabilities when working directly from a memory card. If you have the P-400
connected to a computer, the color enhancement capabilities provided with the
printer driver will allow you to make fairly accurate adjustments (provided
the computer monitor and printer are calibrated with respect to each other),
with on-screen sliders for Gamma, Brightness, and Contrast control. In our tests,
the P-400 was much faster when printing uncompressed TIFF images from the host
computer, since the computer's CPU took care of the processing load. (Camera
JPEGs were about equally fast from card or computer.)
As a standalone unit, the P-400 provides a lot of creative options, but those
options aren't mirrored in the host-computer driver software. Connected to the
computer, it becomes a generic (albeit, high-quality) dye-sub printer, providing
only standard printer driver functions. It would have been nice if Olympus included
some of the creative options in a separate image manipulation software package,
so users could achieve the same level of creativity when working from the computer
as they can when working off a memory card. For this version anyway, users will
have to rely on their own print manipulation programs and plug-ins to be creative.
This printer is well suited for advanced amateurs and serious photographers
who are interested in producing more than a standard 4 x 6-inch print, as well
as small business owners or government offices that need to supply high-quality
product shots, portfolio images, real-estate photos, short-run promotional pieces,
or photographic records. Overall, we were very impressed with its performance,
versatility, and print quality.
For More Info:
View the Olympus
homepage for the P-400
Back to the Imaging Resource Digital Cameras Page
Or, Return to the Imaging Resource home page.