| Polaroid SprintScan 4000 Scanner Software Information Polaroid's 4000 dpi scanner has resolution to spare, and fast operation to boot. (Review first posted 05/31/2001) |
PolaColor Insight Software Interface
(NOTE: All the screen shots shown here are reduced to 75% of actual size,
to save room in the layout, and help everything fit in the browser window. Clicking
on any image with a blue outline around it will show you the original screen
shot at full size.)
 Preview
Panel
One thing we enjoyed about the PolaColor Insight software interface is that
all of its features are clearly labeled, with no strange icons or buttons to
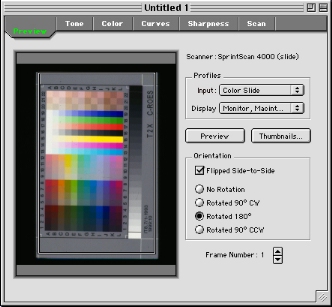
decipher. Launching PolaColor Insight displays the Preview panel, where you
can preview the image, as well as access all of the available settings menus.
A series of subject "tabs" line the top of the Preview panel, providing
access to the Tone, Color, Curves, Sharpness, and Scan image adjustment panels.
In addition to the image preview area, the Preview panel also provides a few
basic settings, such as the film type, display, and orientation of the preview
image. In the Profiles box of the panel, two drop-down menus designate the Input
and Display profiles for the scan. Under the Input profile, you can select the
type of film to be scanned, with a wide array of available film types (including
a range of Agfa, Kodak, and Fuji custom profiles). The Display profile designates
the type of monitor that the scan will be viewed on, and you can create a customized
profile if your monitor is already calibrated to a particular software application.
Two buttons are in the center of the Preview panel, which control these functions:
- Preview: Prescans the image, automatically calibrating the preview display.
- Thumbnails: Creates a thumbnail index prescan of the entire filmstrip or of all the slides in the carrier.
The Orientation box allows you to rotate or flip the preview display clockwise or counterclockwise, and a set of up and down arrow buttons at the bottom of the panel scroll through the prescans of each image in the film tray.
You also have the option to crop the scanning area within the preview window. Positioning the mouse over the prescan image turns the cursor into a marquee tool, allowing you to click and drag the mouse to define the crop area.
 Tone
Panel
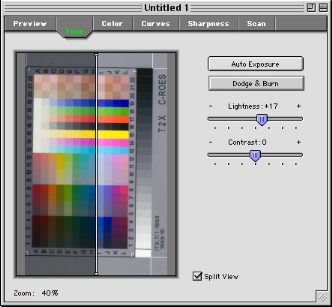
The Tone Panel is the first in the series of adjustment panels. In each adjustment panel (Tone, Color, Curves, or Sharpness), you can enlarge the prescan view by double-clicking anywhere in the image. To zoom back out, either hold down the Options key (for Macintosh users) or the Control key (for Windows users) while clicking on the image. A zoom percentage is reported at the bottom of the image preview area.
The Tone panel provides a series of adjustments controlling the overall image lightness and contrast. In all of the adjustment windows, PolaColor Insight provides a Split Screen view (available by clicking on the selection box below the view), which we found quite helpful when making adjustments. One side of the view shows the image before the current adjustment and the other shows the effect of the adjustment you're making. The Split Screen only shows the difference from one adjustment to the next, not the difference between the original image and the last adjustment.
Two automatic adjustment buttons dominate the top right corner of the Tone panel, with the following functions:
- Auto Exposure: Assesses the image and automatically makes any tonal adjustments that the software deems necessary.
- Dodge and Burn: Adjusts the image contrast within the brightest and darkest points.
Two slider bars provide manual lightness and contrast adjustments, with the
amount of change numerically reported at the top of each bar. We found that
the Auto Exposure tool made our images slightly dark, requiring us to switch
over to manual control, which did a much more accurate job.
 Color
Panel
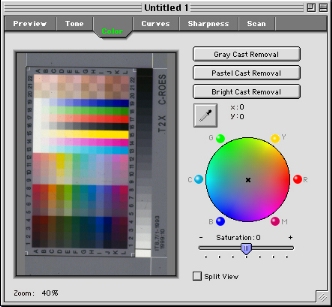
The Color panel allows you to tweak the overall color balance of the image by
removing color casts or manually adjusting the color balance by adding or subtracting
colors. Three buttons in the top right corner of the panel determine the neutral
value of the image by calculating pixels in one of the following methods:
- Pastel Cast Removal: Analyzes all of the lighter, or pastel, pixels in the image to determine the neutral gray.
- Gray Cast Removal: Determines the neutral value based on the average value of all pixels in the image.
- Bright Cast Removal: Bases the neutral value on the brightest pixel in the image.
We didn't really notice much of an effect when using any of the automatic adjustment
tools. Using the gray eyedropper to manually select the neutral tone also failed
to fully neutralize the color cast. That said, the color wheel adjustment provided
slightly better control. By clicking and dragging the target in the center of
the circle, you can add or subtract cyan, magenta, yellow, red, green, or blue
color casts. We found this tool more effective than the automatic controls,
as it provides a finer adjustment. Once you've corrected the color cast, the
final step on the Color panel is to set the saturation level, via the Saturation
slider bar. Dragging the slider all the way to the left position converts a
full color image into black and white monotones ("B&W" appears
over the slider bar instead of a numerical value).
 Curves
Panel
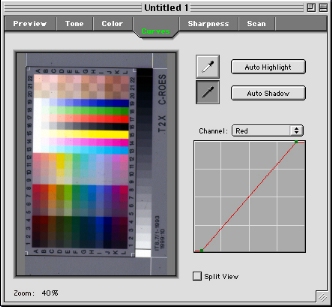
The Curves panel allows you to set specific white and/or black points, adjusting
the tonal range of the image. Setting the white point brightens any muddy highlights,
while setting the black point increases overall image contrast and can increase
shadow detail. As with the other adjustment panels, the Curves panel features
automatic adjustments for highlight and shadow values, in the form of two buttons:
- Auto Highlight: Automatically selects the brightest point in the image and assigns it a numerical value of 255.
- Auto Shadow: Assigns the darkest point in the image a numerical value of zero.
We noticed that the Auto Highlight function produced slightly bluish results
in our testing, seeming to overcorrect somewhat in the direction of boosting
blue in the highlights too much. We found more accurate results with the black
and white eyedropper buttons, which allowed us to manually set the white and
black points. Though these selections weren't 100 percent accurate, they did
get us closer to the actual value. We found the most accurate adjustment when
we set points on the curve itself. You can add as many points as you need to
the curve, clicking and dragging each point to control the overall tonal range,
and to produce virtually any shape tone curve you want. A Channel drop-down
menu lets you adjust white and black points for each of the RGB channels individually,
or for all three channels together (labeled "Master"). You can reset
the curve to its neutral position by selecting "Reset Curves" from
the shortcut menu.
Histogram Window
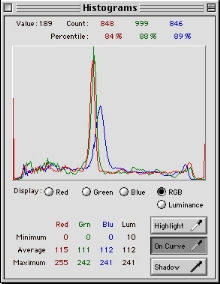 The
Histogram window is automatically displayed when PolaColor Insight is launched
(you can also call it up through the Edit pulldown menu). The histogram displays
the tonal distribution of the image in the form of a graph, for the Red, Green,
and Blue channels individually, or all three together. The horizontal axis of
the graph measures the pixel brightness level range (from zero to 255), while
the vertical axis counts the number of pixels at each brightness level. In addition
to the RGB channels, the histogram also reports the overall luminance of the
image. A series of numbers at the bottom of the graph reports the minimum and
maximum values of the RGB channel or luminance.
There are eight labeled buttons in the Histogram window:
- Red: Displays the distribution of tones for the red channel.
- Green: Shows the tonal distribution of the green channel.
- Blue: Changes the histogram to report the tonal distribution of the blue channel.
- RGB: Shows tonal distribution for all three channels.
- Luminance: Reports the luminance levels for the entire image.
- Highlight: Converts the cursor into an eyedropper, allowing you to pick the area of an image to set as the highlight.
- On Curve: Also uses an eyedropper cursor to transfer a point from the histogram to the tone curve.
- Shadow: Uses the eyedropper cursor to select the darkest point in the image.
The Highlight, Shadow, and On Curve eyedroppers are only available when the
Curves panel is active. The black and white eyedroppers also allow you to set
the highlight and shadow points in the image. This time, however, you can set
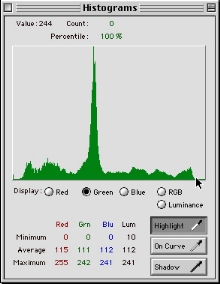
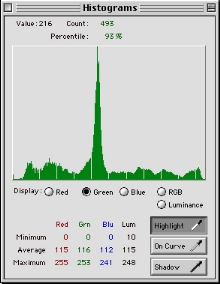
them by looking at the histogram information. In the histograms below, we corrected
the green channel by using the eyedropper to select the point where image information
actually begins. This corrected the tonal range of the image, and brightened
the highlights to the correct level. Though we were able to make reasonably
accurate adjustments with the eyedropper tools, we'd like to see a way to define
the selection area for each eyedropper with an adjustable sample size. Because
of some slight noise in the image, we kept getting a variety of readings within
the same general area. (It would have been helpful to have the eyedropper tool
average values across a group of adjacent pixels.)
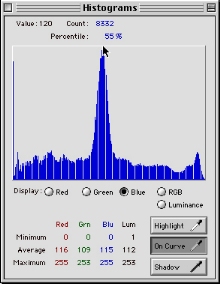
The histogram tool is great for setting highlight and shadow points, but you'll
need to resort to the Curves tool for adjusting midtone values. This is where
the "On Curve" button comes into play. In our sample image here, we
noticed that the large peak for the gray background was offset in the blue channel
relative to the red and green. - Since a neutral gray would have equal amounts
of red, green, and blue in it, we wanted to shift the blue values in the midtones
downward somewhat.
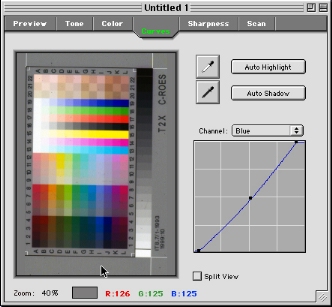
To bring the blue channel back in line, we switched to the blue channel display
and selected the peak blue point in the histogram, which placed a point on the
tone curve. We adjusted the blue channel by dragging the point on the curve
until the blue spike in the histogram fell in line with the red and green spikes.
Switching between the curve and histogram displays like this could be a little
confusing, but once you've played with the controls a bit, it gets pretty straightforward.
We liked the ability to place points on the curve tool based on what we were
seeing in the histogram display.
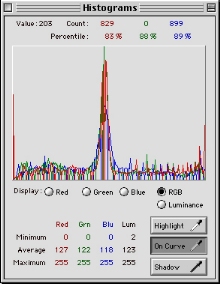
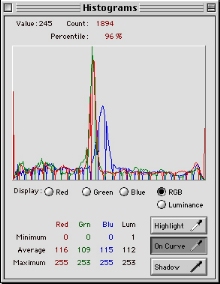
The histogram at right shows the corrected RGB channels, with the midtone peaks
back in alignment. Bringing all three channels in line gave us a more accurate
neutral gray, which meant the excess blue appearing across the image's midtone
areas was eliminated.
 Sharpness
Panel
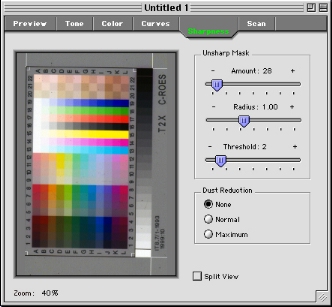
We were impressed with the Sharpness panel, which offers fairly flexible control
over the overall image sharpness. Three slider bars in the Unsharp Mask box
control the Amount, Radius, and Threshold of the effect. This will be very familiar
to users accustomed to Adobe Photoshop's(tm) unsharp masking control. The Amount
slider bar controls the degree of sharpening, with a higher numerical value
producing a stronger effect (the numerical value is reported over the right
side of the bar). The Radius slider bar designates how many pixels are evaluated
at a time during the Amount adjustment. A larger radius means that wider areas
on either side of edges in the image will be affected. Finally, the Threshold
slider bar sets the amount that an individual pixel's value must change relative
to its neighbors before the sharpening algorithm will be applied. For example,
setting the Threshold slider bar to zero disables the Amount and Radius bars
entirely.
Also part of the Sharpness panel, the Dust Reduction tool attempts to remove
the effects of dust particles or light scratches, with intensity settings of
None, Normal, or Maximum. Dust Reduction is definitely not suited for significantly
damaged film, as we didn't find the adjustment very effective in our testing.
We also felt that the image quality was degraded significantly when dust reduction
was applied. - For users of the SprintScan 4000, we'd just recommend that you
take care to clean your slides and negatives thoroughly before scanning them.
 Scan
Panel
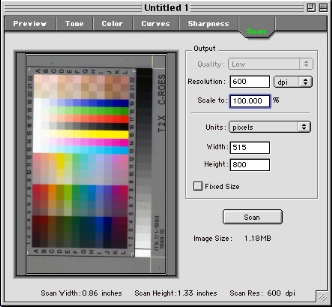
The final adjustment panel is the Scan panel, which completes the scanning process.
On this screen, you can specify the scanning resolution, in lines per inch (lpi)
or dots per inch (dpi), and the scale of the image. You can set the dimensions
of the final image in pixels, inches, picas, centimeters, or points. A Quality
drop box is available when scanning in the lpi mode, with choices of High, Normal,
and Low. You can also redraw your crop lines in the image preview area if needed.
There are only two buttons on the Scan panel, which perform the following functions:
- Fixed Size: When selected, automatically adjusts the Scale input to match the selected image size.
- Scan: Performs the final image scan, applying any adjustments made
through the prescan process.
Pull-Down Menus
PolaColor Insight features a straightforward set of pulldown menus, arrayed
across the top of the application window.
 File
Menu:
- Name Job: Names the current scan.
- Import Settings: Allows you to import saved image adjustments and apply them to the current scan.
- Export Settings: Saves the current set of image adjustments for use on other scans.
- Quit: Closes the application.
- Undo: Cancels the most recent image adjustment.
- Redo: (Windows only) Restores the previously canceled image adjustment.
- Cut: Cuts out the selected area, and temporarily stores it on the Clipboard.
- Copy: Makes a copy of the selected area in the image.
- Paste: "Pastes" in either the copied or cut image data, into the current prescan image.
- Select All: (Macintosh only) Selects the entire image area, allowing the full area to be manipulated.
- Show Histograms: (Macintosh only) Activates the Histogram window.
- Reset All Image Correction Tools: Returns all of the image adjustments to their default settings.
- Zero All Image Correction Tools: (Macintosh only) Sets all the adjustment values to zero.
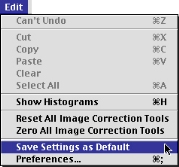
- Save Settings as Default: (Macintosh only) Saves the current image adjustments as the default, so that they are recalled whenever PolaColor Insight is launched. The only complaint we have here is that you can only save one set of settings, typically the last set used. This prevents you from saving a series of adjustments in the order that you made them. One workaround is the AppleScript utility, which allows you to set up a variety of adjustments, useful in batch scanning.
- Preferences: Displays the Preferences window, described further down.
- Current Scanner List: Displays a list of all SCSI scanners connected to the computer.
- Find Scanners: (Macintosh only) Searches for all connected SprintScan scanners.
- Show All Scanners: (Windows only) Searches for all connected SprintScan scanners.
- Update Film Carrier: Resets the Frame Number box to "1" when the film tray has been reinserted into the scanner.
- Eject Film: Ejects the film carrier from the scanner.
 Scripting
Menu (Macintosh systems only)
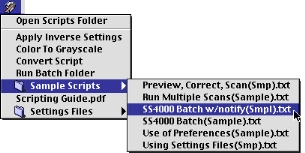
- Open Scripts Folder: Opens the Scripts folder, allowing you to add or delete commands.
- Apply Inverse Settings: PolaColor Insight script that automatically applies the opposite of the current settings to the image.
- Color to Grayscale: Converts a color image to grayscale.
- Convert Script: Allows you to change a preset PolaColor Insight script.
- Run Batch Folder: Sets up PolaColor Insight for batch scanning.
- Sample Scripts: A list of preset AppleScripts for use with PolaColor Insight, which can be customized.
- Scripting Guide: Pulls up a set of instructions for creating scripts.
- About Balloon Help: (Macintosh only) Displays the version information for Balloon Help.
- Show Balloons: (Macintosh only) Displays the Balloon Help balloons, or text windows, which explain settings and controls whenever the cursor is held over the item.
- PolaColor Insight Help: (Macintosh only) Launches Adobe Acrobat Reader and the PolaColor Insight User's Guide.
- View SCSI Bus: (Windows systems only, item appears on Apple menu on Macintosh systems) Displays the SCSI information about the current scanner.
- Help Topics: (Windows only) Displays the online help tabs and index.
- Tip of the Day: (Windows only) Shows a PolaColor Insight scanning tip.
- Product Support on the Web: (Macintosh only) Connects to the Polaroid website via the Internet to find product support and information.
Preferences Window
Accessed through the Edit pulldown menu, the Preferences window allows you to
change parameters for the image adjustment tools, as well as for the software
itself.
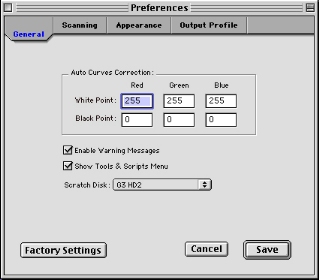 Like
the main PolaColor application window, the Preferences window features a series
of subject tabs, which access a variety of adjustment panels. The first of these
is the General panel, which allows you to change the numerical values of the
Auto Curves Correction (which automatically adjusts the tone curve of the image).
You can change the default highlight and shadow values for each of the red,
green, and blue channels (defaults are 255 for highlight and 0 for shadow).
You can also turn on the warning message function (which warns of any adjustment
or software errors), activate the Tools and Scripts pulldown menus, and specify
the scratch disk. At the bottom of the panel are three buttons, which appear
at the bottom of each of the Preferences adjustment panels:
- Factory Defaults: Resets panel settings to their defaults.
- Cancel: Cancels the adjustment and closes the Preferences window.
- Save: Saves the adjustment and closes the Preferences window.
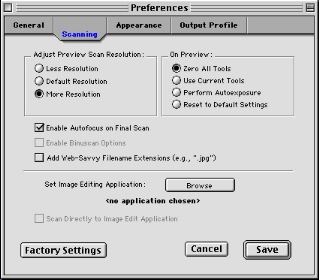 Next
is the Scanning panel, which adjusts scanning parameters. At the top of the
panel are two boxes, one for adjusting the resolution of the preview scan, and
one for setting specific actions to occur as the prescan is created. Preview
Resolution options include Less Resolution, Default Resolution, and More Resolution.
The higher the resolution setting, the longer the prescan will take. Even with
the preview resolution set to More Resolution, it still didn't seem high enough,
making it difficult at times for us to precisely set the highlight and shadow
points. The Preview pushbuttons include Zero All Tools, Use Current Tools, Perform
Autoexposure, and Reset to Default Setting actions, depending on what you want
to occur when the preview is created.
Below the adjustment boxes are three more pushbuttons, the first of which enables
the scanner's autofocus mechanism to automatically adjust each preview image.
You can also enable the Binuscan Options and activate a utility that automatically
adds "web-savvy" extensions to filenames, such as ".jpg."
(Binuscan options work in conjunction with Binuscan ColorPro, a separate software
application that automatically processes the color of scanned images.) The Set
Image Editing Application tool allows you to specify an imaging program to use
when viewing the scanned image, such as Adobe Photoshop. You can also set the
software to automatically scan the image into the editing application.
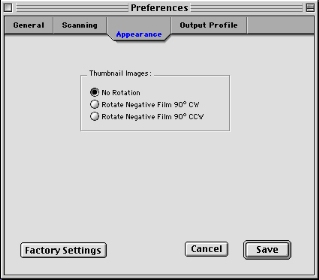
The Appearance panel controls the appearance of image preview thumbnails, allowing
you to control the rotation (either 90 degrees clockwise or counterclockwise)
of the thumbnails.
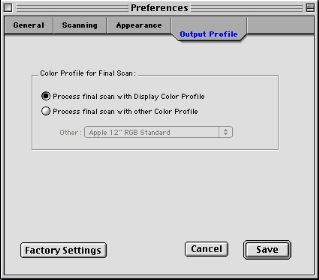
The final panel of the Preferences window is the Output Profile panel. Here,
you can define the color space for the scanned image, with a list of color profiles
available to choose from. We noticed that you must have a color profile selected
to run the scanner software, meaning there's no avoiding color management. (Perhaps
either good or bad, depending on your philosophical bent about such things.)
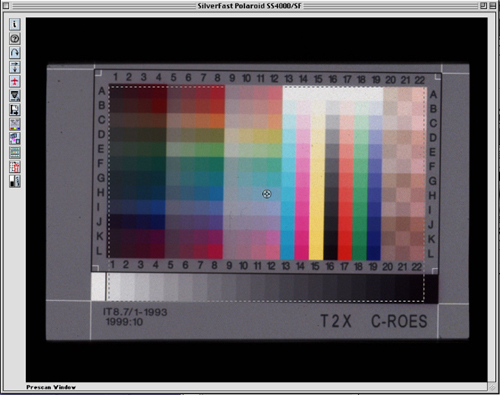
The SilverFast Ai (version 5) software (b LaserSoft) runs as a Photoshop plug-in and provides more extensive control over the SprintScan 4000. Because SilverFast Ai offers both RGB and CMYK adjustment modes, it's better suited to prepress applications. To access it launch Photoshop, select the Import option of the File pulldown menu and choose "SilverFast" from the list. The Main Scan window, preview area, and Scan Pilot window automatically display on the desktop.
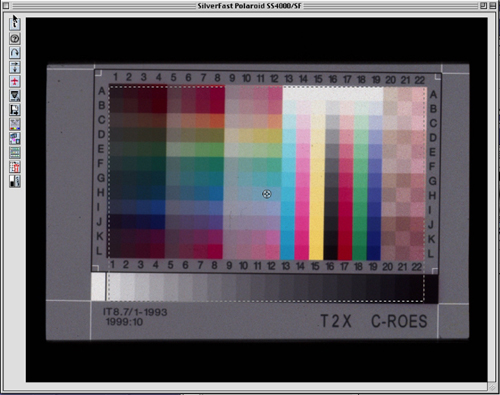
SilverFast Ai offers excellent color management, with an IT-8 calibration utility that calibrates the scanner to the standardized IT-8 test target. We tested this feature and achieved very good results, although we noticed that the calibration tool was a little picky: The IT-8 target has to be horizontal in the image preview area, as the software isn't capable of recognizing it if it's rotated vertically.
Main Scan Window
(As before, note that all these screen shots are shown at 75% of actual size. Clicking on any image will produce a full-scale version.)
The Main Scan window is the base of SilverFast Ai's operations, holding two control panels and a host of adjustments and tools. Across the top of the window is the tools palette, which accesses a variety of SilverFast Ai functions (which will be discussed in further detail later on):
- Zoom (magnifying glass icon): Enlarges the preview image.
- Auto-Adjust (aperture icon): Automatically sets the highlight and shadow points for CMY, and removes any color cast.
- Histogram (graph icon): Displays a histogram of the tonal range of the prescan image.
- Gradation Curves (line graph icon with points): Corrects the tonal values for RGB or CMY curves.
- Color Balance / Global Color Correction (color wheel icon): Corrects the color balance of the image, with additive or subtractive colors.
- Selective Color Correction (triangle gradient icon): Enables the user to control the tone of individual colors (red, green, blue, cyan, magenta, or yellow).
- Highlight and Shadow (eyedropper icon): Allows the user to set the highlight, shadow, and midtone points individually.
- Expert Dialog (graduate icon): Displays all the numerical values of each image adjustment, which can be corrected.
On the far left side of the tools palette is a small arrow that controls the rest of the display in the Main Scan window, hiding or showing the two available adjustment panels.
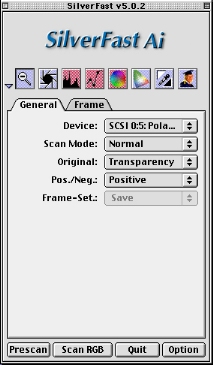
The first adjustment panel is the General panel, which features four basic scanning parameters, set via drop-down menu buttons:
- Scan Mode: Specifies Batch or Normal scanning.
- Original: Indicates the type of media being scanned, with options of Reflective, Transparency, or Document Feeder (requires document attachment).
- Pos./Neg.: Establishes whether the media is positive or negative.
- Frame-Setting: Allows you to import preset frame parameters, or save the current ones.
The Frame panel provides slightly more detailed adjustments. At the top of the panel are four drop-down menu buttons:
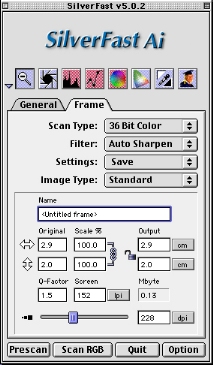 Scan
Type: Controls the color depth of the scan, with options of 36-Bit Color,
12-Bit Grayscale, 1-Bit Line Art, 48-Bit RGB, and 16-Bit Grayscale. The 48-Bit
RGB setting records a raw data file in the High Dynamic Range (HDR) format,
meaning that the file contains the full dynamic range of the scanner. This
is a useful option in that a less experienced user could perform the scanning,
leaving the image adjustment to a more experienced user in Photoshop.
- Filter: Selects from a number of preset image sharpness filters, including None, Less Auto Sharpen, Auto Sharpen, More Auto Sharpen, Unsharp Masking, and Descreening. We found Unsharp Masking to be an effective tool for adjusting the overall image sharpness, as it provides a great deal of control over the process. Once the filter has been selected and the prescan is complete, clicking the mouse over a point in the prescan pulls up another preview window, with an enlarged image of the selected area. From here, you can control the Intensity, Threshold, Light and Dark Contour, Shadow Softness, etc.
- Settings: Allows you to import saved image adjustment settings to apply to the prescan image.
- Image Type: Selects from a range of image types, which are intended to enhance the performance of the scanner. Available image types are Standard, Landscape, Skin Tones, Gold Tones, Technic, Evening, Snow, Night, H&S Cast, Highlight Cast, and Shadow Cast.
Also in the Frame panel are a series of image size adjustments, allowing you to set the size of the original media being scanned, the output size, the scale, quality, dot screen, output file size, and the file name. You can also specify whether the dimensions are measured in inches, picas, pixels, etc., and whether the resolution is measured in dots per inch (dpi) or halftone lines per inch (lpi). A slider bar at the bottom of the panel controls the scan resolution, which is reported in a small box directly to the right of the bar. You can set the image dimensions by typing the measurements into the text boxes, or by using the mouse to select an area in the image. The dimensions of the selected area are then reported in the text boxes. Clicking on the Lock button keeps the image dimensions proportional as they increase or decrease.
At the bottom of the Main Scan window are the following buttons:
- Prescan: Performs a prescan of the image, displaying a lower resolution image preview in the preview window. (We noticed that SilverFast Ai's prescan is a little slower than the PolaColor Insight prescan.)
- Scan: Scans the image at the resolution set in the Frame panel.
- Quit: Closes the SilverFast Ai windows, returning the user to the main Photoshop screen.
- Option: Displays the Preferences window, which adjusts default settings such as color profiles, the radius of the Densitometer cursor, and color management defaults. Many of these adjustments are more complex than what the average user will need to manipulate, but are very detailed and useful for prepress professionals.
 Scan
Pilot Window
The Scan Pilot Window is essentially a reference tool, illustrating the scanning process step-by-step. You can use the Scan Pilot for quick scans that don't require much adjustment, as it guides you through the basic scanning process, complete with automatic image adjustments. Three buttons at the bottom of the window control the following functions:
- Play Button (green triangle icon): Navigates through the scanning process, allowing you to start the prescan, select the frame number, perform automatic adjustments, and perform the final scan.
- Stop Button (red square icon): Pressing this button stops the Scan Pilot process, allowing you to take over the image adjustments and scanning process.
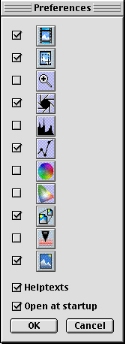
- Prefs Button: Allows you to expand the tools used by the Scan Pilot. You can add or delete adjustment options by checking or unchecking the box. Turning on Helptexts displays abbreviated explanations of an icon or utility as you hold the mouse over it.
 Densitometer
Window
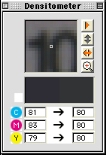
We found the Densitometer window to be a very useful tool, as it reports the RGB, HSL, CMY, LAB and CMYK, K, or LCH values of any point in the image preview area. (A CMY display is shown here.) The values change as the mouse moves over the preview area. Two columns of numbers are reported in the window, the right column reporting values before an image adjustment and the left column reporting the values after the adjustment. A series of buttons down the right side of the Densitometer preview window controls the movement of the selected point.
 Histogram
Window
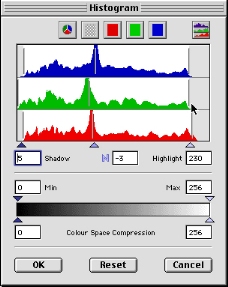
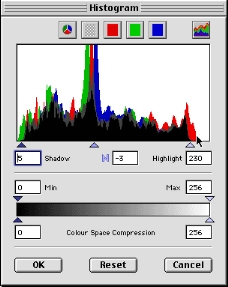
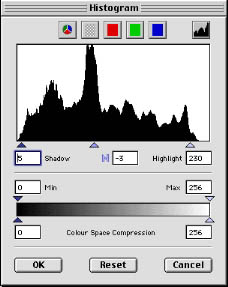
Clicking on the Histogram tool button at the top of the Main Scan window pulls up the Histogram window, which reports the tonal distribution of the image in a graph format. A series of buttons across the top of the histogram window select the type of display:
- CMYK / RGB Selector (pie-chart icon): Switches between CMYK and RGB modes.
- Grayscale (gray box): Displays the grayscale histogram.
- Red, Green, and Blue (or Cyan, Magenta, and Yellow) Channel Buttons: This series of three buttons controls the channel display of the histogram.
- Histogram Display Button: Cycles through the available histogram
displays shown below.
Three sliding triangles on the bottom of the histogram allow you to set the shadow, midtone, and highlight points individually, the numerical values of which are reported in the three text boxes below the triangles. You can use the histogram in conjunction with the Densitometer to fine tune the triangle points. Holding down the Shift key while clicking on a specific point in the image window fixes the Densitometer measurement to that point. As you change the positions of the highlight, shadow, and midtone triangles in the histogram, the Densitometer reports the numerical changes and shows a before and after preview of the selection.
The Color Space Compression slider bar allows you to adjust the tonal range even further by moving the highlight and shadow ends. As the slider points move inward, the tonal range of the image is redistributed to fit within the compressed color space. This is a great tool for prepress uses, as most presses cannot reproduce the full tonal range of an image. Color Space Compression allows the user to limit the highlight and shadow maximum levels, depending on the requirements of the press used for the final output.
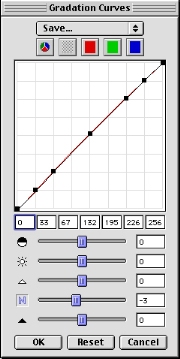 Gradation
Curves Window
Accessible from the Main Scan window by clicking on the Gradation Curves button (indicated by a line graph with points), this adjustment window controls the overall brightness and contrast of the image, as well as the intensity of the highlight, midtone, and shadow values. Just like the Histogram window, the Gradation Curves window features a row of buttons at the top, which indicate the channel being displayed. The same options are available, with Grayscale and either Red, Green, and Blue channels or Cyan, Magenta, and Yellow channels. Just above these buttons is a drop-down menu button, which allows you to save a custom set of curves, or open a previously saved set.
The Curve display shows the distribution of tones for the selected channel, with the numerical values of each point reported along the bottom line of the graph (from zero to 256 for RGB and from zero to 100 for CMY channels). Five slider bars below the graph provide the individual adjustments for overall contrast, brightness, highlights, midtones, and shadows. The amount of adjustment is reported on the far right side of each slider bar in numerical values. The Reset button at the bottom of the window resets all curve settings to their defaults. In addition to the slider bars, you can also adjust the curve by clicking points and moving them. Or, you can make small numerical adjustments that would be difficult to manage with the sliders by typing the appropriate values into the text boxes next to the slider bars.
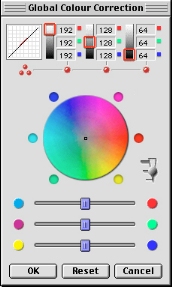 Global
Color Correction Window
The overall color balance of an image is corrected through the Global Color Correction window, called up by clicking on the color wheel button in the Main Scan window. The Global Color Correction window features three methods of altering the color balance, by adjusting the range values for individual colors, by moving the center target in the color wheel, or by sliding the adjustment bars at the bottom of the window. The top input boxes report the values of the highlight, midtone, and shadow points of the Red, Green, and Blue channels (or the Cyan, Magenta, and Yellow channels). A mini-curves graph in the top left corner of the window plots the changes.
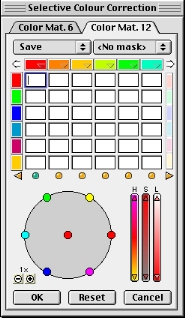 Selective
Color Correction
This is an adjustment panel that we found very useful and effective. The color gradient triangle button on the Main Scan window pulls up the Selective Color Correction window, which provides finely-tuned color control by altering the colors within a color. For example, you can control the amount of blue in a red tone, or cyan and yellow in a green tone. Two adjustment panels within the window control the color matrix, allowing you to correct either six or 12 colors. The 12 color matrix not only adjusts red, green, blue, cyan, magenta, and yellow, but also halftones such as violet.
At the top of both panels is a type of color chart. The colors extending horizontally across the chart are the colors available for adjustment. Those extending vertically down the chart represent the colors that can be adjusted within a color. You can type in numerical values in the input boxes (such as "+ 5" to the cyan field of the magenta row), or scroll over particular points in the image to check the numbers that are reported. If you want to adjust a particular color in the image, click on that color. The input boxes and color wheel reflect the values of that individual color. To adjust the color using the color wheel, you click on the color you want to add or subtract, and drag the cursor towards the center target or away from it.
In our example, we wanted to deepen the red of the test target. (It seemed
a little yellowish and washed out in the preview above.)
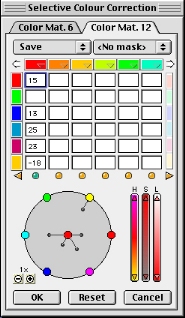 We
decreased yellow, while adding cyan, blue, magenta, and red.
The three slider bars in the lower right corner of the window control Hue, Saturation,
and Luminance. Sliding any of the bars adjusts the parameter for a selected
color. You can adjust all colors at the same time by holding down the Command
and "A" keys on the keyboard, which selects all colors in the matrix.
There's also a zoom control in the lower left corner. This control increases
or decreases the sensitivity of the "color wheel" display in showing
color adjustments. - The lines radiating out from the center show how much of
each primary color is being added to or subtracted from the color being manipulated.
(In the diagram above, the red color is having varying amounts of cyan, blue,
magenta, and red added to it, while yellow is being subtracted.) The length
of the "spokes" shows how much of each color is being added or removed.
The zoom control changes the scale of these spokes.
The Save drop-down menu button at the top of the window allows you to save a
set of color adjustments or load color correction presets.
Our adjustments deepened all of the red tones throughout the image. (Overdoing
it a little, had this been a "real" scan, but we wanted the effect
to be easily visible.)
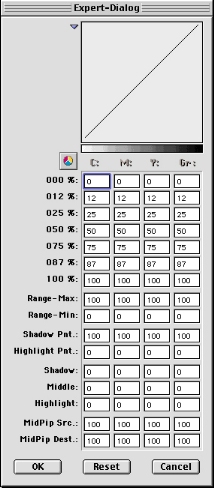 Expert-Dialog
Box
The final button in the toolbox palette of the Main Scan window is the Expert-Dialog
box, which displays all of the image adjustment values set during the prescan
process. Parameters can be checked and edited, with the Cyan, Magenta, Yellow,
and Gray channels reported. The first seven rows of numbers report the gradation
values, followed in the next two rows by the color space compression values.
The remaining rows report information about the highlights, shadows, and midtones.
We don't expect the average consumer (or even pro photographer) to use the Expert-Dialog
box much, but would be a useful editing tool for professionals working in a
prepress environment.
Want more information on the scanner? Get it below!
Main - Software - Sample Pictures
