FASTER, MORE EFFICIENT
DxO Updates Optics Pro
With Faster Processing, Simpler Workflow

By MIKE PASINI
Editor
The Imaging Resource Digital Photography Newsletter
Review Date: November 2011
Just a few months ago in June, DxO unveiled Optics Pro 6.6 to the world just as we were touching up our review of v6.5.
We had a hard time catching up to them then and it isn't getting any easier. This time the French firm has jumped to v7 with some impressive improvements:
• Faster processing speed, particularly for Raw images
• Image management features
• Simplified workflow
• Improved lens softness correction
• Improved saturated color protection
Along with those have come improved stability and more camera modules joining features we've long appreciated in Optics Pro, including its Raw converter, noise removal, single shot HDR exposure control, optical corrections, color control and the DxO FilmPack plug-in.
After updating our FilmPack review to cover the company's earlier release of v3.1 (these guys must never sleep), we installed a beta copy of Optics Pro 7 a few days ago and gave it a whirl. Or it gave us a whirl, we should say.
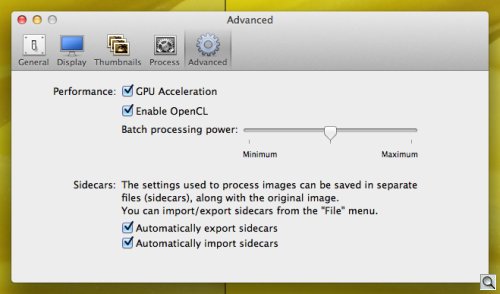
The previous version already tapped into GPU processing to speed things up, but DxO rewrote 50 percent of Optics Pro to optimize the code, implementing some of it in Open CL, which uses the graphics processing unit for non-graphical computing.
That, the company said, had two benefits. It improved stability and it sped up processing by a factor of four. Those are two things you'll actually notice.
It's particularly obvious with Raw processing. Applying a Preset to an image is observably faster.
The very first time we ran v7, we hadn't set the Preference to use Open CL processing (in fact, for some strange reason it was grayed out). Changing presets seemed to start around 80 percent done in the little dialog box Optics Pro flashes over the image.
Then we enabled Open CL and we no longer got the dialog box. OK, once on a NEF (the first time we applied a preset to any NEF, we had a delay slight enough to pop the dialog box on the screen for a second). Never on an ORF.
IMAGE MANAGEMENT | Back to Contents
The new image management features threw us at first. We stumbled around the interface looking for a way to import an image. The old Select button was gone.
Instead, a popup in the right column lets you select Folders to navigate for images. You can alternately create Projects in that column, too.
And you can not only create but also rename, move and copy images organized in Optics Pro. You don't have to jump to the operating system for those services any more.
Clicking on a folder in the right panel shows its contents in the filmstrip panel along the bottom. Click on an image for direct access to it.
A contextual menu available from the image allows you to rename it on the disk, create a virtual copy, perform common operations like rotation or even process it.
Projects have some unique advantages. You can organize your images logically (by project or client job) rather than by filename or camera or whatever your disk hierarchy is. You can apply different sets of corrections to the same image. Projects also track history.
But with Optics Pro 7, you have the much simpler direct access to images and even drag-and-drop simplicity, as DxO explains on its site.
You don't usually see a workflow concept reworked like this. Developers tend to remain devoted to their original conceptions. But DxO has rethought how to access images in Optics Pro and it's a simpler workflow. Kudos.
Although, we have to admit we went back to Projects for this review. It was a lot easier to gather the disparate images we wanted to test in one virtual place for reference than it was to hunt them down from session to session. So Kudos Squared for leaving Projects in there, too.
But the enhancements don't stop there. Instead of the Select, Customize, Process, View workflow of v6.6, the new workflow is just Organize, Customize and Process, simplifying the first step in the process.

Window panes have been reworked to provide that filmstrip along the bottom with horizontal scrolling (which worked much better than the FilmPack version, BTW). Like FilmPack, the filmstrip can also be resized to make your thumbnails larger.
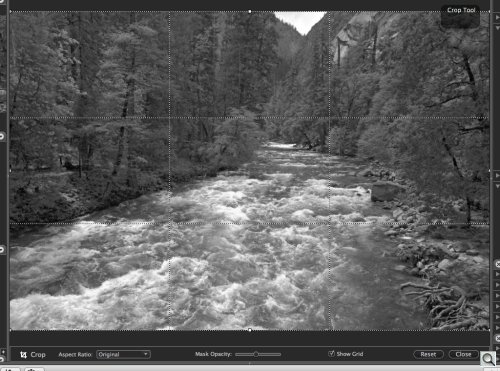
The crop tool grid now has a 1/3 grid display to help with Rule of Thirds compositions.
You can reset any slider with a double click and control them with a mouse wheel. We weren't able to confirm that, however. Our mouse wheel scrolls and double clicks did nothing.
DxO also noted that full screen mode is more accessible, settings are automatically saved in the background, zoom is centered on the cursor, recent locations are preserved and batch processing is more flexible.
IMPROVEMENTS | Back to Contents
Along with the workflow refinements, a number of significant improvements (by which we mean, "Yippee!" because they do matter) to the program's functionality have been introduced in this version. Among them:
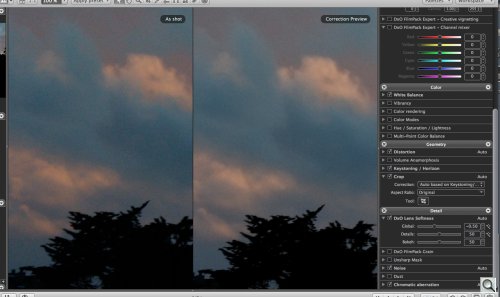
Improved Lens Softness Correction. Lenses vary in sharpness across the scene they capture with the center of the image typically sharper than the corners. The effect varies through the aperture range, but it's almost always there, although it isn't always significant.
In the last few years a number of cameras have included sharpening routines even on Raw image data to obscure this phenomenon but it's always there.
Optics Pro now includes a similar function to automatically and uniformly sharpen an image taken with a supported camera and lens combination. In addition to the camera and lens combination, the function also considers capture parameters like ISO, focal length, focusing distance, aperture and others. It also considers scene content to avoid creating noise in uniform zones like the sky and to preserve bokeh.
And, as with other tools in the Optics Pro bag, you can manually adjust the effect for sharper or softer results.
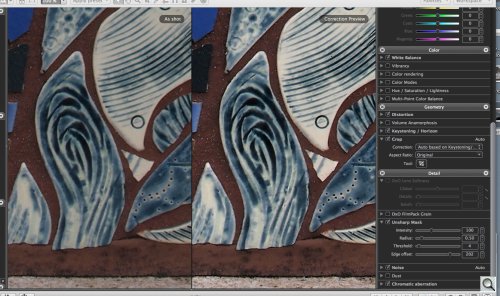
Edge Offset Slider in USM. If your gear hasn't been profiled by DxO, all is not lost. You can perform non-uniform sharpening using the Unsharp Mask's new Edge Offset slider.
By kicking up the Edge Offset, you can sharpen the corners without oversharpening the center of the image. In our close-up shot of some tiles on a staircase, we moved it to 202 units to get more uniform sharpness across the image of an Olympus E-PL1 shot and it sprang to life.
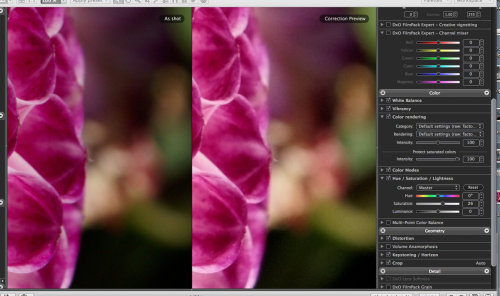
Saturated Color Protection. Under Color Rendering, the Protect Saturated Colors control has been improved to restore depth and texture in saturated colors while leaving unsaturated colors alone.
We set the control completely off with Saturation increased noticeably on a shot of a magenta dahlia against a blurred but colored background. The result was typical of oversaturating any image. But with the control set at 100, we saw texture restored to the dahlia with brighter petals while the background remained nicely blurred and the colors cleaned very subtly.
The protection keeps unsaturated or mildly saturated colors from being affected like the very saturated colors in the image. DxO said it's mostly visible on Raw images or DxO FilmPack-processed images. Our dahlia was, in fact, a Raw image.
We used beta build 582 running under Mac OS 10.7 for our all of our tests, experiencing just one crash trying to access an image on our hard drive in Organize mode.
SYSTEM REQUIREMENTS | Back to Contents
PC: Microsoft Windows XP SP3 (32 bits), Windows Vista (32 or 64 bits), Windows 7 (32 or 64 bits) and Intel Core 2 Duo or AMD Athlon 64 X2 processor
Mac: Mac OS x 10.5 Leopard, 10.6 Snow Leopard, 10.7 Lion and Intel Mac processor
3-GB RAM minimum and 2-GB available disk space
PRICE & AVAILABILITY | Back to Contents
One of the concerns with Optics Pro is whether your camera and lenses are supported. You can, of course, use it on images taken with unsupported gear, but it does so much more with the Raw images of supported gear that we often feel like stomping our feet and crying like a spoiled brat when working with images taken with unsupported gear.
The good news is that the company expects to have released 5,000 total DxO modules by the end of the year -- and to double that by the end of next year. DxO has reengineered its calibration process to keep up with new product introductions and catch up with older ones.
As if to illustrate this, we were disappointed that the beta didn't support the Nikon 1 V1/J1 cameras, even though they were announced just a few weeks before Optics Pro. And yet, the company was already working on the cameras, completing the lens evaluations, just days before the release of the new version (which is available now). So it won't be long.
More good news: the price. Until Dec. 24, the Standard version is available for $99 ($169 list) and the Elite version for $199 ($299 list). If you bought Optics Pro in September or later, the upgrade is free.
In our earlier review of Optics Pro we summed up the experience, "It's as if someone has done the tough job of getting the plane airborne before we get to fly it wherever we want."
You might think of that as a head start on the fine points of image editing that are often overlooked. We tend to accommodate flaws like optical distortion (except when they are severe) but remain inexplicably annoyed by something as subtle as chromatic aberration. We may want a bit more vivid image but we don't want our shadows to glow, too. And as we develop a style or image editing preference for our shots, we might like to just apply them generally.
Optics Pro can handle all that. There are alternatives, certainly, but they don't have the built-in expertise of Optics Pro's modules. Lightroom probably comes the closest in Raw processing, noise reduction and workflow but it isn't in the same league when it comes to optical correction.
Optics Pro is not just a valuable tool but an indispensable tool. We're delighted the company has devoted so much effort to improving it while it chases the fire storm of product introduction.
