A NEW PERSPECTIVE ON DISTORTION
Andromeda's LensDoc Plug-in
| By | STEPHANIE BOOZER |
| and | MIKE PASINI Editor The Imaging Resource Digital Photography Newsletter |
Review Date: August 2001
We're all familiar with the problem. Photograph a painting and the frame bows out. Take a shot of a building and the walls collapse. Shoot that incredible sunset just as the sun turns green and the horizon looks like a hill.
In a word (or three), the problem is distortion, perspective and rotation. In extreme cases (a fish-eye shot) it's an artistic effect. Usually it's just plain disturbing.
Enter Andromeda. Their LensDoc [MW] plug-in (http://www.andromeda.com/info/lensdoc/) using Photoshop's plug-in architecture not only addresses this issue but does so a comprehensive and easy-to-use way.
DISTORTION, PERSPECTIVE, ROTATION
Each of these problems has a different cause.
- Distortion: Your lens itself, as you may have seen, can have a warped view of the world. Especially zooming out to wide angle views. Our minds make marvelous adjustments to these aberrations, but when we know the subject well, the distortions are disturbing.
- Perspective: Tilt your camera up to shoot some skyscraper and (unless you're lucky enough to have a view camera) the vertical lines in your images are condemned to converge. That's because the plane of the CCD (also known as the film plane) is not parallel to the building. So, if the building is tall enough (or built by Transamerica), it will look like a pyramid. View cameras permit you to swing and tilt the film plane to make it parallel to the subject's lines, preserving the subject's natural geometry.
- Rotation: Less sinister, but most obvious, is the tilted horizon problem. And it may not even be your fault. Alignment during camera manufacture of the LCD and the optical viewfinder with the CCD is more of a problem than it should be.
THE FIX
LensDoc, in a nutshell, can correct for barreling (), pin-cushioning )(, perspective distortion /\ and axis rotation (that uphill or downhill horizon).
It does it in either an extremely competent Novice mode or a finely discriminating Expert mode in which you can control its default behavior. And it applies all the transformations you need at the same time, so image degradation is minimized (it will warn you if there's a problem).
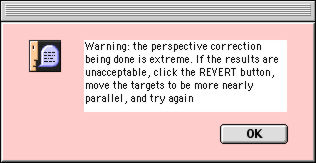 |
| The Warning |
LensDoc includes a database of corrections for specific 35mm and digicam lenses (which just happen to include some playful effects, too). It can even search its database of lenses for the best fit. If your lens is not included (and you don't want to use a generic correction), you can build your own custom correction just by shooting a target with straight lines (like a door) at various focal lengths, marking them in LensDoc and editing a simple text file.
Did we say "comprehensive"?
SYSTEM REQUIREMENTS
Your image editor has to support the Photoshop 4.0 or later plug-in architecture (which includes Paint Shop Pro 5 and Photo Paint 7). Both Macintosh and Windows versions (which is what our [MW] means) are available.
INSTALLATION
LensDoc uses an installer, which asks you if you want to install the 800K plug-in for Photoshop. If so, off it goes, but if not, it asks you where you want to install it. It works with any program that uses the Photoshop plug-in architecture.
Fully-illustrated documentation is provided as a PDF on the distribution CD-ROM. Sample images are also on the CD-ROM, so you can fix the sample problems in the documentation yourself to get up to speed. It won't take long.
Launch your Photoshop plug-in compatible image editor and look for LensDoc on the Filter menu under Andromeda. A large dialog window, the plug-in interface in fact, will greet you and you can get down to work.
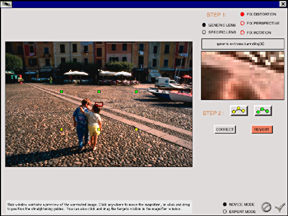 |
| The Large Dialog Window |
And now, ladies and gentlemen, Imaging Resource's Stephanie Boozer will guide you through a typical session before we return with a few personal insights (after trying to straighten out the towers on our Golden Gate Bridge shots):
CONNECT THE DOTS
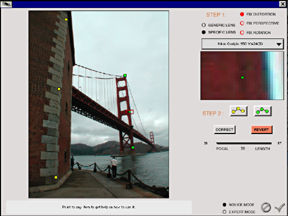
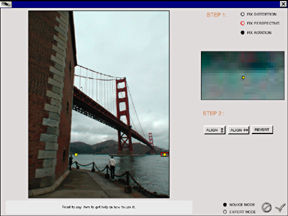
Your image is displayed in the central preview window, with a series of yellow and green squares in the center. There's also lots of options at the top and a Novice and Expert skill level selection at the bottom of the screen. For now, we'll go through the functions of Novice mode before describing Expert mode.
The first thing to do is select whether you want to fix a distortion, perspective or rotation, by clicking the corresponding red radio button in the top right corner. For our example, we're going to fix a barrel distortion, so we've selected "Fix Distortion."
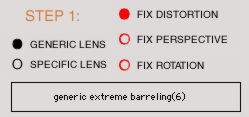 |
| Step One |
Next, choose the lens type. The Generic Lens selection works for any lens. Selecting the Specific Lens option enables a pull-down menu in the rectangular menu bar just beneath it.
This pull-down menu offers a slew of choices, divided into Digital Cameras, 35mm Lenses, Alternate Barreling, Funhouse Effects and No Correction. Under the Digital Cameras submenu, you can choose between a handful of Canon, Nikon and Olympus digicam models and add-on lenses. The 35mm selection is a little more broad, with a variety of lenses from Canon, Minolta, Nikon, Sigma, Tamron and Tokina. The Alternate Barreling selection sets up the filter for a specific type of barrel distortion and the Funhouse Effects submenu allows you to get a little playful, with effects like Bubble, Fish-eye, etc.
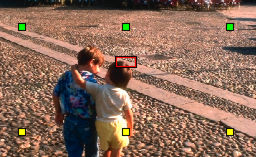
The next step in correcting our barrel distortion is to position the green and yellow squares or guides in the image.
 |
| The Targets |
Align the yellow or green squares (there are two sets of three, each a different color) by dragging them with the mouse along an incorrectly curved line close to the edge of the image. You'll notice that as you drag the squares, an enlarged view of where you are in the image changes in the close-up window on the right side of the screen. Once you get the squares in the general vicinity of where they should be, you can fine tune your placement by holding down the Control key and dragging the square precisely in the enlarged view.
When you've finished with either set of squares, move on to the other set for a more accurate adjustment. You can make an adjustment with only one set of squares active (to deactivate a set of squares, just click on the matching button beneath the close-up window). However, the adjustment will be much more accurate if both sets of alignment squares are active and well placed.
After you've aligned the squares, simply press the Correct button to apply the changes.
 |
| The Correct Button |
LensDoc did a great job of straightening our barrel distortion on the first try. But if you aren't happy with your results, simply press the Revert button to undo the change and start again. To refine your corrections even further, you can shift over to Expert mode by selecting that option in the lower right corner of the screen.
EXPERT MODE
Entering Expert mode enables some new correction tools. The pull-down menu above the close-up window is now active, offering a few generic correction options such as Generic Barreling, Generic Extreme Barreling, Generic Pincushioning and No Generic Correction. Each one applies a standard correction to the preview screen, while the No Generic Correction option returns the image to its original state.
For our test, we selected the Generic Barreling option, which displayed two slider bars underneath the Correct and Revert buttons. The first slider bar adjusts the intensity of the effect, within the parameters established by the placement of the alignment squares. The second slider bar adjusts the actual shape of the correction curve, allowing you to concentrate the correction more on the edges of the image or closer to the center. These slider bars are active with all of the Generic curve settings, except for the No Generic Correction option.
 |
| Expert Additions |
Expert mode provides two more buttons in the lower right corner of the screen. The first button pulls up a graph function, which displays several graphs of the correction curve. As you move the points on the slider bars, you should see the effects of your movements on each of the graphs. The second button, Auto Scale, simply prevents any black pixels from appearing around the edge of the image when the image is resampled to correct the defects.
The two folder icons at the bottom of the screen allow you to load a new lens description from a file, and save your current set of corrections as a new lens description. This allows you to customize a correction to match a specific lens, which you could then apply to each image shot taken with that lens.
In our tests, we were able to achieve very nice results with the LensDoc filter, completely correcting our barrel distortion problem. Correcting a pincushion distortion works along the same lines, only you're bending the curve the opposite way. For rotation and perspective problems, the correction process is slightly simpler.
PERSPECTIVE
Selecting the Fix Perspective option pulls up a less complicated screen, giving you just two alignment squares in each set. The overall principle is the same, just position the alignment squares along the lines you'd like to be parallel, and press the Make Parallel button. The Revert button returns the image to its previous state. The only other options available to you in the Expert mode, as opposed to the Novice mode, are the Auto Scale function and the ability to save and open lens descriptions.
ROTATION
Finally, selecting the Fix Rotation option brings up another very simple screen. You can position the two yellow alignment squares and either press the horizontal or vertical Align buttons to adjust the image. Again, the Revert button removes the changes. As with the Fix Perspective mode, the Expert mode gives you the Auto Scale option and allows you to save or open lens descriptions and settings files.
HELP
You can get instant help for any tool in the window just by rolling the mouse over it. Help information is displayed along the bottom of the window. We found the on-screen assistance extremely helpful.
| The Help Pane |
STEPHANIE: THUMBS UP
Overall, we think Andromeda's LensDoc filter is a good solution to a common problem. It's very easy to understand, with plenty of help to guide you along the way. Plus, the ability to apply unique distortion-type effects to images adds an element of creativity and fun. We also like the extensive selection of lens descriptions to match specific camera models, as well as the generic setting, which makes this filter versatile for all photographers, particularly those with zoom lenses.
MIKE: SOMERSAULTS
The sample images Andromeda supplies are not cream puffs. They've got problems. And the plug-in handles them with ease. By following the directions in the manual, you too can fix them in seconds.
 |
| Automatically Mowing the Lawn |
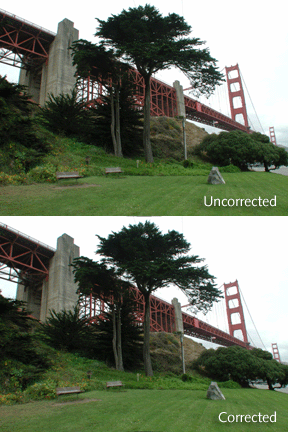
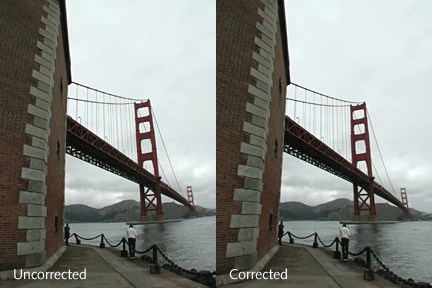
We had a little more difficulty straightening the towers on our Golden Gate Bridge shots. They were taken with a Nikon 990 using a WC-E24 wide angle converter. Oddly enough the supplied 950 WC-E24 custom correction worked very nicely in the blink of an eye.
But we wanted to try it manually. Call us John Henry.
 |
| Perspective Correction |
 |
| Horizontal Correction |
It was challenging. For one thing, the cables on the bridge might easily disappear into the fog with too much of a correction. And straightening both towers got us a warning that we were overdoing it. We were. Everything depends on where you put those magic little boxes. In the end, we weren't able to do as well as the built-in corrections illustrated here. But we came close.
 |
| Our Manual Fixes |
Don't think, though, that the automatic correction was minimal. Undoing and redoing it (rapidly, with the keyboard command) showed us what a dramatic transformation the plug-in was making. (We've reproduced that here with animated GIFs.) Andromeda notes the program doesn't rely on "simple mathematical equations, but rather is derived from testing over 100 lens and focal length combinations. Common patterns were selected out and synthesized into generic groups that work well with all lenses tested."
Considering the improvement, we were very impressed that we could not find any degradation in the image (and we're talking about some very iffy things here, like those distant cables in the fog). You can see a tiny bit of artifacting at the top of the "lawn" shot, but it could easily have been eliminated using Auto Scale in Expert mode.
CONCLUSION
We can't imagine an easier way to flatten horizons that are not horizontal (we hate trying to guess whether we were leaning 0.5 degrees or 1.2 degrees, not to mention clockwise or counter clockwise). And correcting for converging verticals is just as easy (you just use one more set of guides). But correcting for specific lens distortions, too? Turn on movie mode because we're going to do somersaults. LensDoc has quickly become one of our most valuable image editing tools.