U POINT EXTENDED
Nikon's Capture NX 2 --
Putting the U Back in Editing
 By MIKE PASINI
Editor
The Imaging Resource Digital Photography Newsletter
Review Date: June 2008
We found our way back to Dogpatch Studios (http://www.dogpatchstudios.com) again, this time for a demo of Nikon's latest release of their software suite. That includes last week's releases of Nikon Transfer and View, plus this week's release of Capture NX 2.
It's a crowded world on your hard disk. A lot of competent programs are competing to be part of your workflow solution. And frankly, none of them have won the argument. It doesn't matter if you're the Mom trying to keep track of all the digital images acquired every time you open your purse to pull out the camera or a pro who is trying to get home by 6 p.m. every night to see the family you're supporting. Workflow is more work than flow.
Nikon is worried about that. Nikon's Lindsay Silverman told us that while the company is primarily identified with the pro market, that's a much smaller part of its business than the amateur market. And that piece of the pie is getting a lot of attention lately.
U HAVE OPTIONS | Back to Contents
On the long ride home from Dogpatch on the T streetcar, we had a chance to think about that.
Every camera comes with some sort of image editing software but that hasn't stopped the flow of options, no matter what brand camera you have. Kodak Easyshare (http://www.kodak.com) is one such, Google Picasa (http://picasa.google.com) another. And recently even Adobe has jumped on the free social networking model with Photoshop Express (http://www.adobe.com/products/photoshopexpress) and the formerly pay service Phanfare (http://www.phanfare.com) has opted for the free model, too.
All of those free options have some photo organizing and sharing options but as image editors they provide only what they have to provide in what they like to think are tools easy enough for a child to use.
While these tools make global changes easy to make -- lighting or darkening a whole image, for example -- making a change in just one part of an image is often obscure. Sure, you can eliminate red-eye or lighten a backlit subject but anything else gets tricky.
If you want more control, you look up a shelf. Among the more serious editing packages are Light Craft's LightZone (http://www.lightcrafts.com), Apple's Aperture (http://www.apple.com/aperture) and Adobe's Lightroom (http://www.adobe.com/products/lightroom) and Photoshop (http://www.adobe.com/products/photoshop). Except for Photoshop, each of these applications can edit without touching the original data, recording recipes in the metadata to affect changes when the image is opened.
None of these are free but they provide distinct advantages over the first group where user patience is short. Still, none of them are exactly transparent when it comes to making local corrections.
BUT DO U NEED 'EM? | Back to Contents
That may be because image editing itself is not something that comes naturally. You don't have to be a photographer to tell when a shot is too dark or too light or a face doesn't look right (because it has red-eye or is backlit or out of focus).
But concepts like hue, saturation and color temperature take some study to master. And who has time for that?
You don't want tools easy enough for a child to use, you want tools easy enough for an adult to use.
Lucky for you, there are a lot of you out there and companies like Nikon are taking notice, trying to build something you can appreciate. With its second revision to Capture NX, the company has extended the marvelous U Point technology developed by Nils Kokemohr of Nik Software to include masking.
Talk about local correction. We still remember sitting down with Nils at photokina as he turned a daylight image into a scary night scene (http://www.imaging-resource.com/EVENTS/PKNA06mrp/PKNA3.HTM#nik) using U Points.
WHAT U POINT CAN DO | Back to Contents
Let's get real for a minute.
You aren't shooting Raw. You're shooting JPEGs of a birthday party. And you want to edit a few images because you really like them enough to frame them but they have some flaws. You wonder if you can fix the flaws and salvage the image. You doubt it.
You doubt it because you don't know Photoshop. Scott Kelby does not live next door and you've never taken a weekend Photoshop seminar. You don't know which book to buy and you can't understand the chapter titles anyway.
You just want to improve the image. Make some local changes without becoming a wizard in masking techniques.
U Point is what we consider a Noble Prize worthy tool to do just that. You just point to a place in your image that you'd like to change and then, using nothing more than sliders, make an adjustment.
It's really very simple -- and even more fun.
This version of NX, we learned, makes it even simpler and a great deal more useful. Be forewarned that the interface isn't very simple but once you understand which icon does what, it's really easy to make big improvements to ordinary images that would take a doctorate in Photoshop to effect.
Let's check the specs and then see how it runs.
SYSTEM REQUIREMENTS | Back to Contents
The system requirements for Capture NX 2 are:
For Windows:
- OS: Pre-installed versions of 32-bit Windows Vista Home Basic/Home Premium/Business/Enterprise/Ultimate (Service Pack 1) editions or Windows XP Home or Professional (Service Pack 2) editions
- Processor: Pentium 4 or better
- RAM (Memory): 768-MB minimum (1-GB or more recommended)
- Hard-disk space: 200-MB required for installation
- Monitor resolution: 1024x768 pixels or higher (1280x1024 pixels or higher recommended) with 16-bit color or more (32-bit color recommended)
- Other: CD-ROM drive required for installation, Internet connection required, approved memory cards required to import/export Custom Picture Controls
For Macintosh:
- OS: Macintosh OS X (version 10.4.11, 10.5.2)
- Processor: PowerPC G4, PowerPC G5, Intel Core Duo, Intel Core 2 Duo, Intel Xeon or better
- RAM (Memory): 768-MB minimum (1-GB or more recommended)
- Hard-disk space 200-MB required for installation
- Monitor resolution: 1024x768 pixels or higher (1280x1024 pixels or higher recommended) with 64,000 colors or more (16.7 million colors or more recommended)
- Other: CD-ROM drive required for installation, Internet connection required, approved memory cards required to import/export Custom PictureControls
INSTALLATION | Back to Contents
Installation was painless. We installed a version labeled 2.0.0 on a PowerPC G4 laptop that had been running NX. NX 2 met the system requirements easily for the other specs with 2-MB RAM and plenty of disk space. Unlike Photoshop, NX 2 does not quibble about your video card.
There are a few Color Management Options to configure, too. You can tell NX 2 which working space to use when you open a file (either that of the file or the default color space. And you can set that default color space, too, of course.
You can run the product in trial mode or activate it. To activate it, you enter the Purchase Product Key with your name and optionally your company. If you're upgrading from version 1, you'll need your version 1 product key as well.
NEW IN NX 2 | Back to Contents
After the release of NX in 2006, the two most requested features were:
- The ability to use Control Points to select areas for other adjustments besides color
- A simple tool to fix dust spots and other blemishes
The company responded to both requests in NX 2 with:
Selection Control Points: You can now selectively edit photographs without the need to manually outline or mask the area for editing. Just place a Selection Control Point anywhere on the image, then choose from almost any adjustment (like D-Lighting, Unsharp Mask or noise reduction). You can adjust the extent of that adjustment with its Size slider and its effect with its Opacity slider.
Auto Retouch Brush: NX 2 adds an automatic retouch tool to its image editing toolbox to seamlessly remove blemishes, dust and other distracting elements from photographs while maintaining the integrity of the image.
In addition, NX 2 adds these enhancements:
Shadow/Highlight Adjustment: With just a simple slider adjustment, you can easily open up shadows or recover blown out highlights, particularly in NEF images.
Redesigned GUI with Customizable Workspaces: As part of an interface redesign, NX 2 includes a Workspace feature to maximize the tool and palette layout for the task at hand. You can create unique custom workspaces ideal for working with single or multiple monitors. All palettes and windows within can be docked or undocked or hidden as needed. Predefined workspaces include: Browser, Metadata, Edit or an optimized combination of each. In addition, you can access their most used folders with the new Favorite Folder feature.
Improved Edit List: NX 2 also incorporates an improved edit list that allows you to easily apply common enhancements. Common tools like tone curves, exposure compensation, contrast and highlight and shadow protection are a click away on the Quick Fix menu. The improved edit list allows for camera and lens corrections like color moire reduction, dust off, auto color aberration, auto red-eye correction, vignette control and fisheye lens correction (if a fisheye lens was used).
Simultaneous Use of Tools: You can now complete image editing faster with the use of simultaneous tools. For example, you can adjust the brightness and contrast of an image while boosting the color of the image at the same time.
Filters, Ratings and Sorting Toolbar: NX 2 offers an advanced filtering system in its tool bar to efficiently filter hundreds of images using user-defined labels, ratings, file types and file attributes. And these new filters, ratings and sorting tools are integrated into the metadata palette, so you can easily edit and view XMP/IPTC information.
THE U POINT | Back to Contents
There are two U Point controls in NX 2. The first is the original Color Control Point (which also appears in Nik Software's Viveza plug-in for Photoshop) is still there. Click on an area of your image you don't like with the Color Control Point tool and you see three things you can change with simple sliders:
B)rightness -- Make the area lighter or darker
C)ontrast -- Make the shadows darker and the highlights lighter
S)aturation -- Intensify the color or mute it toward black and white
There are two other controls on the basic point. Above it is the S)ize control (or what I like to think of as the Sphere of Influence) which determines how large an area to affect and below it is a triangle you can click to add a few more controls:
H)ue -- Change the actual color
R)ed -- Increase of decrease the amount of red
G)reen -- Increase of decrease the amount of green
B)lue -- Increase of decrease the amount of blue
W)armth -- Make the area more blue or more yellow (colder or warmer)
Nikon has greatly extended what a U Point can do with a second U Point control: its Selection Control Point. In addition to the S)ize control, it has only a single option:
O)pacity -- Increase or decrease how much of the original image is visible through the modification
Of course, that's only part of the Selection Control Point story. Once you've used a U Point to mask your image (we've tried 'em all and this was the simplest mask we've ever made), you can apply any of 26 adjustments available in NX 2 to the affected area.
|
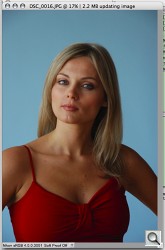
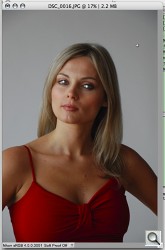
Selection Control Point. The original (left) as masked by three control points (barely visible) and the result when desaturation (right). Note the U Points in the eyes. |
||
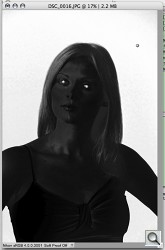
The View > Selection Display > Show Mask command will show you exactly what your mask looks like, if you want. And you might want to see what's being masked and what isn't. Show Overlay takes you back to the image.
For our test, we masked a background and dumped the color so only the model was in color. We had to exclude her eyes using two other Selection Control Points, but as soon as we made one, we simply Alt/Option dragged it to the other eye.
That's a much simpler method of highlighting a subject in color against a black and white scene than the typical Photoshop method involving adjustment layers to mask the color out and painting the layer to reveal the color background layer.
But you can use this approach for any of the adjustments (like Unsharp Masking, D-Lighting, Blurs, Noise Reduction), something that used to take multiple (and expensive) Nik Software Photoshop plug-ins.
RETOUCH BRUSH | Back to Contents
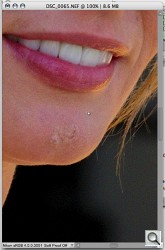
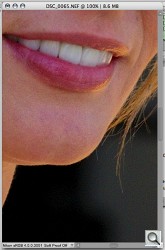
Our model had a blemish on her chin which she covered with cosmetics well enough that it wasn't visible on medium to long shots.
But on close-ups, it was easy to spot. NX 2 has a new Retouch Brush tool to take care of that in just a few swipes of the mouse. In this case, we simply dragged the mouse over the cosmetic cover three times in short strokes to hide the blemish.
|
Retouch Brush. Just three passes and the blemish is gone. |
||
You can increase brush size to minimize the strokes, but we found it was less obvious to take a few smaller strokes to cover the area. Both color and texture are cloned from surrounding areas to hide the flaw.
SAVING AS NEF | Back to Contents
While NX 2 can open JPEG images created by many different cameras, its Raw processing is limited to Nikon's own NEF images. And that restriction also means DNG files can't be processed by NX 2.
But, interestingly, you can save any image you open in NX 2 as a NEF file. So you can convert your JPEG image into a NEF Raw file.
We opened a 2.5-MB JPEG (2,592,545 byte file) in NX 2 and simply saved it as a NEF. That became a 6-MB NEF file (6,240,798 bytes). We did a little editing and saved the NEF again. Our file size increased slighting to 6,327,923 bytes.
The difference was the edit saved in the Exif header. If you save your images as NEFs, the edits are not applied to the bit mapped data, but recorded as recipes in the image header.
This non-destructive approach to editing (also practiced by LightZone, Lightroom and Aperture) is one reason to save your JPEGs as NEFs.
One curiosity however seems to plague NX 2 as it did NX. Saving a NEF in NX2 increases the file size substantially. It also takes a while.
We opened a D80 NEF that was an 8.4-MB file (8,778,849 bytes) and simply saved it from NX 2. It became a 12.3M file (12,913,386 bytes).
What happened? To find out, we ran both images through our Exif header decoder, the same tool we use on the site for our Test and Gallery images.
The first significant difference we found was in the preview size. The original D80 preview was 160x120 pixels, while the NX 2-created preview was 214x320. It was a portrait oriented image, so the new preview shows that. This was also reflected in several other flags.
We also found a new Rating tag in the new file. And the proprietary MakerNotes section had more entries than the D80 MakerNotes section. There was a NikonCapture section with quite a few tags (covering many of NX 2's options) and a good bit of data. We also found an ICC Profile section that did not exist in the D80 file.
But we suspect more is going on with the preview. One reader suggested it's actually a full size preview saved with no compression by NX and NX2 rather than the Basic compression the camera uses.
SHADOW/HIGHLIGHT | Back to Contents
A Highlight Protection slider under the histogram can actually recover highlight details, particularly in NEF files. The Shadow Protection slider does the same thing for detail in shadows. Both are new in NX 2.
The new Workspaces option in NX 2 can configure its numerous panels and display options in various configurations. Four basic workspaces are built into the application. Those are Browser, Metadata, Multi-Purpose and Edit.
Browser is optimized to fly through a folder of images, tagging and ranking them as you go. Metadata list the folder contents with a small thumbnail and various metadata alongside each image with larger panes devoted to File & Camera Info and XMP/IPTC fields. Multipurpose shows larger thumbnails on the left side with the Edit List on the right. And Edit looks a lot like Multipurpose with the left side collapsed.
Another set of these four defaults can be found under the Additional Screen option, which lets you use two monitors in your workspace.
You can also configure and save your own workspaces, places palettes and windows on any screen. There's also a Swap Workspaces command to exchange the contents of both screens.
LENS DISTORTION | Back to Contents
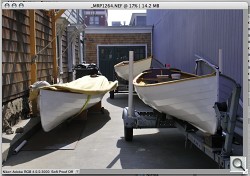
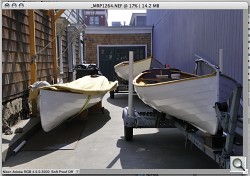
We shot with both a D80 and a D300 in the studio but outside we took a few D300 shots using the popular 18-200mm VR II Nikkor zoom. The D300 corrects for chromatic aberration itself but it won't do anything about lens distortion.
Like NX, NX 2 can correct both, however. So to see what it would do for our 44mm shot of a boat yard, we opened the NEF image in NX 2 and applied the correction. The tool works on any image, but it's particularly intelligent about Nikkor glass. Other lenses are subjected to a generic correction.
It made a 10 percent correction, observed in the Distortion panel of the Edit List. We could adjust that as we saw fit using a slider. But the control did pretty well. Increasing it only bent our horizontals noticeably.
PRICING & AVAILABILITY | Back to Contents
Capture NX 2 will be available in late June 2008 for $179.95 (full version) or $109.95 (upgrade). A 60-day free trial version is available now at http://www.nikonusa.com.
There are a lot of programs beckoning to the photographer who wants to tweak an image. Global tweaks have not really been a challenge, but local ones -- often requiring sophisticated masking expertise -- have been an insurmountable one for many photographers. U Point technology makes it very simple to make those kinds of tweaks. But NX 2's new selection point variation extends this simplest of tools to a new dimension of editing options we find very exciting.
While the program attempts to address batch processing, we really don't think it gets the job done, particularly considering its bloated NEF saves. For processing dozens of images (or even more), we're much happier with Lightroom.
Capture NX 2 shouldn't be the only tool in your box, but Nikon has crafted a tool you can't ignore if you enjoy making the most of your most special images.
