MORE THAN MAGIC
Photoshop 7.0 in Action
By MIKE PASINI
Editor
The Imaging Resource Digital Photography NewsletterReview Date: July 2002
Upgrading Photoshop has always been a little like visiting the local magic shop. "What's new?" you ask. "Hey, I got a great little hat trick just in," the smiling clerk says. "Just for digital photographers."
C O N T E N T S
As he pulls one brightly colored object after another out of his hat, you begin to wonder if your coat is in there. "I just want to impress my in-laws," you plead. "So set the table," he shrugs.
But since Photoshop 6, Adobe has been focusing less on magic and more on the Photoshop user experience. There are certainly enough new magic tricks to applaud Photoshop 7.0 with the flapping of checkbook covers. But what will win you over, launch after launch, is the improved usability. You won't go back.
And if you've been waiting for a Photoshop that runs natively under OS X or Windows XP, the wait is over. Even if you aren't, the new scripting capabilities alone are efficiencies enough.
HOOPLA | Back to Contents
Adobe says this version is aimed at digital photographers especially (and Web designers especially, and ...). We take that to simply mean Adobe recognizes Photoshop has a life outside pre-press. Fifty percent of Photoshop users are not going to press with their files, according to Adobe.
But we do find after using both the beta and the final release that Photoshop 7 is a valuable (and robust) upgrade for digital photographers.
And this time Adobe has made it affordable, too. Upgrades are $149 for the $609 full version (http://www.software-wholesale.com) has the Windows version for $535 with free three-day shipping).
NEW FEATURES | Back to Contents
Among the new features (many of which we'll skip), highlights for digital photographers include:
- File Browser. At last you can see the images you have, not just their filenames. You can also rotate, sort, rank, and batch rename images, as well as view Exif metadata. This won't impress anyone using an image organizer but it's long overdue in Photoshop.
- Auto Color. Improved. Beats the old Auto Levels or Auto Contrast.
- Healing Brush. Like its rubber stamping predecessors it promises to simplify "the photo retouching process by allowing users to effortlessly remove dust, scratches, blemishes, wrinkles, and other flaws." (Wrinkles are flaws?) But this tool promises to do so while preserving "the shading, lighting, and texture of an original image."
- Enhanced Picture Packages. You can easily fill one sheet of photo paper with multiple print sizes and even mark your prints with copyright information.
- New Painting Engine with Enhanced Brush Tool. If it isn't a new type engine, it's a new paint engine. This one has variable valve timing and 400,000 miles between tune-ups. It does allow you to fiddle with a great number of brush variables, actually simulating traditional painting tools.
- Tool Presets. No longer fiddle and refiddle from the default settings for any particular tool. Just save the tool settings and restore them whenever you like with a click.
- Workspaces. You can now save the Photoshop desktop (your palette layouts, that is) that you prefer to use. Save different desktops for different tasks (one for startup, one for photo editing, another for retouching).
- ZoomView technology. Export your high-res images in ZoomView format and Photoshop creates the files you need to access Viewpoint's technology from your Web site to zoom or pan your images online.
- New Scripting Support. Can't help it, we're a sucker for automation. Just a little goes a very long way. And this is more than a little. AppleScript, JavaScript, and Microsoft Visual Basic are all equally supported (no wonder it took so long). But it's a download (you have to be brave, kids) from http://www.adobe.com/products/photoshop/main.html. We'll cover scripting in a separate review.
SYSTEM REQUIREMENTS | Back to Contents
System requirements never get smaller, but 7.0 bumps them up significantly. All systems need 128-MB RAM (192-MB recommended) with a CD-ROM drive and an 800x600 color monitor with at least 16-bit color (24-bit recommended).
On the Mac, you'll need a PowerPC (G3 or higher recommended) running OS 9.1 or higher (or OS X) with 320-MB of free disk space.
On Windows, you need a Pentium III or 4 running Windows 98/ME/NT/2000/XP with 280-MB of free disk space.
INSTALLATION | Back to Contents
Photoshop is still a pretty straightforward install, writing almost all of what it needs to the folder it inhabits.
It needs quite a bit, though, especially this version's multilingual spell checker. Our Mac OS 9 basic install actually required 238-MB. OS X took 280-MB.
We did several installs, taking between five and eight minutes, depending on the machine and disk speed.
We install software on an external drive we move from machine to machine to confirm or resolve one or another issue. But we were unable to run the install we did on a G4 from a 7300 (PPC 604), for example. After a reinstall on the 7300, we were able to run Photoshop 7 on that system without any problems or penalties. The executables were indeed different sizes (56,315,475 vs. 56,288,344 for the G4 version).
WAIT A MINUTE | Back to Contents
Installation is simple, but that doesn't mean you're up and running. Photoshop's personality is usually modified by a few third-party plug-ins, some of which you may consider utterly indispensable.
Adobe actually gives Mac users the OS 9 version along with the OS X version so they can run their plug-ins. The OS X version enjoys few plug-ins at the moment (not to mention printer drivers) but the OS 9 version welcomes most Photoshop 6.0 plug-ins.
That doesn't mean everything you depend on will work. And in our case, it didn't.
Our Average digicam doesn't rotate images. Everything's a landscape, just as if we were still using film. So we rotate them in Juri Munkki's great little utility Cameraid (http://www.cameraid.com). But when we looked at these images in the new File Browser, the rotated images had no thumbnails. Worse, the File Browser didn't display any Exif data for them.
A bug? Adobe couldn't duplicate it (they have an Average digicam, too).
Our only clue was that Photoshop reported the file format as ProJPEG, not its own JPEG. We depend on Boxtop Software's ProJPEG plug-in for optimizing file sizes for Web images, and it has the habit of embracing any JPEG file as its own format. Apparently the File Browser doesn't peek into those files.
Removing the plug-in restored Photoshop's ability to display thumbnails of rotated images and to report the metadata.
FILE BROWSER | Back to Contents
Adobe says the new File Browser was added for digital photographers who have to scan dozens of images at a time. But rest assured the entire graphic arts community thanks you. Long overdue and the single best reason to upgrade. Once you use it, you won't want to live without it.
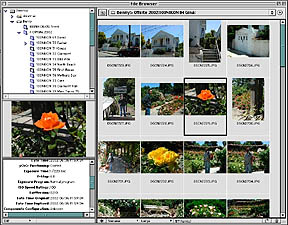
The File Browser
Click on a pane for an enlargmentIt's a good browser, no question. But we much prefer what Apple's done in iPhoto, primarily because iPhoto has on-the-fly thumbnail scaling. But also because iPhoto isn't scrunched into your work area -- it is your work area (like any other photo cataloging program).
Adobe's Browser window has four panes, one big one on the right side for the thumbnails and three stacked on top of each other on the left. The top pane is a navigable list view of your desktop. The middle pane shows a preview of any selected image whose Exif data is displayed in the pane just below it. Like frames in your Web browser, you can resize these panes within the browser window by dragging their dividers around.
Within the Browser you can easily rotate any selection of thumbnails to correct orientation. A double click opens the image in Photoshop and rotates it into the corrected orientation. But thumbnail rotation does not itself change the orientation of the image.
In fact, to make this stick you have to save the image in Photoshop.
Ranking any selection of thumbnails by letter grade can be done from a popup menu. And you can sort the ranked images to group all the A's together, for example.
The Exif display is essential for digital photographers (where it can be illuminating in cataloging software). But Adobe has even decided to preserve it in edited images. Not all data will be valid but it's nice it doesn't disappear any more (even that's more accurate).
The Browser also lets you batch rename (and optionally move) any selection of unopened images using a template for filenames that's among the more sophisticated we've seen. The options include: the document name in initial caps, lower case or all caps; a one, two or three digit serial number; a lower or upper case serial letter; seven date variations; and the extension in lower or upper case. Plus any custom text in any combination of six options.
For example, you can rename all your images as "FathersDay-061602-001.jpg" and so on. We generally find renaming images one of the least rewarding tasks we can think of, preferring to impose a meaningful directory structure without changing any filenames (a folder for each year and a folder for each shoot that year numbered sequentially with a text description like "74 Annadel Park"). So while we like just how descriptive you can be, we won't use it. But that's just us.
Filename compatibility checkboxes for Windows, Linux and the Macintosh are also available. Which beats learning the rules.
The information displayed by the Browser for any folder is stored in a cache. That includes the thumbnail previews, their orientation and their ranking. To avoid recreating it, you have to (remember to) export that cache to the directory. This should really be invisible to the user. Really.
AUTO COLOR | Back to Contents
We found the new Auto Color command useful for correcting color casts, especially if you're not comfortable using Levels, Curves or Variations to do the job.
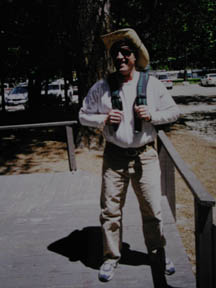
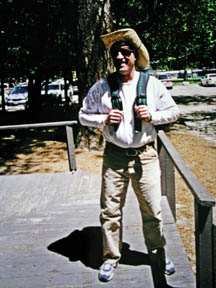
Yosemite Sam Auto Color Sam We used it for a quick color correction of a very flat picture we took of a 4x6 print we took in fluorescent kitchen light. We were just making one of those stealthy copies of a friend's funny image, figuring we could fix it up later. One click of Auto Color was all it took to restore vibrancy to the image.
Auto Color
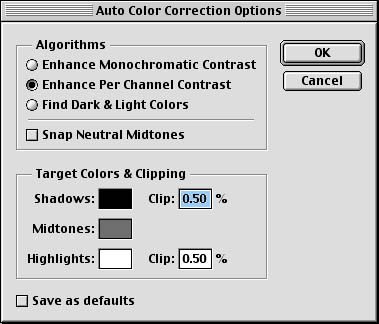
Easily tweekedYou can have some serious control over Auto Color, too. Tweaking Auto Levels, Contrast and Color is done from the Options dialog window in Levels. Setting the algorithm to "Enhance Per Channel Contrast" mimics the old Auto Levels command. Setting it to "Enhance Monochromatic Contrast" makes it behave like the old Auto Contrast command. Setting it to "Find Dark & Light Colors" (which neutralizes the highlights and shadows) and clicking on the "Snap Neutral Midtones" option (to neutralize the midtones) makes it into the new Auto Color command.
You can also shift that midtone in the Options dialog box. And you can save your settings as the default.
Auto color is a welcome addition but to make it useful can require almost as much work as manually manipulating color. Why? Because it has no idea what the colors it is trying to automatically correct actually represent.
So we'll stick with the plug-in iCorrect EditLab (http://www.picto.com) where we can point out the sky, foliage and skin to get a corrected image or batch of images faster than Auto Color can shift its midtone.
HEALING BRUSH & PATCH TOOL | Back to Contents
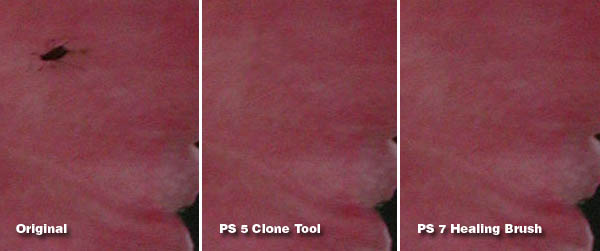
We rolled up our sleeves, launched Photoshop 5.0 and did a Rubber Stamp correction of a blemish in a shot of a rose (as gardeners, we're great snail breeders). Then we opened the same image in Photoshop 7.0, used the new Healing Brush and compared the results. Identical.
A Rose By Any Other Name So what's the big deal?
We'd be tempted to suppose the interface, but we find it confusing, especially how the tool is split into two modes. We don't much care for the name, either, if anyone's listening. To paraphrase an unforgettable line, anyone with a good car don't need healing.
So the real magic is under the hood. Adobe told us a much more sophisticated algorithm is involved, making more than a single pass at the data. But divining exactly what's going on is beyond us. We aren't even sure anyone actually knows although the official word is that it preserves "shading, lighting, texture and other attributes when cloning."
Now that we've gotten that off our chest, let's just say it works well. We have a very damaged old monochrome image that's particularly priceless for being the only photograph of one particular grandfather. But it's so deteriorated it seems like an illustration of the various molds that can grow on a print emulsion.
We'd like to tell you it cleaned up this image like magic, but not even Snake Oil could do that. It did handle various challenges much more believably than the rubber stamp, however. And it was easier to use (although you can overdo it). So we'll take it.
What's the key distinction between the two modes? With the Healing Brush, you option-click an ideal area to use as your retouching paint. With the Patch Tool, you make any selection of the image you like and drag it to the ideal area. It's sort of a My Place or Yours approach.
PICTURE PACKAGES | Back to Contents
Under File Automate you'll find the new and improved Picture Package. This option makes printing multiple sizes of your images (with a number of time-saving options) much more efficient than it has been.
At the top of the Picture Package dialog window is a Source panel to set the options for only the frontmost document, a file or an entire folder of images. If you point it to a folder, you'll get one sheet for each image (not every image on one sheet).
On that sheet you can have a number of layouts (16 to start with) including four 4x5s, two 5x7s, eight 2.5x3.5s and combinations like one 5x7 with four 2.5x3.5s. If you don't like the defaults, you can roll your own.
Photoshop 7 displays a thumbnail of the layout you selected with the image imposed as it will print.
If you've done much editing on the image, perhaps using Layers, you'll appreciate the Flatten All Layers option. It can speed printing without requiring the overhead of housekeeping on your original file.
Even more delightful, though, is the Label option, which let's you impose text (like your copyright) where you like over the image in any font available in any size you like.
And even normal printing of single images is delightfully enhanced with a useful preview that accurately showed us what to expect from our Nameless printer.
SPELL CHECK | Back to Contents
Not strictly for the digital photographer, unless you have trouble typing "copyright" but this is big. Where there's text, there must be spell checking. Photoshop 7 includes a multi-lingual spell checker activated by clicking in any text layer. More importantly, there's a Find and Replace Text function.
We like that and the multi-lingual feature, but frankly, we find all application-based spell checkers inhabiting the Stone Age.
We much prefer -- and use -- system-wide spell checking. OS X now provides the rudiments of this as a service, but it's been available for Windows and Mac OS 9 and below (don't get to say that much) for years. It's Evan Gross's Spell Catcher from Cassady & Greene (http://www.casadyg.com). This inexpensive utility can spell check in almost any application (even interactively), provides a thesaurus as well, plus readability statistics and formatting options. It makes every other spell checker obsolete and is no doubt responsible for whatever's left of the ozone layer, too.
THE BRUSH TOOL | Back to Contents
If you do any retouching (either directly on your image or using a mask), you'll appreciate the new brush tool. But your options just grew enormously.
Photoshop now shows a very long list of brush strokes along with the brush size (whose limit has been increased from 999 to 2,500 pixels), many of which include special effects. But wait. There are also several libraries of brush styles you can load -- brushes for calligraphic, drop shadow, dry and wet media, faux finish, natural, special effects and well, yes, more.
The variety of presets reflects the capabilities of the new paint engine. Which permits you, too, to create your own custom brushes. The new brush preview gives instant feedback on changes to any of the many brush variables.
The Shape Dynamics option supports all the features of Wacom's various pressure sensitive pens and even warns you if you select an unsupported feature. Roundness Jitter (which shakes your pen as you draw), Scattering (which dabs at the canvas) and other effects familiar in paint programs are now in Photoshop.
Other options include Noise, Color Dynamics, an Airbrush setting (which replaces the Airbrush tool) and more.
This isn't just for painters. It's superb control for dodging and burning on contrast masks or directly on your image. You'll be able to draw detail out of your images with much greater subtlety.
TOOL PRESETS & WORKSPACES | Back to Contents
With so many brush options, you might go nuts making changes to the active brush, losing them to make other changes and recreating them. Fortunately, you can save your brush settings now.
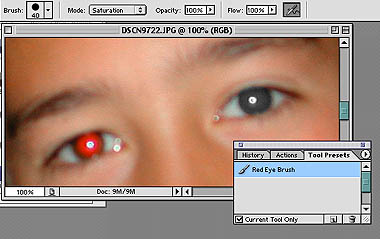
Photoshop suggests a name for each brush when you select New from the Tool Preset palette. Then it adds the settings to the list. You can have a Red-Eye brush, for example, and even a Botox brush.
Red-Eye Brush?
With Tool Presets anything is possibleSimilarly, you can save your palette locations as a Workspace. A click recalls the desktop layout you saved.
ONLINE HELP & UPDATES | Back to Contents
Whether it's your operating system or your favorite application, the trend is clear. Vendors want you online. When you're online (preferably with broadband) they can confirm you own the software and, in return, provide online (and free) updates.
The problems with this scheme are 1) without a backup, it's nearly impossible to go back to the previous version if you encounter a problem with the update and 2) the updates aren't small (think overnight for a modem connection).
When you launch Photoshop 7.0 it, too, checks online for updates. But you can change the schedule by clicking the topmost tool (Adobe Online) in the toolbar and clicking Preferences.
No personal information is sent but your Internet connection is used to automatically update your software when revisions are released.
A great deal of the help is online now, too. Much as we love the extensive online Photoshop help, we do wonder about running a browser with Photoshop. You'll want to be sure you have enough RAM for both applications to take advantage of the wealth of assistance Adobe has online.
CONCLUSION | Back to Contents
There's much more to Photoshop 7 than we've covered here, particularly for Web designers. We'll address the extensive automation capabilities shortly, though.
Any software is an investment. You not only invest a goodly sum for a license to run the product, but you invest your time in mastering it. Once again we are amazed at how adroitly Adobe has rewarded our investment in Photoshop.
Your needs may indeed be met by many other products that approach it in function, some even surpassing it in ease of use.
But if you want to impress your in-laws with magic tricks, this is it.
