GETTING TO THE NEXT LEVEL
SilverFast 6 Impresses an Old Pro
 By MIKE PASINI
Editor
The Imaging
Resource Digital Photography Newsletter
(Review Posted: 11/22/02; Updated: 6/7/07)
We came to terms with scanners a long time ago by thinking of them not as unwieldy photocopiers but as compact process cameras.
|
C O N T E N T S |
A process camera is what newspapers and magazines used to rely on to make negatives of photo prints and page layouts. They were big. Room size. Or two rooms, really, if you count the darkroom behind them where you loaded halftone or line film. They could handle huge sheets of film and enlargements to 300 percent -- which often wasn't quite enough.
So when we cabled our first scanner to a Mac SE, we were delighted. We could sit down instead of run from room to room loading copy or film. And we could simply draw a marquee around what we wanted to copy instead of lining things up on the ground glass or the cheat marks on the camera back. We could even type in an enlargement or reduction without pushing the lens into its bellows or the copy stand off the end of its track. We even liked the cover that hid the exposure, having been regularly blinded by carbon arcs.
Over the years we've gone from scanner to scanner -- and from one bundled scanner plug-in to another. And we've come to pine for a software package that we could take with us as we upgraded hardware as well as one we felt comfortable using. There's a lot of junk out there.
We aren't asking for much. A Preview window goes without saying. But a densitometer to read the preview and set the highlight and shadow are often missing. A curve adjustment would be nice. And an easy way to size the image and set its resolution.
Sharpening is a convenience if often done prematurely (sharpening is best done as the last step in image correction, at final print size). But a good descreening filter to handle halftoned images is essential.
You tend to suffer whatever software comes with your scanner. But if you want to upgrade its capabilities or commit to a product that isn't vendor-specific, there are a couple of products we can recommend.
We've been using both Ed Hamrick's standalone scanning application VueScan (http://www.hamrick.com) and LaserSoft Imaging's SilverFast Ai and HDR (http://www.lasersoft-imaging.com). More about VueScan another time. Today, let's look at SilverFast.
LaserSoft Imaging is a German firm whose CEO and president is Karl-Heniz Zahorsky. "The original motive for the 'invention' -- meaning the conception, development and additional development of SiverFast Ai -- was to be able to produce one's 'own' image successfully, without requiring extensive training in reproduction techniques," he said.
Indeed, the product packs a lot of intelligence into itself. And while it is primarily a high-end tool equally at ease in either RGB or CMYK color modes, it does provide a sort of automatic mode for beginners called the ScanPilot.
SilverFast is well enough regarded that it's bundled with some high-end scanners. See, for example, Dave's discussion of version 5.5's menus and program layout at http://www.imaging-resource.com/SCAN/SS4000/SS40SOFT.HTM in the Polascan 4000 review.
Also available separately, its price depends on the particular hardware you'll use with it. You need a version for each scanner you'll use it with (as well as the manufacturer's driver). Generally, it is priced at $99 for more popular low-end scanners but goes as high as $999 for some high-end machines. Add about $125 for IT-8 color matching.
While more expensive than VueScan, it doesn't have VueScan's hefty memory requirements (ameliorated a bit by virtual memory). But VueScan doesn't need a driver, either -- making it a lifesaver for unsupported hardware.
SilverFast 6 is supplied as both a Photoshop and TWAIN plug-in and a standalone application.
PRODUCT LINE | Back to Contents
SilverFast 6 (http://www.silverfast.com) is available in several packages:
- SilverFast Ai provides up to 48-bit color capture for over 150 scanners.
- SilverFast HDR handles 48-bit RAW image files rather than scans.
- SilverFast DC works with 24-bit color image files from digicams.
- SilverFast SE is a low-cost ($49) version of the program that contains NegaFix in version 6.
- And SilverFast PhotoCD is designed to work with PhotoCD images.
FEATURE SET | Back to Contents
Version 6 sports a number of impressive features:
- Smart Removal of Defects. Dust and scratches, highlighted in red, are decreased or increased with real-time selection controls. Any image details that might be affected by SRD can comfortably be excluded with an exclude-mask.
- Selective Color Correction. Click on the color to correct and SilverFast automatically selects it. Use the controls, layers and masks to correct it.
- Adaptive Color Restoration. Bring back faded or weak color automatically, controlling the effect with a slider.
- Selective Color to Gray. Select which shade of gray to convert Red, Green, Blue, Cyan, Magenta or Yellow.
- Grain and Noise Elimination. A before and after preview shows the effect of three standard settings or a custom setting on noise and grain.
- Remove Multiple Color Casts. Up to four neutral points can be set and neutral density values edited. Click on a neutral to eliminate the color cast. Fine-tune by double-clicking on the tool to edit fields showing before and after RGB or CMY values.
- Job Manager. Batch automation by any other name.
- NegaFix. Convert scans of negatives into positive images with presets for several film types.
- Standalone Application. Requires only 2-4-MBs with access to SilverFast Ai, SilverFast HDR, SilverFast DC or SilverFast PhotoCD.
- Silver Fast QuickTime Tutorials. Excellent, short but thorough examples of each feature in actual use.
SYSTEM REQUIREMENTS | Back to Contents
SilverFast 6 runs on Windows 98/ME/NT4/XP/2000 with 128-MB RAM and 50-MB free hard disk space; and Mac OS 9.2 or later (including OS X) with 64-MB RAM and 50-MB free hard disk space.
The Photoshop plug-in requires Photoshop 5.5 or later.
Performance was noticeably better on our faster systems with more RAM.
INSTALLATION | Back to Contents
A single installation of SilverFast 6 went well. We had a bit more trouble installing HDR with Ai, however. A little manual file copying removed a great deal of duplication. But more than likely, this only affects reviewers. Most users will install a single version.
The install was simpler than we recall with version 5.5.
We used SilverFast 6 mostly as a Photoshop plug-in but its behavior is similar as a TWAIN plug-in or as a standalone application.
 |
 |
|
| The Main Window |
The ScanPilot |
As such, you Import the SilverFast option from the File menu and the plug-in launches.
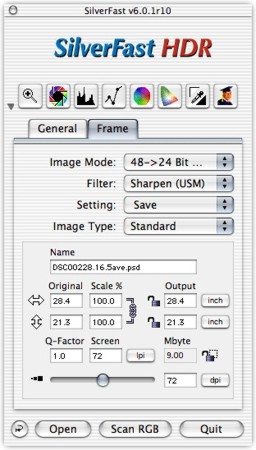
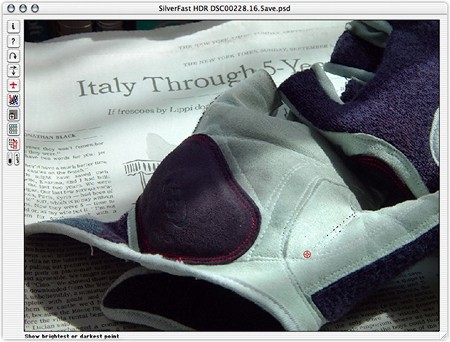
Several windows pop up when you launch SilverFast. And you can configure which ones they are and where they appear. You'll want the Main window with eight correction buttons, two tabs and four dialog buttons, of course. You'll also want the Preview window with nine control buttons, the prescan and the help line.
 |
| The Preview Window Note the red target indicating lightest point |
Beginners will want the Scan Pilot window open with six scanning steps and a go/stop set of buttons that guide you through the process.
 |
| The Densitometer |
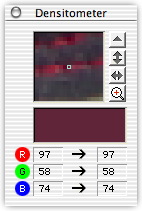
We also liked having the Densitometer window open.
With an interface this complex, we really appreciated the context-sensitive help. No matter where you move the cursor, a short but helpful explanation is displayed at the bottom of the Preview window. This was very helpful in deciphering what various buttons and controls did.
The key concept behind SilverFast is to shift the task of color correction off the puny shoulders of your 8-bit per channel image editor and onto the hefty shoulders of your (up to) 16-bit per channel scanner, where a great deal more information about an image can be manipulated without deterioration.
To work with your scanner's raw data, SilverFast depends a great deal more on the prescan than most scanner software, which only uses the prescan to let you crop the scanning operation to the smallest possible area. SilverFast has bigger plans for the prescan.
In fact, LaserSoft calls this the "prescan concept."
You might expect a slow prescan, but no, SilverFast is quick. Yet, all the image color correction tools we'd expect to use in Photoshop after a scan, are available to the prescan. By tweaking the prescan, you can milk the best data from your scanner for any particular image.
Special features often rely on a smaller, sample prescan of their own to show before and after effects. So each time you change a feature setting, you also rerun the prescan on a small but revealing area of the image to see the effect.
That may seem annoying, but it beats rescanning the entire image.
SilverFast is clearly something of a Swiss Army knife of scanner software, but it's also something of a twist-off cap to great captures, too. Anybody can get great results without really trying. The corkscrew and can opener are there if you need them, though.
For our first test scan, we chose (at random) a magazine ad of a sofa.
We told SilverFast to use the descreening filter on our halftoned image, setting it at magazine quality (133 lpi). Everything else we left at the default values.
We clicked the Prescan button to see what was in the scanner bed and when it showed up in the Preview window, we cropped it. Then we hit the Scan RGB button and waited as the scanner scanned the image.
In a few seconds, we got a gorgeous first scan.
But what fun is that?
To exercise the power of the program, we had to play around a little.
Our first delight was pretty harmless. In the Preview window is a small button that shows the brightest and darkest points in the prescan. This used to be one of the skills you paid a lithographer to know. But all you have to do is click and a red target hovers over either the bright or dark spot, depending on which button you hold down.
Our second delight was discovering you can scan more than one image at a time. Scan, say, a magazine page with a couple pictures of Roberto Benigni as Pinocchio and you can crop not just one but both. Each crop is a frame, identified with a number.
 |
 |
|
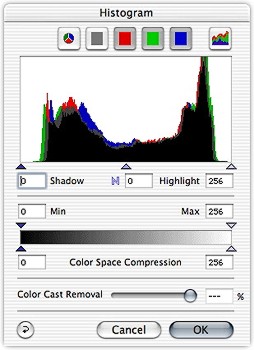
| One of the Histogram Displays Could use a little transparency |
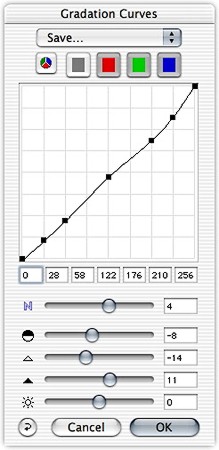
Curves With Synched Sliders |
We also got a kick out of the histogram displays (there are multiple options, but we would have liked to see some transparency in the overlaid option) and the curves dialogs, whose manipulation using sliders was an education in itself.
We're grateful for small efficiencies, but there are some big ones, too.
The biggest of those is the Job Manager, accessible from the Preview window, which lets you scan all the frames to a specific folder in any of four formats.
But let's briefly revisit a few of those features touted above to enjoy a few more routine blessings.
The GANE filter has three settings to reduce grain and noise in an image. You can also vary the intensity, threshold and radius settings to refine your own setting.
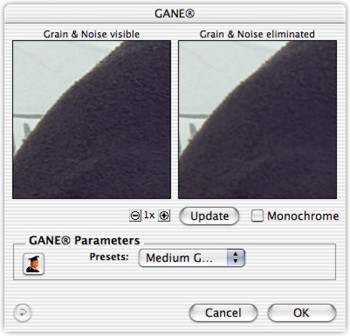 |
| The GANE Filter |
To our amazement, we found this filter did an excellent job on a problem that has stymied us for years: removing the inevitable specular highlights caused by the reflections off textured photo papers. You know, those linen and pearl finishes that were very chic a while ago.
We did lose a little sharpness, but far less than in any other desperate measure we've ever tried.
USM & DESCREENING | Back to Contents
You can use both Unsharp Masking and Descreening filters or either. USM will sharpen your image while Descreening will hide the halftone pattern in printed images. Sliders provide for tweaking the results.
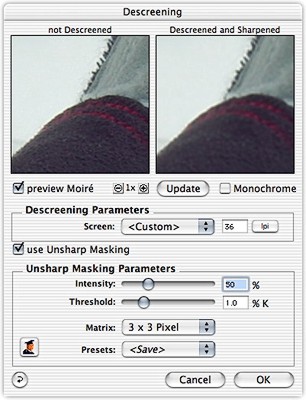 |
| Descreening |
DUST & SCRATCHES | Back to Contents
In the Preview window, a Dust & Scratch Removal button provides software removal of artifacts common when scanning prints and negatives.
Press the button to get another button directly below it to display itself (well, the interface has some quirks). Click on that parameter button to bring up the dialog box with another preview button. That's where you start.
Click the preview button to scan the image again and display the defects that SilverFast recognizes circled in red. You can press a button to show the original, the correction or the marked-up original.
The marked-up original is handy for setting the parameters: white, black or all defect types; detection sensitivity; defect size limits; and defect intensity. And you can save these correction levels to disk for reuse.
You can further refine this tool by using masks. Lasso, polygon or brush modes are available.
With a few clicks, you've eliminated a lot of cloning (and even healing brush) time in Photoshop.
No one is born a scanner operator. And if we hadn't spent years behind a process camera, we wouldn't have understood how to play the game. In fact, we spent about six months trying to figure out the multiple exposures required to make a halftone. Until one day our film salesman Larry Johnson came by to demonstrate all the tricks of an old pro (like calculating bump exposures and using still development for tray processing).
Larry's gone on to greener pastures, but you can enjoy the same sort of help using the excellent QuickTime videos that demonstrate SilverFast's features in actual use.
The tutorials take up as much screen space as necessary and as little of your time as required to show you how to use each tool. This is enormously beneficial even if you know how to play the game because not everything in this package is intuitive (like that Dust & Scratch Removal button).
Despite our quibbles about the interface and confusion over the multiple packages and the dependence on the hardware manufacturer's drivers, SilverFast 6 does not disappoint. In fact, we were delighted with the Swiss Army toolset for tapping into the depth of our scanner and 16-bit channel images.
If your scanner software makes you feel like you're sitting in the dark playing a video game where you can never get to the next level, try SilverFast. It gave us the feeling we were back in the darkroom, making magic happen with an old pro in the glow of a safe light.
LaserSoft recently released an update to SilverFast (http://www.silverfast.com), its venerable scanning software application we reviewed above. That review covered version 6 -- and the latest release is still version 6. But a lot has changed with the lastest update.
In fact, a lot has changed since the blockbuster release of version 6.5r5 just a few months ago. With release 6 of version 6.5 (pay attention now), LaserSoft has gotten into the calibration game, selling barcoded IT8 targets that work with its software to provide one-click calibration convenience.
Version 6.5 introduced a couple of very helpful new technologies, too, so if you haven't upgraded lately, or you're still using the SE lite version that came with your scanner, you might think about upgrading to Ai version 6.5r6. Let's take a look at the major new features to see why.
It seems obvious, but automatically identifying the scannable parts of a film holder like a 12-up slide holder should be something any scanning software package should know how to do. Typically, however, only the manufacturer's software is privy to the location of the images in its holders. Every other application requires you to identify the scannable areas in some sort of batch mode, saving the configuration for reuse later. For some reason batch processing just gets no respect.
With this revision, SilverFast has made a stab at auto identification, scanning the preview you make manually and drawing frames where it thinks images are. At the same time, Auto Frame Alignment (new in Release 6) can straighten those frames out (if, for example, you are scanning prints that are not easily aligned on the scanner glass).
Unfortunately, our experience was problematic (to use a polite word), even after upgrading to release 6, which, we were told, made significant improvements in this function. And given its very imprecise selection tools (at least on the Mac) for marking up the full view size of the preview (showing the whole scanner bed on the screen, that is), that's unfortunate. It still takes a lot of twiddling to identify scan areas in SilverFast unless you're working with a 100 percent preview.
To use the feature, first make a preview scan and then click the Auto Frame button identified by an icon with two images surrounded by dotted black lines. You can see it identify frames, marking them with marching ants and moving on to the next. The selected frame is outlined in red with a large crosshair in the middle that can also be used for rotation.
You can delete frames by selecting them individually and clicking the Trash icon. In release five, we had to delete a lot of empty slide slots on the holder. SilverFast seems to identify scannable frames by contrast detection. Hence a dark slide only convinced SilverFast a part of it was the image. The program, in short, doesn't look for a repeating pattern (as you might have on a 12-up slide holder). In release six, the function only found one frame. We didn't have to do any deletions, but we didn't enjoy any automation either.
This is a new function, so we hope a little more tender loving care will turn it into the useful tool we all could use.
MULTI-EXPOSURE | Back to Contents
The most exciting development in this release, however, is the new multi-exposure option. At PMA we discussed the feature with several scanner manufacturers who were universally delighted with it.
LaserSoft discovered that by scanning once for highlights and once for shadows (at two different exposures that is) and then combining the two scans into one high density range image, it was able to 1) reduce noise while 2) revealing shadow detail and 3) still retain highlight detail.
Scanner manufacturers are fond of quoting Dmax numbers (especially above 4.0), for their units but they don't easily confess that they've cranked up exposure so much to get that Dmax that the highlights are blown out. The rarely quoted density range is what you're really interested in (Dmax minus Dmin) for single pass scanning.
But with Multi-Exposure you can tap into that Dmax to get shadow detail without sacrificing highlight detail, which can be captured on a second pass exposed just for them. Ingenious.
LaserSoft claims the new feature makes multi-sampling obsolete. And we agree. Unfortunately the feature isn't available for all scanners that run SilverFast. Check the SilverFast site to see if your scanner is supported. If it is, consider yourself the proud owner of a new scanner. It's that good.
To use Multi-Exposure, pick a 48-bit scanner setting, set the Multi-Sampling option to "1" and then click on the Multi-Exposure button below it to set it to "2." Your scanner will perform a dark scan of the shadow detail and a lighter scan of the highlight detail and then merge the two together into a 16-bit channel file.
We found it helpful to adjust exposure before scanning, which we would normally do. The presets for type of scan are disabled in this mode.
AUTO CALIBRATION | Back to Contents
With release 6 of version 6.5, SilverFast also includes auto calibration. This new trick uses the auto frames detection capability as well as new IT8 targets manufactured by LaserSoft that include barcodes.
The barcodes imprinted on LaserSoft's IT8 targets tell SilverFast exactly what reference data to use for the target. You can do this manually, of course, for any IT8 target (as you always have), but the one-click automation can do it for you with the barcode. The reference data simply tells the calibration software what the values of each color block on the target actually are, as opposed to how the scanner has read them. The difference is the calibration.
This works with both reflective and transmissive targets, both of which are available from the company (http://www.silverfast.com/show/it8/en.html). The transparencies available include Kodak 35mm ($50), 6x7 ($33) and 4x5 ($33), Fuji 35mm ($110), 6x7 ($95) and 4x5 ($95). Reflective targets include Fuji 10x14cm ($33), 5x7 ($33), 16x21cm ($76).
Version 6.5 can also scan to PDF, pass SilverFast Ai's HDR gamma optimizations of 48-bit scans on to SilverFast HDR for further processing and adds a color cast neutralizer to NegaFix.
Version 6.5 is a compelling upgrade and release 6, with the inclusion of auto calibration, makes it a no-brainer for commercial studios where time is money. We'd like to see auto frame alignment polished a bit, but that's no reason to deny yourself the advantages of innovations like Multi-Exposure and its other useful improvements.