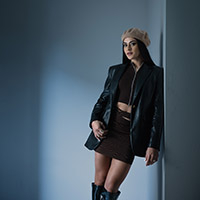
Video: How to create ‘flash’ in natural-light portraits using Adobe Lightroom
posted Monday, May 2, 2022 at 4:00 PM EDT

When capturing natural light portraits, there are numerous ways you can add a bit of light to your subject to help them stand out. An 'in the camera' approach is to use a reflector to bounce light onto your subject. Another way is to use software to create 'flash' with photo editing techniques. With Adobe Lightroom's AI masking tool, this second approach is easier than ever. But how do you use Lightroom's masking tools to create a natural, realistic-looking artificial fill flash? In a new video for Adorama, photographer Pye Jirsa of SLR Lounge shows us how to help a portrait subject standout with some quick Lightroom editing.
Before watching the video below, you can download the exercise files here (note: link may automatically start a download) if you'd like to follow along with Jirsa. While you'll do a lot of heavy lifting on your computer when using this type of technique, there are still important steps you should take at the time of capture. Beyond capturing an image with good composition and a compelling pose, you should shoot RAW, as RAW image files offer considerably more flexibility during editing and the image quality will hold up much better when doing extensive editing. Further, the better your exposure during capture, the better the final image will look, especially concerning detail and noise.
Once you've got your RAW file in Lightroom, Jirsa suggests starting by editing the background and overall color. We know that we'll add light to the subject later in the process, so let's ensure we've got a strong foundation before getting to the subject. Color is a personal choice and while Jirsa usually goes for warmer portraits, he's mixing things up a bit and making the image cooler to start. It's okay if the subject looks too dark after you adjust the background, we'll deal with that later.
Once your basic color is dialed in, now it's time to use Lightroom's powerful AI masking tools to select the subject. In a single click, Lightroom detects the subject, and in most cases, it works very well. Once the subject is selected, now it's time to brighten the subject to create the illusion of flash. You may be tempted to use the 'exposure' slider, but if you make any significant adjustments to overall exposure, your image will quickly look fake and flat. Instead, Jirsa recommends starting with the 'highlights' and 'whites' sliders. Instead of brightening the entire subject, this will increase the brightness of the areas on your subject that are already brighter. You can then increase the exposure slightly but use a light touch.
The final step is to perform a few more local adjustments and refinements. An effect Jirsa uses is a subtle radial burn. This will darken the edges of an image and help draw more attention to the subject. You can use different masking tools and brushes to make small edits to your taste, but the important thing to consider is subtlety. You don't want to go overboard with any individual edit.
To see more videos from Jirsa's 'Master your Craft' video series, check out the playlist on Adorama's YouTube channel.
(Via Adorama and SLR Lounge)