How your camera’s focus bracketing system works & how to create sharp stacked photos
posted Tuesday, February 28, 2023 at 10:30 AM EST
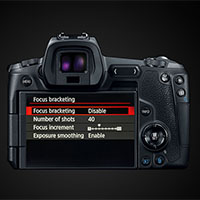
Focus stacking, combining images shot at different focus distances to create a composite image with greater depth of field, isn't new. For years, photographers have used specialized software, like Helicon Focus and Zerene Stacker. However, this approach has required photographers to adjust focus and capture consecutive shots manually. Recently, cameras have begun incorporating focus bracketing modes to capture the requisite images for a focus stack automatically. Some cameras can even combine and stack images in-camera. For modern cameras with focus bracketing systems, how do they work, and are they as good as doing the focus bracketing yourself? Over at Lensrentals, photographer and all-around digital photography expert Jim Kasson answers these questions and more.
There's no doubt that focus stacking has helped photographers capture brilliant images. Not only does focus stacking extend the depth of field of images, but the technique also allows photographers to use their lenses at optimal apertures rather than stopping way down to increase the depth of field. On the other hand, the process is tedious at best and extremely difficult at worst. When working with high-magnification lenses up close, the depth of field is razor-thin. It is challenging to adjust focus the optimal amount over and over. Dedicated equipment such as focusing rails can help, but that adds another layer of complexity – and cost.
Enter camera manufacturers and their latest mirrorless cameras. Nikon has Focus Shift Shooting. Fujifilm, Olympus, Hasselblad, Sony, and Canon have Focus Bracketing. Whatever it's called, the feature takes the frustration out of capturing images for focus stacking. However, as Kasson writes, documentation about the feature is sometimes cryptic, and using the focus bracketing modes is only sometimes intuitive. There are many questions about how in-camera focus bracketing systems work and the best practices to achieve optimal results.
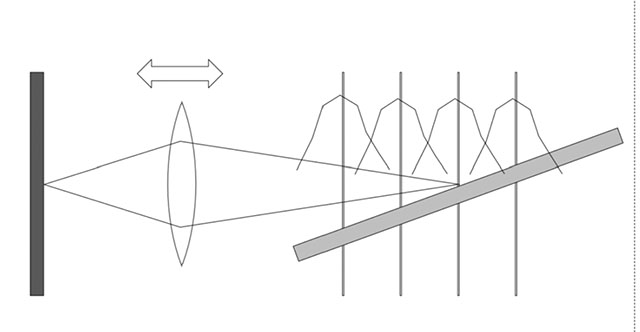
Kasson explains that Nikon and Fujifilm's systems work in a similar way. Considering the issue that must be overcome – limited depth of field – Nikon and Fuji deal solve it by successively moving the plane of focus further from the camera. In Kasson's diagrams above and below, he's sketched how sharpness can vary with distance at each focal plane distance. The "haystacks" show that "as you move further away from the focal plane, sharpness at first falls off gradually, then rapidly, then gradually again," writes Kasson. The width of the haystacks corresponds to the f-stop of the lens used. As expected, when you increase the step sizes from one focal plane to the next, the planes of focus "become more separated" while the "haystacks" remain the same.
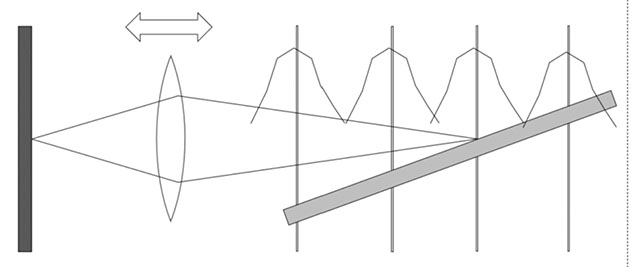
Ideally, the selected step size ensures that the worst-case sharpness in a completed set of focus bracketing images is acceptable without shooting many extra, unnecessary images. Kasson writes that the first rule of focus bracketing is "All calculations of the desired step sizes should stem from choosing the minimum acceptable sharpness, and picking step sizes that are small enough to give you the sharpness you desire, and not so small that you waste a lot of exposures getting the job done."
Consider lens focus differently. Given static focus, what happens when you move the target? When the focal point is in front of the image sensor (red lines in the diagram below), the subject is considered "back-focused." If the focal point is behind the sensor (blue lines), the subject is "front-focused." When the focal plane falls precisely on the image sensor (black lines), the subject is "in focus."
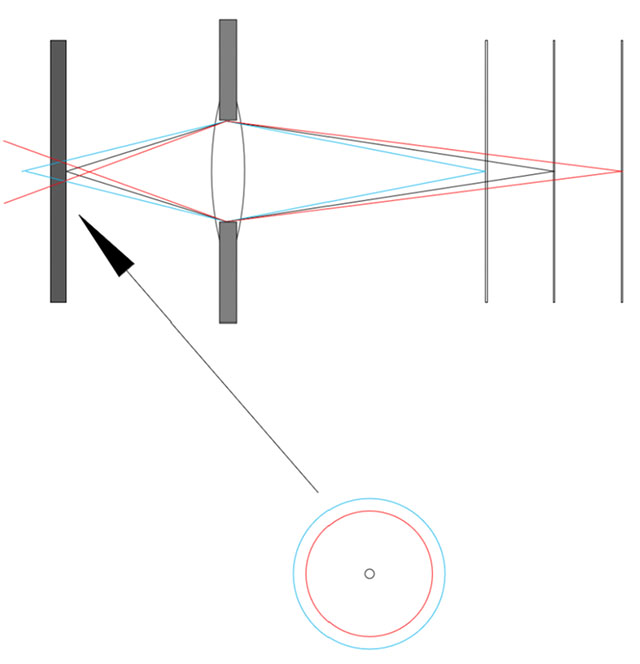
This diagram helps illustrate the importance of "image space." As Kasson says, " If we concern ourselves with what happens on the sensor, or image side of the lens, we talk about image space and depth of focus." Focus bracketing systems like Nikon's and Fuji's work in image space. What's significant about this is that image space has nothing to do with the lens itself. After all, it deals with what's happening on the image side of the lens, not the lens itself. These focus bracketing systems ignore the focal length of the lens and subject distance, although they do consider the f-stop.
Concerning print sharpness, focus bracketing systems don't need to deal with focal length or subject distance. It's possible to reasonably model normal photographic lenses using an image of the diaphragm opening, which is approximately a circle. Kasson writes, "For most of today’s lenses, that means we’re talking about filled-in blur circles called circles of confusion (CoC). The thing that determines how much blur we’ll see in the image is the diameter of that circle. The size of the CoCs, which are illustrated in the lower part of the above figure. Note that no matter whether the image on the sensor is front-focused or back-focused, the size of the CoC is determined by the amount of misfocusing on the sensor side of the lens (in image space). If you will forgive a bit of math, the diameter of the CoC is the amount of image space misfocus over the f-stop, but you don’t even need to know that; the camera will figure that out for you."
With modern high-resolution image sensors, what's an acceptable CoC? For 35mm film cameras, depth of field tables were calculated using a 0.03 mm CoC diameter. That's too large for modern cameras, and sticking with that standard results in blurry images. CoC diameter these days is measured in micrometers (µm). There are 1,000 µm to a mm. The sensor pitch for a high-res camera is around 4 µm, so to achieve "roughly equal contribution of sensor and pixel aperture blur and defocus blur, you'd set the CoC for depth of field computations to about 4 µm," says Kasson. This results in depths of field considerably smaller than typical DoF tables.
Kasson describes the next rule of focus bracketing as follows: "Depending on your subject matter, the size of your intended prints, and the esthetics of the scene, I recommend using 15 µm as a default, and 7.5 µm for the parts of the image that you want to look reasonably sharp. If you want the most out of your camera, the right worst-case CoC for stacking and focus bracketing is on the order of the pixel pitch of the camera, or about 4 µm for high-res cameras. If you want the ultimate precision, you could go as low as half that with modest improvement. For non-critical work, twice that will be just fine."
When working with focus bracketing in your camera, you can select step size. This is a direct way to affect the circle of confusion. How do shot-to-shot CoCs change with camera settings?
Returning to image space, check out the diagram below. "The red circle indicates the blur circle in the sensor plane for an object in the near plane when the camera is focused on the middle plane. Let’s call that the single-step-CoC. When you use focus bracketing, what controls its diameter?" If you guessed that the focal length, focus distance, or even the f-stop controls that diameter, you're wrong. Join the club. The only thing that affects the diameter of the single-step-CoC is the step size. When working in image space, the step size in micrometers will remain constant throughout an entire series of focus-bracketed images.
You can consider the step size, and select the optimal step size, solely based on the acceptable blur circle.
Putting that into real-world terms, Kasson considers the GFX series cameras, all of which include in-camera focus bracketing (some earlier models, like the GFX 50S, added this feature via a firmware update). "With the Fujifilm GFX 50, GFX 50R, GFX 50S II, GFX 100, and GFX 100S, it’s really simple: the single-step CoC in µm is twice the step size, which means that the size of the largest blur circle you’re going to see in a stack from a set of captures (the worst-case CoC) is the step size in µm. Step size = 1 means you’ll not need to use an image with CoC of over 1 µm, which is ridiculously small for a 3.72 µm camera. Step size of 4 means that the largest blur circle you’ll have to take is 4 µm, which is about the pixel pitch, and not a bad place to start. With a step size of 10, you’ll have to use blur circles as large as two and a half times the pixel pitch, which is starting to get a bit sloppy. If you want to see the experimental results for the GFX 100, look here."
That's a lot of detailed technical information. So, how do you put all that into practice? At Lensrentals, Kasson explains, in easy-to-follow steps, how to put focus shift systems to work for your photography, regardless of the camera system you use. Kasson works through a real-world example, offers practical tips, and explains precisely how to select the optimal settings for your situation.
Visit Lensrentals for the full details, including additional background information, more diagrams, a deeper look at circles of confusion, some math, and step-by-step directions for taking full advantage of your camera's focus bracketing system.
For even more excellent, technical in-depth articles, visit Jim Kasson's blog. His photography can be viewed here.
Image credits: Lensrentals / Jim Kasson