=================================================================
To subscribe, unsubscribe or change your email address, visit:
http://www.imaging-resource.com/IRNEWS/index-subs.html
Support the Newsletter!
- Find the best price for anything at http://ir.pricegrabber.com
- Shop Amazon, Adorama at http://www.imaging-resource.com/buynow.htm
=====================================================
THE IMAGING RESOURCE DIGITAL PHOTOGRAPHY NEWSLETTER
=====================================================
Volume 17, Number 2 - 31 January 2014
----------------------------------------------------------------------
Copyright 2014, The Imaging Resource. All rights reserved.
----------------------------------------------------------------------
Welcome to the 379th edition of The Imaging Resource Newsletter!
In this edition, we not only bring you another Shooter's Report installment from Dave Pardue for the (extremely) popular Olympus Stylus 1 superzoom, but a first installment of the Shooter's Report for the just-announced Olympus OM-D E-M10!
On the feature side, Roger Cicala from LensRentals dared to do the unthinkable -- completely disassemble the new Sony A7R! Roger gives us a step-by-step look into what's been crammed inside that incredibly compact full-frame camera. We must warn you, though; the photos aren't for the faint of heart! ;-)
The E-M10 wasn't the only camera announced this week, as it turns out. We've also welcomed the Fujifilm XT-1, plus some other interesting Olympus cameras and a trio of new Olympus lenses. Check our the photos and links for all the details down below.
Finally, we share some of the most popular news stories from this past week.
Happy reading!
TOPICS
----------
Get Social with IR
Sponsors
Camera Review: Olympus E-M10 Shooter's Report, Part I; Olympus Stylus 1 Shooter's Report, Part II
Feature: Sony A7R teardown: What secrets lie inside Imaging Resource\92s 2013 Camera of the Year?
Just Announced: New Cameras from Olympus and Fujifilm announced this week
Popular News
Next Issue
Signoff
GET SOCIAL WITH IR
---------------------------
If you want to stay up-to-date with the latest camera and photography news, get notified when IR posts its latest camera or lens review, and much more, please get social with us on your favorite networking sites by:
By doing so, you'll also be supporting our efforts to deliver the best camera and photography content on the planet. (Google in particular apparently pays lots of attention to Google+ in deciding site/page relevance for its search results, so "circling" us there and +1-ing our site and pages would be an especially big help.) Thanks! We appreciate it!
SPONSORS
--------------
This issue is sponsored in part by the following companies. Please show your appreciation by visiting the links below. (Visiting our sponsor's links really helps support this newsletter, thank you for your attention!) And now a word from our sponsors:

* Sigma *
\A0 \A0------
\A0 \A0 Sigma's approach to photographic equipment is based on quality, craftsmanship, value, customization and
\A0 \A0 \A0 \A0 responsibility to photographers and the environment. All encompassed in our breakthrough, award winning
\A0 \A0 \A0 \A0
Global Vision lenses:
\A0 \A0 \A0 \A0 18-35mm F1.8 DC HSM
\A0 \A0 \A0 \A0 35mm F1.4 DG HSM
\A0 \A0 \A0 \A0 17-70mm F2.8-4 DC Macro OS HSM
\A0 \A0 \A0 \A0
120-300mm F2.8 DG OS HSM
\A0 \A0 \A0 \A0 USB Dock
\A0 \A0 All designed to deliver the highest optical quality and performance.
-----------------------------------------------------------------------------------------------------
Are you in the digital photo business? This newsletter is read by more than 47,000 direct subscribers (plus additional pass-along readers), all with a passion for digital photography. For information on how you can reach them, contact us at editor@imaging-resource.com.
-----------------------------------------------------------------------------------------------------
Shooting with the Olympus E-M10
by William Brawley
Part I -- Initial thoughts
 |
E-M10 + 14-42mm II kit lens: The articulating screen and decent close-focusing ability of the 14-42mm kit lens allowed to get down and close for this shot. (22mm, f/5.6, 1/80s, ISO 200) |
I've mentioned this in some of my earlier reviews, but I began my journey into photography as a DSLR person. I've stuck with that style of camera even after mirrorless cameras came on the market. I still put a priority on good autofocus speed, the viewfinder and the fuller handgrip over sheer portability -- not to mention the extensive lens selection that the big DSLR brands offer. However, I've recently found myself leaning toward using smaller and smaller cameras (my cameras du jour are a Canon EOS M and a Sony RX100). Slowly but surely, I've realized that bigger does not always mean better. I like having a camera with me almost all the time, and, especially if I'm out doing something active like hiking, I've found I don't want -- or need -- to haul a bunch of DSLR gear around.
So, when I heard about the Olympus E-M10, I was really excited to review it, especially after the rave reviews and excellent images I've seen coming from its two sibling OM-D cameras. Furthermore, the E-M10 looks to combine lots of features I personally want in a camera: excellent AF performance, a nice viewfinder, a comfortable grip (there's also an awesome grip accessory for an extra-secure hold) all in a small, lightweight and well-priced package.
 |
E-M10 + 14-42mm EZ: (14mm, f/3.5, 1/4000s, ISO 200) |
I shot with the higher-end Olympus E-M1 briefly, and think it's an excellent camera. The performance all around is amazing, especially the super-fast AF and the grip, making it a standout among mirrorless cameras -- it really is like a full-size DSLR put under a shrink ray! However, its DSLR resemblance is not far off. It's quite a bit larger and heavier than the E-M10, for example, and therefore much less portable, and thus something I'd be less apt to carry it around with me all the time. It's also quite expensive: around $1,400 for the body alone. As Olympus themselves said, the E-M1 is aimed at advanced enthusiasts and professional photographers (though $1,400 is an outstanding price for a pro-level camera)!
In contrast, the Olympus E-M10 provides a stellar combination of features and performance, at a budget-friendly price point. In this first installment of my Shooter's Report, I'll report on my initial impressions of the camera after having shot with it for a few days, and highlight some of its excellent features, as well as some not-so-excellent details I've come across.
 |
E-M10 + 14-42mm EZ: (14mm, f/3.5, 1/80s, ISO 400) |
Design & Build: The good and the bad. The exterior design of the E-M10 is practically a carbon copy of the E-M5, with minor button rearrangements here and there, of course. The E-M5 is a gorgeous camera with superb build quality, and the new E-M10 follows right along with the same retro styling and solid construction. In fact, placed side-by-side, you be hard-pressed to tell them apart.
I my opinion, though, the E-M10 has both improvements on the E-M5's design, as well as some downsides. Like I mentioned earlier, the build quality of the E-M10 seems excellent. It's super-solid with a nice heft that feels nearly identical to the E-M5. The E-M10 is not weather-sealed like the E-M5, though, and while that may be a disappointment to some (I would have liked it, just for a bit of insurance in adverse weather), but the lack of sealing has made for a notable operational improvement, in that the buttons are much easier to press, and provide better tactile feedback. According to Olympus, the weather sealing on the E-M5 made the buttons, especially those on the rear of the camera, soft and mushy to press.
 |
E-M10 + 14-42mm EZ: (14mm, f/3.5, 1/640s, ISO 200) |
The E-M10 isn't just stripped-down E-M5, though, in fact it adds a new feature that's a first for an OM-D camera: a built-in flash. Both the E-M5 and E-M1 required an external flash, and given that the kit lens with the E-M10 is an f/3.5-5.6 variable aperture lens, it's nice to have an included flash when you need it. The control for the built-in popup flash (which is pretty solidly-built, by the way, and doesn't feel flimsy, the way some with multiple hinges or collapsible bits do) is very thorough, with automatic and fill flash settings as well as full manual brightness adjustment (full strength to 1/64th power). Although I generally try to avoid using flash, as it tends to look quite harsh and can be distracting, it's nice to have it there and ready to go, if and when you need it.
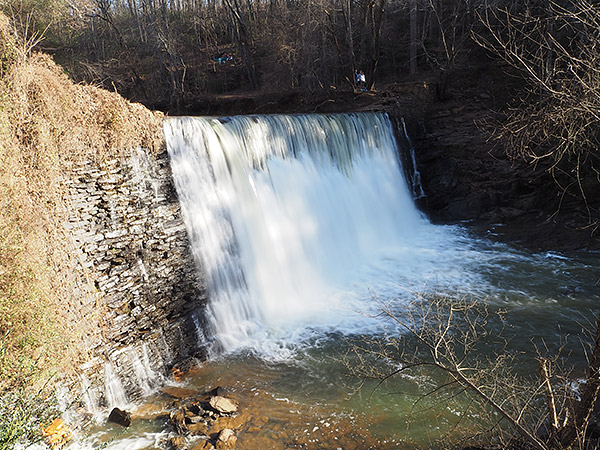 |
E-M10 + 14-42mm EZ: (14mm, f/22, 1/10s, ISO 200) |
When I took the E-M10 out shooting, one thing that kept annoying me was the front-most control dial: it's very easy to bump and quickly adjust something unexpectedly. In Aperture-Priority, for instance, this dial defaults to controlling Exposure Compensation. Numerous times, I'd put the camera up to my face to take a shot and notice I was +/- a third of a stop or so. When I got back to the office, I quickly grabbed our E-M5 to see if it had the same issue, and found that its dial -- even after undergoing heavy usage here in the lab and with a reviewer -- still takes a bit more effort to rotate.
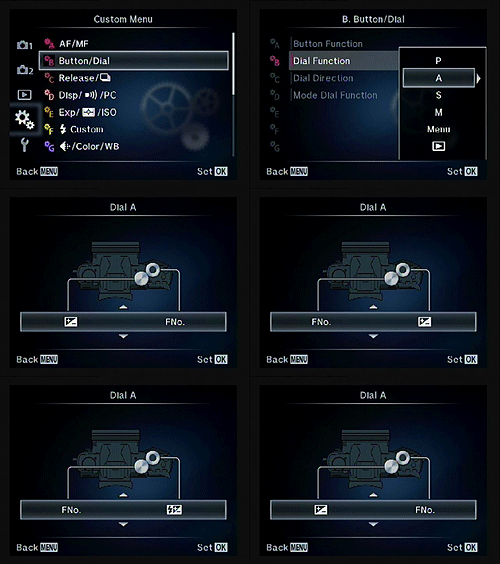
Customize. An example of the extensive customization options offered on the E-M10.
There's perhaps a silver lining to this, though, that brings me to one of my favorite features of not only the E-M10, but other OM-D cameras as well: customization. As any respectable enthusiast camera should allow, the E-M10 lets you customize all sorts of buttons and dials to suit your shooting style. Thanks to this, I was the able to swap the top dials around, with the front one controlling aperture and the back one for exposure compensation. Not only did this help prevent accidental E.C. adjustments, it was also more ergonomic for me as well. Shooting in aperture priority, I'm always monitoring and adjusting my aperture, and using my index finger to adjust aperture was more intuitive and more comfortable.
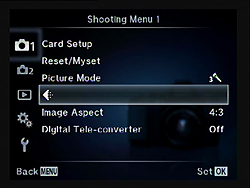
Symbols. Instead of using "Image Quality," Olympus chooses to denote this with a confusing diamond icon.
I'll admit that this vast customization aspect of the E-M10 can be a little daunting, particularly given Olympus' odd menu conventions, with a mixture of both text and symbols. I've always found this system to have a bit of learning curve, but once you understand its quirks and nuances, it's fairly straightforward.
Along the same lines, it seems Olympus has a habit of leaving important and useful settings disabled by default. Such is the case with the higher quality "Super Fine" JPEG compression, and also my favorite user interface improvement -- Super Control Panel.
I love shooting with both the LCD monitor and the EVF, making use of the proximity sensor next to the EVF. With the Super Control Panel enabled (shown on the left), a quick press of the "OK" button brings up a big on-screen grid of all the major camera settings, giving you a quick lay of the land, as well as letting you easily adjusting all sorts of settings. Why this isn't enabled by default, I'll never know.
The last little design quirk I'd like to mention are the shoulder strap lugs. Not long after I began carrying the E-M10 around shooting, I started getting irritated at those little triangular shoulder strap rings -- particularly the one on the right side of the camera. The ring would either scrape up against my finger when gripping the camera, or I needed to make a conscious effort to move the ring out of the way. Using a strap or not, I find those lugs to be in the way, especially on my right hand. Upon mentioning this to a fellow IR employee, he retorted, "I know what you mean…I always take those things off!"
 |
E-M10 + 14-42mm EZ: (14mm, f/3.5, 1/500s, ISO 200) |
Image Quality & Performance. Since the E-M10 uses a similar (though not identical) 16MP sensor as the E-M5 and also the image processor of the E-M1, it unsurprisingly manages to produce excellent photos. I took the E-M10 around the North Atlanta area and to a local park, and the images it produced were crisp and sharp with vivid colors and great dynamic range. A lot of building shots I took were backlit by bright sun, with the faces of buildings in shadow. The E-M10 did a great job of showing shadow detail, while at the same time keeping highlights in-check. Overall, considering the E-M5 and E-M1 produce stellar results, it's no shocker that the E-M10 follows suit.
 |
E-M10 + 14-42mm EZ: The E-M10 performed well with dynamic range, showing lots of shadow detail while keeping highlight relatively well-controlled. This particular image, however, does have some blown highlights right in the center. (42mm, f/5.6, 1/800s, ISO 200) |
Trying some low-light indoor shots, the E-M10's higher ISO images were very nice, and I saw performance similar to that of the E-M5. Things do start to get a little soft in very fine detail areas once you hit ISO 1600 and 3200, but if you don't pixel peep, images look great, as do RAW images.
 |
E-M10 + 14-42mm EZ: The E-M10 did well with higher ISOs and low-light shooting for its class of camera. (14mm, f/3.5, 1/60s, ISO 1600) |
One really handy feature is the ability to set a maximum ISO sensitivity for Auto ISO. I love using Auto ISO; especially in situations where I'm in and out of varying lighting conditions, or if I'm shooting subjects that call for a certain aperture and shutter speed. You'll have to enable it manually, but you can use Auto ISO in Manual exposure mode, which is a nice touch.
As I mentioned over in my Panasonic GM1 Shooter's Report, I'm a Canon EOS M owner. And while it's a great little camera for a number of things, what it's not great at is autofocus, even after the firmware update. It was such a refreshing experience to use a small, lightweight camera like the Olympus E-M10 with excellent, lightning-fast AF. Shooting fast-moving subjects or just swinging the camera up to get the shot, the E-M10 was quick, accurate and fun to use. I've had no issues with AF whatsoever with the camera. Although since it uses the same contrast-detect system as the E-M5, it can struggle to focus on dark, low-contrast subjects, especially if you turn off the shockingly bright orange AF assist light.
 |
E-M10 + 14-42mm II kit lens: Although a full-frame "bokeh king" camera, the E-M10's Micro Four Thirds sensor is plenty big enough for some great shallow depth of field shots. (14mm, f/3.5, 1/3200s, ISO 200) |
The E-M10 has also borrowed the more precisely-segmented AF point grid from the E-M1, giving you 81 total "AF points" in a 9x9 grid for really precise control over composition. Compared to the comparatively coarse 35 AF points (5x7 grid) of the E-M5, this is a definite upgrade.
I found the E-M10's expanded AF grid very useful, especially when using fast primes, as the focus-and-recompose method can often lead to out-of-focus shots at large apertures, when the plane of focus shifts after recomposing.
Like other OM-D cameras, the Olympus E-M10 also makes it super simple to adjust the AF point -- simply press a directional button on the rear of the camera. No need to hold down a function button or activate some mode, instead you just use to the directional pad to move to the AF point of your choice -- all 81 of them. I love this about the E-M10. I use single-point AF most of the time, and this behavior lets me quickly and easily adjust the focus point to fit my composition and get focus right where I want it. Plus, thanks to the EVF, I can see all this happening in the viewfinder -- just like with a DSLR -- avoiding the need to take the camera down from my eye.
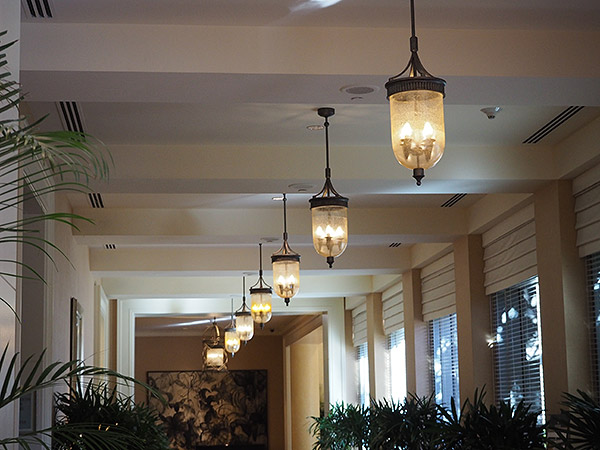 |
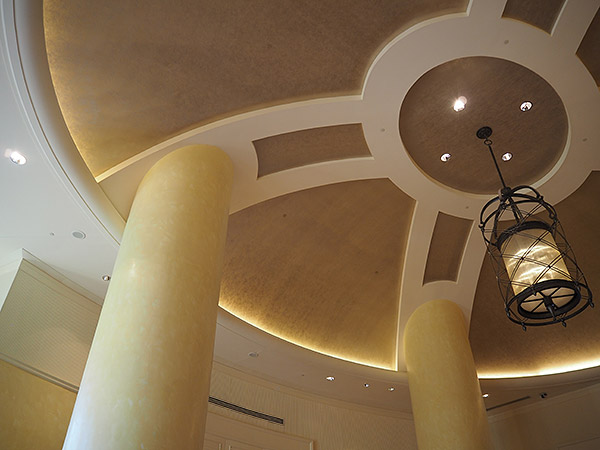
E-M10 + 14-42mm EZ: The 81 AF point system and easy adjustment system let me quickly move the AF point to the front-most hanging lamp. (36mm, f/5.5, 1/80s, ISO 1600) |
Speaking of EVF, the E-M10 shares the same EVF magnification as the E-M5, and looking through it is a very similar experience. The "DSLR guy" in me appreciates having the electronic viewfinder (versus just the rear-panel LCD screen), especially when shooting with longer, heavier lenses, or when shooting at slower shutter speeds. It's not the biggest or brightest EVF out there, but I found it to be just fine -- easy to read text and no strange rainbow tearing artifacts like I've seen with other cameras. In fact, Olympus has given the EVF a little performance boost compared both the E-M5 and E-M1 with a much shorter lag time, thus making the view of the EVF more like a traditional optical viewfinder. (Lag time in this context is the delay between when something happens in the scene you're shooting, and when you see it on the EVF screen.)
 |
E-M10 + 14-42mm II kit lens: (41mm, f/5.6, 1/160s, ISO 200) |
The new 14-42 lens: smaller, flatter...worse? Introduced alongside the Olympus E-M10 is a new 14-42mm lens with their "EZ" electronic zooming system. One of the biggest features is that when the camera is powered off, the lens automatically retracts to a very compact, almost pancake-style size, which makes this body and lens combo even more portable.
The pictures I've taken so far with the E-M10 have primarily been with this new 14-42mm EZ lens, and over all the images look nice, with great color and sharp detail. However, I did notice an issue with flare when shooting with the sun just outside the frame. I noticed this with the standard 14-42mm II kit lens as well, though, so it's not an issue unique to the new EZ lens.
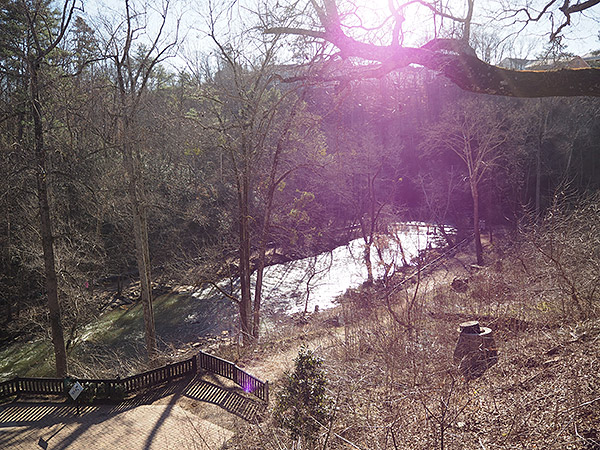 |
14-42 EZ - (14mm, f/3.5, 1/800s, ISO 200) |
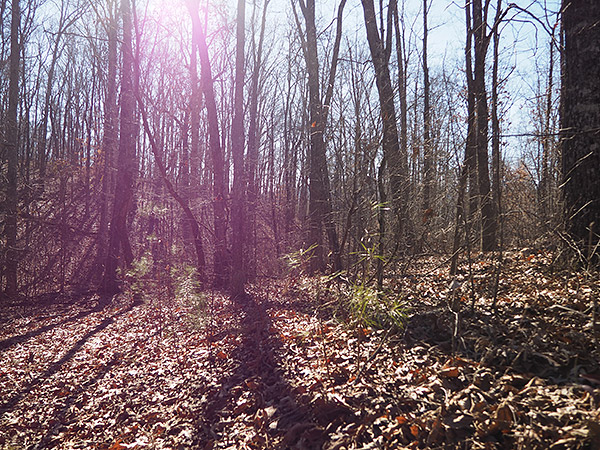 |
14-42 II Kit Lens- (14mm, f/3.5, 1/800s, ISO 200) |
On the physical side of things, I'm personally not a fan of the EZ lens' electronic zoom, and while it's smooth and very quiet, it's still much slower than your typical "manual" zoom lens. Thankfully, Olympus does let you speed up (or slow down) the zoom speed via a menu option, but I still found the fastest setting too slow for my liking. It feels almost like a point-and-shoot, and takes away a bit of the experience of a true interchangeable lens camera.
Overall, my experience with the Olympus E-M10 so far has been extremely positive. The Olympus E-M10 is packed full of features and is superbly customizable, both features insuring that it will be a favorite among enthusiast photographers. Autofocus performance and shot-to-shot speed are both excellent, and I never felt like I missed a shot from waiting on the camera to focus or finish processing an image (or a RAW+JPEG pair, for that matter). Be sure to check out our gallery photos page for even more sample images from the Olympus E-M10.
 |
E-M10 + Panasonic 25mm f/1.4 Leica: (25mm, f/1.4, 1/400s, ISO 200) |
In the next installment of my Olympus E-M10 Shooter's Report, I aim to explore the smaller, more unique features of the camera, such as the cool new Live Composite shooting mode and the expanded Wi-Fi capabilities, as well as see if I can coax some moiré out of AA-filterless sensor. Stay tuned!
Also: We've also completed our full Image Quality Comparison, so be sure to check out how the E-M10 stacks up again its competitors!
-----------------------------------------------------------------------------------------------------
Shooting with the Olympus Stylus 1
by Dave Pardue
Shooter's Report Part II: Reader Requests, Special Features and More
Reader Requests. Thanks for your comments and suggestions for additional testing (and patience!).
Below we'll take a look at some of them in detail and see if we can further expand on the benefits of owning a Stylus 1 versus any potential drawbacks or shortcomings. So grab another coffee, dive right in and don't forget to keep your comments and suggestions coming at the bottom of the review page on the site when you're finished reading.
| Olympus Stylus 1 - Low light test against the Sony RX100 II at 100mm eq. |
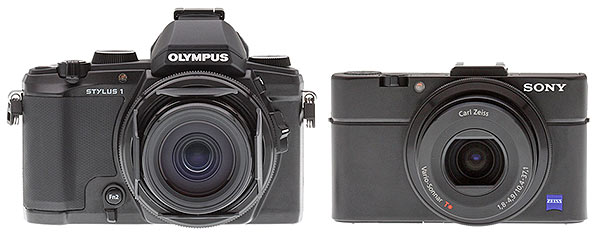 |
Thanks to our reader Duoxi for suggesting the simple and pertinent comparison in low light against the very capable and similarly priced Sony RX100 II. We already know without hesitation that the RX100 II with its much larger 1"-type sensor performs better as ISO rises, and that the Stylus 1 has a much longer zoom range and a larger available aperture across the farther end of that range. So this is a test to determine if the larger aperture on the Stylus 1 at longer focal lengths takes in enough light (thus allowing for a lower ISO at similar settings) to compensate for its weaker high-ISO performance.
I enlisted our senior lab technician, Luke Smith, to help me create test conditions in our lab comparable to the available light level in a typical restaurant at night. The floor lamp we used for this experiment wasn't as warm as typical indoor lighting, but better for being able to get an accurate read of the test images. We set both cameras to manual and adjusted the various settings of each to be as close as possible, given the inherent differences from camera to camera, with the basic settings consisting of a 100mm (eq.) focal length (the maximum for the RX100 II), a 1/30 second exposure time, and the maximum available aperture at that focal length (f/2.8 on the Stylus 1, f/4.9 on the RX100 II). We then allowed the ISO to fall where it needed to be in order to achieve good exposure as determined by the camera's exposure system. We also performed a custom gray-card white balance for each camera and set center focus on the "Chiquita" banana label.
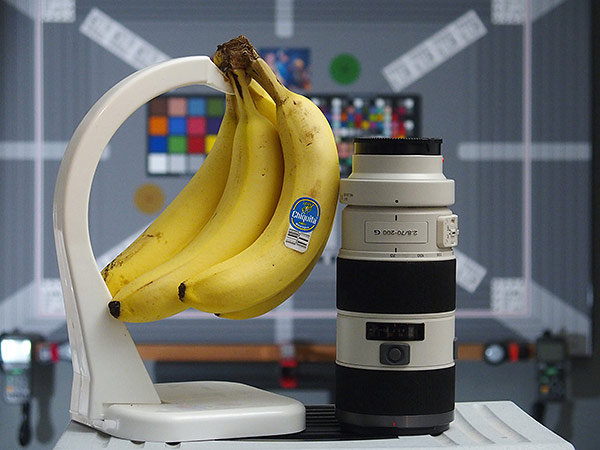 |
| Olympus Stylus 1 at 100mm eq., f/2.8, 1/30s, ISO 1000 |
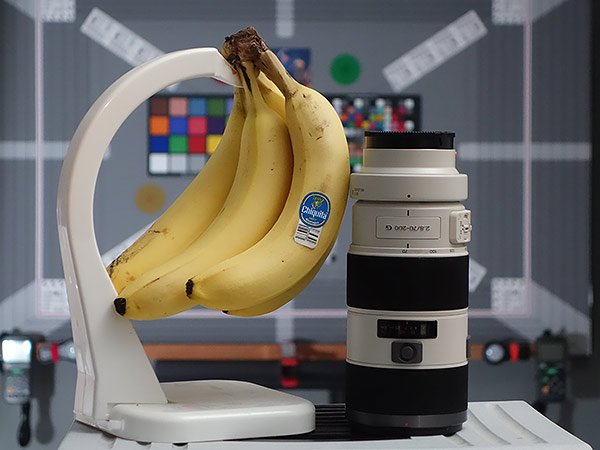 |
| Sony RX100 II at 100mm eq., f/4.9, 1/30s, ISO 3200 |
Larger sensor vs. faster aperture. At 100mm eq. focal length (the maximum zoom for the RX100 II) the Stylus 1 with its larger available aperture is able to capture just enough additional light to balance the ISO playing field and produce a comparable image in terms of quality and noise levels. |
It should be noted that the important comparison here is not color saturation, as that can vary from shot to shot and can be a bit arbitrary. We're primarily interested in whether the Stylus 1 at ISO 1000 can hold up in the image quality department with the RX100 II at ISO 3200, as these were the ISOs needed to achieve good exposure in this simulated test condition. Does one image have significantly more noise than the other? Or more examples of over-aggressive noise processing artifacts? Better sharpness and clarity?
...Let's take a closer look!
Clicking any of these images will take you to a carrier page that will allow you to in turn click on and explore the image at full resolution and see EXIF data as produced directly by the camera, so feel free to analyze away. To save you that trouble, though, below are several side-by-side crops of interesting areas for comparison purposes.
*(One technical note about this test: while both cameras are at a comparable focal length, the higher resolution sensor on the RX100 II yields larger full resolution images. Therefore, to be fair to the RX100 II, I re-sized the images slightly so that we're comparing them at the same apparent size visually onscreen.)
A very interesting comparison indeed. This test does not suggest that the Stylus 1 can hold its own against the RX100 II in all low light situations - far from it, actually. At wide angle, the RX100 II has a larger aperture and, combined with its better high ISO capabilities, will easily best the Stylus 1. But zoomed to 100mm eq. range, the Stylus 1 comes quite close in most respects, due to its constant f/2.8 aperture letting in so much more light. So if you need zoom range to go along with your low light shooting, that certainly levels the playing field quite a bit, especially given that you can keep zooming in for days compared to the RX100 II and still remain at f/2.8. It's also interesting to note that the level of background blur is actually pretty similar in the comparison above; the f/2.8 aperture of the Stylus 1 helps compensate for its smaller sensor when it comes to shallow depth of field.
Wide and tele. Mentioned more than any other facet of the Stylus 1 is the i.Zuiko 28-300mm (eq.) f/2.8 lens, which has quite a nice range for a camera this size, paired with a larger sensor than the 1/2.3"-type chips found in most consumer long-zoom cameras. We explored the telephoto end quite a bit in part 1 of my shooter's report, especially as it relates to isolating subjects with background blur. Now we'll zoom out and see just how good the Stylus 1 is at capturing landscapes and other subjects at wide angle. Thanks to our reader Nigel Brown for requesting landscapes, which led us to solve a mystery with the Fn1 button (at least in the current F.0 firmware on our sample, mentioned in a bit).
| Olympus Stylus 1 - the same location at wide angle (28mm eq.) and telephoto (300mm eq.) |
 |
| 28mm eq., f/4, 1/640s, ISO 100 |
 |
| 300mm eq., f/4, 1/500s, ISO 100 |
Reaching out. 28mm is a little narrow for some traditional landscape shooting, but the images are plenty sharp if 28mm is wide enough for you. Olympus has yet to announce a wide angle converter, but we strongly suspect they will at some point, since they have done so with other lines in the past. |
The Stylus 1 has several things working against it for consideration as a capable wide angle shooter. As mentioned in the caption above, 28mm is a bit on the narrow side for many landscape purposes. Also, for those of you who prefer maximum depth of field in your wide angle shots, the minimum aperture of f/8 produces slightly soft images due to some diffraction limiting.
If you're interested in seeing the wide angle shot across the full range of apertures, click here to see the gallery tab, and you'll be able to access full resolution versions of this same shot at f/2.8, f/5.6 and f/8 as well as the f/4 shot displayed above. Below are examples of the wide angle shot with the built in neutral density filter engaged, as well as a shot zoomed in with the 2x digital zoom feature engaged.
| Olympus Stylus 1 - Neutral Density Filter and 2x Digital Zoom features |
 |
| 28mm eq., f/4, 1/80s, ISO 100 (neutral density filter engaged) |
 |
| 300mm optical eq., f/4, 1/400s, ISO 100 (digital 2x zoom engaged for effective 600mm eq.) |
Special effects. The neutral density feature allows the same shot to be taken at a much slower shutter speed (in this case 1/80 instead of 1/640) and gives you 3 stops less light without the need to add an external filter. We'll discuss this feature more below, but wanted to include it here as a reference against another test image without it. The 2x "Digital Tele-converter" feature doubles the effective zoom range and can be used across the entire focal length range (some cameras only allow it to engage at full telephoto optical zoom). |
For further wide angle comparison purposes, below is an indoor shot zoomed out. I stopped down just a bit to yield a slightly greater depth of field and had to push the camera to ISO 800 to achieve this and still get a fast enough shutter to stop most of the motion. Note that I did add just a wee bit of post-processing to this image, which we normally don't do, primarily for leveling out shadows and highlights.
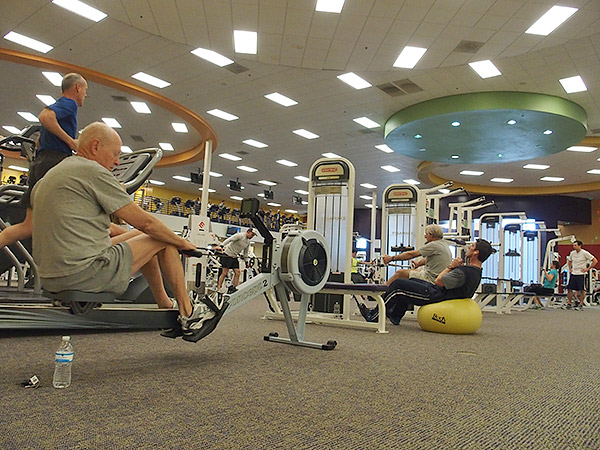 |
| 28mm eq., f/3.5, 1/125s, ISO 800 |
The mystery of the function button (as referenced above) is that the user manual states the Fn1 button should default to "no setting" and we were told we had production firmware (which is true in terms of image quality and performance). However, both of our test units defaulted to that button being set to toggle "Digital Tele-converter" which is a 2x digital zoom. I was unaware of this and inadvertently bumped it a few times and had to re-shoot as a result. For any of you that have purchased a Stylus 1, make sure and test to see if your unit has the Fn1 button disabled until you go into the menu and set the function you'd like it to control.
Voice Memo Function. The Stylus 1 sports the ability to add a voice recording of up to 30 seconds length to any image while still in the camera. This function is not new to the camera world but was a first for most of us here at IR. Of course, Olympus has been making great handheld voice recorders for some time now, so the marriage of the two seems a logical match, and the feature is valuable for a wide range of shooting purposes.
Our reader Cesare inquired about this nifty little feature, and I'm pleased to report that it works quite well and is easy to use. For any image that you have created while still on the card in the camera, you simply hit the play button, scroll to find the image you want, hit "OK" which brings up a dialogue of options, scroll down to the microphone icon, hit "OK", select the icon again with "Start" beside it, and start talking. You can manually stop the recording, or it will stop automatically at 30 seconds.
| Olympus Stylus 1 - nifty voice memo function allows you to tag a photo with an audio recording |
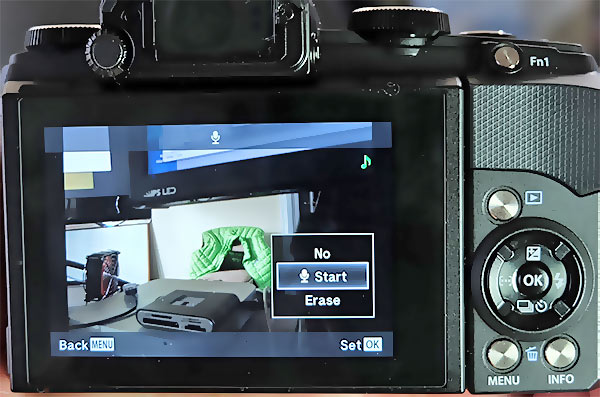 |
The camera will then play the recording back to you using similar commands, only this time hitting the music note button that has now been created (images with a recording also display a musical note on the screen when displayed, as shown above). You can also re-record it as many times as you want, but only one recording per image. The sound file is saved as a common WAV file with the same filename as the JPEG and/or RAW file. Once you transfer the contents to your computer or smart device, the WAV file can be played by any audio player that supports that file type. Neither the image file nor the EXIF data are changed, the WAV file simply exists with the same name, so if you want to preserve the connection of audio to the image you'll want to keep the files in the same location with the same name (except the extension of course).
After testing it out, I have now begun using it to record my test settings, and can see the feature being used extensively for anyone shooting out in the field where a description of shooting conditions or subject matter would be handy to record without the need to write or type, including for certain business purposes like insurance adjusters or real estate agents.
Neutral Density. As mentioned previously, the Stylus 1 comes with an onboard neutral density filter which effectively lowers the amount of incoming light by 3 stops without changing the aperture. This can be useful in bright conditions when a large aperture is needed for a shallower depth of field than could be otherwise achieved with the camera's top shutter speed of 1/2000s, and also when motion blur at slower shutter speeds is desired in brighter than optimal conditions. In the example below, I was already at the smallest available aperture (f/8) and was unable to dial in a slow enough shutter speed to catch some of the waterfall blur without greatly overexposing the shot. The neutral density filter allowed me to achieve a 1/8s exposure which was not as slow as I would have preferred but still enough to achieve some of the motion blur I wanted.
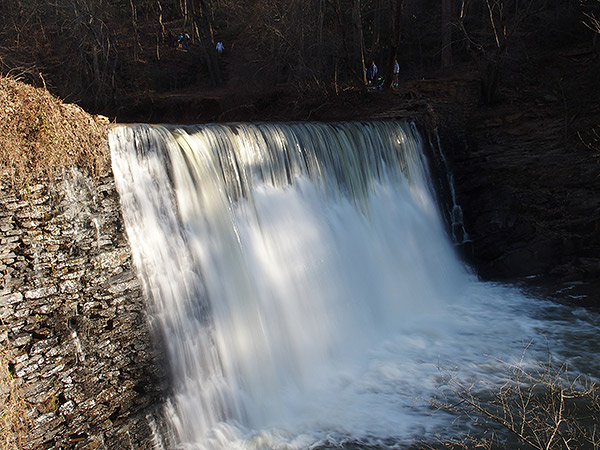 |
| 42mm eq., f/8, 1/8s, ISO 100 (neutral density filter engaged) |
Capturing moments. For the last section of this second Shooter's Report I thought it would be fun to end with a few spur-of-the-moment shots I was able to get with the Stylus 1. With its long zoom range and relatively small size, it effectively becomes a no-brainer to keep with you during times when a larger rig is not convenient, but for those of us who are not willing to compromise on things like lens quality just for the sake of smaller size. For me that's one of biggest reasons to consider owning a Stylus 1... it's just a great little catch-all camera.
 |
| 300mm eq., f/2.8, 1/80s, ISO 100 |
 |
| 28mm eq., f/2.8, 1/160s, ISO 1250 (slightly enhanced in post-processing for shadows) |
Stay tuned for Part III of my Olympus Stylus 1 Shooter's Report, where we'll dive into the last batch of tests and explore some of the functions and usability of the camera a bit deeper, as well as wrap up the review. We'll also include a few of the creative filters, as well as take a look at some bokeh examples with the aperture stopped down a bit for comparison. In the meantime, head over to the Stylus 1 Gallery page for a closer look at the next batch of sample gallery images, including some images not on display here. And, as always, feel free to write out any questions you might have about the Stylus 1 in the comments section at the bottom of this page.
*(Special note to our readers: Many of you may already know, but it's worthwhile repeating once again, that we don't apply any post-processing to our gallery images other than a size reduction for showing them onscreen unless we specifically mention it in the image caption area or review text. Clicking on the images will take you to a page where you can access the full size image exactly as the camera produced it. You're welcome to download these for your own testing purposes, play with them in post-processing, etc., to help you further evaluate the cameras' potential for your own individual shooting needs. Please contact us for permission to use for commercial purposes, or on another website.)*
-----------------------------------------------------------------------------------------------------
Feature: Sony A7R teardown: What secrets lie inside Imaging Resource\92s 2013 Camera of the Year?
by Roger Cicala
Ever since we here at LensRentals first tested the Sony A7R, we were dying to take a look under the hood. Say what you will about Sony as a company, but they create some of the most elegantly-engineered camera bodies we've seen. Plus, the A7R is something of a groundbreaking camera, and we wanted to see how they crammed all that stuff into its little body. Oh, and finally, we wanted a closer look at how thick the cover glass over the A7R's sensor is, since there is some evidence that it may affect the edge performance of certain adapted lenses.
But we were a bit afraid of what we were getting ourselves into. Because Sony engineers its cameras so efficiently, they tend to be difficult to disassemble, let alone reassemble. And Tyler, knowing us like he does, had probably set computerized alarms on the inventory control system, notifying him the instant an A7R got sent to the repair department for any reason. But Tyler was out sick for half a day -- and there were actually some A7R bodies in stock. So we did what we had to do.
The usual warnings apply to our Sony A7R teardown:
-
Do not try this at home. This post was made by semi-trained, semi-professional repair technicians who sort of know what they're doing.
-
The following blog post contains graphic images of the inside of a very nice camera.
-
No cameras were harmed in the making of this blog post. By the time you read this, the camera has been fully reassembled and is functioning normally.
-
Yeah, We Had to Do It
A Quick SLR Comparison
Mirrorless cameras tend to be simple and elegant compared to SLRs -- in part, because they have a lot less stuff in them. Just to set the stage, let's remove the body caps and compare the front of a Sony A7R with a Canon EOS 5D Mark II.
If you take the body cap off the A7R, here's what you see:
Take the body cap off the 5D Mark II, and there's a whole lot more to see.
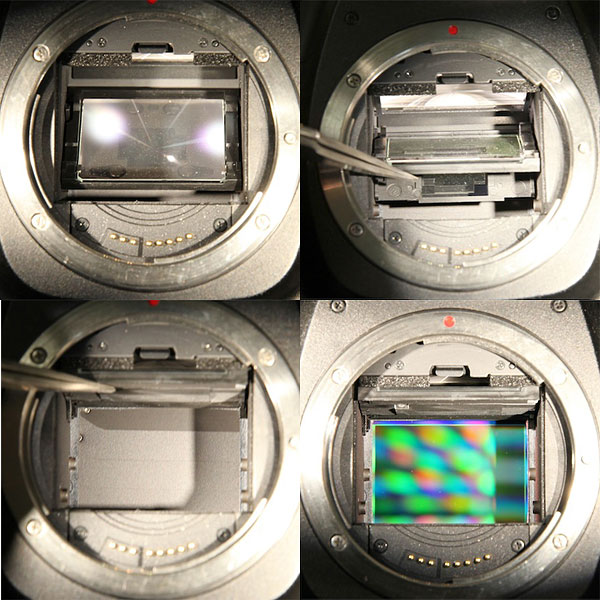 |
| Canon EOS 5D Mark II showing main mirror (top left); partially lifted to show sub-mirror (top right); fully lifted to show the shutter (bottom left); and with shutter opened to show the sensor (bottom right). The white area atop the mirror box is the focusing screen. |
If you flip things around and look at the bottom of the mirror box, you can also see the phase-detection autofocus sensor.
This isn't particularly important for today's teardown, I'm just trying to show why a mirrorless camera can be simpler inside than an SLR ever could. If you'd like to compare this article to a teardown of an SLR, you might like our Nikon D7000 teardown, or perhaps this dissection of a Sony NEX-3.
So Let's Get To It!
As usual when we do these things, Aaron drives the screwdrivers, while I take the pictures and offer helpful comments or suggestions, like "Don't tear that flex". This teardown was a bit like Indiana Jones and the Temple of Doom, as we survived one near miss after another without quite destroying the camera. I'm sure my comments were most helpful.
The first trap we encountered was entirely of our own making. With almost every camera, you begin disassembly by peeling off the rubber grips to get to the screws beneath. Not with the A7R. The good news is that the A7R's grips are completely bonded to the camera body, not held on with sticky tape, because there are no screws beneath them. They're never going to come loose over time, unlike some cameras we know all too well. The bad news is that we found this out by spending half an hour trying to remove the unremovable grips.
Once we gave up on grip removal and started taking out the screws we could see, things progressed quickly, and the back was off in no time.
The electronic viewfinder cover came off just as easily. That's the eye proximity sensor on the flex above the viewfinder.
A very nice thing -- and one that's quite typical of Sony engineering -- was that there were only two different screw sizes used thus far: one size for the casing, and another for the EVF cover. A typical Nikon or Canon camera has four to seven different screw sizes by this point.
Back to the camera, the LCD assembly is now exposed.
Removing a few more screws frees the LCD to be lifted up, showing the single large flex that connects it to the main PCB.
The LCD assembly is a very sturdy piece of metal that is totally rigid, even once stripped out of the camera. That may seem inconsequential, but LCDs get pushed and pulled on quite a lot. When they're weakly mounted, as we've seen on some very pricey DSLRs, they can get quite loose or even bent into the camera a bit.
Near-doom adventure number two came as we started to peel back the thick shielding tape over the main PCB. On the right side, there are several flexes under the tape that badly wanted to tear themselves as it was removed.
But the tape came off without any major mishaps, showing a typically clean Sony layout. All flexes are arranged to have the shortest possible runs, with no wires winding across, around, or under the PCB as we see all too often in other brands. There's even a nice little cutout to let the PCB on the bottom left come up through the board, rather than making it 10 times longer so that it can wind around the edge from underneath.
The nice layout continued as we lifted up the large flexes on the right, showing smaller flexes laid neatly under the larger ones, rather than winding their way around them. The lower flex leads to the memory card slot.
And a repair guy's dream: That blue grounding wire has a neat little snap connector, rather than being soldered to the board.
Disconnecting all the flexes lets us lift up the PCB, showing the input connectors and a couple more flexes coming in from underneath the board.
At this point, we thought we'd reached a dead end. The PCB was out, and so were all the screws, but neither the top nor the front would come off of the camera. We pried. We cursed. Finally, we realized that we'd been working so long that our caffeine levels were probably too low, so we went and had some coffee. And a snack. Once we came back, Aaron immediately discovered the Secret Screw of Sony, hidden away at the bottom of a hole in the right side of the camera.
Once the Secret Screw was removed, the grip came off. With the grip off, the top came right off. And at last, the deepest secrets of the A7R were ours!
For completeness, here's a picture of the top assembly. This can be disassembled further, but reassembling it is another matter. (This is why when you break a button on your camera, the repair is usually listed as 'Replaced top assembly'. It's cheaper to do that than it is to pay someone to spend hours reassembling the multiple flexes and buttons in the top assembly.)
The Nice Surprises
With our disassembly down to the core of the camera, things got even better. We had now exposed the back of that big, bad sensor, complete with heat sink tape and copper sink / shielding. (By the way, if you wondered who made the A7R's shutter, now you know.)
A couple more screws, and the sensor can be removed from the main mount of the camera, exposing the shutter.
Note that the sensor doesn't mount to the shutter. It mounts directly to the metal housing of the camera, with shims in three locations to make sure that the sensor is aligned to the lens mount.
The simplicity of the design becomes easier to see with the shutter removed, and only the metal chassis of the camera left.
The sensor is mounted and shimmed on one side of the metal chassis, as indicated by the red arrow. The lens mount is attached directly to the other side, marked with a yellow arrow. There's nothing else that needs to be calibrated or aligned.
Compare that to the pictures of DSLR mirror-boxes at the start of this article, where there's a lens mount, two mirrors, an autofocus sensor, the main image sensor, and the focusing screen, each of which must be aligned and calibrated to the other.
The Sensor
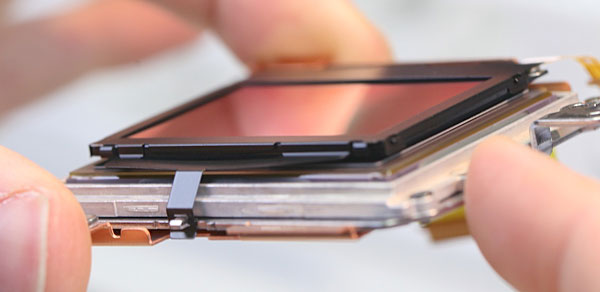
The sensor assembly is a nice, self-contained unit. One thing that was immediately apparent is that the cover glass on the sensor is held onto the assembly with three strong clips.
It does seem that -- in theory, at least -- replacing a scratched cover glass might be done without a complete sensor assembly replacement. Not to mention that there has been some discussion regarding removing or replacing the cover glass, possibly improving performance with adapted lenses in the process. I can't say for certain, but it appears this should be a simple matter. But the clips didn't pop off easily and we'd already pushed our luck with this camera enough, so we decided not to force the issue.
 |
One Last Image
This is rather amazing. The completely disassembled Sony A7R consists of about a dozen major pieces, held together with 29 screws of just three different sizes. A typical DSLR has around 120 screws of 11 different sizes. You might not care less about that, but do you know what I thought about? How much easier it will be to fix this camera when it breaks. How much simpler it must be to perform all the calibration that must be done during assembly. And how much simpler it must be to assemble the A7R in the first place. In other words, how much cheaper it must be to make this camera, than to make a DSLR.
--Roger Cicala and Aaron Closz
(Roger Cicala is the founder of LensRentals.com. Visit LensRentals.com to rent that cool lens you've been hankering for, and for some of the best customer service on the Internet!)
-----------------------------------------------------------------------------------------------------
Quick Hits: New Camera Roundup
-----------
This past week, both Fujifilm and Olympus announced new products, so here's a little roundup listing of all the big announcements:
-----------------------------------------------------------------------------------------------------
POPULAR ON THE SITE
-----------------------
At http://www.imaging-resource.com/news you can keep track of the photo news on our main site. Among the most popular stories over the last couple of weeks:
- Nicholas Buer captures the entire Milky Way in one spectacular panorama (http://www.imaging-resource.com/news/2014/01/29/nicholas-buer-captures-the-entire-milky-way-in-one-spectacular-panorama)
- Stunning Photos: Team USA wins gold in inaugural World Photographic Cup (http://www.imaging-resource.com/news/2014/01/28/team-usa-wins-gold-in-inaugural-world-photographic-cup)
- Behind the scenes with incredible aerial photographer Jessica Ambats (VIDEO) (http://www.imaging-resource.com/news/2014/01/30/behind-the-scenes-with-incredible-aerial-photographer-jessica-ambats-video)
- Tamron 150-600 Telezoom Shootout (http://www.imaging-resource.com/news/2014/01/21/tamron-150-600-telezoom-shootout)
- Edited Out: AP drops award winning photographer over Photoshop fiddling (http://www.imaging-resource.com/news/2014/01/23/edited-out-ap-drops-award-winning-photographer-over-photoshop-fiddling)
- Narciso Contreras responds to AP firing, calls public dismissal \93an exhibit of power\94(http://www.imaging-resource.com/news/2014/01/28/narciso-contreras-responds-to-ap-firing)
----------------------------------------------------------------------------------------------------
NEXT ISSUE
---------------
We'll see you next on February 14, with a regularly scheduled edition (and lots more news and analysis to share)!
SIGNOFF
-----------
That's it for now, but between issues visit our site for the latest news, reviews, or to have your questions answered in our free discussion forum. Here are the links to our most popular pages:
Newsletter Archive: http://www.imaging-resource.com/cgi-bin/dada-nltr/mail.cgi/archive/irnews
Daily News: http://www.imaging-resource.com/news
SLR Gear: http://www.slrgear.com
New on Site: http://www.imaging-resource.com/new-on-ir
Review Index: http://www.imaging-resource.com/camera-reviews
IR Photo Contest: http://www.dailydigitalphoto.com
Google + http://plus.google.com/+imagingresource
Facebook: http://www.facebook.com/imagingresource
Twitter: http://www.twitter.com/IR_Lab
Happy snapping!
Dave Etchells & the IR Editorial Team
editor@imaging-resource.com
|

