IR Updates its Daylight Simulator Light Source
By Dave Etchells
May, 2008
| More about our testing |
| New Indoor/Outdoor Portrait Tests (5/23/2008) |
| New Daylight Simulator (5/23/2008) |
| "Sunlit" Portrait - What to look for (5/23/2008) |
| Indoor Portrait - What to look for (5/23/2008) |
| Still Life and Multi Targets (Updated 11/29/2010) |
| HMI Studio Lighting (5/22/2006) |
| Performance Timing (5/22/2006) |
| New Review Format (5/22/2006) |
While we were once making the move to using mannequins with human hair for the Indoor and "Sunlit" portrait tests, it seemed that it'd make good sense to update the Daylight Simulator light source we've used for the past 4 years or so. The old source worked very well, and as we'll see, the changes made are relatively minor. Still, we think it's important to share details of our test methods and equipment, so felt it well worth the time to describe the new source; what's changed, what hasn't, and why we made the changes that we did.
What is "Standard Daylight"?
This is really the central question; one that we've wrestled with as long as the site has existed. On the one hand, we could say that a great many people smarter than us have wrestled with the same question and come up with an answer: See ISO standard 7589 "Illuminants for Sensitometry." The members of the working group who defined ISO 7589 basically (after much debate) settled on a particular location and time that was determined to be a reasonably representative average of daylight worldwide, and measured the spectral profile of the daylight there.
The result was a spectral curve similar to the one above. (From Testing linear models on spectral daylight measurements by Javier Hernandez-Andres, Javier Romero, Antonio Garcia-Beltran, and Juan L. Nieves.) The standard daylight spectra incorporates light coming from both the sun and the sky, but not light reflected from surrounding objects. Boiled down to a single number, Standard Daylight works out to a correlated color temperature of 5500K. While I'm sure that the ISO committee had very good reasons for coming up with the 5500K standard for daylight, it's worth noting that the widely accepted standard for daylight color temperature in the graphic arts industry is 5000K, a noticeably warmer shade of "white," and much closer to what we've measured locally here in Atlanta, Georgia.
Back when we first moved this test indoors (the original was conducted outdoors, under genuine sunlight), I was most interested in duplicating the particular color temperature and overall color balance of the location I shot the original from. When I measured that light with my color meter, I found that it was more in the range of 4700-4900K than the 5500K of the ISO standard.
Accordingly, in setting up the solar simulator in the studio, I aimed for an overall color temperature in the range of 4700-4900K. To really simulate the original daylight illumination though, I had to worry about more than just the light coming from the sun. As it turned out, a significant amount of light in the original scene was coming from the sky itself, as well as reflected by the surrounding objects. I thus needed to simulate light from all three light sources, namely 1) direct sunlight, 2) diffuse sky light, and 3) secondary "fill" illumination.
Our previous solar simulator did a good job of mimicking the daylight from the original scene in hue and contrast ratios (just at a lower overall level of illumination), but definitely had a somewhat warm hue to it when compared to the ISO standard. Given that we were about to change the subject for these tests (Marti's "retiring," and being replaced by a lifelike mannequin with a human-hair wig), it seemed it might make sense to bring the illumination to a more neutral color balance relative to "standard daylight".
So what is "Standard Daylight"?
(Or does such a thing even exist?)
The efforts of the ISO standard illuminants working group aside, years of testing digital cameras, and a fair number of measurements of the actual daylight outside our offices led me to conclude that 5,500 kelvin (at least as indicated by my admittedly aging color temperature meter) was really a good bit higher than what consumers are likely to encounter in the real world. It's possible that higher latitudes or higher elevations could result in daylight color balances shifted more toward the blue end of the spectrum relative to what we see here in north Georgia (USA), but in my own experience I've certainly never seen anything locally that's that cool-hued.
That said though, once I began paying closer attention to daylight color temperatures and contrast ratios, I was amazed by the amount of variation I saw from season to season, month to month, and even within the course of a single day. It soon became clear that there just isn't any such thing as "standard" daylight, or if there were, the range of typical variation is so great that it would be only a matter of coincidence if you were to encounter the particular "standard" mix of colors and brightness ratios on any given day.
In some ways, the extraordinary range of variation I found in natural daylight was a blessing: Rather than trying to precisely match a specific set of spectral profiles and brightness ratios for the sun, sky, and surrounding ambient, the task became one of developing a light source that did a good job of representing an approximate centerline of the range of variation in each parameter. So rather than aiming for "standard" daylight, what we strove for was "representative" daylight.
The IR formula for "Representative Daylight"
So what did we settle on for the color balance and brightness ratios of our main light sources? Here's how they break down:
- Sun: 4,900K, ~12 EV at subject's shoulder level
- Sky: 10,500K, ~8 EV at subject's shoulder level
- Ambient: ~5,100K, ~8 EV at subject.
The net of this is that my color meter reads about 5,050 - 5,100 K overall when all the lights are running. It's important to note that the absolute light levels here are considerably lower than those found in real daylight. That's not significant for our testing, as we're adjusting each camera's exposure system to deliver the desired final image brightness, and we're still running the camera sensors in a normal exposure regime. (That is, we're not remotely dealing with light levels so low that long-exposure image noise becomes an issue.) What does matter is the ratio between the different light sources, as that determines the contrast level and dynamic range of the scene.
"Sunlight"
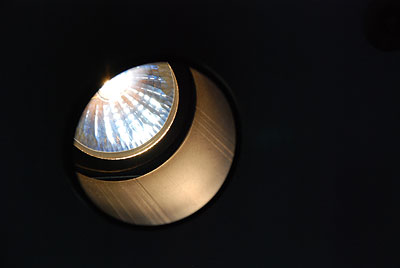
The "sunlight" for this test comes from a set of 24 Solux 4700K incandescent lights with black-painted backs, in a 4x6 array, running at about 13 volts apiece, yielding a color temperature of about 4900K, measured at the subject. Natural sunlight is pretty collimated, which means that the light rays fall more or less parallel to each other, as from a distant point source. Given the limits of our current studio (ceiling height of 9 - 10 feet, and a practical limit for light mounting of around 8 feet), I couldn't take the most obvious approach of simply hanging a single, very bright light 20 or 30 feet above the subject to mimic the sun. The solution I came up with was to construct a rectangular array of lights at a height of about 8 feet, with baffles around each bulb to limit side-spill. This produced reasonably well-collimated light, with a very high contrast ratio. (Limiting side-spill also helped avoid the warmer-hued light that the Solux bulbs emit off-axis.)
The primary difference in this area between the new simulator and the previous one was that the backs of the Solux bulbs are painted black, to absorb the yellow light that spills from the back of normal, uncoated Solux lights. This was necessary due to the change in how we were generating the sky illumination. Painting the backs of the bulbs shifted the overall color balance toward the blue end of the spectrum somewhat, so we now run the bulbs at about 13.1 volts each, vs the 15 volts we used on the previous array.
When it came time to set up the mannequin test subject under the lights, we realized that there was still considerable side-spill from the Solux bulbs. This led to less-defined shadows around the model's eyes than would be the case outdoors. To combat this and provide darker shadows that would better duplicate true sunlit conditions, we added some baffles made of black Cinefoil material around the three bulbs that were most directly illuminating the model's face. This gave much sharper shadows there, with very minimal impact on the rest of the scene.
"Skylight"
In the previous daylight simulator, the sky illumination was provide by a second array of Solux bulbs, gelled to produce a color temperature of about 7,000K. This light was bounced off the face of the flat baffle around the "sun" bulbs, which was covered in reflective foil.
While the 7,000K color temperature was a reasonable representation of average Atlanta sky light in late spring and early fall, multiple measurements convinced me that a better "representative" value would be somewhere around 10,000K. (In actual practice, 7,000K was on the low end of the range I measured when the sky was cloudless. In fall and winter, I frequently found sky color temperatures as high as 15,000K. 10,000K seemed to be a good average value to represent a clear, deep blue sky.)
To get that deep a blue with incandescent lighting (while maintaining the approximately four stop brightness ratio relative to the sun) would have required a very significant increase in wattage. So, rather than burn another 5 KW or more of lighting just for the sky light, I chose to go with filtered, broad-spectrum fluorescents instead. Compact fluorescents are quite efficient, not wasting nearly as much of their input energy in infrared emission and heat. One downside though, is that their spectral output is somewhat spiky, which could cause problems with metamerism if they were the principle light source. Since the sky illumination is a second-order component of the overall daylight spectrum though (in our case being approximately four stops down from the light level of our "sun"), any metameric issues would be strictly third- (or higher) order. Given this, I felt that broad-spectrum, filtered fluorescent bulbs made excellent sense for the "sky" lighting.
"Fill light"
Because of the particular surroundings (notably the color of a neighbor's house and an abundance of green vegetation in fairly close proximity to the subject), the fill illumination of the original outdoor scene was rather warm-hued, with a color temperature on the order of 3,900K. This is perhaps the biggest change from the previous setup: Repeated measurements of the daylight outside our office convinced me that a color temperature of 5,000-5,100 K was much more representative of typical real-world conditions. Here again, the intensity of the fill light was sufficiently far down from that of the sun (about 4 stops) that it seemed entirely acceptable to use fluorescent illumination for this light source as well. Here, the light source is a pair of Photoflex CoolStar 150 compact fluorescent lamps, with strips of CTO color-warming gels inside 2x3 foot softboxes to trim the CoolStar's native 5,600K color temperature slightly to the requisite 5,100 K. These are set at roughly 45 degree angle from the subject, at a distance that gave the desired 4-stop difference relative to the Solux "sun" source.
"Big Bertha", the new daylight light source
It was primarily the desire for a better sky light simulation led to the construction of a new light source. Rather than bouncing blue light off a reflective baffle surrounding the incandescent "sun" lights, we went with an array of broad-spectrum compact fluorescent bulbs behind a white acrylic plastic diffuser, with blue gels to deliver the desired ~10,000 K color temperature. The new CF tubes would be interspersed between and around the incandescent Solux bulbs of the "sun" array. This had two consequences for the design of the light source.
The new "sky" source required that we place baffles around the Solux bulbs that create our "sun." The baffles also reduce warmer-hued side-spill. Some lights directly over the model have additional baffles formed from black-anodized aluminum foil helped cast sharper shadows.
First, since the aperture plate surrounding the Solux bulbs would now be translucent, we needed to block the light that normally spills from the edges of these bulbs, which is quite warm in hue. The Solux bulbs provide their stated color temperature only on-axis: As you get outside the specified light cone (36 degrees in the case of the bulbs we were using), the light level drops, but its color temperature drops quite a bit as well. This is because this off-axis light comes directly from the bulb's filament, rather than bouncing off the dichroic reflector at the back of the bulb envelope first. We used baffles made of 2" electrical conduit, painted black, to restrict this side-spill light. These were simply attached to the original 4x6 lighting array via metal brackets.
Second, we needed to both support the array of compact fluorescent bulbs providing the sky lighting as well as limit the amount of light that would spill from them into the room. This would be a big array of lights; the light that they'd throw into the studio would seriously upset the overall color balance if they weren't shielded. This suggested that the light source be enclosed somehow, but the fact that we might have as much as 3 kilowatts of combined lighting within that enclosure meant that we'd also have to provide pretty aggressive cooling as well.
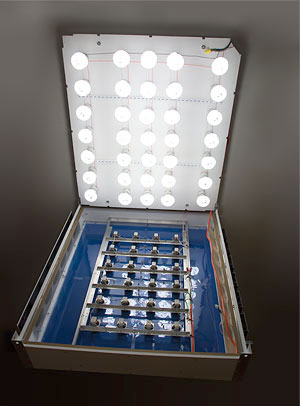
The broad-spectrum compact fluorescent bulbs are mounted on a panel suspended over the Solux array. When the lid is closed, the CF bulbs project down between the Solux bulb/shroud assemblies (which themselves are supported by the aluminum gridwork seen in the lower half of the box).
The shot above shows the solution we came up with: The array of broad-spectrum CF bulbs is mounted on the plywood back of a box built to house the original 4x6 Solux array and support the acrylic diffuser panel. The CF bulbs are carefully positioned so they'll align between the Solux bulbs and their associated support structure. (Alignment was a little ticklish, there's not more than a half-centimeter of clearance in some places.) A total of 35 lights are provided for in the array: With new bulbs and the gel pack needed to deliver the desired ~10,000 K sky color, it we only need about half that many to produce the required light level. As the CF bulbs age, their color temperature and total light output both drop. We'll monitor the color temperature and light balance of the array weekly, and add lights and gels as needed to maintain perfectly constant color and light output.
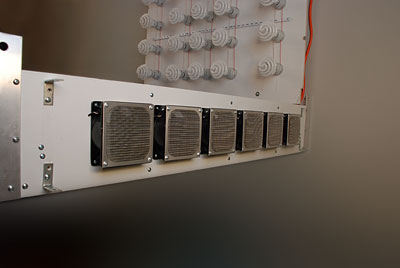
With all the lamps turned on, power dissipation can hit a peak of 3 kilowatts. An array of six muffin fans circulates air through the box to keep the assembly from burning up. (!)
As noted, we can potentially have over 3 KW of power running through the light box (about 2KW of incandescent, and 1KW of fluorescent lighting), so good cooling was a must. A set of six 4.7-inch cooling fans blows about 1,000 cfm of air into the back of the box, the air in turn exiting through a series of holes on the opposite side of the box. A light baffle over the exit holes helps control light spill from the fluorescent array. Some air also exits from around the metal baffles of the Solux array, helping cool them as well. In use, a muffler assembly lined with carpet encloses the rear of the fans to make life a bit more livable in the studio when they're running.
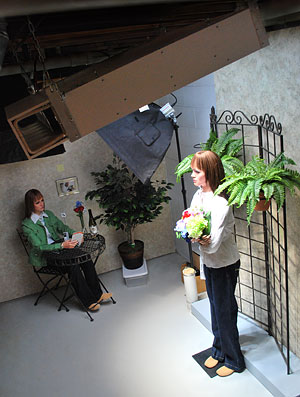
Here's "Big Bertha" (the light source) suspended from the lab's ceiling, above "Jody," our mannequin for the sunlit shot. (That's "Lauren" in the background, the new indoor and sunlit shot sets are right next to each other in the lab.)
The bottom line of all this is a rather large light box, about four feet on a side by eight inches deep, weighing in at about 150 pounds. It's suspended from the ceiling by four hefty hunks of chain that also provide the means for tilting it at the roughly 20 degree angle we use to simulate a late-AM/early-PM sun angle.
Results
Overall, we're very happy with the results from this new light source. It was a very time-consuming construction project, but the end results have been gratifying. The overall color temperature is about 200K higher than our original daylight simulator setup. The new "sky" light source has a nice sky blue color, and covers broader coverage than the last setup did. It still comes nowhere close to the angular coverage of the unobstructed sky, but it's closer than we've managed in the past.
The most noticeable difference between the current and previous daylight light source is one that actually has no effect on the subject itself: The previous source spilled quite a bit of warm-hued light onto the upper part of the backdrop. With the light from this current one more confined to housing itself, the top of the backdrop is lit almost exclusively by the diffuse, blue sky illumination. It's thus darker and more blue-toned than it was with the prior source. As noted though, this only affects the backdrop lighting, the light falling on the subject itself is much closer to that from the previous source.
(To understand what to look for in the "Sunlit" test images and how we interpret the results from them, see this article.)