Nikon D3100 Modes and Menus
Nikon D3100 Capture Modes
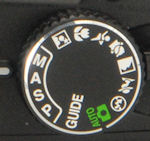 The mode dial on the right side of the D3100's top panel provides access to its various exposure modes, with the usual Program, Aperture-priority, Shutter-priority, and Manual operating modes found on all Nikon DSLRs, plus an Auto mode, a total of seven Scene modes, and a Guide mode that helps beginners get to grips with their first DSLR. Here's a list of what's available:
 Auto: The camera sets everything. Used for snapshots or users who just don't want to be bothered with the details of how the camera will do its work. The AF-assist light will come on if needed, and the camera selects the AF point covering the closest subject.
 Guide: Provides access to the camera's Record, Playback and Setup options through one user-friendly, graphically rich menu system. The user is prompted to select the type of photo they're looking to achieve, and then the camera provides a recommended setup. These can then be further customised by the user, with the camera explaining the effect of each individual setting. Fully manual shooting isn't possible in this mode, but manual aperture or shutter adjustment can be made for certain types of photos. For some modes where the user can adjust aperture or shutter speed, a small example image visually demonstrates the effect that might be achieved.
 Program: Puts the camera in charge of aperture and shutter speed, though all remaining camera settings are available. You can vary the combination of aperture and shutter speed the camera has selected, while retaining the same exposure level, by rotating the Command Dial. Called Flexible Program in Nikon parlance, this function is otherwise known as Program Shift, and is a great way to quickly bias your exposure without needing to switch to a Priority mode.
 Shutter Priority: The user controls shutter speed, from 1/4,000 to 30 seconds, while the camera sets the aperture value.
 Aperture Priority: The opposite of Shutter Priority mode, this mode lets the user control the aperture, while the camera sets the shutter speed.
 Manual: Gives the user complete control over the exposure (both shutter and aperture settings), and provides access to the camera's Bulb shutter setting, for exposures longer than 30 seconds.
 Auto (Flash Off): The flash is disabled, and the camera will vary the sensitivity up to a maximum of ISO 3,200, to capture images using available light. By default, the autofocus assist light will come on if needed, although this can be manually disabled. This mode is great for museums and other places where flash isn't permitted, more natural-looking indoor shots, etc. (Do note though, that you may need to use a tripod, as the shutter speeds may still be on the slow side, even at ISO 3,200.)
 Portrait: Opens the lens aperture to soften the background, helping the main subject to stand out more clearly. Sharpness and color saturation are moderated somewhat, to give softer, more natural-looking skin tones. The built-in flash will pop up and fire if the lighting is too dim, and the AF assist lamp will illuminate if needed.
 Landscape: Boosts color saturation, contrast, and sharpening for landscape shots. The built-in flash and AF assist lamp are both disabled in this mode.
 Child: Boosts sharpness and saturation for clothing and background details, but renders skin tones soft and natural-looking. The built-in flash will pop up and fire if the lighting is too dim, and the AF assist lamp will illuminate if needed.
 Sports: Uses higher shutter speeds to freeze subject motion. The camera switches to continuous-servo autofocus while the shutter button is held down halfway, tracking the subject in the center focus area. The focus point can be chosen with the Multi-Selector. Both the built-in flash and AF assist lamp are disabled.
 Close up: Reds and greens are pumped up. The camera defaults to using the center focus point, but other points can be chosen with the Multi-Selector. The built-in flash will pop up and fire, and the AF assist lamp will illuminate, if the lighting is too dim.
 Night Portrait: Uses slow shutter speed with flash, balancing the two so that night portraits look natural even with flash. Closest-subject AF is used. Use a tripod to avoid blurring.
Nikon D3100 Menus
The menu system on the Nikon D3100 follows that of the D3000 fairly closely. Like that camera, the D3100 lacks a Custom settings menu, and includes a Guide menu that aims to make the camera more approachable.See the tables below for details.
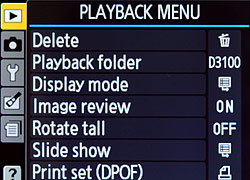
Playback Menu:
| Playback Menu Options | |||
Top-Level Selection |
Second-Level |
Third-Level |
Notes |
Delete |
- Selected - Select Date - All |
Delete? |
Deletes pictures from the camera memory card. Protected images will not be deleted. |
Playback Folder |
- Current - All |
Select a folder for playback. |
|
Display Mode |
- Detailed Photo Info |
- Done - Highlights - RGB histogram - Data |
Allows you to select what shooting information is displayed with the picture during playback,and whether a slideshow-like transition effect should be used when moving between images.. |
- Transition Effects |
- Slide in - Zoom / fade - None |
||
Image Review |
- On - Off |
Lets you choose to see the image right after shooting it or not. |
|
Rotate Tall |
- On - Off |
Allows pictures that were shot in portrait orientation to be rotated correctly on the LCD monitor. |
|
Slide Show |
- Start |
- OK |
Allows you to create a slide show of existing pictures with your choice of interval between pictures. Slide show can be paused, or resumed with the OK button, frames skipped forwards or backwards with the left and right arrow buttons, or the info display changed with the up and down arrow buttons. Hidden pictures will not be displayed. The menu, play or shutter buttons exit the slideshow to the playback menu, playback mode or shooting mode respectively. If the slide show ends uninterrupted, the user is prompted whether to restart the slide show, change the frame interval, or exit to the playback menu. |
- Frame interval |
- 2 s - 3 s - 5 s - 10 s |
||
- Transition effects |
- Zoom / fade - Cube - None |
||
Print Set (DPOF) |
- Select/set |
- Select image screen |
Allows you to select which pictures to print on a DPOF compatible printer, and choose whether to imprint either the date of capture, the shutter speed and aperture, or both. |
- Deselect all? |
- Remove print marking from all images? - Yes - No |
||
Shooting Menu:

| Shooting Menu Options | |||
Top-Level Selection |
Second-Level |
Third-Level |
Notes |
Reset Shooting Options |
- Yes - No |
Restores all Shooting Menu and Picture Control settings to their default values, and the focus point to center (if not in auto AF-area mode). Also clears any focus or exposure locks, and resets the exposure and flash compensation values to zero, and if Flexible Program mode is active, reverts to regular Program mode. Finally, resets the flash mode to auto front-curtain sync (if in the Auto, Portrait, Child or Close-Up modes), Front Curtain Sync (if in the Program, Shutter-priority, Aperture-priority or Manual modes), or Auto Slow Sync (if in the Night Portrait mode). |
|
Set Picture Control |
- Standard - Neutral - Vivid - Monochrome - Portrait - Landscape |
- Quick Adjust - Sharpening - Contrast - Brightness - Saturation - Hue |
Set the picture control option for various levels of sharpening, contrast, brightness, saturation, and hue. Not all options are available for all modes. |
Image Quality |
- NEF (RAW) + JPEG fine - NEF (RAW) - JPEG fine - JPEG normal - JPEG basic |
Choose the type of still image file you want to capture. |
|
Image Size |
- Large (4,08 x 3,672; 14.2M) - Medium (3,456 x 2,304; 8.0M) - Small (2,304 x 1,536; 3.5M) |
Choose the still image size you want to capture. |
|
White Balance |
- Auto - Incandescent |
Adjusts the white balance to match the conditions you are shooting in. All options except for preset manual can then be fine-tuned in a 2D fine-tuning adjustment screen, letting the user set a green / magenta bias, and a blue / amber bias. |
|
- Fluorescent |
- Sodium-vapor lamps - Warm-white fluorescent - White fluorescent - Cool-white fluorescent - Day-white fluorescent - Daylight fluorescent - Mercury-vapor lamps |
||
- Direct Sunlight - Flash - Cloudy - Shade |
|||
- Preset manual |
- Measure - Use Photo |
Allows manual white balance to be measured, using either a live reading from a neutral gray or white object in front of the camera, or by copying white balance from a photo on the memory card. Only one manual white balance reading can be stored at a time, and if the lighting is too dark or bright, the camera will warn that it was unable to measure the white balance. |
|
ISO Sensitivity Settings |
- ISO sensitivity |
- Auto |
Select the current ISO sensitivity. Hi 1 is equivalent to ISO 6,400, and Hi 2 is ISO 12,800. Auto is only available in Auto and Scene modes, but is confusingly shown (grayed out) in all other modes. |
- ISO Sensitivity auto control |
- On - Off |
Not to be confused with the above-mentioned Auto ISO option available only in Auto or Scene modes. This option applies only to Program, Aperture-priority Shutter-priority or Manual modes. If set to On, the camera will adjust ISO sensitivity from the user's selection only as needed to obtain a proper exposure. If set to Off, the user's choice of ISO sensitivity will be used, even if the camera's metering detects this will result in under- or over-exposure. If Ato ISO overrides the user value, this will be indicated with red text for the ISO value in playback mode. |
|
- Maximum sensitivity |
- 200 - 400 - 800 - 1,600 - 3,200 - Hi 1 - Hi 2 |
Sets the maximum ISO to be selected automatically. Applies only in Program, Aperture-priority, Shutter-priority or Manual modes, and only when ISO sensitivity auto control is set to On.
|
|
- Minimum shutter speed |
- 1/2000 s - 1/1000 s - 1/500 s - 1/250 s - 1/125 s - 1/60 s - 1/30 s - 1/15 s - 1/8 s - 1/4 s - 1/2 s - 1 s |
Sets the minimum shutter speed to be maintained in Auto ISO mode. Applies only in Program, Aperture-priority, Shutter-priority or Manual modes, and only when ISO sensitivity auto control is set to On.
|
|
Active D-Lighting |
- On - Off |
Helps preserve the details in shadows and highlights. |
|
Auto Distortion Control |
- On - Off |
Corrects for barrel or pincushion distortion, when shooting with type-G or type-D lenses, excluding PC, fisheye, and certain other models. Reduces burst shooting rate when enabled. |
|
Color Space |
- sRGB - Adobe |
Sets the color space. |
|
Noise Reduction |
- On - Off |
Controls both the dark-frame subtraction noise reduction (when using exposures slower than eight seconds), and the high ISO noise reduction. High ISO noise reduction cannot be disabled completely; it will still kick in at higher ISO sensitivities (cut-off point unspecified) when disabled. Dark frame subtraction processing can be cancelled by switching off the camera after the exposure has completed. |
|
AF-area Mode |
- Viewfinder |
- Single-point - Dynamic area - Auto-area - 3D tracking (11-points) |
Allows you to select from which point the camera should detect focus. When using the optical viewfinder, you can select a single point with the multi-selector, or select a starting point but have the camera detect subject motion and follow it across the other focus points. Alternatively, the camera can automatically detect the subject and choose the appropriate focus point, or if the focus mode is set to auto-servo AF or continuous-servo AF, the camera's 3D tracking function can be used across all eleven focus points. For live view or movie capture, you can select between face detection autofocus, two sizes of AF target that can be positioned anywhere within the frame, or a tracking target whose starting position can be manually set. |
- Live view / movie |
- Face-priority AF |
||
AF-assist |
- On - Off |
Enables or disables the camera's built-in AF assist illuminator, if supported by the currently mounted lens. The assist illuminator functions only in low light conditions, when single-servo AF is automatically or manually selected, .and the AF area mode is either set to Auto-area or the center AF point is currently in use. |
|
Metering |
- Matrix - Center-weighted - Spot |
Selects the camera's metering mode. Matrix metering uses the camera's 420-pixel RGB metering sensor to analyze tone distribution, color, composition, and (if using a G- or D-type lens) range information to determine the exposure. Center-weighted metering analyses the entire frame, but assigns a higher weight to information from the center of the frame. Spot metering determines the exposure from an area of approximately 2.5% of the frame, centered around either the currently selected AF point, or the central point if the AF-area mode is set to Auto-area. |
|
Movie Settings |
- Quality |
- 1,920 x 1,080; 24 fps - 1,280 x 720; 30 fps - 1,280 x 720; 25 fps - 1,280 x 720; 24 fps - 640 x 424; 24 fps |
Selects the recording resolution and framerate for the movie mode, and enables or disables audio capture during movie recording. |
- Sound |
- On - Off |
||
Built-in Flash |
- TTL |
Selects whether the camera should determine output power for the built-in flash automatically based on its metering of the scene, or allows the user to select the flash power manually from full power to as little as 1/32 of full power.. At full power, the flash has a guide number of 13 meters / 43 feet at ISO 100. |
|
- Manual |
- Full - 1/2 - 1/4 - 1/8 - 1/16 - 1/32 |
||
Setup Menu:
| Setup Menu Options | |||
Top-Level Selection |
Second-Level |
Third-Level |
Notes |
Reset Setup Options |
- Yes - No |
Resets all settings except the video mode, flicker reduction, time zone, date, language, and storage folder to their default values. |
|
Format Memory Card |
All images on memory card will be deleted. OK? - Yes |
Formats the camera's memory card, which erases all data - including files marked as protected. |
|
LCD Brightness |
- -3/+3 adjustment |
Adjusts LCD brightness darker or lighter 3 arbitrary units each way. |
|
Info Display Format |
- Classic |
- Blue, Black, Orange |
Both display types provide similar info, but the Graphic display has a cleaner, more modern layout, and adds visual cues of shutter speed, aperture, mode dial position, etc. Each type has three color scheme choices. |
- Graphic |
- Green, Black, Brown |
||
Auto Info Display |
- On - Off |
When On, LCD will display Info after shutter button is pressed halfway and released. If image review is off, it will also appear immediately after shooting. If set to Off, the display can be called up as needed by pressing the Info button. |
|
Clean Image Sensor |
- Clean now |
- Cleaning activated |
Selects whether the camera should clean dust from the image sensor, and if so, when. |
- Clean at |
- Startup - Shutdown - Startup & shutdown - Cleaning off |
||
Mirror Lock-up |
- Start |
This locks the mirror up and opens the shutter to allow manual cleaning of the imaging sensor. The mirror and shutter are reset when the camera is switched off or the power runs out. Hence, it is important to ensure the camera has plenty of power before cleaning the sensor so as to avoid damage to the delicate shutter mechanism. Usefully, the camera tries to warn of an impending power loss by flashing the self-timer lamp and emitting a beeping sound approximately two minutes beforehand. |
|
Video Mode |
- NTSC - PAL |
Selects the video output mode for display on a TV |
|
HDMI |
- Output resolution |
- Auto - 480p (progressive) - 576p (progressive) - 720p (progressive) - 1080i (interlaced) |
Selects the video output mode for display on a high definition display, and whether HDMI-CEC (Consumer Electronics Control) should be enabled, allowing certain playback functions to be controlled from the attached display's remote control unit. |
- Device control |
- On - Off |
||
Flicker Reduction |
- 50 Hz - 60 Hz |
Reduces live view or movie flicker from fluorescent or mercury vapor lighting by matching the frequency of the local AC power supply. |
|
Time Zone and Date |
- Time zone |
- Graphical time zone selector |
Selects the time zone and date format that you want to use and sets the camera to use Daylight Savings time or not |
- Date and time |
- YMD and HMS |
||
- Date format |
- Y/ M / D - M / D / Y - D / M / Y |
||
- Daylight saving time |
- On - Off |
||
Language |
- Czech - Danish - German - English - Spanish - French - Indonesian - Italian - Dutch - Norwegian - Polish - Portuguese - Russian - Finnish - Swedish - Turkish - Traditional Chinese - Simplified Chinese - Japanese - Korean |
Selects the language that the camera will use |
|
Image Comment |
- Done |
- OK |
Allows text comments to be added to the EXIF header of a picture. Comments can be up to 36 characters long, and can be seen in-camera in the third shooting data page of the photo info display, or in Nikon's supplied ViewNX 2 and optional Capture NX 2 applications. |
- Input comment |
- Data entry screen |
||
- Attach comment |
- Set |
||
Auto Image Rotation |
- On - Off |
Decides if the camera will record orientation information in your pictures, allowing them to be correctly rotated for viewing during playback in-camera or using compatible applications on a computer. |
|
Dust Off Ref Photo |
- Start - Clean sensor then start |
- Take photo of bright featureless white object 10cm from lens. Focus will be set to infinity |
Captures the reference data used to filter out dust electronically |
Auto Off Timers |
- Short - Normal - Long |
Selects how long the LCD display should remain on if no actions are performed in the camera's various operating modes, as well as how long the exposure meter, viewfinder display and information display should remain active. Three preset groups of timeouts are offered, plus the ability to specify separate times for playback / menus, image review, live view, and Auto Meter-off. |
|
- Custom |
- Done |
||
Self-timer Delay |
- 2 seconds - 10 seconds |
Selects how long the shutter release delay should be when using the self-timer. |
|
Beep |
- On - Off |
Selects whether or not the camera should emit a beeping sound when focus lock is achieved in single-servo AF mode, when a photograph is taken in quick-response remote mote, and during the countdown in self-timer or delayed remote modes. |
|
- Rangefinder |
-On -Off |
Uses the camera's autofocus sensor to provide an indication of the distance and direction to correct focus when focusing manually. The option isn't available when using manual exposure, requires an f/5.6 or faster lens, and is subject to the same limitations on operation as there would be when using autofocus.. |
|
File Number Sequence |
- On |
Controls whether file numbering continues from the last number when a new folder is created, the memory card is formatted or a new card is inserted. |
|
Buttons |
- Function Button |
- Image quality / size - ISO sensitivity - White balance - Active D-Lighting |
Selects the function assigned to the Function and AE-L / AF-L buttons. The function button in concert with the command dial can select the image quality and size, ISO sensitivity, white balance, or Active D-Lighting options. A press of the AE-L / AF-L button can lock either or both exposure and focus. It can also lock exposure until the camera's metering system powers off or the button is pressed a second time. Finally, it can be used instead of a half-press of the shutter button to trigger an AF operation. Finally, AE Lock chooses whether exposure should lock only with the AE-L/AF-L button, or also when the shutter release button is half-pressed. |
- AE-L / AF-L Button |
- AF/AF lock - AE lock only - AF lock only - AE lock (hold) - AF-ON |
||
- AE lock |
- On - Off |
||
Slot Empty Release Lock |
- Release locked |
Determines whether or not the camera's shutter release should function without a memory card in the camera. |
|
Date Imprint |
- Off - Date - Date and time |
Allows the date, date and time, or the number of days elapsed since / remaining until a preselected date to be permanently imprinted into photographs as they're captured. Up to three separate dates can be stores in-camera for the date counter option, from which any one date countdown / countup can be selected for imprinting on new images. |
|
- Date counter |
- Done - Choose date - Display options |
||
Storage Folder |
- Select folder |
Choose the active folder name where your images will be stored. . |
|
- New |
- Data entry screen |
||
- Rename |
- Data entry screen |
||
- Delete |
|||
GPS |
- Auto meter-off |
- Enable - Disable |
Determines whether the exposure meter should remain active at all times while the optional GP-1 GPS unit is connected, and shows the current GPS fix (latitude, longitude, altitude, heading, UTC time) when active. |
- Position |
|||
Eye-Fi Upload |
- Enable - Disable |
Enables wireless uploading of images. Displayed only when Eye-Fi card is installed. |
|
Firmware Version |
- Done |
Displays the current version of firmware installed in the camera. |
|
Retouch Menu:
| Retouch Menu Options | |||
Top-Level Selection |
Second-Level |
Third-Level |
Notes |
D-Lighting |
- Picture selection (shows all pictures, but only those with detected faces can be selected) |
- Normal - High - Low |
Adjusts the D-Lighting to brighten shadows and reduce highlights. |
Red-Eye Correction |
- Picture selection |
- Zoom in |
Allows you to automatically detect and remove Red-eye in your pictures. |
Trim |
- Picture selection |
- Increase size of crop - Reduce size of crop - Change crop aspect ratio (3:2, 4:3, 5:4, 1:1, 16:9) - Move crop - Create copy |
Allows you to crop a picture. |
Monochrome |
- Black-and-white |
Allows you to copy pictures to black and white, sepia or cyanotype. 'Darker' and 'Lighter' don't actually affect brightness, just saturation. |
|
- Sepia |
- Darker - Lighter |
||
- Cyanotype |
- Darker - Lighter |
||
Filter Effects |
- Skylight - Warm Filter |
Selects the filter effect to be added to the selected image, and allows the effect to be refined for some filter types, before saving as a new image. 'Darker' and 'Lighter' don't actually affect brightness, just saturation. |
|
- Red Intensifier |
- Darker - Lighter |
||
- Green Intensifier |
- Darker - Lighter |
||
- Blue Intensifier |
- Darker - Lighter |
||
- Cross Screen |
- Number of points (4, 6, 8) - Filter amount (three levels) - Filter angle (three angles) - Length of points (three lengths) - Confirm - Save |
||
- Soft |
- High - Normal - Low |
||
Color Balance |
- +/- 5 steps green / magenta bias, and a - +/- 5 steps blue / amber bias |
Allows you to fine-tune the color balance via the adjustment window. |
|
Small Picture |
- Select image |
- Selection screen |
Create a small copy of the selected image. |
- Choose size |
- 640 x 480 - 320 x 240 - 160 x 120 |
||
Image Overlay |
- Selection window |
- Image overlay screen |
Allows you to take 2 RAW images and combine them into a third picture. Gain can be adjusted within the range of 0.1 to 2.0 for each source image separately. Result is saved as a JPEG file, so it isn't possible to stack more than two images by repeating the process. |
NEF (RAW) Processing |
- Selection window |
- Image quality - Image size - White balance - Exposure compensation - Picture Control |
Create JPEG copies of NEF files. |
Quick Retouch |
- Selection window |
- Adjust amount |
Enhances saturation and contrast, and applies Active D-Lighting as required to brighten dark or backlit subjects. |
Straighten |
- Rotate image in +/- 20 steps (+/- 5 degrees in 0.25 degree steps) |
Correct tilted images (or deliberately tilt them for artistic effect) in-camera. Image is cropped to a rectangle fitted inside the rotated image. |
|
Distortion Control |
-Auto - Manual |
+/- 5 step adjustment |
Corrects pincushion or barrel distortion. Auto corrects for you and then allows fine-grained adjustment, manual provides a coarser adjustment with no initial auto-adjust. |
Fisheye |
- +10 step adjustment |
Mimics the effect of a fisheye lens |
|
Color Outline |
- Selection window |
Creates a copy with only the outlines of an image showing. |
|
Perspective Control |
- +/- 20 step adjustment on horizontal and vertical axes |
Corrects for diverging horizontals / verticals such as a shot of a tall building from ground level. |
|
Miniature Effect |
- Choose area in focus - Preview copy - Cancel - Create copy |
Creates a graduated blur effect on either side of a user-specified area, which yields an artificially strengthened effect similar to narrow depth of field, reminiscent of a photograph of a miniature. |
|
Edit Movie |
- Choose start point |
- Movie playback dialog with play, fast forward, rewind, frame forward, frame rewind, pause, and crop controls |
Allows basic editing of movies, and saving of frames as still images. |
- Choose end point |
|||
- Save selected frame |
|||
Nikon D3100 Guide Menu:
As first seen in the D3000, the D3100 retains Nikon's user-friendly Guide Menu. Accessed via its own position on the mode dial, this menu aims to make more approachable the various complexities of a digital SLR. The photographer is guided through a series of options that ascertain the type of photo needed, and then advise on the relevant setup. It's clever, if rather deeply nested and hence difficult to display logically on a web page. Rather than attempting to list the entire Guide menu (which duplicates functions accessible through the camera's other menus), we've listed the main sections and summarized the rest.
| Guide Menu Options | |||
Top-Level Selection |
Second-Level |
Third-Level |
Notes |
Shoot |
- Easy Operation |
- Auto - No flash - Distant subjects - Close ups - Sleeping faces - Moving subjects - Landscapes - Portraits - Night Portrait |
Allows the photographer to offer an indication of the subject type. Each specific mode then allows the photographer to immediately start shooting using the camera's settings, or to further adjust the flash mode, release mode and AF area mode. (Flash modes on offer depend on the specific subject type selected). |
- Advanced Operation |
- Soften backgrounds |
Allows the photographer to adjust the aperture (soften backgrounds, bring more into focus) or shutter speed (freeze motion, show water flowing). Each specific mode then allows the photographer to immediately start shooting using the camera's settings, or to further adjust the flash mode, release mode, AF area mode, picture control, exposure compensation and flash compensation. (Flash modes on offer depend on the specific subject type selected) |
|
- Use a timer / quiet shutter |
|
Displays a help screen showing the location of the drive mode lever |
|
View / Delete |
- View single photos |
- Image selection screen |
Allows you to view one image at a time. |
- View multiple photos |
- Image selection screen shows four images. |
Allows you to view multiple images |
|
- Choose a date |
- Date selection screen |
Allows you to view images from one specific date. |
|
- View a slide show |
- Start - Frame interval |
Allows you to view a slide show. Frame interval choices are 2, 3, 5 or 10 seconds. The OK button pauses the slide show.. |
|
- Delete photos |
- Delete multiple photos - Delete photos by date - Delete all photos |
Allows you to delete a selection of photos, all photos from a specific date, or all photos. |
|
Set Up |
- Image quality |
- NEF (RAW) + JPEG fine |
Allows you to select the file format and image quality. |
- Image Size |
- Large (4,08 x 3,672; 14.2M) - Medium (3,456 x 2,304; 8.0M) - Small (2,304 x 1,536; 3.5M) |
Allows you to select the image dimensions. |
|
- Playback folder |
- Current - All |
Selects whether the camera should restrict playback of images to the current folder, or all folders on the flash card. |
|
- Print set (DPOF) |
- Select / set - Deselect all? |
Allows you to select which pictures to print on a DPOF compatible printer, or clear the current selection. |
|
- Format memory card |
- Yes - No |
Allows you to format the memory card, deleting all images - including those marked as protected. |
|
- LCD brightness |
- LCD brightness |
Adjusts LCD brightness darker or lighter 3 arbitrary units each way. |
|
- Info background color |
- Green - Black - Brown |
You can select the background color for the camera's info display. |
|
- Auto info display |
- On - Off |
Enable or disable the auto info display. |
|
- Video mode |
- NTSC - PAL |
Select between American and European types for the standard-definition video output. |
|
- Time zone and date |
- Time zone - Date and time - Date format - Daylight savings time |
Selects the time zone and date format that you want to use and sets the clock, as well as whether the camera should use Daylight Savings time or not |
|
- Language |
- Czech - Danish - German - English - Spanish - French - Indonesian - Italian - Dutch - Norwegian - Polish - Portuguese - Russian - Finnish - Swedish - Turkish - Traditional Chinese - Simplified Chinese - Japanese - Korean |
Selects the language that the camera will use |
|
- Auto off timers |
- Short - Normal - Long - Custom |
Selects how long the LCD display should remain on if no actions are performed in the camera's various operating modes, as well as how long the exposure meter, viewfinder display and information display should remain active. Three preset groups of timeouts are offered, plus the ability to specify separate times for playback / menus, image review, and Auto Meter-off.
|
|
- Beep |
- On - Off |
Selects whether or not the camera should emit a beeping sound when focus lock is achieved in single-servo AF mode, when a photograph is taken in quick-response remote mote, and during the countdown in self-timer or delayed remote modes.
|
|
- Date imprint |
- Off - Date - Date and time - Date counter |
Allows the date, date and time, or the number of days elapsed since / remaining until a preselected date to be permanently imprinted into photographs as they're captured.. Up to three separate dates can be stores in-camera for the date counter option, from which any one date countdown / countup can be selected for imprinting on new images.
|
|
Slot Empty Release Lock |
- Release locked - Enable release |
Determines whether or not the camera's shutter release should function without a memory card in the camera. |
|
Movie Settings |
- Quality |
Selects the recording resolution and framerate for the movie mode, and enables or disables audio capture during movie recording. |
|
- Sound |
|||
HDMI |
- Output resolution |
Selects the video output mode for display on a high definition display, and whether HDMI-CEC (Consumer Electronics Control) should be enabled, allowing certain playback functions to be controlled from the attached display's remote control unit. |
|
- Device control |
|||
Flicker Reduction |
- 50 Hz - 60 Hz |
Reduces live view or movie flicker from fluorescent or mercury vapor lighting by matching the frequency of the local AC power supply. |
|
Recent Settings Menu:
The Recent Settings menu consists of the twenty most recently used settings, which are automatically added to the menu during operation. It's also possible for individual options to be removed from the menu by highlighting them and pressing the delete button twice. Hence, the structure of this menu changes with the usage patterns of the photographer, and its contents can't be mapped out. The screenshot below shows one possible permutation of options you could see in the Recent Settings menu.
 Fujifilm GFX 50S Review
 Fujifilm X-T3 Review
 Olympus E-M5 III Review

Follow Imaging Resource