Panasonic Lumix DMC-LX2 Design
The Panasonic LX2 carries on the same classic Leica-like style as the previous model, looking virtually identical to the LX1. Like the LX1, it comes in silver or black. Despite its slightly boxy profile, the Lumix LX2 is a compact digital camera with enough contours and a not-too-obtrusive snub-like lens (28-112mm in 35mm equivalent) to fit comfortably in a bag or coat pocket. Dimensions of the camera are 4.2 x 2.2 x 1.0 inches (106 x 56 x 26 millimeters) and weight is just 7.6 ounces (217 grams), so while it has as many features as some prosumer models, it's far more portable.
Though the appeal of the Panasonic Lumix LX2's design might be generational -- it certainly looks like what a camera should look like to anyone who can still remember the glory days of film -- it also has enough allure to appeal to younger photographers.
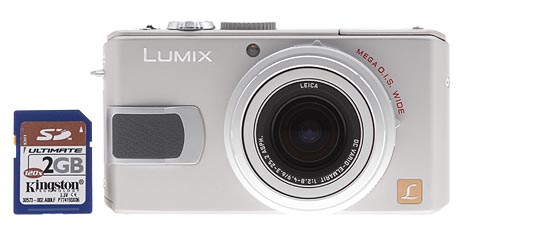
With the minimalist Leica rangefinder styling that's been a hallmark of the company's Lumix lineup, the Panasonic LX2 looks clean and functional, with a 4x Leica DC optical zoom telescoping lens that dominates the front panel, and a small two-tone faux-leather fingergrip on the right side (as seen from the camera's rear). At the very top of the camera's front panel, just to the right of the lens, is the red LED light emitter that serves as the self-timer countdown indicator and autofocus assist lamp. At the very top left-hand corner of the front panel is the pop-up flash strobe lid.
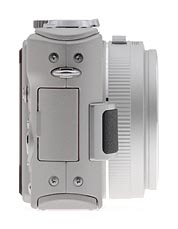
The right side of the Panasonic LX2 (as viewed from the back) features only the hinged, plastic door that covers the connector compartment, and an eyelet for the wrist strap. The connector compartment houses the A/V port which doubles as the Digital Out port, and also contains the DC In connector terminal.
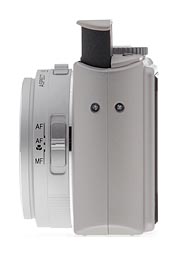
The opposite side of the Panasonic LX2 is featureless. But from this side you can see the Focus switch on the lens barrel, which offers three settings: Autofocus, Autofocus Macro, and Manual Focus.
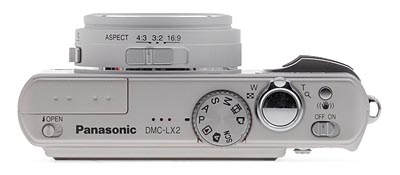
The Panasonic Lumix LX2's top panel features a Mode dial near the center, along with the Shutter button, Zoom lever, Optical Image Stabilizer button, and Power switch, all to the right. The Zoom lever surrounds the Shutter button, which has a good feel for the difference between a half and full press. A set of three small holes just to the left of the Mode dial is the camera's microphone. And at the far left side is a slide switch that pops the flash up. The flash itself pops up from the front left side of the top panel. Also from the top, you can see the Aspect Ratio switch on the Panasonic LX2's lens barrel, offering three settings: 4:3, 3:2, and 16:9.
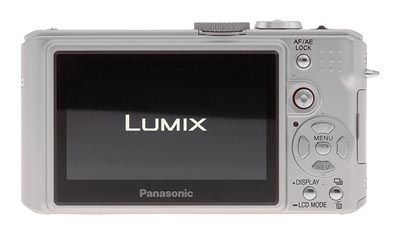
The majority of the Panasonic LX2's exposure controls are located on the camera's rear panel, along with the 2.8" LCD monitor. Running down the right side of the LCD monitor are the AF/AE Lock button, the Joystick, a small LED Status Indicator, and a set of four navigational buttons, each of which also serve as EV, Flash mode, Review, and Self Timer buttons. In the center is the Menu/Set button. Below the arrow pad are the Display/LCD Mode button and the Drive/Delete button. A textured thumb grip at the very top right corner of the camera's rear reinforces the modest handgrip on the camera's right side.
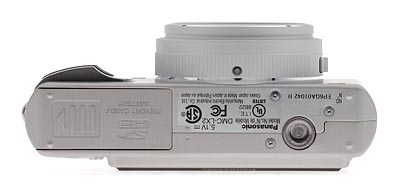
The Panasonic LX2's bottom panel is reasonably flat, with a sliding door to access the combined battery and SD/MMC memory card compartment at the right of the camera, and a threaded metal tripod mount near the left rear corner. The tripod mount is positioned off-center from the lens, and is too close to the left side of the camera to provide a stable platform. That said, the tripod mount is far enough from the battery/memory compartment to allow quick changes while shooting on a tripod.
Panasonic Lumix DMC-LX2 External Controls

Shutter Button: Located on the right side of the Panasonic LX2's top panel and surrounded by the Zoom lever, the Shutter button sets focus and exposure when halfway pressed, and when fully depressed, it trips the shutter release. In Self-Timer mode, fully depressing the Shutter button triggers a two- or 10-second countdown before the shutter is released.
Zoom Lever: Surrounding the Shutter button, this lever controls the optical and digital zoom in any Record mode.
In Review mode, pushing the lever toward the "W" end activates a nine or 25 image index display mode, and also accesses a calendar display. Pushing the lever to the "T" end digitally enlarges a captured image as much as 16x. When playback zoom is active, pushing the lever back toward the "W" zooms back out.

Mode Dial: To the left of and slightly behind the Shutter button, this notched dial on the camera's top panel is used to select the Panasonic LX2's shooting modes as follows:
- Print Mode: Indicated by a printer icon on the Mode dial, this mode allows you to print images directly to a printer when the camera is connected to a PictBridge device.
- Movie Mode: A filmstrip icon marks this mode on the Mode dial. Here, the camera records short movie clips with sound at either 4:3 or 16:9 aspect ratios. At 4:3, options include 10 or 30 fps at VGA or QVGA quality. At 16:9, options include 10, 15 or 30 fps. Recording time is limited only by the capacity of the SD card in the camera (and of course the remaining battery life). A handful of exposure controls are available in this mode, including exposure compensation, white balance, frame rate, AF mode, digital zoom, optical stabilization, and color effect. However, once recording starts, the aperture, optical and digital zoom, and focus are locked for the duration of recording.
- Manual Mode: This mode, indicated by the letter "M," lets you control both the aperture setting and the shutter speed using the joystick to both select and set the control. When you half press the Shutter button, the aperture and shutter speed values turn red if the exposure isn't what the camera thinks it should be. Auto ISO is not available in this mode.
- Shutter Priority Mode: In this mode ("S" mode), you control the shutter speed and the camera compensates with the aperture setting. When you half press the Shutter button, the aperture and shutter speed values turn red if the exposure isn't adequate.
- Aperture Priority Mode: In this mode ("A" mode), you control the aperture and the camera compensates with the shutter speed. When you half press the Shutter button, the aperture and shutter speed values turn red if the exposure isn't adequate. Auto ISO is not available in this mode.
- Program Mode: Marked with a "P" on the Mode dial, this mode puts the camera in charge of both the shutter speed and the aperture, but you can shift either value by toggling up and down with the joystick. In addition, you retain control over other exposure and image options. Auto ISO is not available in this mode.
- Playback Mode: Indicated by the traditional Playback symbol (a triangle within a rectangle outline), this mode allows you to scroll through captured images and movies, write-protect images, view an index display, zoom into a captured image, delete unwanted images, rotate images, set up images for printing on DPOF compatible devices, as well as play movies.
- Auto Mode: A black camera icon with an "A" superimposed on it marks this mode, where most user options are removed, but without the dumbed-down terminology that we see on most Panasonic digital cameras. Still, it's limited, allowing control only over Picture size, Quality, and Digital Zoom. All continuous mode options are available. Flash options are reduced to just Off, On, and Auto with Red-Eye Reduction. The self-timer function offers both two and 10-second options, and the Image Stabilizer is permanently set to Mode 1.
- Scene Mode: The final position on the Mode dial (marked "SCN"), this selection gives you access to all 18 scene modes on the camera. Scene mode choices are: Portrait, Soft Skin, Scenery, Sports, Night Portrait, Night Scenery, Self-Portrait, Food, Party, Candle Light, Fireworks, Starry Sky, Beach, Aerial Photo, Snow, High Sensitivity, Baby 1, Baby 2.
![]()
Optical Image Stabilizer Button: Directly to the right of the Panasonic
LX2's Shutter button/Zoom lever combo on the top panel, this button accesses
the camera's image Stabilizer function, which attempts to reduce image blurring
caused by camera shake. The Stabilizer can be disabled altogether, or can be
set to Modes 1 or 2. In Mode 1, the Stabilizer functions continuously. Mode
2 operates the Stabilizer only during the actual image capture, which conserves
power and potentially provides a slightly better chance of capturing a blur-free
image (when in Mode 1, the Stabilizer may already have used much of its available
range to correct shake that occurred just before the shutter was released, and
hence may not have as much latitude to correct the shake during the actual exposure).

Power Switch: Directly behind the Optical Image Stabilizer button, this sliding switch turns the camera on or off. Powering the Panasonic LX2 on with the Mode dial set to a record mode triggers the lens to extend. Likewise, turning the camera off causes the lens to retract.

Flash Open Button: On the very far left of the camera's top
panel, this button pops open the flash compartment.

Aspect Ratio Switch: On top of the camera's lens, this sliding
switch controls the camera's aspect ration, offering 4:3, 3:2, and 16:9 options.
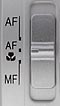
Focus Switch: Positioned on the left side of the lens barrel
(as viewed from the rear), this switch controls the main focus mode, with options
for Autofocus, Macro AF, and Manual.
![]()
AF/AE Lock Button: Next to the top right corner of the LCD
monitor, this button locks the exposure and focus when pressed in any record
mode. Through the Record menu, you can set the button to lock only exposure
or focus, however. And in Manual focus mode, it will only lock exposure.

Joystick Controller: Directly below the AF/AE Lock button,
this multi-directional joystick controller has multiple functions. In Program
mode, moving the controller up and down adjusts the exposure, letting you bias
the autoexposure toward shutter speed or aperture. In Manual focus mode, moving
the controller up and down adjusts focus. In any menu, you can use the controller
to navigate through settings and make selections. Pressing down on the center
of the controller confirms selections. In the manual and partial manual exposure
modes, the controller accesses the available exposure variables, and is also
useful in adjusting the AF area.
In Playback mode, moving the controller right and left scrolls through captured image and movie files.
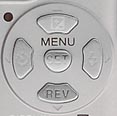
Four-Way Arrow Pad and Menu/Set Button: Dominating the lower right portion
of the camera's rear panel, this group of four buttons accesses a variety of
camera settings. Menu options may be navigated and camera settings adjusted
using the buttons as arrow keys. Pressing the Menu/Set button at the center
confirms selections. Outside of the menu, pressing the Menu/Set button displays
the LCD menu system. In addition to their navigational function, the arrow keys
also access basic camera settings outside of a menu screen. The up arrow accesses
Exposure Compensation (repeated presses access the Auto Exposure Bracketing
and Flash Exposure options as well), while the right arrow cycles through the
available flash modes. The left arrow cycles through the Self-Timer modes, and
the down arrow activates a quick review of the most recently captured image.
In Auto mode, the up arrow instead activates a backlight compensation feature,
which brightens backlit subjects.
In Playback mode, the right and left arrow keys navigate through captured images and movie files. The down arrow key starts or stops movie playback. While a movie is playing, the left and right arrow keys cue through the movie, while the up arrow key pauses the movie. When an image has been digitally enlarged, the four arrow keys pan around within the image.

Display/LCD Mode Button: Adjacent to the lower right corner of LCD display,
this button controls the image and information displays in Record and Playback
modes. In Record mode, pressing the button cycles between the four display modes,
which include the image with information, image with information and live histogram,
alignment grid, and image with no information modes. Pressing and holding the
button in Record mode lets you choose between the Power LCD or High Angle display
modes. In Power LCD, the screen becomes brighter to make it easier to see outdoors.
Brightness increases further in High Angle so you can see the picture on the
LCD when holding the camera above your head -- such as when shooting over a
crowd. You can also choose to turn these modes off. (In Playback mode, you have
the option of choosing the Power LCD selection but not High Angle.)
In Playback mode, pressing the button cycles between the image with information, expanded information and histogram, and no information displays.
![]()
Drive Mode/Delete Button: To the right of the Display/LCD Mode button,
this button accesses the three Burst modes (High Speed, Low Speed, or No Limit),
or returns to the single-shot mode.
In Playback and Review modes this button pulls up the Delete menu.
 Fujifilm GFX 50S Review
 Fujifilm X-T3 Review
 Olympus E-M5 III Review

Follow Imaging Resource