 Genuine Fractals™ |
Review Date: March 2000
The Road to Digital High-Res
For more than two years, I’ve been exploring the world of digital
photography using what have become known as "pro-sumer" cameras.
Almost from the beginning, I was convinced that there were ways
I could produce images with these modestly priced tools that were
suitable for commercial applications. However, the key to achieving
this goal was "processing" the raw image through sophisticated software
that could take the captured data, enhance it to maximize the quality
of the image so that it could be reproduced, either in the form
of a high quality print, or by graphic processes that utilize CMYK
color separations.
By the time I began my experiments, studio photographers and a handful
of hardy outdoor types were already using higher end digital scanning
backs on medium and large format cameras to produce excellent images
for commercial and fine-art applications. Their systems, however,
were tethered to computers, and although some were portable in the
sense that they required tethering only to a lap-top, I wanted a
truly portable system that was as convenient to use as the conventional
cameras I’ve carried into the field for more than forty-five
years. I also wanted to be able to produce my images independently.
As a photographer/artist, I’ve never been comfortable having
someone else process and print my images and then taking personal
credit for the work. I believe the art and the process are inextricably
bound together.
Early Experiments Showed Promise
By the end of my first year, I had managed to produce and exhibit
8" x 10" digital black and white prints that could be hung side-by-side
with conventional, chemically processed gelatin silver prints. But
I could not exceed that size without displaying an obvious difference.
I did not offer digital prints for sale however, because I was certain
that the life expectancy of these early efforts would be rather
short-probably less than five years.
During this same one-year period, I also succeeded in using my "megapixel"
digital color images in a handful of commercial print projects.
In each instances, the reproduction size of all images was held
to 5" x 7" or smaller. By the end of 1999, I had succeeded in producing
larger images that reproduced well in print, but this was accomplished
by upgrading cameras as newer technology became available. Currently,
I’m using an Olympus C-2500L that produces a 2.5 megapixel
image file.
Getting back to my earlier comments, however, It is important to
say that my success in using "pro-sumer" digital images is due largely
to the capabilities of the software I use. No one could use the
raw file produced by the camera to achieve the same effects.
My primary processing tool is Adobe® Photoshop®2 5.5. This
is the industry’s premier photo retouching and image editing
program, used by every professional graphic designer, commercial
pre-press operation, service bureau and photographer I know. I know
only a few people who use more than half of this powerful program’s
capabilities, and although my experience with Photoshop began many
versions ago, I still use it primarily to produce what most of us
would call "conventional images"where even the most complicated
retouching is not the least bit apparent to viewers who have not
seen the original image.
Routinely, by the time an image is ready for reproduction, I have
altered the levels and curves (modifying tonality and contrast),
balanced the colors, retouched the picture to eliminate blemishes,
minimize reflections, and neutralize obvious distractions, and I’ve
sharpened the image with the unsharp masking tool.
A Breakthrough from Altamira
Over the years, I have employed a number of plug-ins for Photoshop.
For those unfamiliar with the term, "plug-ins" are compatible additions
that work from the Photoshop palette even though they’re produced
by companies outside Adobe Systems, Inc. They include products like
Extensis Mask Pro and Intellihance, and the remarkable product by
Altamira Group that I’m going to describe in a moment Genuine
Fractals.
Though it is not a newcomer to the software market (Version 1.0
won the Macworld "Eddy Award" as the best graphics plug-in of 1997
and Genuine Fractals PrintPro won the 1998 "Eddy Award" as the best
publishing utility), I didn’t discover it until late in 1999.
Moreover, when I inquired about the product among my friends in
education and the graphics arts industry, I found I wasn’t
the last kid on my block to discover Genuine Fractals.
My first exposure to this plug in was on the recommendation of a
visitor to the Imaging Resource Web site. He had written to compliment
me on my article about digital landscape photography and closed
his correspondence with the remark, "I hope you have discovered
Genuine Fractals."
Well, I had not discovered Genuine Fractals and although I had heard
of fractal technology and read a definition, I had no practical
knowledge or experience. I immediately searched the Internet and
found the web site of Altamira Group, Inc., a software development
company located in Burbank, California. The Company describes itself
as a developer of applications for high-resolution graphics utilizing
state-of-the-art digital imaging technology.
I immediately downloaded a trial versions of Genuine Fractals 2.0
and GF PrintPro and began a test on one of my raw image files captured
with the Olympus C-2000Z. It was a photograph of an antique gold
pocket watch that can be seen on my web site. I saved it in the
GF PrintPro.STN format and enlarged it to 300% of its original size.
I was speechless. Not only was the image sharper than I’d seen
it before, but I saw on the smooth metal inner surface of the watch
face cover a small fingerprint I’d never before detected in
working on the file. I couldn’t wait to get my hands on the
full program and explore the full capability of Genuine Fractals.
Meanwhile, being the curious type, I "needed" to know more about
fractal technology, so I looked it up.
Here’s what Genuine Fractals software does:
After you have optimized your image file in Photoshop, establishing how
the final image will appear, you save the image using the preferred Genuine
Fractals file extension (FIF or STN). GF transforms the image into "resolution
independent-assets" eliminating the relationship between pixels and resolution.
The image becomes mathematically encoded as an algorithm and the pixels
of the original raster image are replaced with a new file structure that
stores the entire image and none of the pixels. When you open the image
again, you can re-scale it to the desired size and the algorithm will
generate new pixels while maintaining sharpness regardless of image size.
Genuine Fractals lets you save time by allowing you to work in medium
size original files for high resolution output. What’s more, when you
scan images from film, no longer is it necessary to scan images at output
resolution. You need only between 15MB and 40MB of RGB data to capture
an image for large format output.
Now, I know some of you are beginning to show your skepticism, but bear
with me. This really works and I can prove it. I’ve actually tested the
following statement found in the GF product sheet:
"You can scan a 4" x 5" transparency at 25MB, do all the image editing at that scan resolution, then encode the image. The encoded file will typically be 2MB to 12MB. Now, if you need to output the image at 450MB and 60MB, you can generate both resolutions from the same encoded file." "For smaller print-quality output, you can start with a 4MB-5MB original, encode to less than a megabyte, then render the image easily and beautifully to 20MB. For screen resolution output, start even smaller."
A Test: Getting the Most from Photoshop
Here’s another experiment you can try, comparing the best method
of Photoshop image enlargement against Genuine Fractals. The Photoshop
method was recommended by an instructor friend some time ago and it does
produce a pretty good result. Download the JPEG or TIFF image from your
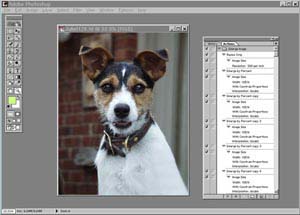
digital camera and open it in Photoshop (see figure. 1) . Open the actions
palette under the Window menu by clicking on Show Actions. Begin a new
set of actions following instructions in your Photoshop user guide and
enlarge your image to the desired size by just a few percentage points
at a time. For "speed," you can enlarge the image in 5% increments, although
you’ll get a far better result resizing the image just 1% at a time.
Let’s go over this step-by-step.
Though this process is rather time consuming, you will get a much better
result that you would if you simply resized your image in a single step
(Image Size under the Image menu).
Step Number 1:
First, I downloaded a JPEG image file from my Olympus C-2500L and made a copy of the file. (It’s a good idea to make a copy to work from the first time you try this, so that you can preserve the original for future use in the event you make a major mistake and damage the file you’re working on.)
My objective was to end up with a 300 ppi file at 8 x 10 inches.
Step Number 2:
I then resized the original image without resampling (that would have altered the original file size) to 300 ppi (4.56" x 5.7" for this particular file).
Step Number 3:
My next step was to begin enlarging the image in steps, 5% at a time, resampling to keep the image at 300 ppi, until the final image size was just over 8" x 10". You’d expect this to take some time, but using the actions palette speeds the process substantially.
Step Number 4:
I saved the enlarged image in TIFF format.
Continuing the Test: Enlarging the Image with Genuine
Fractals
I reopened the original image file and again resized it to 300 ppi without
resampling. This time, however, I simply saved the original file with
Genuine Fractals using the STN extension (see figure 2).
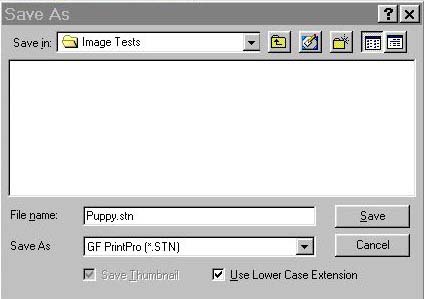
Fig. 2: The Photoshop Save As dialog box showing the STN extension
I then opened the STN file at exactly the same size as my first enlargement and in two side-by-side windows made a direct comparison of portions of the images at 100% magnification.
The Comparison Results
Without question, the GF image won this comparison test. The GF image
was reasonably free of artifacts, was smoother, and had better color quality
than the image enlarged in increments. At 200%, the differences became
even more obvious. Photoshop’s bicubic interpolation method produces
good results, but a side-by-side comparison with fractal technology is
a bit like comparing apples and oranges, if you’ll excuse my use
of a tired cliche.
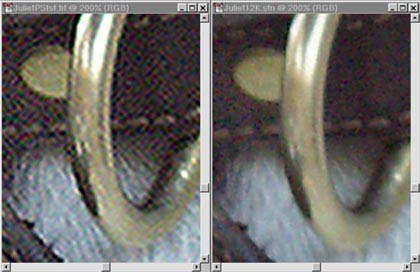
Fig 3: The portion of the image used for this comparison at 200% shows the brass ring on the puppy’s collar (which also may be seen in Fig 1). On the left is the image enlarged in 1% increments in Photoshop. On the right is the identical image enlarged using Genuine Fractals.
One also should consider, that even if you have the time to use the incremental method of enlarging images (though I can’t imagine why you would want to), you still may have to store multiple copies of your files for different uses. I’ll address that issue further as we continue.
Using Genuine Fractals: Two Options
Currently, there are two available GF products: Genuine Fractals 2.0 and
Genuine Fractals PrintPro. GF 2.0 is designed for digital artists, photographers
and photo service bureaus that output digitized photographs or computer
generated images. It also is ideal for photographers and web designers
who want to optimize their capabilities for producing web images, providing
50 web graphics options and encoding for 10:1 compression.
I chose the PrintPro version because I work with commercial printers and
graphic designers and need the capability to scale images that are separated
into CMYK color channels for traditional four-color printing. (GF 2.0
doesn’t offer that option.)
 Fig.
4: The Genuine Fractals "Save As" dialog box showing the Lossless
and Visually Lossless options.
Fig.
4: The Genuine Fractals "Save As" dialog box showing the Lossless
and Visually Lossless options.
With Genuine Fractals PrintPro, there are two "Save As" options available when you encode your optimized image from Photoshop: Lossless and Near Lossless (See figure 4). Both use the STN (STiNG4 ) file extension. [GF 2.0 offers these plus 2 more options for FIF (Fractal Image File) extension web graphics.] When you choose lossless encoding, GF produces a file of approximately 2:1 compression that renders the image exactly when opened at 100%. This option produces the highest quality enlargements. When you choose near lossless encoding, GF produces a file of approximately 5:1 compression yet still enables you to render an image well beyond 100% with excellent quality. Inasmuch as I am not strapped for storage capacity and normally save my images to CD-ROM, I prefer to use lossless encoding, but if you are storing snapshots that probably will never be reproduced as large size images, near lossless encoding is a wonderful space-saving option.
Genuine Fractals Print Pro speeds the process of transmitting images and eliminates the need to rescan or store several copies of a single image for multiple output requirements. For example, a photograph that is used for the cover of a publication might also be used on a poster, an inside page and in a cropped thumbnail version as a complement to the table of contents. Traditionally this would require as many as four scans and the storage requirements would be significant. Moreover, Internet transmission of such files can be very time consuming. But, with GF, a single file of medium size could be transmitted to serve all intended uses—from a magazine illustration to a billboard.
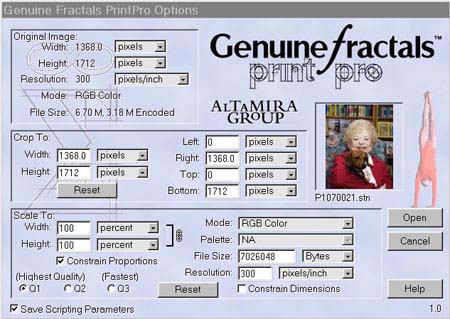
Fig, 5: The Genuine Fractals Print Pro image opening screen
When you open your files, GF’s on-screen menu (see figure 5) displays image dimensions in inches, pixels, picas, points, lines or dpi. It also displays the original image’s bitmap file size, width, height and the encoded file size. It gives you the option to constrain image proportions to maintain the aspect ratio or to unconstrain to distort the dimensions. It provides a thumbnail image with a cropping tool that lets you define and render only a portion of the original image, and it gives you three rendering options from highest quality to fastest rendering. GF also will display the image on your desktop for quick launch and easy recognition.
Conclusion
It may be a slight exaggeration to say that Genuine Fractals is the greatest
thing since sliced bread, but it is a truly remarkable plug-in for users of
Photoshop. It’s given me a way to produce 16" x 20" and larger reproductions
of my pro-sumer digital photographs and that’s something that would have
been called wishful thinking a very short time ago. Nikon now includes GF2.0
LE in the software package for its Coolscan® 2000 and Coolscan®
III film scanners and Epson bundles it with its Stylus Photo 1200 printer.
For more information on Genuine Fractals and a free trial download, go to the
Altamira Group Web site. The complete version of Genuine Fractals 2.0 may be
purchased for $159, while genuine Fractals PrintPro is priced at $299.00. (Owners
of the full version of GF 2.0 can upgrade to PrintPro for $139) Both products
are available for Mac or Windows 95/98/NT platforms.
UPDATE : The Genuine Fractals products were acquired by LizardTech in 2001 and were eventually acquired by ON1 Software in 2005. ON1's Perfect Resize product still uses the technology. Their contact info is available here.
Note to readers: Upon publishing our review, we received a large amount of email concerning our perceived bias towards Genuine Fractals. In actuality, we try our best to keep our reviews free of bias, therefore, an addendum has been added to this review to clear up any problems or misunderstandings that our readers may have encountered. Please read our addendum for full details...